To avoid these ads, REGISTER NOW!

Dust collection 101: tips, tricks, & mistakes to avoid

cheechi

Well-known member
Joined
Feb 29, 2012
Messages
4,384
Location
Triad, NC
I'm going to try to convince you guys my name is drivesitfar and start a new 101 thread.

Here are some threads as a reference from the past, with some photos

Homemade or low buck dust collection systems?

Show us your woodworking dust collection systems

and a recent question that came up while I have been working on my own system recently and have collected my last bit of questions made me think we need more discussion about the process and design rather than just to show off the finished products.

I will start with a few basic questions that can (to me) get someone started with a good half of the questions they are going to come up with during the design and budget process.

what is the correlation between your blower's CFM, pipe ID, and linear feet (I assume let's exclude bends and losses due to friction for a 'rough' design and then considering bends if a resource is available for a more specific design step)

what if any correlation is there to the size of a 'box' or 'shroud' (example miter saw station) to the pipe ID and CFM available at the mouth of it?

for a given tool that has a 2" dust port as most non-pro tools will, and a shop with 4" 6" or 8" pipe for DC, would you be better off reducing at the mouth of the pipe to a 2" hose, or running the 4"/6"/8" hose to the tool and adapting it at the tool?

Some guys are lucky enough to have a shop where most machines are stationary and have their own dedicated dust port. For those whose tools are mostly portable, shared areas where some tools could connect up one at a time to the same port, where do you decide to put the blast gates? Most with stationary tools use blast gates at the mouth of each pipe before a change to flex or into the tool itself. Do many suggest using blast gates to close off a leg of the system not at the mouth, but after a wye or say on a common run (example between the 'tool port' to the pipe down to the floor sweep, on a common run).

While my questions are focused mostly on woodworking tools I know some guys that do auto body work, machine work, or maybe setting up something like a CNC may have similar questions even if they have separate specifics.

Thanks in advance
 
Last edited:
To avoid these ads, REGISTER NOW!
OP
C

cheechi

Well-known member
Joined
Feb 29, 2012
Messages
4,384
Location
Triad, NC
I'm going to reserve this space for important reference info as it comes up or link to particularly useful questions & answers.
 
OP
C

cheechi

Well-known member
Joined
Feb 29, 2012
Messages
4,384
Location
Triad, NC
You're right. Part of my questions were looking for more of a real world, spelled out answer than what he provides here although it is a good resource.
 

derosa

Well-known member
Joined
Oct 19, 2010
Messages
1,078
Location
Oceanside, NY
Right now my space is in the basement and has layout issues due to assorted pillars and posts being in the way of everything. So my method has been to start outfitting each machine with its own soft hose and a slip fit connection so the needed hose can be quick connected to the collector. My plan had been to completely remove the first floor, put in a double 2x12 support beam under the centerline of the house so there would only be one support post and connect all the floor joists into the new center support. I would then put a dust collector on each side of the basement to run to the tools on its respective side. Before you think I'm nuts the current beams are original to the house which predates 1853 and they're getting soft, not to mention sections cut out, rot at the ends of some, if they weren't tree trunks they'd have failed already.
Each collector would have its own 4" pvc line laid out, no 90* bends, wyes + 45s or the long curves, joints would have a layer of duct tape wrapped around the male ends and screws to hold them in place.
I'm now selling the house and moving in a couple months so the current plan is out the window and I have no idea for the future. I have a number of 4" ready but won't know what the new space will be.
 

Toolfool

Well-known member
Joined
Aug 22, 2011
Messages
4,991
Location
Columbus, Ohio
You're right. Part of my questions were looking for more of a real world, spelled out answer than what he provides here although it is a good resource.

The most important info I took from Bill Pentz's research was that a 4" or smaller duct opening was only adequate for collecting the 'chips' and heavy particles that fall closest to the intake point. A 6" opening would be required to capture the fine 'dust cloud' that the machines throw in the opposite direction, and are the biggest health risk. When I'm making cuts with my miter saw with the sun shining through the window just right, I can actually watch the fine dust cloud develop in front of me during the cut (as the heavy stuff disappears instantly) and then suddenly get pulled into the hood as I stop the saw. I realize I'm not capturing 100% of the dust and run an air filter as well.
 

matt_i

Well-known member
Joined
Mar 14, 2008
Messages
10,802
Location
SE Michigan
The best thing I ever got after the initial dust collector, was an air filration unit, which was made by Delta and hung in the shop, it actually cut down on the fines which get tossed out of saws that the main airflow stream can never get.

The Delta model is gone but googling "woodworking air filtration" brings up several models made in the exact same vein.
 
Last edited:
OP
C

cheechi

Well-known member
Joined
Feb 29, 2012
Messages
4,384
Location
Triad, NC
derosa
I am also running 4" PVC pipe, but am not planning on needing tape or screws like metal ducts. And I'm also in the basement although in my case, I'm trying to utilize a corner to my advantage. The 'workshop' area of my basement is cut in half by a fireplace so the end result of my ducting is going to be largely an 'F' shape.

how long are your intermediate pieces that make up your '90' (45 + length + 45) ? Is this the same length you use between a wye & 45?

After beveling the edge of my pipe I am getting a pretty consistent 2" 'tight' dry fit and have arbitrarily planned to cut 6" sections for my '90' but I am wondering is that still too tight? So far I have done some experimenting and found the right bevel after a few cuts so I'm ready to start the ground wire and hang up a few pieces hopefully in the next few weeks.

And on the topic of grounding, I'm not paranoid but it is my house. So I'm planning to make it continuous but not go nuts over every cubic inch.

Toolfool
unfortunately 6" or a bigger blower aren't an option both in the space I have (some places less than 7' ceiling) so I tried to use the HF blower's ports and super dust deputy as a gage for deciding on the 4" pipe size.

matt
I have built out of a box fan a dust filter that I plan to hang also, and am getting some MERV15 filters for it, but I am waiting for the pipe to be hung first since I have a lot going on in that area with lighting, plumbing, existing ducting for AC, electrical, data & cable all limiting where the fan can be hung. I would like to have one of the Delta style units, but I don't think in terms of clearance or price that one of those is going to be an option in the near future.
 
Last edited:
OP
C

cheechi

Well-known member
Joined
Feb 29, 2012
Messages
4,384
Location
Triad, NC
well since nobody wants to talk more I will ask another question.

I started hanging the pipe at the furthest from the DC because that's where the longest straights are. The next one that connects to what I have is going to have a 3"-4" drop to go under plumbing & HVAC duct. While a pipe will go above the plumbing it won't go above the duct, and it would be a tight 'U' as there are already several fittings nearby.

My question is this. DC doesn't work like waste plumbing, where I could create a trap? My plan is to drop the 3-4" using a pair of 45's then keep going horizontal, so from the perspective of the DC it's an elevation rise as it continues further down the line. Is this likely to create a problem? I'd rather keep it 'as straight as possible' than have to use 2 extra 45's to make a drop anyway.

Am I right in assuming that so long as I have the head, suction does't care about gravity?
 

tarmy

Well-known member
Joined
May 28, 2014
Messages
4,755
Location
Nor Cal
The best thing I ever got after the initial dust collector, was an air filration unit, which was made by Delta and hung in the shop, it actually cut down on the fines which get tossed out of saws that the main airflow stream can never get.

The Delta model is gone but googling "woodworking air filtration" brings up several models made in the exact same vein.

This...
IMG_0465.jpg

It is amazing how much this collects every time I am running the tablesaw under it. I have a collection system on all of my woodworking tools...but this overhead still collects alot.

I have it wired to a wall switch and leave it run constantly as I am turning on and off which ever tool I am using. I run it a good half hour after my last cut to clean the shop air too.

It actually cuts down on the overall dust in the shop as well.
 
To avoid these ads, REGISTER NOW!

ar2stp48

Well-known member
Joined
Feb 20, 2008
Messages
503
Location
Magnolia, Arkansas
I installed the Jet version of the air filtration unit. It is amazing how quickly it clears the air; three speed and I usually run it on second setting

Have a Delta dust collection system (50-181 ?) that I am planning the installation. Want to make some improvements to it as I have found on the net
 
OP
C

cheechi

Well-known member
Joined
Feb 29, 2012
Messages
4,384
Location
Triad, NC
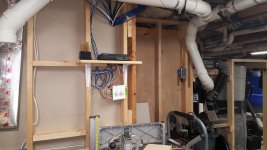
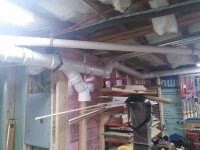
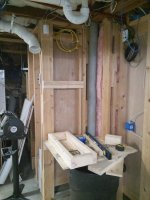
I got some photos along the way but finally got the chance to sit down and put them all together to share. The photos aren't in order of how it was built;

hung the longest runs at the end first
06 long runs.jpg

hung the first part of the pipe that would connect to the middle
04 home run assembled.jpg
hung the middle section so there was something on either side to attach to even with four hands this was tricky due to the complexity and weight of all the fittings
05 middle.jpg
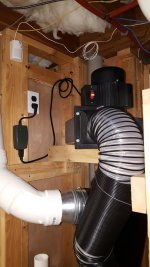
built the frame for the cyclone and motor, wired the outlet & switch, assembled the collector unit.
01 corner before cyclone.jpg
02 cyclone in place.jpg
03 5-4 to pvc.jpg
 
OP
C

cheechi

Well-known member
Joined
Feb 29, 2012
Messages
4,384
Location
Triad, NC
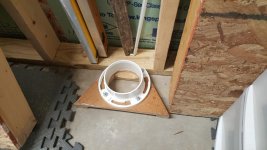
Then we built the floor sweep and attached all the drops with blast gates on each.
07 floor sweep bottom.jpg
08 floor sweep top.jpg
attached all the ground wiring to each other and am currently 'enclosing' the framed closet type thing I built around the collector
09 connected final.jpg
10 connected final 2.jpg
11 connected final 3.jpg
 

gnpenning

Well-known member
Joined
Jan 25, 2015
Messages
2,754
Location
I have more questions than answers.
Looking good. That step up may cause you some trouble. Hopefully not.

Like the custom blast gates. How do you plan to run your ground wire around your blast gates?

Are you using any 22.5 fittings ? ?

Are you using a remote to turn on your dc?

I picked up my last air filter at the habitat store with a bunch of filters. I think I might have paid for 3 of the filters. I got one on a timer. The other I will wait and do in my next place.

During warm weather on the cyclone I run my filter
line to a dryer vent to the outside. I get very little dust on that line. I don't cut mdf very often.
 
Last edited:

Hagatronics

Well-known member
Joined
Jun 18, 2016
Messages
248
Location
Melbourne, Victoria, Australia
I've used 4“ (100mm) PVC a few times with good results.

Wrap an un-insulated wire spiralled around the outside of the pipe along it's length and attach it to ground at the dust collector. It stops the build up of static electricity generated by the air rushing past the plastic. Otherwise you'll get annoying zaps each time you touch the pipes.
 
OP
C

cheechi

Well-known member
Joined
Feb 29, 2012
Messages
4,384
Location
Triad, NC
Thanks guys. Replies in red.

Looking good. That step up may cause you some trouble. Hopefully not.
not so far, that was my concern also
Like the custom blast gates. How do you plan to run your ground wire around your blast gates?
they literally go around, more below
Are you using any 22.5 fittings ? ?
none, all 45's
Are you using a remote to turn on your dc?
yes the Fastcap remote

How did you seal your trash can to the bottom of the OSB panel ?
foam weatherstrip around the inside lip. marked the bin's OD, measured the thickness, put the foam as close to a circle touching the inner mark. It's not perfect but it works.

Wrap an un-insulated wire spiralled around the outside of the pipe
on the longest runs I have a straight uninsulated copper wire along the inside and one wrapped along the outside. They connect to common endpoints in the form of through bolts and there is an insulated wire going from each bolt 'endpoint' outside the pipe to the next bolt on the next pipe.
The ground wire bypasses all fittings and pipes shorter than 4ft, which includes all the blast gates, but it is a continuous ground circuit from the motor housing to the end of each leg. I will get some more photos next time I'm down there and there is room to get up a ladder. Even on the parts with no ground wire contact, no zaps so far.
 

Gizmosity

Well-known member
Joined
Jun 17, 2014
Messages
377
Location
SW Wisconsin
In previous systems I'd run a wire on the inside of 4" pipe. I had constant clogging when jointing or planing anything over 6" wide with straight jointer and planer knives.

The system I have now is 6" pipe with aluminum tape run inside the pipe. So far it has worked really well. I also have a helical planer head now and a jointer with a skewed 4 knife head. The lack of clogging issue may be the cutterhead designs. If you end up with clogging issues you might try the tape. I ran mine through the inside and left 4" extra on each end. I rolled that tight around the end of the pipe and fittings to the outside surface. When assembling you get tape-to-tape contact. I just ran a screw through the fittings and attached a jumper wire around my blast gates.
 

larry4406

Well-known member
Joined
Jan 27, 2006
Messages
20,226
Location
Northern Virginia
In previous systems I'd run a wire on the inside of 4" pipe. I had constant clogging when jointing or planing anything over 6" wide with straight jointer and planer knives.

The system I have now is 6" pipe with aluminum tape run inside the pipe. So far it has worked really well. I also have a helical planer head now and a jointer with a skewed 4 knife head. The lack of clogging issue may be the cutterhead designs. If you end up with clogging issues you might try the tape. I ran mine through the inside and left 4" extra on each end. I rolled that tight around the end of the pipe and fittings to the outside surface. When assembling you get tape-to-tape contact. I just ran a screw through the fittings and attached a jumper wire around my blast gates.

What is this "aluminum tape" you are using? The foil tape that HVAC contractors use? How did you go about applying it to the inside of the pipe (I guess 6" is large enough to put your hand into but not very far in)?
 
OP
C

cheechi

Well-known member
Joined
Feb 29, 2012
Messages
4,384
Location
Triad, NC
that's exactly it, Aluminum hvac tape. you pull it through the pipe, peel one end, tie a string to the paper, throw it down the other end of the pipe, then pull to peel the rest. I almost decided to do that on my long runs but went with the copper wire since I have plenty left over from a full rewire.

Giz, are you saying with the 4" you got clogs because of the smaller diameter or because of the ground wire on the inside?
 
To avoid these ads, REGISTER NOW!
Top Bottom