To avoid these ads, REGISTER NOW!

E-tek Restorations: PROJECT THREAD

OP
E

e-tek

Well-known member
Joined
Dec 19, 2007
Messages
10,690
Location
Saskatoon, SK
Details, details....

Cleaned up the original map light for the upholsterers to mount when they install the headliner. I've been using Turtle Wax Color Back since my Dad made me clean my bicycle fenders with it!

106_6222.JPG


BAM! :thumbup:

106_6223.JPG


Then I spent 20 (painful!) minutes snaking the hands-free microphone down the window post and behind the dash:

106_6227.JPG


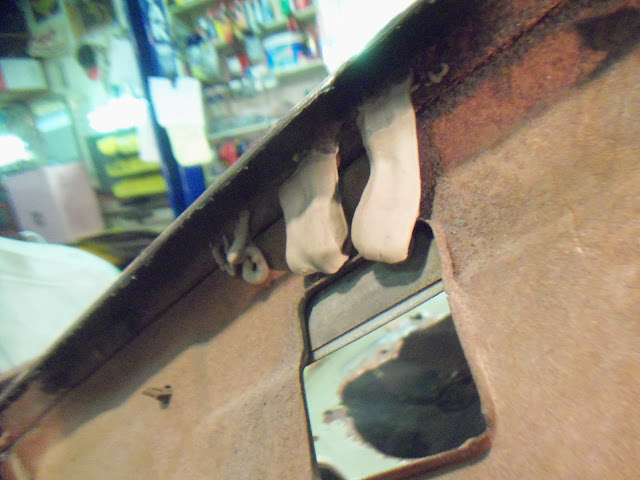
All the while continuing the prep on the window garnishes:

106_6230.JPG


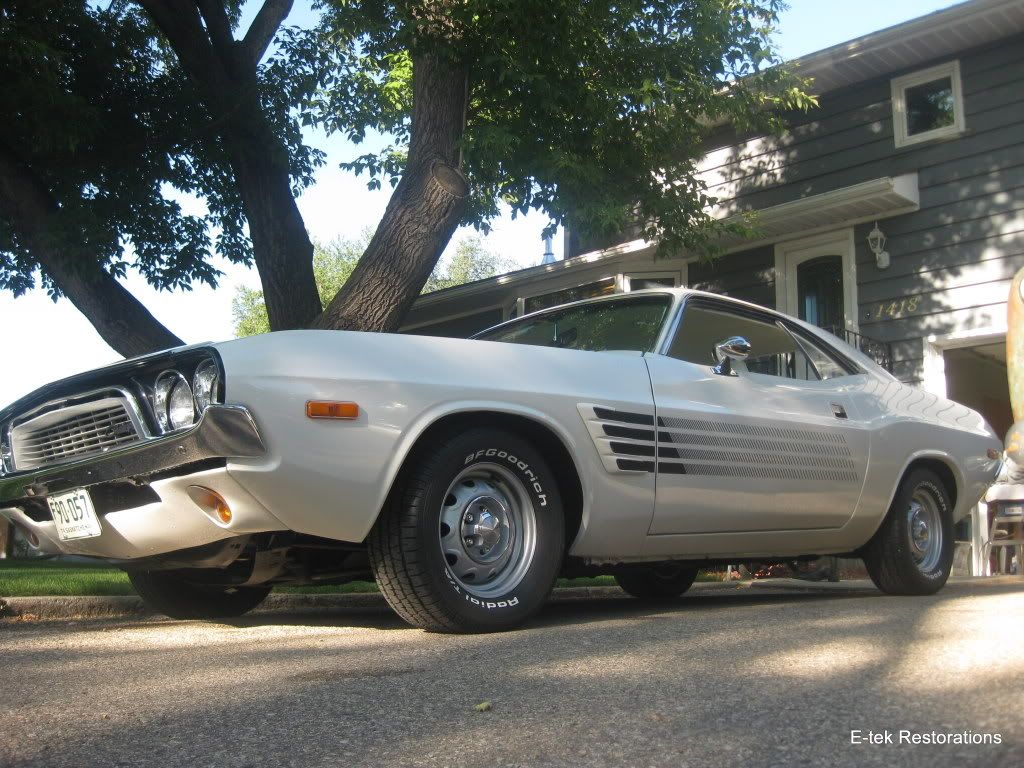
After getting those items done, I spent more time buttoning up electrical connections, playing with the hood and front-end alignment (AARRGGH!), then finally got frustrated enough I though I'd better leave it for a while.

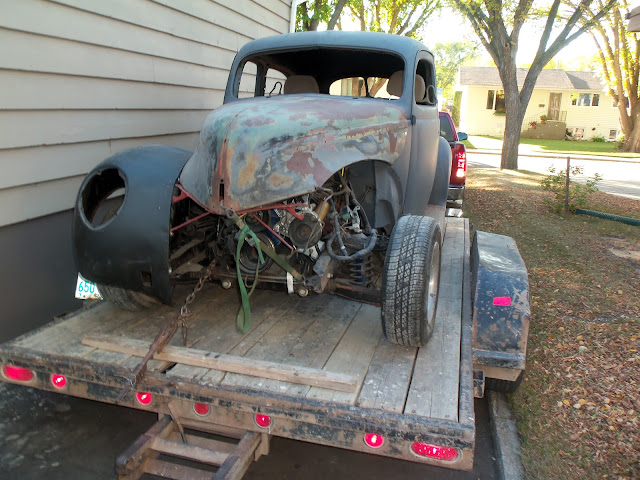
So I moved on to the Camaro. Man I love my door caddy!

106_6231.JPG

As I continued stripping the interior, I found the front carpet must be original, based on how the shifter was still mounted on it and how it was tucked under the kick panels:

106_6235.JPG


Check out this new tool. It's a needle scaler, to remove undercoating from areas the oscillating tool wont reach:

106_6233.JPG
 
To avoid these ads, REGISTER NOW!

MP&C

Well-known member
Joined
Oct 21, 2009
Messages
4,396
Location
Leonardtown, MD
That map light is a late 70's-early 80's Ford interior light. I used to raid the salvage yards for those quite often!


106_6214.JPG


40 is looking good. What style wheels is he going with?
 
Last edited:

Beefbuzz

Well-known member
Joined
Feb 17, 2013
Messages
72
Location
Idaho
Awesome thread, I like to come back and re-read a few pages once in a while. With so many great projects in this thread, have you ever thought about adding an index to the first page?
 
OP
E

e-tek

Well-known member
Joined
Dec 19, 2007
Messages
10,690
Location
Saskatoon, SK
Awesome thread, I like to come back and re-read a few pages once in a while. With so many great projects in this thread, have you ever thought about adding an index to the first page?

Good idea...but as it is I barely have enough time each night to download and place the photos here!
 

DynoDave

Well-known member
Joined
Mar 25, 2005
Messages
1,685
Location
Michigan
I'm not thrilled that it got moved around so much either....But I certainly appreciate you tracking it down and chiming in! Merry Christmas Dave!

Thank you sir. And a belated Merry Christmas and Happy New Year (just made it in time for that one) to you and yours. Was away for a bit...we lost power (well included) for a while before Christmas due to an ice storm, then was away seeing family.

And I see my PM indicator flashing. I'll check that out shortly, and get this "subscribed'. You'll be my first! :D

As for your stick can of Rust Bullet, I can relate. Had similar issues with POR 15 cans. Meticulous cleaning of that groove, and putting a square piece of a plastic grocery bag in between the can and lid helped, but it can still be a PITA.
 
Last edited:
OP
E

e-tek

Well-known member
Joined
Dec 19, 2007
Messages
10,690
Location
Saskatoon, SK
Unfortunately - regrettably, lamentably and especially, irritatingly, I've been having issues with the final alignment of the hood and grille on the 40. I read everything I could on the subject (and there's lots, because these cars are a ***** to align) and have made a LOT of adjustments until it is VERY close, but it's still about 3/8-1/2inch long! The issue likely lies somewhere in the many people that have had a hand in building this car over the years, from the chopping in of an IFS, to the many new panels having been welded in (including cowl and floor pans), to signs of undercarriage damage. I'me hoping that once it gets moved around some - it'll settle out - or at least loosen up so that more small adjustments can be made. In the end it may have to go to an alignment shop for a tweak, but it'll get there - somehow!

So I've been busying myself with everything else - all the while running through panel fitment scenarios in my mind.

Like finishing the chrome -

106_6245.JPG


Some of which is pretty ROUGH!

106_6247.JPG


But I persevere:

106_6237.JPG


106_6238.JPG


106_6242.JPG


106_6243.JPG


My feet where COLD today as it was MINUS 35C (same F) and you could feel it through the floor!

106_6239.JPG


The major work now lies with the Camaro, so off with the rest of the headliner and on with the new hinges and door:

106_6250.JPG


Nice original inners - no rust:

106_6252.JPG


Oddly, someone decided to silicone (?!) the door seal runners to the body - when screws have done the job in every other Camaro ever built. Did they run out of screws?Are the screw holes too big (stripped)? Where they just stupid? ;)

106_6254.JPG


106_6249.JPG


Once I finsihed taking out enough to remove and replace the quarter, I got busy changing out the door and hinges:

106_6264.JPG


Here's something interesting. The hinges where all installed with Grade8 bolts - which is overkill - but check out the shoulder on them.

106_6265.JPG


106_6271.JPG


The shoulder is so long that once the bolt is tightened all the way through the hinges, it would have likely come in contact with the thread block inside the post, decreasing it's clamping force. The threaded portion is also too long. It's a wonder the doors didn't sag even more than they already were.

106_6274.JPG


I replaced them with correct body bolts:

106_6275.JPG


A trick I learned - the hard way - is to make sure you always keep a bolt in the thread block so it doesn't fall down and out of reach when replacing hinges and such:

106_6270.JPG


Off with the old:

106_6278.JPG


On with the new:

106_6276.JPG


106_6277.JPG


Alignment tomorrow. Once the rocker and quarter gaps are set, it'll be time to cut off the old quarter.
 
OP
E

e-tek

Well-known member
Joined
Dec 19, 2007
Messages
10,690
Location
Saskatoon, SK
Lay down the tools, shut the computer down and take your wife out tonight!

Yessir! We had an AWESOME Eve! One son is at his Grandmas and the other was in bed by 7:30, so we had a couple drinks, lit some candles in the bedroom and out came the massage table. We get a LOT of use out of it, but tonight was extra special. I'll leave the rest to you imagination (think HARD!:evil:). Afterwards, Mrs E made a rum-creme desert and we relaxed on the couch.

Best way to I know to spend New Years eve!! :pimpflash :beer:


Hope you all did something special too!

HAPPY NEW YEAR!
 
OP
E

e-tek

Well-known member
Joined
Dec 19, 2007
Messages
10,690
Location
Saskatoon, SK
After a day off yesterday to spend with the family, I got back at it today:

106_6280.JPG


106_6282.JPG


106_6285.JPG


More bling!

106_6286.JPG


The kit included two allen wrenches - both the wrong size!

106_6287.JPG


What do you guys think?

106_6289.JPG


it's hard to see in the photo, but the front end has under "underbite" and is off-centre a hair. After a LOT of measuring and jiggling, I'm thinking it may need a pull...

106_6290.JPG


Forgot to run the hidden antennae when I did the hands-free wiring...

106_6295.JPG


106_6295.JPG


Then finally, put the trunk weather seal on it:

106_6298.JPG


Not sure if I should cut the corners so they'll sit down....would hate to cause a leak...

106_6301.JPG


Then it was time to get the door aligned on the Camaro, so I can start cutting on the quarter...

106_6296.JPG


106_6297.JPG


Looking good...after an hour of struggling with it!

106_6302.JPG


106_6309.JPG


106_6303.JPG


but that's a massive gap at the quarter!

106_6305.JPG


Up she goes!

106_6310.JPG


OFF TO THE HOT TUB!!
 
Last edited:

MP&C

Well-known member
Joined
Oct 21, 2009
Messages
4,396
Location
Leonardtown, MD
Ed, looking at the door to quarter gap, check the front end sheetmetal placement real well before cutting anything. With the hood closed, check the gap to the cowl panel, then the front edge of hood should align to front edge of fender. If anything is off and require further adjustment, it may shift the door back a bit. If things are totally beyond adjustment, it may point to body damage/frame racked.


The bling panel looks good on the 40. On the angle, I would trim those corners to match the angle of the radiator, if possible Is it aluminum where you could re-polish after trimming? Any lead time on the wheels? Time for another vendor? :bounce:
 
OP
E

e-tek

Well-known member
Joined
Dec 19, 2007
Messages
10,690
Location
Saskatoon, SK
Thanks MP&C - I'll be sure to check everything before making a cut - including measuring the "original" door and the other side.

on the 40, we were about to mount that radiator plate a couple months back - but I decided to wait until I did everything I could - or needed to - in that area, so it finally got installed today.
I called the wheel vendor AGAIN today as their machine said they'd be closed until Jan 1st.....no answer, same message. Bet they don't come back until Monday. I think the owner has committed to getting the wheels from them, so I'll wait it out.
 

Deadhead

Well-known member
Joined
Nov 8, 2011
Messages
435
Location
Northeast Arkansas
Thanks for what you wrote about my road box, that carries a lot of weight coming from someone that puts out the quality work that you do.
But there is something that I am wanting to know.
How many projects do you have going at one time and how do you dictate what you are going to be working on that day or tomorrow and how do you stay focused with so many things to do to different vehicles. I have my own style of how I stay somewhat on track but I am always open to good advice.
 
OP
E

e-tek

Well-known member
Joined
Dec 19, 2007
Messages
10,690
Location
Saskatoon, SK
Thanks for what you wrote about my road box, that carries a lot of weight coming from someone that puts out the quality work that you do.
But there is something that I am wanting to know.
How many projects do you have going at one time and how do you dictate what you are going to be working on that day or tomorrow and how do you stay focused with so many things to do to different vehicles. I have my own style of how I stay somewhat on track but I am always open to good advice.

Funny you posted here - I've been ogling your boxes ever since!

Well....Good question. I guess I've always just needed a lot of things going on at once to keep my mind and body occupied. When I was younger I was a triathlete - because I loved swimming, biking and running all in one go, plus I rock-climbed, waterski'd, golfed, tied flies, fished and worked on cars. "Idle hands" and all that... :dunno:
Now I 'just' have 3 main projects, 1 on hold (27-T Rod) and 3 rental properties to tend to...that's not very much really...is it?
As far as what to work on, the 40 Ford was my main project until it was nearly nearly done. Some of the stuff at the end is picky, or time consuming, so I get bored - or frustrated - and go on to the Camaro. Once in a while - for a break I guess - I do something on the 240Z.
But today I had to tend to a broken door, a window replacement and the plumber at a rental - so I went there first. Of course it had snowed 3 inches, so then I snowblowed for 2 hours. Now I'm having a quick break, before hitting the Hot Tub, then going into the shop for the afternoon.

Ah the Hot-Tub.....maybe there's your answer. I know it's mine! :rocker:
 

NASTYZEN

Well-known member
Joined
Jun 11, 2010
Messages
2,823
Location
St-Colomban,Que. Canada
Ed, I tend to be much more productive with my hair on fire and work backed up than I do when there's not so much of a workload.:dunno:
Like today...I'm trying to work....but the computer is on and... it won't let go of me.....must get something done......aw just a few more minutes......
 

Deadhead

Well-known member
Joined
Nov 8, 2011
Messages
435
Location
Northeast Arkansas
Funny you posted here - I've been ogling your boxes ever since!

Well....Good question. I guess I've always just needed a lot of things going on at once to keep my mind and body occupied. When I was younger I was a triathlete - because I loved swimming, biking and running all in one go, plus I rock-climbed, waterski'd, golfed, tied flies, fished and worked on cars. "Idle hands" and all that... :dunno:
Now I 'just' have 3 main projects, 1 on hold (27-T Rod) and 3 rental properties to tend to...that's not very much really...is it?
As far as what to work on, the 40 Ford was my main project until it was nearly nearly done. Some of the stuff at the end is picky, or time consuming, so I get bored - or frustrated - and go on to the Camaro. Once in a while - for a break I guess - I do something on the 240Z.
But today I had to tend to a broken door, a window replacement and the plumber at a rental - so I went there first. Of course it had snowed 3 inches, so then I snowblowed for 2 hours. Now I'm having a quick break, before hitting the Hot Tub, then going into the shop for the afternoon.

Ah the Hot-Tub.....maybe there's your answer. I know it's mine! :rocker:

Well I am somewhat the same way. I am a list maker, especially at work. I may have up to 3 tractors tore down all at once and it helps me to write it all down. I have been known to get pissed off and walk away and go start another job till I calmed down. Normally when I walk back up to the first job what I was trying to do will fall into place after a nice little break from it.
 
To avoid these ads, REGISTER NOW!
OP
E

e-tek

Well-known member
Joined
Dec 19, 2007
Messages
10,690
Location
Saskatoon, SK
Took some measurements today on the Camaro and this what I found:

106_6322.JPG


106_6325.JPG


Front end is off by 1/4" - which is within spec. None of the bolts are pushed or slotted and the hood is reasonably square. All good there.

Then I checked the door openings:

106_6326.JPG


106_6327.JPG


The opening is 1/2" larger on the passenger side....which is a LOT. It could be due to how the quarters where installed.... If you look closely at the drivers quarter - you can see a crack along the edge where the new panel was attached and filled over....likely done with the doors off, so they didn't get the edges right back where they should be...

...and this is what leads me to believe this to be true: look how poorly they shaped the edge on this side (it should be shaped like the door):

106_6332.JPG


But the drivers side (with the nicer gaps) is better :

106_6333.JPG


Of course, I'M OPEN TO OTHER IDEAS!!

Anyways, time to get the new quarter out so I can be sure where the edges are:

106_6335.JPG


Which also makes it easier to find the seams, including the roof seam. The lead filler shows this part of the quarter is very likely original.

106_6336.JPG


106_6339.JPG


Oh **** - I slipped! :eyecrazy:

106_6340.JPG


Just kidding - gotta cut 'er open so I can see and get to the edges where all the spot and pinch welds are.

106_6342.JPG


I went with this method as it will cause the least amount of dirt and dust in the shop - especially with 2 freshly painted cars nearby!

106_6346.JPG
 

Kevin54

MEMBER EMERITUS
Joined
Jan 12, 2005
Messages
29,341
Location
Urbana, Ohio
106_6215.JPG


Ed....In looking at this picture right here, it looks to me like the front fender needs to slide back a tad to line up with the windshield cowl. If the fender goes back, then the door can go back, which will bring it in closer alignment with the gap at the rear quarter at the door jamb.

If it were me, And I've worked on a lot of cars aligning panels with both factory parts out of a yard, and repop parts from Taiwan, I'd get that front spot on and work from front to back.

The reason I say that is that car has been hit in the rear, hence that bid dent where HARRY wrote his name. Both rear quarters have been replaced, so chances are, that is where most of the problems will lay. Once you get the front squared and aligned, get the doors set, then pop off those rear quarters. Just my $.02 on it. It's been a few years, but I still remember what my dad and I went through on a lot of cars. My dad started at 16 in a body shop which would have been 1932 and worked his way up to having his own for years. And he taught me what I know.
 

MP&C

Well-known member
Joined
Oct 21, 2009
Messages
4,396
Location
Leonardtown, MD
Sliding the pass fender rearward would also help bring that 68-3/4 closer in line with the other diagonal's dimension (as well as matching cowl panel next to it). On the new door to quarter fitment, I'd say at this point, check the new doors rear edge to the front edge of the new quarters to see how well it fits there. Despite popular opinion in trying to save a factory door jamb crease because it is typically crisper than repops, it appears both of those on the car are problem ridden enough to cut out entirely and go with the reproductions, providing they match the doors.


No turning back now, huh? :beer:


106_6342.JPG
 
OP
E

e-tek

Well-known member
Joined
Dec 19, 2007
Messages
10,690
Location
Saskatoon, SK
Good eye Kevin. I think the cowl is a little loose, so I wasn't keying off that, but you'd both be right if it squares up the front end. I'll see how much room there is for movement at the leading edge and try that tomorrow.

As for the repop parts - these are high-end OEM-replacement parts (called OER) that look really crisp (and where packed really well) - so I'm very hopeful they'll fit together really well.

Thanks for the input!
 

Responder

Well-known member
Joined
Nov 1, 2009
Messages
368
Location
Saskatoon, SK
Funny you posted here - I've been ogling your boxes ever since!

Well....Good question. I guess I've always just needed a lot of things going on at once to keep my mind and body occupied. When I was younger I was a triathlete - because I loved swimming, biking and running all in one go, plus I rock-climbed, waterski'd, golfed, tied flies, fished and worked on cars. "Idle hands" and all that... :dunno:

So do you still do any of the tri events? I took up running three years ago and in two weeks I will be running my 8th Half Marathon. Winter run this year is in Phoenix!

With kids, wife, and projects I imagine it is difficult to spare any time!!
 
OP
E

e-tek

Well-known member
Joined
Dec 19, 2007
Messages
10,690
Location
Saskatoon, SK
We all know that these cars were never made to the standards of today's vehicles. However, I'm pretty sure I can get the gaps a LOT nicer than this before it goes for paint this time:

106_6348.JPG


106_6349.JPG


As well, check out the finishing of the lower windshield pillars - which no-one ever see's as they are covered with moldings...

106_6351.JPG


106_6350.JPG


As for the wider gap at the right door to quarter, as I said, this is likely due to the previous installation of a replacement quarter - and I'm confident I can do a little better!

But first - it has to come off....to reveal the horrors the lie within...

106_6353.JPG


106_6355.JPG


This time, the quarter gets replaced at all the factory points - which means it's time to get the lead out:

106_6357.JPG


106_6358.JPG


106_6359.JPG


106_6360.JPG


The joint, cleaned up a bit:

106_6361.JPG


Here comes the yuk:

106_6362.JPG


Did they really cut and crimp the wheel well to fit it into a new skin?!

106_6363.JPG


They also glued and welded a skin right over a partially-removed quarter....

106_6365.JPG


106_6370.JPG


They didn't even bother to clean up - or throw a little paint on the edges (bodywork 101)...

106_6371.JPG


Fill 'er up!

106_6372.JPG


106_6373.JPG


This one's a classic: Rust holes? Just stuff 'em full of bondo!

106_6375.JPG


106_6376.JPG


After some more work, I removed as much as possible of the quarter - without getting right into the edges - which will be carefully separated and cleaned up tomorrow - -

106_6366.JPG
 
Last edited:

RivennHewn

Well-known member
Joined
Jun 4, 2011
Messages
10,357
Location
PNW
I get tired just reading your thread. How do you find the energy to tackle such an ambitious project?
 
OP
E

e-tek

Well-known member
Joined
Dec 19, 2007
Messages
10,690
Location
Saskatoon, SK
I get tired just reading your thread. How do you find the energy to tackle such an ambitious project?

I get that a LOT, but even you went out and did like 2 or 3 hours a night, you (anyone) can get a lot done. I guess the key is not to dawdle....

It's one of those ingrained things too - my Dad owned a body shop and he used to come back into the shop and, if he caught anyone standing still he'd freak out. Often times he'd yell: "Get your hands out of your pockets!", or "Are you playing pocket pool!?" Everyone made sure they were busy all day!

Plus, I really enjoy it!:beer:
 
OP
E

e-tek

Well-known member
Joined
Dec 19, 2007
Messages
10,690
Location
Saskatoon, SK
Yes he should. And DON'T get banned, please.

Although well within their right, I'm not going to use my 10K post to go on about the site, but I will use my 9999th one just to say how much I LOVE it and the way it's evolved over the years. I know a bunch of banned members aren't gonna like hearing this - and I'm sure there are many different reasons for their banishments - but I support Ryan's vision of a forum dedicated to Garages - and what goes on in them - and that's it. There's enough drama in our lives and it doesn't need to follow us onto the 'net.

And to all the guys that have I have "befriended", that have posted on my thread and that have helped me in so many ways, THANK YOU!!:beer:
 
OP
E

e-tek

Well-known member
Joined
Dec 19, 2007
Messages
10,690
Location
Saskatoon, SK
And here's my 10,000th post! Let's review:

My shop:

img_0881.jpg


As featured in CarCraft Magazine

ccrp_1103_01_o+ed_dannebergs_garage+and_shop.jpg


A few Before & After's of the many projects I've done:

IMG_2546.JPG


IMG00959-20120211-1620-715826.jpg


27220007.jpg


IMG_2219.jpg


106_2303.JPG


photo%25203.JPG


My 2-car, with PIT:

100_1120.JPG


And of course....Mrs E-tek...who let's me do what I do :pimpflash

IMG_3575.JPG


Well, that's it for know....hopefully I'm allowed to stick around for a while longer! Cheers to all of you - which is why I DO STICK AROUND! :beer:

images
 

dozerbuilder01

Well-known member
Joined
Jun 20, 2011
Messages
180
Location
Far Northwest Burbs of Chicago
Congrats on the milestone.

Looking at the pictures of the Camaro quarter panel....isn't it amazing what some people feel are acceptable repairs? That's why I've become obsessed with doing things myself. I still may not always do it right either but I will try my best and if I do screw up, I can only blame myself.

I'll be anxious to see it repaired properly. I'm sure it will last for many years to come.
 
OP
E

e-tek

Well-known member
Joined
Dec 19, 2007
Messages
10,690
Location
Saskatoon, SK
And now back to our regularly scheduled program!

Took some fanagaling to remove the sheet metal from the striker support welded in behind it:

106_6378.JPG


But off it came!

106_6380.JPG


Once more I find nearly 1/2" of filler where it shouldn't be...

106_6384.JPG


Cleaning up around the trunk and rear glass seams:

106_6388.JPG


106_6392.JPG


The trunk weatherstrip channel is a separate piece and has to remain behind -

106_6390.JPG


106_6391.JPG


As always, I douse any remaining rust and all the seams with POR15's MetalReady, a Phosphoric Acid solution, so it doesn't return:

106_6394.JPG
 

ADSR

Well-known member
Joined
Jan 12, 2013
Messages
10,713
**** bro! I thought i was good at body work. You have some real skills!

love the updates!
 

Responder

Well-known member
Joined
Nov 1, 2009
Messages
368
Location
Saskatoon, SK
As always, I douse any remaining rust and all the seams with POR15's MetalReady, a Phosphoric Acid solution, so it doesn't return:

Are you still using the Eastwood product? or POR 15 after the metal ready?
 
OP
E

e-tek

Well-known member
Joined
Dec 19, 2007
Messages
10,690
Location
Saskatoon, SK
As always, I douse any remaining rust and all the seams with POR15's MetalReady, a Phosphoric Acid solution, so it doesn't return:

Are you still using the Eastwood product? or POR 15 after the metal ready?

Actually neither! Rust Bullet sent me a bunch of product to review and so far so good, so I'll be using that. It's very similar to POR15 and performed well in short-term testing I've done (see my blog). I also have a side by side long-term test going on - having painted both POR15 and Rust Bullet onto a rusty panel, then strapped it to the bottom of my van. It's currently minus 35C here - and has been for weeks - so it's getting a workout!!

The Eastwood product didn't hold up as well as the POR15, but I do use their Chassis Black it to paint black pieces as it's tough and shin, but not a perfect rust paint.

Hope that answers your question!
 
To avoid these ads, REGISTER NOW!
Top Bottom