To avoid these ads, REGISTER NOW!

E-tek Restorations: PROJECT THREAD

OP
E

e-tek

Well-known member
Joined
Dec 19, 2007
Messages
10,690
Location
Saskatoon, SK
Would love to hear more about the Camaro you got there! Went through your blog and website to try and find more, read everything there, so I ask here :beer:

Good eye! The Camaro is the newest project to grace the E-tek Rod Shop! It came in with a WICKED 373 Stroker, with 2.5" dual exhaust, full flo-through mufflers, Demon 4 bbl and even a Rattler balancer, making about 450-475HP. It has a full delete shaved firewall but that'll be remedied with a Vintage Air kit install and aftermarket wiper set up.

It underwent a - somewhat poorly done - restoration quite a while back though, so it's gonna get the full-meal-deal including full quarters, new door shells and hinges and a complete body and paint do-over. Once that's all done it'll also get a full interior redo.

So stay tuned if you're interested in that one - but be patient - each of these restorations taker about 2 years to complete. The 40 Ford has been with me for just over a year! :bounce:
 
Last edited:
To avoid these ads, REGISTER NOW!

Aquaticbob

Well-known member
Joined
Dec 3, 2013
Messages
488
Location
Seattle
Good eye! The Camaro is the newest project to grace the E-tek Rod Shop! It came in with a WICKED 373 Stroker, with 2.5" dual exhaust, full flo-through mufflers, Demon 4 bbl and even a Rattler balancer, making about 450-475HP. It has a full delete shaved firewall but that'll be remedied with a Vintage Air kit install and aftermarket wiper set up.

It underwent a - somewhat poorly done - restoration quite a while back though, so it's gonna get the full-meal-deal including full quarters, new door shells and hinges and a complete body and paint do-over. Once that's all done it'll also get a full interior redo.

So stay tuned if you're interested in that one - but be patient - each of these restorations taker about 2 years to complete. The 40 Ford has been with me for just over a year! :bounce:

I'm very interested in seeing the finished project! My old neighbor at my old shop finished up a Hurst Camaro not too long ago, and man was it beautiful. I think it was a '67? not 100% sure on it. Got to go on a few rips in it, so amazing. Made me really want one :lol_hitti
 
OP
E

e-tek

Well-known member
Joined
Dec 19, 2007
Messages
10,690
Location
Saskatoon, SK
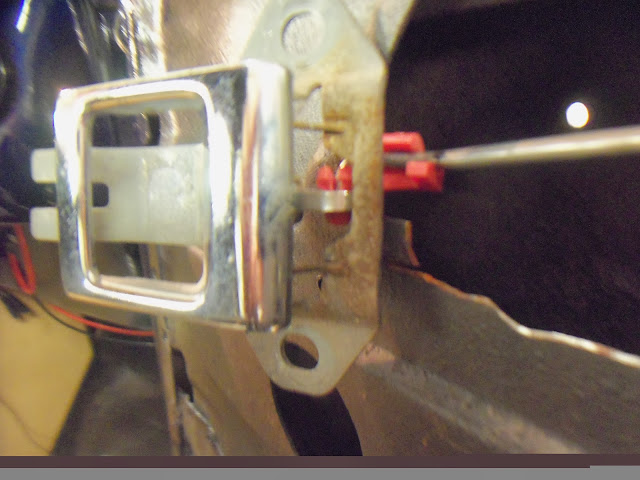
Wired up the supper-cool signal containing "peep" mirrors today:

106_6106.JPG


Hardest part was threading the wire into the slotted arm, then through this retainer:

106_6109.JPG


I'm a details guy and this rubber protector didn't sit right on the arm:

106_6110.JPG


So I cut the one side a bit:

106_6111.JPG


So it would better hug the chrome arm and further protect the paint:

106_6112.JPG


Once installed on the door, it was time for some garage-selfies!

106_6115.JPG


There's a few ways you can mount these mirrors, so the owner can decide which way suits him later down the road:

106_6131.JPG


With the mirrors in place I measured out the wires. I ended up running a peice from the turn signal wire under the dash, through to door post and connecting it inside the door.

106_6116.JPG


Next I ran the speaker wires and tucked everything up for the upholsterers:

106_6118.JPG


Once it's back from the upholsterers, the window garnish moldings will all need to be installed. But way before that they need to be sanded out and painted, so today I sanded them out and put some high build primer on them:

106_6104.JPG


106_6105.JPG


106_6121.JPG


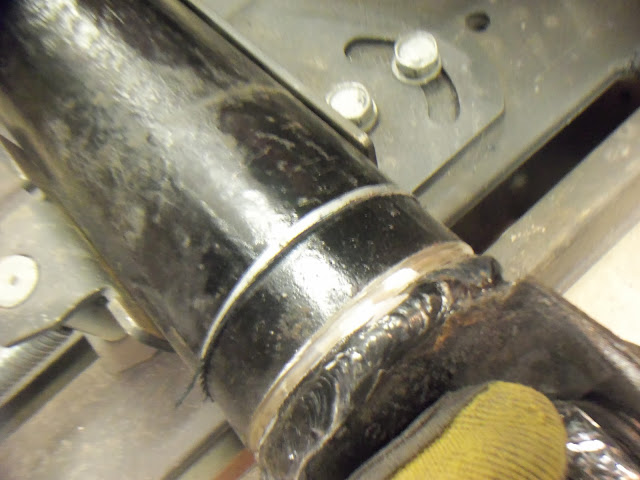
I've had a few things to re-check on my list since initially mocking up the car and the gas pedal was one of them. The way everything lined up, the pedal was pulling the throttle cable down and to the side. Time to fix that:

106_6122.JPG


Drilled a second hole to lower the connection point:

106_6123.JPG


Chamferred the hole:

106_6124.JPG


Then I took a little material off so the clevis wouldn't bind:

106_6125.JPG


Now to remove the grinder marks and make it all smooth-like:

106_6126.JPG


then polish it back to a shine:

106_6127.JPG


Good enough for under the dash! :thumbup:

106_6130.JPG


After getting all that done on the 40, I decided I'd better continue to show the Camaro some love....

Once again, my door caddy came in handy:

106_6134.JPG


When I was pulling up the carpets, I found something else I'd never seen before:

106_6135.JPG


These large diameter bolts, cut off flush with the floor:

106_6138.JPG


Anyone know what they are?? At first I though maybe it was where they attached the body for dipping, but what's with the FRESH cut marks??

here's another item that I'd heard of - but never seen before: assembly line signatures!

106_6139.JPG


With the parcel shelf cover removed, we can see it was an original light green car:

106_6140.JPG


And that whoever hacked them up to install the speakers was either a hack, or McGiver!

106_6141.JPG


If this old girl could talk!!

She'd say - can you fix me? :(

106_6090.JPG


And I'd say: "Don't worry sweetheart, I'm a doctor...." :bounce:
 
Last edited:

Kevin54

MEMBER EMERITUS
Joined
Jan 12, 2005
Messages
29,341
Location
Urbana, Ohio
106_6139.JPG


By the looks of that, I'd say this car has had some accidents in it's past life. The bolts that are cut off in the other pic, they wouldn't be original seatbelt bolts or seat track bolds would they? It's possible the car was originally a bench seat Camaro.
 
OP
E

e-tek

Well-known member
Joined
Dec 19, 2007
Messages
10,690
Location
Saskatoon, SK

By the looks of that, I'd say this car has had some accidents in it's past life.[/quote]

Absolutely Kevin. It's gonna be interesting to see what happens (and what's hiding), when I cut that quarter off.

This is where it's [I]so[/I] important to do things in the correct order (hinges, new doors lined up to rockers, THEN quarters) to make sure things line up properly in the end!

[quote]The bolts that are cut off in the other pic, they wouldn't be original seat belt bolts or seat track bolts would they? It's possible the car was originally a bench seat Camaro.[/QUOTE]

Hmmmm.....:dunno:
 
OP
E

e-tek

Well-known member
Joined
Dec 19, 2007
Messages
10,690
Location
Saskatoon, SK
Only out for about an hour today, with my youngest (he's 10), so we did something on "his" car:

photo%25202.JPG


So we (OK, mostly me ;)) finally pulled the masking off the wire harness and gas lines and cleaned them up, again using the new style wire wrap before setting them back into the stock pinch-holders:

photo%25201.JPG


This stuff sure looks better than that corrugated ****!

photo%25202.JPG
 
OP
E

e-tek

Well-known member
Joined
Dec 19, 2007
Messages
10,690
Location
Saskatoon, SK
I like the wire wrap. Who makes that?

I got it at a local electronics shop but it's making its way into the auto-resto world. I see Painless and others have it now. Aquticbob shows it's available online as well.

BTW - it WAY easier to work with. Cuts with scissors, opens easily with fingers, supposedly doesn't harden like the corrugated automotive stuff. Also, when you add a little piece for some "offshoot" wires, it blends together nicely (see the 40Ford application below):

106_5891.JPG
 
Last edited:

Aquaticbob

Well-known member
Joined
Dec 3, 2013
Messages
488
Location
Seattle
BTW - it WAY easier to work with. Cuts with scissors, opens easily with fingers, supposedly doesn't harden like the corrugated automotive stuff. Also, when you add a little piece for some "offshoot" wires, it blends together nicely (see the 40Ford application below):

It is easy stuff to work with, and it won't harden, however it will stiffen up a little bit. I've noticed when it stiffens up it's a PITA to work with because it wants to return to how it was originally laying. I never tried applying some heat because a heat gun was never nearby when I worked with it, but with heat I could see it moving around a little easier.
 
OP
E

e-tek

Well-known member
Joined
Dec 19, 2007
Messages
10,690
Location
Saskatoon, SK
Something I wanted for Xmas, but decided to wait until spring, for the 390FE that I'm building - for my Galaxie.

!B7uT75w!mk~$(KGrHqF,!lEEy+jC1)KIBM1Drc,ktw~~0_1.JPG
 

g13092

Member
Joined
Jun 14, 2005
Messages
20
Location
Southeast Wisconsin
Religious follower of your thread, first time poster... Is that a really really late 67? It has many hallmarks of a 68, side marker lights, astrovent, horseshoe shifter... I've got a '67, so I have a bad habit of tuning into these things.

I wonder if that long bolt cut off in the floor comes up from the subframe? seems about the right location...
 
OP
E

e-tek

Well-known member
Joined
Dec 19, 2007
Messages
10,690
Location
Saskatoon, SK
Religious follower of your thread, first time poster... Is that a really really late 67? It has many hallmarks of a 68, side marker lights, astrovent, horseshoe shifter... I've got a '67, so I have a bad habit of tuning into these things.

I wonder if that long bolt cut off in the floor comes up from the subframe? seems about the right location...

First off - THANKS for reading! Second - THANKS for (finally ;)) posting!! :beer:

Since you're an owner/expert on this era Camaro, I will defer to your superior knowledge! My apologies for calling it a 67 - as it is a 68 (as you are well aware!) and I'll endeavor to refer to it as such from now on.

I think that bolt does come up from the sub frame. I'll be out there shortly so I'll take a closer look at the underside and report back tonight. I'm still wondering through - if there's any significance to it being cut of 'fresh' like that....
 

welder4956

Well-known member
Joined
Apr 8, 2010
Messages
3,059
Location
Birmingham, AL USA
Another "religious follower" here. This is one of the few threads I always check for updates when I visit and helps me tremendously in my own resto work. Keep up the good work and Merry Christmas to you and the family!
 
OP
E

e-tek

Well-known member
Joined
Dec 19, 2007
Messages
10,690
Location
Saskatoon, SK
Time for a RANT! I'm sure everyone's had a situation like this:

The 40 Ford's wheels where supposed to be here last week (and even before that), but the wheel place we are dealing with is run by a younger guy who just has NO CONCEPT of time! He's Mr. Personable and will tell you "they are ready", or "they will be there", when it's just NOT true! He was supposed to bring them for weeks and then last week the owner asked me to call him - so I did: THREE times! Then one day he finally turns up - with a TAPE MEASURE!!. He wanted to get a final check on the wheel well size....then he told me he'd go back to the shop and put them together and bring them the next day....next day comes and - surprise! - nothing. So today, being the last day before Christmas, I call the shop, hoping against hope that they are ready to go - and maybe I'll even get them myself today - or at the very least, right after Christmas.

I get the machine and the message says: 'Thanks for calling ** Wheels....the shop will be CLOSED until January 2nd!" :willy_nil Oh for Christ's sake....:willy_nil:eyecrazy:
 
Last edited:
To avoid these ads, REGISTER NOW!
OP
E

e-tek

Well-known member
Joined
Dec 19, 2007
Messages
10,690
Location
Saskatoon, SK
Another "religious follower" here. This is one of the few threads I always check for updates when I visit and helps me tremendously in my own resto work. Keep up the good work and Merry Christmas to you and the family!

Well thank you very much - to all of you!

MERRY CHRISTMAS - and here's to MORE RESTO in the NEW YEAR!
 

DynoDave

Well-known member
Joined
Mar 25, 2005
Messages
1,685
Location
Michigan
Merry Christmas Ed.

I FINALLY found your thread....AGAIN! Keeping track of this thread is like tracking big game.
 

ZAPPER68

Well-known member
Joined
Feb 14, 2011
Messages
807
Location
Sand Pit
Merry Christmas Ed to you and your family up there in the GWN...

I am the lucky owner of an all original 68 RS Z28 and will be watching your Camaro build with interest. You commented previously that the Camaro isn't an original Z28...therefore, can I suggest you obtain the book referenced below authored by Jerry Macneish who is a first generation Camaro 'expert'.

1967-68 Chevrolet the Definitive Camaro Z28 Facts Reference Book ...

There is a wealth of information in the book which will be helpful for you to produce a product as close to 'an original' as possible...
 
OP
E

e-tek

Well-known member
Joined
Dec 19, 2007
Messages
10,690
Location
Saskatoon, SK
Merry Christmas Ed.

I FINALLY found your thread....AGAIN! Keeping track of this thread is like tracking big game.

I'm not thrilled that it got moved around so much either....But I certainly appreciate you tracking it down and chiming in! Merry Christmas Dave!

May I suggest you subscribe to it and never miss an update. :)

Although that may work Simon, not everyone wants to subscribe to every thread. I feel bad for all the readers lost along the way.

Merry Christmas Ed to you and your family up there in the GWN...

I am the lucky owner of an all original 68 RS Z28 and will be watching your Camaro build with interest. You commented previously that the Camaro isn't an original Z28...therefore, can I suggest you obtain the book referenced below authored by Jerry Macneish who is a first generation Camaro 'expert'.

1967-68 Chevrolet the Definitive Camaro Z28 Facts Reference Book ...

There is a wealth of information in the book which will be helpful for you to produce a product as close to 'an original' as possible...

Thank you for that! And I hope you either comment or PM me along the way if you see anything I can do to turn out the best Camaro possible! :3gears:
 

HOTFR8

Banned
Joined
Mar 2, 2007
Messages
24,498
Location
Castlemaine, Victoria. The Hot Rod Centre of Austr
I'm not thrilled that it got moved around so much either....But I certainly appreciate you tracking it down and chiming in! Merry Christmas Dave!

Still not sure how or why topics got jumped round as they did. Still now we have many topics in this same section about the same type of work.
When they kept jumping round I was glad my subscription to this topic stayed in place as it helped me work out what was going on as a Mod.

Although that may work Simon, not everyone wants to subscribe to every thread. I feel bad for all the readers lost along the way.

True, but it is one way to keep up until you are following it again. Dave sent me a PM and I have helped him work out how to not miss a post here :thumbup: Sometimes you may follow a topic and then later cancel a subscription. :) I would hope Ed many have found this informative topic once again.
 
OP
E

e-tek

Well-known member
Joined
Dec 19, 2007
Messages
10,690
Location
Saskatoon, SK
Y'know that old saying: "The best laid schemes of mice and men..."

Well, thus far this Xmas, everything is conspiring against me and keeping me out of the shop!!!! AAARRGGG!!! I'd better be in there tomorrow - for many days straight....or I'll freak! %*#%)#*@&!
 
Last edited:

Aquaticbob

Well-known member
Joined
Dec 3, 2013
Messages
488
Location
Seattle
Well, thus far this Xmas, everything is conspiring against me and keeping me out of the shop!!!! AAARRGGG!!! I'd better be in there tomorrow - for many days straight....or I'll freak! %*#%)#*@&!


I know the feeling. I've been out of my shop for 2 months now... So far this holiday season I haven't even been able to touch a wrench and barely my welder
 
OP
E

e-tek

Well-known member
Joined
Dec 19, 2007
Messages
10,690
Location
Saskatoon, SK
C'mon Ed you do need some family time and it must be cold at your location. Mind you it is to Hot here to do much today.

I get plenty of family time, but the way it works out at Xmas is that the wife and kids want to spend time at her mothers/their grandparents - and I don't.

As for the whether, if I wasn't in the shop, I'd be house-bound!
 
OP
E

e-tek

Well-known member
Joined
Dec 19, 2007
Messages
10,690
Location
Saskatoon, SK
Ok, photos are finally uploaded....First up - new tools! I got the Leatherman for an actual Christmas present, but the rest was just my monthly Princess Auto habit.I'll post detials in the new tools thread:

106_6147.JPG


I've wanted a way to use a ratchet on taps forever, so when I saw this set I snapped it up:

106_6148.JPG


106_6149.JPG


Now, onto the 40Ford, where I buttoned up a few more little items, like mounting the MAF sensor:

106_6151.JPG


Tidying up some more wiring (although - as you can see - I have left much of it uncovered until the car goes through everyone's hands and it's running as it should):

106_6152.JPG


A little ways back in the thread I mentioned that I repaired this bezel. The photo I posted was actually a before shot - and between that and this - it was bent, hammered, filed, then sanded with 120, 240, 320, 600 then 1500, before buffing it out again - to get back to this point:

106_6153.JPG


The repaired area was to the right of the mounting screw:

106_6155.JPG


Next, I sanded out the high-build primer i had applied to these inner window suurounds, then re-applied several coats in between doing the driveshaft:

106_6156.JPG
 
OP
E

e-tek

Well-known member
Joined
Dec 19, 2007
Messages
10,690
Location
Saskatoon, SK
THEN, I tackled the driveshaft, but first, I threw together a couple stands to make the job a little easier - and much more accurate:

106_6157.JPG


106_6158.JPG


106_6159.JPG


Lumpy, but it holds!

106_6160.JPG


106_6161.JPG


The stands make it easy to keep items like drive shafts left and square in various instances:

106_6162.JPG


The key to cutting a drive shaft is to try and keep everything square as you go, so you don't have to do a lot of squaring at the end:

106_6163.JPG


Driveshafts all have an insert on the one end that you want to be sure NOT to damage. What I did was score the weld first by turning the shaft in the chop saw, then cutting it at the actual cut line:

106_6166.JPG


106_6164.JPG


By cutting the remaining tube piece with the hacksaw, I was able to remove it easily:

106_6168.JPG


106_6167.JPG


The tubes end was fine-tuned several times before tacking it on:

106_6170.JPG


106_6171.JPG


A pair of Vice Grips made a good welding ground point:

106_6173.JPG


But I couldn't roate it freely, so I switched to a magnet:

106_6174.JPG


After some final checking (forgot to snaps photo's), it was ready to bolt back in:

106_6175.JPG


Pretty much exactly where I wanted it!

106_6178.JPG
 
Last edited:

Jokeman

Well-known member
Joined
Jul 14, 2005
Messages
394
Location
Boston
e-tek, please keep this thread going. Great seeing quality craftsmanship in this thread!

Sent from my Nexus 7 using Tapatalk
 

Responder

Well-known member
Joined
Nov 1, 2009
Messages
368
Location
Saskatoon, SK
Belated Merry Christmas Ed!

I get the machine and the message says: 'Thanks for calling ** Wheels....the shop will be CLOSED until January 2nd!" Oh for Christ's sake....

Ya, the holidays end up being a real pain as to what is open and what is not. I went last year on Boxing Day to Princess Auto and they were closed...wtf!
 
OP
E

e-tek

Well-known member
Joined
Dec 19, 2007
Messages
10,690
Location
Saskatoon, SK
Belated Merry Christmas Ed!

Ya, the holidays end up being a real pain as to what is open and what is not. I went last year on Boxing Day to Princess Auto and they were closed...wtf!

Thanks man - Merry Christmas to you too!

I was at PA on Boxing Day last year too - I'd bet half the men in Saskatoon said WTF!! This year I called and the girl who answered said: "Yes - due to DEMAND - we'll be open this year for sure" LOL!
 

gorilla

Well-known member
Joined
Dec 13, 2007
Messages
1,650
Can you describe in more detail how you alined the yokes on that drive shaft? I'm wondering how you did it with the u joints still installed.
 
OP
E

e-tek

Well-known member
Joined
Dec 19, 2007
Messages
10,690
Location
Saskatoon, SK
Another item on my list of "do it last", was to open up a hole on one of the bumper brackets that was too small to insert a bumper bolt into. The hardened steel stopped me several months back and now I have to get it done. This time I stepped up the drill bits one at a time to slowly open the hole, then used a shaping rock to finish it out:

106_6186.JPG


106_6185.JPG


Took about 30 minutes to oepn it up just enough to put the bolt through:

106_6184.JPG


To get the bolt head straight, I used a 15/16" wrench on the oblong head, wrapped in shop towel:

106_6188.JPG


Finally!

106_6189.JPG


Since the wheels STILL haven't shown up, I was left staring at the rusty brake hats and dingy caliper housings all week:

106_6190.JPG


I cleaned them up really well with a Scotch pad, then Wax & Grease remover before painting on some Rust Bullet Black Shell.

If you've been reading along, you'll recall that the good people at RustBullet sent me some of their product to test and review, which I did, by brushing it on and describing that process, but I yet to have any long-term experience with it - until now.

106_6191.JPG


106_6192.JPG


I'm going to call this the "welding the lid closed" property. The product dries so strong and sticks to bare metal so well, that it virtually welded the lid to the can. To me, this is a good indication that it will stick to whatever it is applied to, so long as it's clean.

I hammered the can back into shape and punctured a hole in the top to allow me to pour out what I needed - a well-known procedure used with these types of products:

106_6193.JPG


106_6194.JPG


After pouring out what I needed, I resealed the can with some duct tape:

106_6199.JPG


Finally, I was able to brush the brakes, rotor hats and some of the suspension parts:

106_6200.JPG


should look better behind the wheels - if they EVER show up!

106_6218.JPG


106_6219.JPG


When I did the door latches, I broke one of the plastic rod clips. The clip was purchased a while back and today I crossed it off the to-do list:

106_6204.JPG


106_6206.JPG


The console had been on the bench while I mocked up a new face for the the stereo, tach and knobs. Today I was able to get it re-installed for the upholsterers:

106_6210.JPG


It's going to look sweet all covered in carpet and leather (or a leather-like substance):

106_6211.JPG


I keep looking at the rod, thinking how lucky I am to build things like this. I just love doing (most of!) it and put a lot of thought and effort into everything I do on them:

106_6213.JPG


106_6214.JPG


Next up - another classic!

106_6215.JPG
 
Last edited:
To avoid these ads, REGISTER NOW!
Top Bottom