To avoid these ads, REGISTER NOW!

E-tek Restorations: PROJECT THREAD

OP
E

e-tek

Well-known member
Joined
Dec 19, 2007
Messages
10,690
Location
Saskatoon, SK
So - most unfortunately, the trunk and door needed to be repaired. Largely because of too much filler used by the shop that "made" the body 10 years ago, but the door because the power window motor hit the inside of the door when it was slammed too many times - and the trunk due to the flex introduced by the licence plate light mount. Luckily (?!) it had to go back to the painter for a couple little items - so he'll have to repaint the trunk and door while he's at it.

:(

106_6900.JPG


OK, shield your eyes if you're at all quesy about filler being used like cement!!

106_6902.JPG


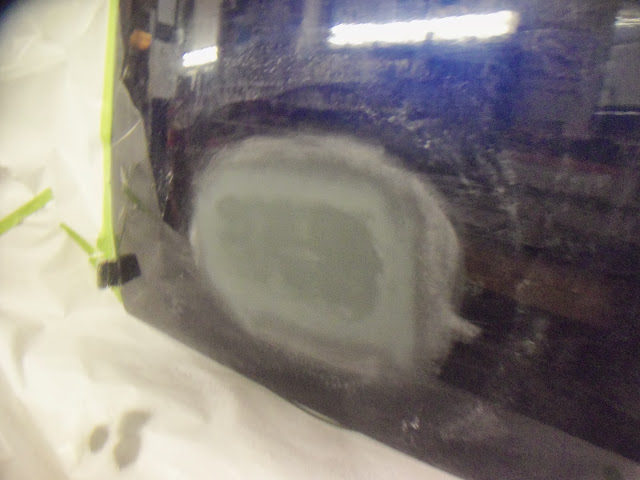
I ground the old filller down to the metal to be sure I got the new filler to adhere all the way through. I'm guessing they used a trowel to pile this much on here:

106_6904.JPG


Then I feathered out the repair area with the DA best I could....vacuuming up all the filler after each pass...

106_6905.JPG


Was pretty damn thick on the trunk lid! Did I say how I hate filler?!

106_6907.JPG


Look closely - it's like tree rings!

106_6908.JPG


Before re-filling it with new filler, I first cleaned it really well with Wax & Grease remover. I half-wondered if I should have drilled in some re-bar to tie it all together!

106_6910.JPG


After filling and sanding with 40 & 80 grit, I blocked it with 120 then feathered it out again with 120, then 320 on the DA -

106_6911.JPG


Finally (for today), I put a few coats of primer on it so I can do a final block on it tomorrow:

106_6912.JPG


106_6913.JPG


;(
 
Last edited:
To avoid these ads, REGISTER NOW!

Kevin54

MEMBER EMERITUS
Joined
Jan 12, 2005
Messages
29,341
Location
Urbana, Ohio
Damn:eek: I think if that car hits a pot hole, he'll be leaving some parts behind. Does the inside of the panels show that much damage that they had to use that much filler?

I know if that was me and I say it had that much filler in it, I'd refuse to work on it or I'd be changing my wages some. Didn't you see any of that when you started the job?
 
OP
E

e-tek

Well-known member
Joined
Dec 19, 2007
Messages
10,690
Location
Saskatoon, SK
Damn:eek: I think if that car hits a pot hole, he'll be leaving some parts behind. Does the inside of the panels show that much damage that they had to use that much filler?

I know if that was me and I say it had that much filler in it, I'd refuse to work on it or I'd be changing my wages some. Didn't you see any of that when you started the job?

Not at all Kevin. I mean I could see there were patch panels put in the doors and I had commented on the ripples in the underside of the roof, but not until I drilled those holes in the trunk lid did I see how much was in there!!! I'd HATE to see what's in the roof the quarters. The only parts I worked on were the front fenders and hood and there's VERY little in the fenders - and NONE in the hood.

I already suggested to the owner that he should find another hatch lid - but he thinks other originals will all be the same and the aftermarket ones don't fit any better. I said I'd repair it once with no guarantee - I won't be the one to fix it a second time. Did I mention how much I hate doing filler work? :willy_nil
 
Last edited:

HOTFR8

Banned
Joined
Mar 2, 2007
Messages
24,498
Location
Castlemaine, Victoria. The Hot Rod Centre of Austr
Looks like it has had a polish.

Ever seen one of these ?
40sloper.gif

This is an Aussie Sloper. We never had the Coupes or the Tudors and instead had what was called a Sloper. This one is a 1940 model. I had a 1939 model that looked almost identical to this right down to the wheels and color. It had a 396 big Block Chevrolet.
 
OP
E

e-tek

Well-known member
Joined
Dec 19, 2007
Messages
10,690
Location
Saskatoon, SK
^^^ This is currently it's good side - LOL!!!

After a bunch more details - like making rad brackets:

119_6914.JPG


Bolting on new rear meat, the 275/50- 17s filling out the rear fenders MUCH better:

119_6916.JPG


Shaping the intake pipe the owner welded up:

119_6917.JPG


119_6922.JPG


I put the hood back on....but not before finding more scratches! I gotta say, I've put together MANY entire show cars after paint without so much as a scratch, then this one - after being out of my shop for only a month - will almost need a COMPLETE repaint :willy_nil:lol: Oh well, we'll get there! :rocker:

119_6918.JPG


119_6920.JPG


119_6925.JPG


photo.JPG
 
OP
E

e-tek

Well-known member
Joined
Dec 19, 2007
Messages
10,690
Location
Saskatoon, SK
A week off coming up here - then I'll be getting back on the Camaro...and maybe my 240z! Cheers Y'all!!

Also, I finally bought a new flanger/punch tool, which will make the Camaro roof go MUCH smoother! I have about 30 holes to punch, plus I want to put a flange at the sail panel to match the original. No more drilling plug-weld holes for this cowboy!

photo%25203.JPG
 
Last edited:
OP
E

e-tek

Well-known member
Joined
Dec 19, 2007
Messages
10,690
Location
Saskatoon, SK
Back from Calgary and back to it. The front end is MUCH straighter now but I still want to play with it a bit more:

IMG_0007.JPG


Whenever I buy a purpose-built tool I wonder how - AND WHY - I ever did without it:

IMG_0014.JPG


No more drilling holes in sheet-metal for me! This tool not only saves on drill bits, it also means not having to remove the drill-slag left on the underside of every hole. I'm guessing Robert has one but chooses not to use it, 'cause anyone still drilling holes for plug welds must have an amazing excuse not to!

IMG_0012.JPG


IMG_0011.JPG


IMG_0017.JPG


It also makes a perfect flange which can be perfect to hide/blend spot-welds, shrink bulging metal, put in valley's so as to minimize the need to feather out fillers:

IMG_0015.JPG


Back on the 40 Ford, I didn't want to cut above the gas tank last week due to the active leak, but I forgot I could have used the electric shear, which doesn't produce sparks. So today I cut an access hole above the pump flange to access and repair the leak:

IMG_0001.JPG


IMG_0003.JPG


Here's what I found - the return line (left), was twisted to one side, so the locking tab was impossible to remove being jammed up against the electrical connector. I thought that may have been the cause so fixed that while I was at it and then searched for more, but couldn't see much...So I powered up the car to kick in the fuel pump, at which time it became perfectly CLEAR:

IMG_0020.JPG


Do you see it? How could you not! So I removed a short section to fix the leak, then retested it with success:

IMG_0021.JPG


All was good in the back - but with the system under pressure I then found a leak up front near the engine, which I'll have to get to later so I can finish up back here...

Made a quick and dirty access cover:

IMG_0018.JPG


Then pre-wired wired up the Bazooka 450W amp:

IMG_0022.JPG


Before I put the Licence plate bracket back on the hatch, I though a plate to strengthen the inner structure would help guard against flex and another crack:

IMG_0032.JPG


Up at the front, I fit the air cleaner to the custom elbow and made a bracket to hold it all up, which I'll attach to the valve cover hold down:

IMG_0024.JPG


IMG_0026.JPG


IMG_0028.JPG


The left window was a little tight when it last left and I wanted to test it again, but when I did, I found it now wouldn't go all the way up. After a bunch of testing and fiddling, I just pulled the thing out to play with it on the bench:

IMG_0029.JPG


In searching for the stoppage I pulled the cover off the bottom end of the runner and this is what I found:

IMG_0030.JPG


These parts had been sitting for a long time with rust and dirt building every time the runner went up and down, collecting in this one spot until it became too big to pass (like when you're constipated?! - LOL!):

IMG_0031.JPG


I removed the rust and dirt and cleaned the runner with a stiff brush, then lubed everything up which returned its smooth action. Just another of the many issues that will pop up when a car sits for as many years as this had between build phases. Slowly we'll get them all sorted out...
 
Last edited:

MP&C

Well-known member
Joined
Oct 21, 2009
Messages
4,396
Location
Leonardtown, MD
No more drilling holes in sheet-metal for me! This tool not only saves on drill bits, it also means not having to remove the drill-slag left on the underside of every hole. I'm guessing Robert has one but chooses not to use it, 'cause anyone still drilling holes for plug welds must have an amazing excuse not to!

Let me know how that works for you in the middle of a floor pan. :lol:

Where it may do well around the perimeter of a panel, it won't do everything. If it does what you need, then I guess it's money well spent.


It also makes a perfect flange which can be perfect to hide/blend spot-welds, shrink bulging metal, put in valley's so as to minimize the need to feather out fillers:

IMG_0015.JPG

Ed, if I remember correctly, don't you have a bead roller? Some stepped dies in a bead roller would do a much nicer, smoother job where you need to duplicate a factory flange, and not leave those puckers that the end of each "punch" will leave in the panel..

But to answer your question, no, I don't have one. IMO they are one of those gimmick tools that are marketed to the guys doing their first auto project repair and just don't yet have the stones to attempt **** welding. Unfortunately, used in the wrong setting, the stepped flange seam they promote also leads to ghost lines in their paint job. I've had numerous guys on different forums ask me my opinion of them, and I've told them basically the same thing. After about a week of online tutorial, I had them **** welding where they didn't need it. If the flanger works for what you need it for, great. But I think you'd see much better results with the step dies in a bead roller.
 
OP
E

e-tek

Well-known member
Joined
Dec 19, 2007
Messages
10,690
Location
Saskatoon, SK
Beefed up the backside of the hatch where the licence plate light mounts -

IMG_0038.JPG


IMG_0040.JPG


A little repaint and it'll be better than before:

IMG_0041.JPG


Also re-installed the window motor, tested it up and down several times and cleaned up battery acid that had leaked in the car and onto my concrete - leaving me a permanent reminder of the build...

Also did a little more fitment, pulling and pushing on the Camaro's reproduction panels to get them closer to perfect before welding them up:

IMG_0043.JPG


IMG_0044.JPG
 

Motown 454

Well-known member
Joined
Sep 25, 2008
Messages
1,359
I paid a lot of money to have my sheet metal all replaced on my car, and the tail panel to quarter match is terrible on the right side and it took him 4 years.
 
OP
E

e-tek

Well-known member
Joined
Dec 19, 2007
Messages
10,690
Location
Saskatoon, SK
I paid a lot of money to have my sheet metal all replaced on my car, and the tail panel to quarter match is terrible on the right side and it took him 4 years.

Sorry to hear that. Hopefully it doesn't take me 4 years (hopefully!)... :lol:

I've done 10 or 12 builds over the years and I generally allow 2 years per. It seems like a long time when I first mention my time lines to people, but it ends up being much faster - and much more realistic - than the alternatives!:beer:
 

akdiesel

Well-known member
Joined
Aug 8, 2008
Messages
2,617
Location
Wasilla, AK
e-tek

I enjoy reading your updates. Gathering all sorts of information on these subjects. Thanks for posting.
I too will take any excuse to buy tools. I am a noobie in the vehicle body repair and paint. I have a truck project I keep putting off. I really need to get started on it before I am not able to swing any tools again.
 

Kevin54

MEMBER EMERITUS
Joined
Jan 12, 2005
Messages
29,341
Location
Urbana, Ohio
Ed......what are you going to do where the quarter and tail panel comes together? Are you going to rework the tail panel or rework the rear quarter radius?

That's what I hate about aftermarket parts. They are pure **** anymore. When I fixed my truck after it was hit, I bought replacement panels from LMC. Huge mistake. Not only was the fender 1/2 the weight of a factory fender (I couldn't find a factory fender at the time), it had more waves than the Great Lakes in a major storm. What was going to be a simple scuff and prime turned into two days of bodywork just to get it ready to prime. Then half the mounting holes had to be elongated to boot.

That gap might look like a simple fix, but to get an even gap all around, I bet turns into a ***********.

I hope you document it when you fix it. I want to see what tricks you have up your sleeve.

I did go through Motowns thread this morning, and I must say.....that was a hell of a build. E-Tek.....I don't know if you looked through it, but you're about at the same place if you pull the panels back off. :lol: I've got two buddies that both have Camaros, and they were, and one still is, down to all the substructure. Both have '69 Camaros. It took my one buddy almost three years to get things to fit up correct, working on it almost every evening. He took it from a $200 junker to a $40,000 car. My other buddy is just now starting to hang panels on, and he is pretty particular, like you are, and he's been on his for 2 years now, and probably has another year or so on it to get it right. It was the typical rusted out '69. I think he picked it up for around $1000. But like Motowns, it's all going back new.

Good luck and looking forward to updates.
 

Attachments

  • gap.jpg
    gap.jpg
    131.7 KB · Views: 55
Last edited:
OP
E

e-tek

Well-known member
Joined
Dec 19, 2007
Messages
10,690
Location
Saskatoon, SK
Kevin, compared to many I've done, these panels are actually pretty good! It wont take me much to even the gaps and work the edge of the lower valence. I'll be sure to document it all!

And ya, for those that think I pulled a lot of panels off this 68, here's what Motown's was reduced too:

185.jpg


:willy_nil :thumbup:
 
Last edited:
To avoid these ads, REGISTER NOW!
OP
E

e-tek

Well-known member
Joined
Dec 19, 2007
Messages
10,690
Location
Saskatoon, SK
Did some work on every car in the shop this weekend! :thumbup:

Pulled apart the rear suspension of the 240Z for cleaning, rebuilt and detailing:

IMG_0061.JPG


IMG_0055.JPG


IMG_0057.JPG


IMG_0068.JPG


Look, I even used my press!!!

IMG_0069.JPG


IMG_0070.JPG


Maybe I'll even use it again during the rebuild!

IMG_0058.JPG


Prepped and welded some on the Camaro:

IMG_0072.JPG


IMG_0064.JPG


IMG_0067.JPG


IMG_0073.JPG


These panels line up nicely. As I work the welds, they'll be near perfect.

IMG_0066.JPG


I then want back to the 40 Ford and chased the other gas leak..and finding two leaks, one up front, where the "high pressure" plastic piping connects to the metal connector from the rail return -

IMG_0045.JPG


...and back where this plastic section joins to the metal piping going back to the tank, which I am trimming here. You'll notice a split in the piping, but the outer tubing is just a protective cover for the plastic piping underneath:

IMG_0049.JPG


So I bent up a new section of plastic piping, trying to increase the clearance at the exhaust piping:

IMG_0047.JPG


I had to use these fugly hose clamps for now....

IMG_0052.JPG


And still it leaked. Argghh... The whole thing is a cluster ****. The owner ran large diameter metal piping from the tank - which was a good idea BTW! ;) - but is larger than the plastic piping that connects to the metal connector on the rail section. As well, the plastic piping was likely heated, then press-fit, at the factory - and although I used a similar process here I'm not confident it sealed the same. 40 psi is a lot of pressure to maintain using old-school methods that were OK at 5 psi. So I'm going to rethink this section and replace it before it goes BACK to the painter next week.
 
Last edited:

JTH

Well-known member
Joined
May 4, 2012
Messages
167
Location
MO Ozarks
Ford had a tool kit that came out in the 80s to press the ends in the nylon tubing. I found it easier to do what you're doing and heat it slightly and push the fittings in. There is a sweet spot on temp that lets it stretch but not make it brittle. Reworking someone else's genius engineering should pay at least double! JT
 
OP
E

e-tek

Well-known member
Joined
Dec 19, 2007
Messages
10,690
Location
Saskatoon, SK
Ford had a tool kit that came out in the 80s to press the ends in the nylon tubing. I found it easier to do what you're doing and heat it slightly and push the fittings in. There is a sweet spot on temp that lets it stretch but not make it brittle. Reworking someone else's genius engineering should pay at least double! JT

Thanks - I thought there must be something specific to be used.
 
OP
E

e-tek

Well-known member
Joined
Dec 19, 2007
Messages
10,690
Location
Saskatoon, SK
What the hell E-Tek? Let's get this party going. You just going to sit around and not post? We need updates man!!!!

Well, thanks for noticing Kev! ;)

The 40 Ford is pretty much done, so it's off to get the door and hatch re-painted, then he'll do the final color sand. From there it'll go to the upholsterer.

IMG_0077.JPG


IMG_0080.JPG


Check out the new stance. Rear tires where swapped for taller ones at 26". That, plus the lowering blocks, makes the tires totally fill the wheel well now:

IMG_0081.JPG


IMG_0090.JPG


This photo is meant to show the transition from the 40 Ford back to some of my own projects!

IMG_0082.JPG


Other projects in line for some attention....and here I am taking Sunday off 'cause I tweaked my back pushing the 40 Ford out and onto the trailer....:eyecrazy:

IMG_0083.JPG


IMG_0084.JPG


IMG_0086.JPG


IMG_0087.JPG


Might have a few minutes to get the suspension on the 240Z now!

IMG_0091.JPG


IMG_0093.JPG
 
Last edited:

Kevin54

MEMBER EMERITUS
Joined
Jan 12, 2005
Messages
29,341
Location
Urbana, Ohio
IMG_0081.JPG


The back wheels and tires look better than what was on there. It fills the wheel house opening up nicely now.

I've been doing some looking around at different wheels for momma's Cutlass, and I think those are the wheels that I'm going to go with. Everybody's got them, or at least they are probably one of the most popular. So many are going to 22's and larger, but I'm the type that would rather see more rubber than wheel.

The Cutlass currently is rolling on 14's, and I thought about putting some 17's on, but they may be too large. And with the way our roads are, you always need a little more rubber to absorb some of the potholes.

I still have a few weeks before the weather gets nice, and I still have to find seat tracks for the passenger side bucket seat. Once I get the interior back in, then it will be wheel and tire time. :rocker:
 
OP
E

e-tek

Well-known member
Joined
Dec 19, 2007
Messages
10,690
Location
Saskatoon, SK
Spent the weekend burning in the panels on the Camaro, cleaning the shop and garage, sandblasting the 240Z's suspension and then detailing and swapping tires out on the DD's.

I spent so much time on my cars I had to pay someone else to put a new door in a rental house!

Rental houses are doing well though - allowed me to order up the white walls for the "Old Man" (Merc) - yee ha!
 
Last edited:
OP
E

e-tek

Well-known member
Joined
Dec 19, 2007
Messages
10,690
Location
Saskatoon, SK
No biggie. Just got too busy building show cars to bother playing "who drops a better weld dot...." ;) Take care!
 

welder4956

Well-known member
Joined
Apr 8, 2010
Messages
3,057
Location
Birmingham, AL USA
I really enjoy your posts Ed and have learned a lot from them. One thing I learned long ago is that people do things different ways. That doesn't mean one person's way is better than another. Don't let other peoples comments dissuade you from showing your craft. Many thanks for sharing with us.
 
To avoid these ads, REGISTER NOW!
Top Bottom