To avoid these ads, REGISTER NOW!

Above 1200 Sq/FT Eastern Washington Workshop

Wokspaces above 1200 squarefeet.
OP
S

slodat

ALLIANCE MEMBER
Joined
Feb 6, 2010
Messages
3,679
Location
Central-ish, WA
Thank you for cheering me on! It has been a ton of work. I am really enjoying the results, though. The stucco building was built in 1953. The block walled 30x70 addition was built later. I'm guessing in the 60's or 70's, but haven't found anything solid to confirm. It was a body shop for a long time and then used as storage for the past 15 years.

I closed on the shop two years ago today. It's crazy how much work it has been to get it to this point. It's very close to where I want it, for now.
 
To avoid these ads, REGISTER NOW!

drivesitfar

Well-known member
Joined
Oct 23, 2013
Messages
35,988
Location
Pacific Northwest
SD: Congrats on getting that huge PAINTING JOB completed this early in the year. I know you have a lot of stuff on your TO DO LIST, but there is a lot less than when you started not to mention all the COOL TOOLS and STORAGE you've acquired and set up.

easy to cheer on a guy that has a goal and keeps his eye on the prize.

keep up the great work and best of luck on making a deal with the guy with the bulldozer for you lot clean up next door.

cheers
 
OP
S

slodat

ALLIANCE MEMBER
Joined
Feb 6, 2010
Messages
3,679
Location
Central-ish, WA
That huge painting job is far from done. I've only painted the walls shown in the photos above- about 1/4 of the whole building.

I appreciate the comments!!


Sent from my iPhone using Tapatalk
 

drivesitfar

Well-known member
Joined
Oct 23, 2013
Messages
35,988
Location
Pacific Northwest
SD: i know, but thought i'd give you some KUDOS. keep up the good work and since we are supposed to get mid 70's on Wednesday and Thursday i'm guessing you will get some good weather too later this week.

cheers and easy to give you praise cause you keep doing great work.
 
OP
S

slodat

ALLIANCE MEMBER
Joined
Feb 6, 2010
Messages
3,679
Location
Central-ish, WA
When I had the metal roof installed on the old building last year I had a different contractor take a look at the other roof. He suggested I get it coated as soon as I could come spring. I researched products online and decided to buy a 100% silicone roof coating. This stuff is not cheap (about $40/gal), but every indicator pointed to it being the best. I bought the material a few weeks ago.

A good friend offered to help. I'm grateful for my great friends!! First step was pressure washing all 2100 sqft. Then rinsing again, followed by clearing out the gutter. It didn't take long to dry in the morning sun..
Before:

ed7b9232f7363f98131072b175e0ba21.jpg

2460e033e53be429db4dfa94b835eab7.jpg

Starting to get the coating on:
59ce5fe42376b99bdfd02262f7f043be.jpg

edaec7c1c5c73170c1b3bbc16f05af25.jpg

End of the job:
b85223af81ef93feb7e1513e3c3e49e8.jpg

That was a ton of work. While this was not an esthetic job, it looks amazing! And, it is rated for standing water, which I have almost all the time because of the very limited slope. Should be good to go for several years!
 

Attachments

  • 2460e033e53be429db4dfa94b835eab7.jpg
    2460e033e53be429db4dfa94b835eab7.jpg
    855.5 KB · Views: 1
  • 59ce5fe42376b99bdfd02262f7f043be.jpg
    59ce5fe42376b99bdfd02262f7f043be.jpg
    896.5 KB · Views: 1
  • edaec7c1c5c73170c1b3bbc16f05af25.jpg
    edaec7c1c5c73170c1b3bbc16f05af25.jpg
    840.4 KB · Views: 1
  • b85223af81ef93feb7e1513e3c3e49e8.jpg
    b85223af81ef93feb7e1513e3c3e49e8.jpg
    579.7 KB · Views: 1
  • ed7b9232f7363f98131072b175e0ba21.jpg
    ed7b9232f7363f98131072b175e0ba21.jpg
    848.5 KB · Views: 1
OP
S

slodat

ALLIANCE MEMBER
Joined
Feb 6, 2010
Messages
3,679
Location
Central-ish, WA
Thanks for checking out my shop and commenting. The roof coating was primarily a maintenance item. The secondary benefit of it looking great and possibly handling the heat a little better are huge bonuses. I can't get over how nice it looks from the highway now.
 

drivesitfar

Well-known member
Joined
Oct 23, 2013
Messages
35,988
Location
Pacific Northwest
SD: i've got a torch down flat roof on my home that we just had that expensive coating put on ours last spring. we re roofed our 2000 square foot home with 440 square foot garage so almost 2500 square feet maybe 25 years ago and our roofer that put on that torch down did the work putting on the new product similar to what you just did. he said he would expect 5 years and maybe 10 years before we would have to re roof our house.

not sure how old your roofing material is or how long ago it was applied, but it looks great now. in the 80's torch down roofs had a life expectancy of maybe 10-15 years so we are happy we are getting 30 out of ours. hope you get another 5 or 10 years out of your roof too.

I bet your shop is looking great as you drive up to it or drive past it and i bet you are getting positive comments from friends, clients and neighbors too.

good to see some sunshine isn't it and since you guys on that side of the mountains seem to go from winter to summer almost immediately i bet you'll have to start testing your AC soon as you work inside. all that new insulation should help a lot though so best of luck with that.

cheers
 

zmotorsports

ALLIANCE MEMBER
Joined
Oct 20, 2009
Messages
21,312
Location
Northern Utah
I've been reading through your shop journey over the past couple of days. All I can say is WOW!!

Great job and attention to detail. It is coming along nicely.

Mike.
 
OP
S

slodat

ALLIANCE MEMBER
Joined
Feb 6, 2010
Messages
3,679
Location
Central-ish, WA
I really needed a day of screwing off.. and today was the day! I drove an hour to an annual old timey swap meet. Didn't find anything there that I needed to drag home. While I was there I got a response to a lowball offer I had made on Craigslist. Three hours driving in another direction to pick up this:
c693dce2fa64a7c3268f32206d3883a2.jpg

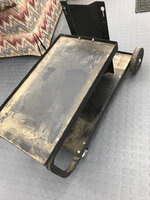
I didn't realize until after we parted ways that he forgot the helmet. I have a couple so not a big deal. I'd like to have three total for when my nephews visit. I went straight to the welding shop around the corner to trade the 60cf bottle in for an S size. While there I noticed a welding cart with drawers. One thing led to another and I had spent my allowance :)

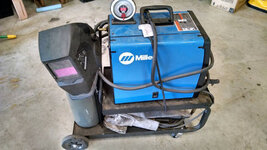
A little tinkering, cleaning and what not when I got back to the shop and I have this:
a5fa8142a18ea65f9aad3a72a27cb102.jpg

I picked up the 135 on the left two years ago. It has 0.023 wire in it, which is good for really thin stuff. Most of which for me would be sheet metal. I've kept an eye out for a 240v MIG for a little bit thicker fabrication. That's where today's machine fits in quite nice. It came loaded with a 10lb spool of 0.030. I also have some 0.035 on hand. I got it all sorted out and it works great. All told for less than the cost of the welder new.

The top drawer has some metal dividers and is quite shallow. I made a mark on the side of a Schaller bin and went to work with the band saw:
1c11b4f3968c351b38c8b55830a06efe.jpg
e038918ec6baaa2d55d11014eb3ec77c.jpg
01ee69eb83e08897dc5018b0879fd12f.jpg

That machine is ready to go to work when called upon. It will get used in just about every seat frame I work on. They always have some sort of crack, break, etc.

Speaking of seats.. I've been wanting a new (better quality) pneumatic grinder to run Roloc discs for shaping seat foam and other stuff. This Ingersol Rand came highly recommended and showed up today along with a couple of assortments of 3" Roloc discs.
1692c15aa56b5fdeeaa1ec7810f421fb.jpg
884829da7ddf621a4fe4385f487fb3d2.jpg

Now, I'm relaxing for a few waiting for my buddy to stop by. He doesn't know it but his 110v Miller MIG will no longer be sitting on the floor. He just needs to clean this guy up a little :)
f9d06e980dd062694115861a365a4f23.jpg
 

Attachments

  • f9d06e980dd062694115861a365a4f23.jpg
    f9d06e980dd062694115861a365a4f23.jpg
    751.8 KB · Views: 1
  • 884829da7ddf621a4fe4385f487fb3d2.jpg
    884829da7ddf621a4fe4385f487fb3d2.jpg
    861.2 KB · Views: 0
  • c693dce2fa64a7c3268f32206d3883a2.jpg
    c693dce2fa64a7c3268f32206d3883a2.jpg
    555.8 KB · Views: 0
  • 01ee69eb83e08897dc5018b0879fd12f.jpg
    01ee69eb83e08897dc5018b0879fd12f.jpg
    667.8 KB · Views: 0
  • a5fa8142a18ea65f9aad3a72a27cb102.jpg
    a5fa8142a18ea65f9aad3a72a27cb102.jpg
    648.1 KB · Views: 1
  • 1692c15aa56b5fdeeaa1ec7810f421fb.jpg
    1692c15aa56b5fdeeaa1ec7810f421fb.jpg
    728.5 KB · Views: 1
  • 1c11b4f3968c351b38c8b55830a06efe.jpg
    1c11b4f3968c351b38c8b55830a06efe.jpg
    776.3 KB · Views: 1
  • e038918ec6baaa2d55d11014eb3ec77c.jpg
    e038918ec6baaa2d55d11014eb3ec77c.jpg
    860.1 KB · Views: 1

Duker

Well-known member
Joined
Sep 25, 2010
Messages
10,861
Location
Livingston, TX
Nice score on the welder! I recently bought that IR disk sander. I have only used it once but I like the trigger versus the lever on my other grinders. I bought it so that I would have a dedicated grinder to use my Roloc type S pads. I got a whole bunch of them cheap on eBay a few years back.


Sent from my iPad using Tapatalk Pro
 
Last edited:
OP
S

slodat

ALLIANCE MEMBER
Joined
Feb 6, 2010
Messages
3,679
Location
Central-ish, WA
I've been thinning things out in the shop. Getting rid of stuff that I don't use or don't want, etc. Got a call this morning from a guy wanting a Craigslist item. One thing led to another..
793479fbc5d46032b0e7e35ddf3a1573.jpg

Finally got a new welding hood on the way, too. I'll get power to the metal fabrication room at some point so I can use the TIG.
 

Attachments

  • 793479fbc5d46032b0e7e35ddf3a1573.jpg
    793479fbc5d46032b0e7e35ddf3a1573.jpg
    654.7 KB · Views: 1
OP
S

slodat

ALLIANCE MEMBER
Joined
Feb 6, 2010
Messages
3,679
Location
Central-ish, WA
This probably doesn't look like much but it's a small milestone. I mounted the dust collection controls enclosure, mounted all of the components and got the power wired in. The 1.5" conduit to the sub-panel and gutter will be plenty for the current activated switches and whatever else comes up.

I'm happy to see this going together. I'm thinking the tablesaw will have automated dust collection on the first cut. I have to run conduit to wire it up, so I'm going the get all this business wired in from the start.

abc31831659890f83e8a9572e02d1c99.jpg

Not much going on in here, yet.
f434f46ab33b41691cf92d45fe3a029f.jpg
 

Attachments

  • f434f46ab33b41691cf92d45fe3a029f.jpg
    f434f46ab33b41691cf92d45fe3a029f.jpg
    685.2 KB · Views: 1
  • abc31831659890f83e8a9572e02d1c99.jpg
    abc31831659890f83e8a9572e02d1c99.jpg
    559.1 KB · Views: 0

Jo Diesel

Well-known member
Joined
Aug 26, 2015
Messages
402
Location
St. Johns MI
You gotta love when you get all done and the inspector just looks, doesn't ask a thing or ask to turn any thing on and gives you a pass sticker.
 
OP
S

slodat

ALLIANCE MEMBER
Joined
Feb 6, 2010
Messages
3,679
Location
Central-ish, WA
I have three more upholstery machines on the way. The lead times can be crazy long, especially when it's coming from Italy. My general philosophy is to have good equipment that will last and produce a great result. One arrived yesterday and I got to dialing it in today. It's a carpet serger. A one trick pony. It wraps a small yarn around the edge of the carpet, tightly thereby binding and finishing the cut edge of the carpet. It can be used on carpet alone or with a backing to make all sorts of mats.

When you watch the marketing videos for this type of equipment they make it all look easy and effortless. If only that were the case! This is a small sample of what hit the floor while I sorted out the tensions and adjustments..

6d3bb6c8dbcd8c458291f6df3c1fe3f4.jpg

This is some of the cheapest, flimsiest and in general worst case scenario automotive carpet out there. I figured if I could get it looking decent I was on the right track.

277306ebdba28c025e698977d6775586.jpg

Here it is in all its glory, after kicking my **** all afternoon and evening:
215a4f2bdaa56b28d11ae9611323e8e2.jpg

This is going to be a really nice detail in my interiors. Happy guy over here.
 

Attachments

  • 215a4f2bdaa56b28d11ae9611323e8e2.jpg
    215a4f2bdaa56b28d11ae9611323e8e2.jpg
    774.1 KB · Views: 1
  • 277306ebdba28c025e698977d6775586.jpg
    277306ebdba28c025e698977d6775586.jpg
    792.3 KB · Views: 2
  • 6d3bb6c8dbcd8c458291f6df3c1fe3f4.jpg
    6d3bb6c8dbcd8c458291f6df3c1fe3f4.jpg
    777.3 KB · Views: 3

nine4gmc

Well-known member
Joined
Mar 24, 2012
Messages
14,357
Location
Dallas
Awesome machine and sweet shears there too! I step away from your thread for a few days and you are almost finished with the place! Great work, keep it up!
 
To avoid these ads, REGISTER NOW!
OP
S

slodat

ALLIANCE MEMBER
Joined
Feb 6, 2010
Messages
3,679
Location
Central-ish, WA
Awesome machine and sweet shears there too! I step away from your thread for a few days and you are almost finished with the place! Great work, keep it up!


Thank you! I know you recognize these machines and what they mean to the shop! I'm far from finished but I'm closing in on version 1.0!

Those Kai shears are the only ones you reach for after you get a pair!

Thanks for stopping by, Nines!
 
OP
S

slodat

ALLIANCE MEMBER
Joined
Feb 6, 2010
Messages
3,679
Location
Central-ish, WA
Continuing the exterior paint prep. Did a bunch of pressure washing stucco. Hit the retaining wall while I was at it. Huge difference!

8d3135d2c85a36d642b2ef7a905574fd.jpg
75b882e97383161ed46848fd8dd4fdcf.jpg

Inside now enjoying the a/c continuing on the dust PLC install.
 

Attachments

  • 75b882e97383161ed46848fd8dd4fdcf.jpg
    75b882e97383161ed46848fd8dd4fdcf.jpg
    900.1 KB · Views: 3
  • 8d3135d2c85a36d642b2ef7a905574fd.jpg
    8d3135d2c85a36d642b2ef7a905574fd.jpg
    956 KB · Views: 1
OP
S

slodat

ALLIANCE MEMBER
Joined
Feb 6, 2010
Messages
3,679
Location
Central-ish, WA
This just showed up.
23eea7f3df5a33047183e2b70fbb6684.jpg
fd74f1260fc367c91e780fab21348fe7.jpg
 

Attachments

  • 23eea7f3df5a33047183e2b70fbb6684.jpg
    23eea7f3df5a33047183e2b70fbb6684.jpg
    725.4 KB · Views: 0
  • fd74f1260fc367c91e780fab21348fe7.jpg
    fd74f1260fc367c91e780fab21348fe7.jpg
    744.9 KB · Views: 0

drivesitfar

Well-known member
Joined
Oct 23, 2013
Messages
35,988
Location
Pacific Northwest
SD: always something cool going on at your shop. i thought your dust collection set up was pretty big, but whatever you are building now looks gigantic. i'll sit back and watch and learn while you do it. keep moving forward and looking great.

RIV: I can't recall the term POOKIE cause i always used aluminum or DUCT TAPE.

ALL: speaking of DUCT TAPE when did it get so cheap cause the stuff at HOME DEPOT and COSTCO falls apart especially if out in the weather for a few months. anybody know of the better brands or where to buy good DUCT TAPE or do i need to call up RED GREEN?
 

RivennHewn

Well-known member
Joined
Jun 4, 2011
Messages
10,356
Location
PNW
Drives,
Not to derail the thread, but duct sealant is a gray, brush on, kind of rubbery product that outlast duct tape and actually seals the duct(if applied correctly)

If you use tape, I recommend
http://www.nashuatape.com/
 
Last edited:

drivesitfar

Well-known member
Joined
Oct 23, 2013
Messages
35,988
Location
Pacific Northwest
Riv: thanks for the link and it had a nice video with plenty of information on it that plays while you are looking at their products. sounds like great stuff. i don't think we are really HIJACKING SD'S thread since he is actually doing some duct work and maybe he's already got a plan or if he doesn't you mentioned a couple nice options.

SD: good luck and still wondering how you are going to use all that ducktwork. i also like the warning signs posted on the ductwork to the shippers and handlers.
 
OP
S

slodat

ALLIANCE MEMBER
Joined
Feb 6, 2010
Messages
3,679
Location
Central-ish, WA
It's an open face spray booth.

24" exhaust fan and auto damper.
d925b0f3d62ea3a437bc9ecddc6bf574.jpg

6' duct with roof curb and storm collar:
9c2f1a9e9ce4ce3c491599f638a6c3a6.jpg
 

Attachments

  • 9c2f1a9e9ce4ce3c491599f638a6c3a6.jpg
    9c2f1a9e9ce4ce3c491599f638a6c3a6.jpg
    731.1 KB · Views: 0
  • d925b0f3d62ea3a437bc9ecddc6bf574.jpg
    d925b0f3d62ea3a437bc9ecddc6bf574.jpg
    722.4 KB · Views: 1
OP
S

slodat

ALLIANCE MEMBER
Joined
Feb 6, 2010
Messages
3,679
Location
Central-ish, WA
That damn Craigslist..

d69374ff0eee2f9b74d50b1748a3adb2.jpg

4 x 8 plasma table. It's a bit of a project, but the price was right. Gecko 540 control with torch height controller.
 

Attachments

  • d69374ff0eee2f9b74d50b1748a3adb2.jpg
    d69374ff0eee2f9b74d50b1748a3adb2.jpg
    852 KB · Views: 1

nine4gmc

Well-known member
Joined
Mar 24, 2012
Messages
14,357
Location
Dallas
Other than a highly trained crew, is there anything else you need for the shop? [emoji3]


Sent from my iPhone using Tapatalk
 
OP
S

slodat

ALLIANCE MEMBER
Joined
Feb 6, 2010
Messages
3,679
Location
Central-ish, WA
You know, it's funny you say that. I have a buddy that owns a top end audio shop. We talk tools, swap ideas and in general give each other a hard time in the best way possible. I told him a while back I really only wanted a few things left for the shop.. and a CNC plasma was next. Maybe next year. Then day before yesterday a good buddy in town sent a Craigslist post to me. One thing leads to another and I brought this guy home.

It needs some stuff. The torch height control that it came with is an antique. The Geko G540 stepper driver is a good bit of kit. And it looks like a good power supply too.

fe046a67c6dacd679a3cb5bfc7c358b2.jpg

d9f99984e579f2025ca04763c6701f1d.jpg

I already have an unused Dell computer that I can run the control on. I think all told I'll have about $6k in a 4x8 with torch height control, Hypertherm 45 XP that's controlled by the software and a few small bits. It's not in the budget for now. So, I'll get it sitting in its place and get back to working on other things.

I did get it assembled before I called it a day last night.
a0cdc586c3e091529c4388e82f594320.jpg

The PO didn't use it a whole lot, so there's some finish work to be done on the table itself. As well as a slat table, water box, and cable management.

12569c237a7ef398a120cabcb31c4bca.jpg

I really want to cut it down in length. I don't have any interest trying to wrangle 4x8 sheets of pretty much any thickness of metal. It's just too heavy and hard on the body.


This weekend I've been in the process of getting everything into its final resting place so I can get the shop sorted. It's going well and in a way the plasma is helping with that floor plan layout.
 

Attachments

  • 12569c237a7ef398a120cabcb31c4bca.jpg
    12569c237a7ef398a120cabcb31c4bca.jpg
    749.2 KB · Views: 1
  • a0cdc586c3e091529c4388e82f594320.jpg
    a0cdc586c3e091529c4388e82f594320.jpg
    781.3 KB · Views: 1
  • fe046a67c6dacd679a3cb5bfc7c358b2.jpg
    fe046a67c6dacd679a3cb5bfc7c358b2.jpg
    627.6 KB · Views: 1
  • d9f99984e579f2025ca04763c6701f1d.jpg
    d9f99984e579f2025ca04763c6701f1d.jpg
    666.2 KB · Views: 1
To avoid these ads, REGISTER NOW!
Top Bottom