To avoid these ads, REGISTER NOW!

Above 1200 Sq/FT Eastern Washington Workshop

Wokspaces above 1200 squarefeet.
OP
S

slodat

ALLIANCE MEMBER
Joined
Feb 6, 2010
Messages
3,679
Location
Central-ish, WA
The seller had one more ten drawer. It's a bit rougher, but I can make a nice cabinet out of it. Supposed to ship today. It's hard to believe how dense these are for storage.

07e0e02a0a5f174314feb7db6c9d8af6.jpg

I started grinding on the concrete patchwork. It is making an insane mess. Going to have to get some heavy plastic to make a containment before I continue. Patches look like they are going to work well. Just a ton of work.
 

Attachments

  • 07e0e02a0a5f174314feb7db6c9d8af6.jpg
    07e0e02a0a5f174314feb7db6c9d8af6.jpg
    834.6 KB · Views: 1
To avoid these ads, REGISTER NOW!
OP
S

slodat

ALLIANCE MEMBER
Joined
Feb 6, 2010
Messages
3,679
Location
Central-ish, WA
Dan - I'd love to do an interior in a car like yours. They look like a ton of fun to drive, too! I see a lot of DIY interior projects fail because of the adhesive they chose. The 3M Super 77 sold at Home Depot is not a HHR (high heat resistive) adhesive and fails in the heat. Interior work requires the correct adhesive, ideally sprayed.

nonhog- Thanks for checking out my shop!

I have an embarrassing amount of Schaller bins coming.. Ordered the 2" deep bins last week.. They come today.. Realized I'm almost out of the 3" and ordered them this morning. It is truly hard to believe how much you can fit in these cabinets!

Lots to do in the next couple of weeks. Working a lot at the day job and trying to get bay 1 painted and as much done on bay 5/6 floor as I can before the CNC router and laser arrive.

Soon, the shop projects will finally be done enough to support some customer work-- the real reason for all of this work!
 
OP
S

slodat

ALLIANCE MEMBER
Joined
Feb 6, 2010
Messages
3,679
Location
Central-ish, WA
Spent the evening moving into the cabinets. This stack is in about 4 drawers..
92c4489c219cc0beb21c45d9beae1806.jpg

b24d7cfa3287d8954b8bd1cc3a1f59ea.jpg

Lots of bins left, and plenty of space in the drawers.
e8e67f6f9c682f3551a26855e00207c6.jpg
 

Attachments

  • e8e67f6f9c682f3551a26855e00207c6.jpg
    e8e67f6f9c682f3551a26855e00207c6.jpg
    600.6 KB · Views: 1
  • b24d7cfa3287d8954b8bd1cc3a1f59ea.jpg
    b24d7cfa3287d8954b8bd1cc3a1f59ea.jpg
    353.2 KB · Views: 1
  • 92c4489c219cc0beb21c45d9beae1806.jpg
    92c4489c219cc0beb21c45d9beae1806.jpg
    703.2 KB · Views: 0

drivesitfar

Well-known member
Joined
Oct 23, 2013
Messages
35,991
Location
Pacific Northwest
SD: ORGANIZING AT IT'S BEST!! when a smaller cabinet of organized stuff just won't do just find a bigger one. the quality of your cabinet finds is second to none too so keep up the great work putting your shop together.

also if you have time and would like to post up your metal cabinets on this thread of misc. vintage cabinets please do even if maybe all your cabinets are not quite vintage i think that would be ok to post them. also show how you organized the drawers cause that will help a lot of us GET ORGANIZED that are maybe also trying to be our own hardware store.

http://www.garagejournal.com/forum/showthread.php?t=305350

cheers
 
OP
S

slodat

ALLIANCE MEMBER
Joined
Feb 6, 2010
Messages
3,679
Location
Central-ish, WA
Drives- I posted in the thread. Thank you for pointing me that direction!

Gave the old stuff to a friend tonight. All of this in a few drawers and bins..
2a89b4f1efafde2e6a4b0da9fb1200b9.jpg
23d545f86503baca0326da1cd0dfd953.jpg
 

Attachments

  • 23d545f86503baca0326da1cd0dfd953.jpg
    23d545f86503baca0326da1cd0dfd953.jpg
    729.5 KB · Views: 1
  • 2a89b4f1efafde2e6a4b0da9fb1200b9.jpg
    2a89b4f1efafde2e6a4b0da9fb1200b9.jpg
    784.6 KB · Views: 1

nine4gmc

Well-known member
Joined
Mar 24, 2012
Messages
14,357
Location
Dallas
I've used the Olfa rotary before but I had a sacrificial masonite top on my table. I wouldn't mind picking up a nice full size healing mat. Shop looks great, when do you plan to get started with customers?
 
OP
S

slodat

ALLIANCE MEMBER
Joined
Feb 6, 2010
Messages
3,679
Location
Central-ish, WA
I've used the Olfa rotary before but I had a sacrificial masonite top on my table. I wouldn't mind picking up a nice full size healing mat. Shop looks great, when do you plan to get started with customers?


I got it on Amazon. Plan is May 1st! Lots to do between now and then!
 
OP
S

slodat

ALLIANCE MEMBER
Joined
Feb 6, 2010
Messages
3,679
Location
Central-ish, WA
Picked up the fourth Vidmar from the freight terminal yesterday. It is rougher than the other two I bought from this surplus seller.

0f9d272c6a0f0de9b4430f647e1fd3f4.jpg

I wiped down all of the drawers with Sprayaway glass cleaner and removed the slides last night. Tonight I cleaned the slide bearings with brake clean and lubed with Permatex assembly lube before putting it all back together. A couple drawers needed small tweaks to correct some bends from neglect or abuse. It all went together pretty well. One slide is missing a bearing and one drawer needs a spot weld on each side at the front. This is the drawer that's out of whack in the photo above. Should be an easy fix tomorrow.
cc8d261eaf85b8c9512aa238ae388d13.jpg

I scrubbed the drawer handles with oven cleaner and reinstalled. I'm going to hold off on the cosmetic facelift for now. I'll need to sort out the slide with the missing bearing. Other than that I have a nice, functional, ugly but clean cabinet!

a411f78647a60341926a41810d73235d.jpg

The row:
a538f5ec04d87bf00702f65ad70f5855.jpg
f174b2e73e6c0c7f9c962254074bd9dd.jpg
 

Attachments

  • a411f78647a60341926a41810d73235d.jpg
    a411f78647a60341926a41810d73235d.jpg
    604.5 KB · Views: 0
  • cc8d261eaf85b8c9512aa238ae388d13.jpg
    cc8d261eaf85b8c9512aa238ae388d13.jpg
    612.7 KB · Views: 0
  • 0f9d272c6a0f0de9b4430f647e1fd3f4.jpg
    0f9d272c6a0f0de9b4430f647e1fd3f4.jpg
    702.7 KB · Views: 0
  • a538f5ec04d87bf00702f65ad70f5855.jpg
    a538f5ec04d87bf00702f65ad70f5855.jpg
    325.6 KB · Views: 0
  • f174b2e73e6c0c7f9c962254074bd9dd.jpg
    f174b2e73e6c0c7f9c962254074bd9dd.jpg
    328.6 KB · Views: 0
OP
S

slodat

ALLIANCE MEMBER
Joined
Feb 6, 2010
Messages
3,679
Location
Central-ish, WA
The most recent Vidmar had one drawer slide bearing missing. These bearings are swaged/riveted on. After some searching around I ordered bearing and bolt mentioned in this thread
baf95b5976b793216bd968ebbdd142b3.jpg

Flattened a 1/4-20 T nut and trimmed it to length. And assembled onto drawer with red loctite. Then trimmed excess length off the threaded end.
9e3c6b73bee0f47a8d43b597cd56f47c.jpg
70a892917634c1348632d91a7b1bdb09.jpg
Works great!!

Another drawer needed a couple of spot welds. It's all good now. Very happy with the cabinets. CNC router was supposed to hit the port today. Laser supposed to arrive Friday. I'm excited to say the least!

I've wanted a multi-channel thermometer setup for a while. I have wireless sensors in a few spots in the shop and outside with this new setup. Happy with it thus far..
eb254a77ea929f6a1b4c7fc689cb046b.jpg
 

Attachments

  • 9e3c6b73bee0f47a8d43b597cd56f47c.jpg
    9e3c6b73bee0f47a8d43b597cd56f47c.jpg
    239.3 KB · Views: 0
  • baf95b5976b793216bd968ebbdd142b3.jpg
    baf95b5976b793216bd968ebbdd142b3.jpg
    358.8 KB · Views: 0
  • 70a892917634c1348632d91a7b1bdb09.jpg
    70a892917634c1348632d91a7b1bdb09.jpg
    277.3 KB · Views: 0
  • eb254a77ea929f6a1b4c7fc689cb046b.jpg
    eb254a77ea929f6a1b4c7fc689cb046b.jpg
    509 KB · Views: 10
Last edited:

GarrettWeidman

Active member
Joined
Apr 14, 2013
Messages
43
Metal fab room taking shape. I've had these Jessem Clear Cut guides waiting to be installed on the Unisaw for a while. Set them up and cut a good bit of French cleat stock.

ImageUploadedByTapatalk1454270600.633300.jpg

If I missed this in the thread somewhere I am sorry. But what is the 2"x72" grinder in this picture here?
 
OP
S

slodat

ALLIANCE MEMBER
Joined
Feb 6, 2010
Messages
3,679
Location
Central-ish, WA
Laser made it to the shipping terminal yesterday. I saved a ton of money picking it up there.
25a08efec29cf6f0642c9a14fd98549e.jpg

A coworker loaned me his forklift the day before after work.
b52224db68e82822e826c92ed6b73b87.jpg

It was about all it could do to get the 1400 lbs up the steep ramp. Once inside un-crating went well.
d0fb19a6c503263387ebc711d32dcc5d.jpg

A couple minor shipping damage issues to sort out.
 

Attachments

  • d0fb19a6c503263387ebc711d32dcc5d.jpg
    d0fb19a6c503263387ebc711d32dcc5d.jpg
    540.6 KB · Views: 9
  • b52224db68e82822e826c92ed6b73b87.jpg
    b52224db68e82822e826c92ed6b73b87.jpg
    709 KB · Views: 2
  • 25a08efec29cf6f0642c9a14fd98549e.jpg
    25a08efec29cf6f0642c9a14fd98549e.jpg
    901.8 KB · Views: 3
To avoid these ads, REGISTER NOW!
OP
S

slodat

ALLIANCE MEMBER
Joined
Feb 6, 2010
Messages
3,679
Location
Central-ish, WA
Thanks for checking out my shop guys!

I have the 3M adhesive remover. Use it often. Just haven't got to the cosmetics on the Vidmars... currently using the 80/20 approach - 80% of the progress for "20%" of the effort. Today was a good example of this. I wanted the Lock-Tile under the laser. I got the tile down everywhere I could. The rest needs some concrete work.. later..

After that I started on the laser fume/smoke exhaust setup. The blower came with the laser.
44d1f6efc08874f2c564f5668a7794c6.jpg

I want it to exhaust as high on the wall as possible to get the acrylic fumes up and away from the building. I used perforated angle to mount the blower on the ceiling. There's a short run straight out the building. I have a spring closed damper on the way.
1ac436314647d58c7f8f2369cec5cd71.jpg

Using 6" S&D PVC for the suction down to flex hose at the laser. I'll finish up in the morning..
da6496dc9550b994033db568b948b1df.jpg
 

Attachments

  • da6496dc9550b994033db568b948b1df.jpg
    da6496dc9550b994033db568b948b1df.jpg
    587 KB · Views: 3
  • 1ac436314647d58c7f8f2369cec5cd71.jpg
    1ac436314647d58c7f8f2369cec5cd71.jpg
    453.2 KB · Views: 1
  • 44d1f6efc08874f2c564f5668a7794c6.jpg
    44d1f6efc08874f2c564f5668a7794c6.jpg
    665.6 KB · Views: 1
Last edited:

hardly

Well-known member
Joined
Mar 22, 2011
Messages
78
Location
Vancouver, WA.
^^^^2:54 a.m.! Now it's confirmed; you get by with very little sleep! "Burning it at
both ends" is routine. Have to admire your energy level.....

Shop and new toy looking great!
 
OP
S

slodat

ALLIANCE MEMBER
Joined
Feb 6, 2010
Messages
3,679
Location
Central-ish, WA
^^^^2:54 a.m.! Now it's confirmed; you get by with very little sleep! "Burning it at
both ends" is routine. Have to admire your energy level.....

Shop and new toy looking great!


Last night was a lot later than usual, but it was three hours prior to that time stamp you are referring to. I'm guessing it is using EST. I'm not that energetic!

Thank you for checking out my shop. Lots to do this week ;)

As I mentioned, there was some shipping damage to the laser. The manufacturer has been really great thus far. I just test fired the laser. It works!!
fe6f4a3cf35b0e24458e6c3c68623a13.jpg

And, this seems mandatory..
123cfdda3449b6796edaf539122f93dd.jpg
 

Attachments

  • 123cfdda3449b6796edaf539122f93dd.jpg
    123cfdda3449b6796edaf539122f93dd.jpg
    29.5 KB · Views: 1
  • fe6f4a3cf35b0e24458e6c3c68623a13.jpg
    fe6f4a3cf35b0e24458e6c3c68623a13.jpg
    587.6 KB · Views: 0
OP
S

slodat

ALLIANCE MEMBER
Joined
Feb 6, 2010
Messages
3,679
Location
Central-ish, WA
31731295d93403cdf8a1d295a86b06f1.jpg

Test on a piece of leather.. it was a .jpg not vector so there's some pixelation..
 

Attachments

  • 31731295d93403cdf8a1d295a86b06f1.jpg
    31731295d93403cdf8a1d295a86b06f1.jpg
    759.2 KB · Views: 0
OP
S

slodat

ALLIANCE MEMBER
Joined
Feb 6, 2010
Messages
3,679
Location
Central-ish, WA
Every time I've worked with the 6" S&D pipe I've had a mental image of a clamp I'd like to use to attach it to the wall, ceiling, etc. Last night I sketched it out using router templates.
63cd29bed4857627f509c0d540043688.jpg

Earlier I was considering making a clamp template using the manual router methods. I decided to give it a go drawing in Corel Draw and cutting a 1/4" thick template in the laser.
bde88524c4147c4b5013f74c2603607f.jpg

That went well so I used the template to cut the 3/4" thick clamp using a flush trim bit in the router table.
5f90d580953cad6d519bcd9ce759cad2.jpg

Drill two holes..
8bc746c1f8988d774b8528f32506f509.jpg

a29e7e9f31fa84c33edd246c6ae5b589.jpg

dc17ecd0aa2b413fd2ba0d060da175cd.jpg

344fbd3b205ce11ba6d92d7c1e7020d0.jpg

Picking up a big order of cast acrylic tomorrow so I can start playing with that. This thing is cool!
 

Attachments

  • 8bc746c1f8988d774b8528f32506f509.jpg
    8bc746c1f8988d774b8528f32506f509.jpg
    549 KB · Views: 0
  • 344fbd3b205ce11ba6d92d7c1e7020d0.jpg
    344fbd3b205ce11ba6d92d7c1e7020d0.jpg
    653 KB · Views: 0
  • dc17ecd0aa2b413fd2ba0d060da175cd.jpg
    dc17ecd0aa2b413fd2ba0d060da175cd.jpg
    628.5 KB · Views: 0
  • a29e7e9f31fa84c33edd246c6ae5b589.jpg
    a29e7e9f31fa84c33edd246c6ae5b589.jpg
    489.7 KB · Views: 0
  • 5f90d580953cad6d519bcd9ce759cad2.jpg
    5f90d580953cad6d519bcd9ce759cad2.jpg
    696.2 KB · Views: 0
  • bde88524c4147c4b5013f74c2603607f.jpg
    bde88524c4147c4b5013f74c2603607f.jpg
    635.5 KB · Views: 0
  • 63cd29bed4857627f509c0d540043688.jpg
    63cd29bed4857627f509c0d540043688.jpg
    668.7 KB · Views: 2
OP
S

slodat

ALLIANCE MEMBER
Joined
Feb 6, 2010
Messages
3,679
Location
Central-ish, WA
I tidied up the laser area this morning. It shouldn't have to be pulled out from the wall for quite a while.
d56f13708a7da1225d5e0a08063ca6c6.jpg

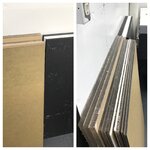
I picked up an order of cell cast acrylic and PVC foam sheet in several thicknesses of each. The thicker sheets are too much for one person to muscle around without risking a serious back injury. So, I split each sheet into thirds. I try not to think about how much money these two small stacks represent..
435dc7aecd9202fbee7d6f3ec37fe2f5.jpg

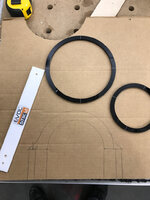
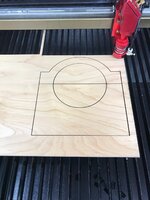
Next up was finishing the outside portion of the laser exhaust. The idea is to get the fumes and smoke up and away from the building. The stink can get pretty bad with wood and plastics. First up I shortened the galvanized pipe and made a trim piece. I drew it up in CAD, laser cut a 1/4" template and used a flush trim in the router to make the part out of 1/2" PVC. Before you ask why not just cut the PVC with the laser?.. PVC will create chlorine gas and combine with moisture in the air to create hydrochloric acid. No bueno..
fda8f1ee055ede355c3f7b33a353c3e6.jpg

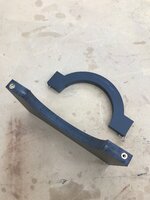
Next up was measuring for the stack standoff/support bracket.
c9735b208f3fd4afed3e8b1d4843d37e.jpg

Repeated same process to make the two part bracket out of 3/4" PVC.
6ea9e924e645bcfa636849cd4a2fdff7.jpg
820ff60b6a435cb3f0543dc60d74d912.jpg
cb43b00b3a0c8d61aef6538fdaea0721.jpg

Finished project:
49e0f9bec06db3af0536f0ffbb9817b0.jpg

The best part about the laser is the test pieces are cheap 1/4" material. I haven't wasted expensive material yet due to having to change a dimension or what not. For example I made the square flange 3 times in 1/4" before I was happy with it..
 

Attachments

  • 6ea9e924e645bcfa636849cd4a2fdff7.jpg
    6ea9e924e645bcfa636849cd4a2fdff7.jpg
    664.1 KB · Views: 2
  • 820ff60b6a435cb3f0543dc60d74d912.jpg
    820ff60b6a435cb3f0543dc60d74d912.jpg
    583.3 KB · Views: 0
  • cb43b00b3a0c8d61aef6538fdaea0721.jpg
    cb43b00b3a0c8d61aef6538fdaea0721.jpg
    487.1 KB · Views: 0
  • c9735b208f3fd4afed3e8b1d4843d37e.jpg
    c9735b208f3fd4afed3e8b1d4843d37e.jpg
    748.9 KB · Views: 0
  • fda8f1ee055ede355c3f7b33a353c3e6.jpg
    fda8f1ee055ede355c3f7b33a353c3e6.jpg
    628.4 KB · Views: 0
  • 435dc7aecd9202fbee7d6f3ec37fe2f5.jpg
    435dc7aecd9202fbee7d6f3ec37fe2f5.jpg
    731.3 KB · Views: 0
  • d56f13708a7da1225d5e0a08063ca6c6.jpg
    d56f13708a7da1225d5e0a08063ca6c6.jpg
    461.9 KB · Views: 1
  • 49e0f9bec06db3af0536f0ffbb9817b0.jpg
    49e0f9bec06db3af0536f0ffbb9817b0.jpg
    678.1 KB · Views: 1
Last edited:
OP
S

slodat

ALLIANCE MEMBER
Joined
Feb 6, 2010
Messages
3,679
Location
Central-ish, WA
Lots of cleaning and laser setup/learning thus far today. Finally got things to a point where sweeping and mopping the tile made sense.. it was quite the mess but it cleaned up really nice!
77368e1bd4e1d4246b1d447acb027a69.jpg
0b62894730dfd2e96abb5584c0ec95e9.jpg

Here's a before/after photo for reference:
9932379a9f7f1896c0a2faacbfac611e.jpg

Next up is getting primer sprayed in Bay 1..
 

Attachments

  • 77368e1bd4e1d4246b1d447acb027a69.jpg
    77368e1bd4e1d4246b1d447acb027a69.jpg
    592.9 KB · Views: 2
  • 0b62894730dfd2e96abb5584c0ec95e9.jpg
    0b62894730dfd2e96abb5584c0ec95e9.jpg
    572.3 KB · Views: 1
  • 9932379a9f7f1896c0a2faacbfac611e.jpg
    9932379a9f7f1896c0a2faacbfac611e.jpg
    810.2 KB · Views: 2
Last edited:

Finallygotit

ALLIANCE MEMBER
Joined
Jul 6, 2013
Messages
4,076
Location
Tucson, AZ
Following along, I have seen the transformation in it's progression. It's when you see the before and after pics that really show the stark differences and the thought and work that was put into it.

Great job! :thumbup:

:beer:
 
OP
S

slodat

ALLIANCE MEMBER
Joined
Feb 6, 2010
Messages
3,679
Location
Central-ish, WA
I get accustomed to the changes quickly, mostly because I'm at the shop every day. The before and after photos almost don't seem real some days. This has been a loooong project. I am excited the light is starting to glow dimly at the end of the tunnel!

Thanks for following and contributing!


Sent from my iPhone using Tapatalk
 
OP
S

slodat

ALLIANCE MEMBER
Joined
Feb 6, 2010
Messages
3,679
Location
Central-ish, WA
Tunajoe and 250- thanks for checking in on my shop. I always get a little excited when people comment on it!

After spraying 111 gallons of paint thus far in the shop I have come up with a process that works a lot better than when I first started. Spraying is the way to go. It is just great. Save for the masking of all of the things not getting painted. A big one to overcome was how to mask a floor. This is what I've come up with that works for me..

I run a wire brush around the outer edge by hand and go back and vacuum up everything this kicks up. This leaves a clean surface to apply quality masking tape. Looks like this at this stage:
e8c382d7b46adeda4571df8a88115d28.jpg

Then I use this really handy masking machine I found at Home Depot. I've run many rolls of paper and tape through it and it works great!! This sticks the edge of the 12" wide paper to the tape on the floor. I use cheap tape of whatever I have on hand for this.
7768fde8890d81546a8d8a55b2e93e13.jpg

Now there's a clean edge and there's a 12"border around the room. At this point I lay out the super thin "painters who plastic" and tape that to the paper.

I'm about to do this in bay one. I'll add more photos as I progress.
 

Attachments

  • e8c382d7b46adeda4571df8a88115d28.jpg
    e8c382d7b46adeda4571df8a88115d28.jpg
    728 KB · Views: 1
  • 7768fde8890d81546a8d8a55b2e93e13.jpg
    7768fde8890d81546a8d8a55b2e93e13.jpg
    515.6 KB · Views: 1
To avoid these ads, REGISTER NOW!
Top Bottom