To avoid these ads, REGISTER NOW!

Above 1200 Sq/FT Eastern Washington Workshop

Wokspaces above 1200 squarefeet.

Bob Heine

ALLIANCE MEMBER
Joined
Oct 24, 2009
Messages
10,703
Location
Boca Raton, Florida
Steven, just looking at the pictures I'm going to have to take two Tylenol. I only had to grind 700 square feet of thinset in the great room and have a hint of what you have gone through. The worst part is the dust has probably invaded the rest of the shop. Even with the doors taped shut it made it into the far reaches of our house.
 
To avoid these ads, REGISTER NOW!
OP
S

slodat

ALLIANCE MEMBER
Joined
Feb 6, 2010
Messages
3,679
Location
Central-ish, WA
I’m grateful I don’t have any injuries in my past that make things like this impossible for me. I’m sore, but not hurting. It did kick my ****. I did my best to isolate the dust. It is everywhere.

I hope all of the effort is worth it and the mold doesn’t come back.

This is only half of this bay. The other half will happen later.
 
OP
S

slodat

ALLIANCE MEMBER
Joined
Feb 6, 2010
Messages
3,679
Location
Central-ish, WA
Still chipping away at the huge floor project. Used a needle gun to clean up edges and other areas that the grinder didn’t get. The surface wasn’t finished the way we do these days. Very rough with lots of small holes full of dirt and muck. Made my way around the whole area. Vacuumed as much of the fine dust as I could before blowing the cracks out with compressed air. Went through three more epoxy kits filling cracks. Next up is mixing some mud and filling holes.

What I started with:
86977fcbfed433b2220e27210c66ec24.jpg

957c8f5550fef9e8132d73283589f6bc.jpg

Current status:
e11517b4d20eff5854f7fc11dc2c9093.jpg

Sealer is set to be here end of the week.

Changed direction on the mil a little. Going with Centroid Acorn and DMM 1.3kW AC servos. Will work the mill project in parallel with the floor.

Started making a bench top CAT40 tool storage rack. Matt’s tooling organization thread gave some inspiration. These inserts match the taper. The Prusa does a nice job making them.
a62f25c7f0aa3972acbb3548123b73ec.jpg

622f80fe3d62ab10eff79a605e196edf.jpg

The concept in mdf. Will work for a while. Once I know I like it, I’ll make it out of a composite material.
4933305fee48b874b36adf0ba629fdfe.jpg
 

Attachments

  • 622f80fe3d62ab10eff79a605e196edf.jpg
    622f80fe3d62ab10eff79a605e196edf.jpg
    1.4 MB · Views: 0
  • a62f25c7f0aa3972acbb3548123b73ec.jpg
    a62f25c7f0aa3972acbb3548123b73ec.jpg
    1.2 MB · Views: 0
  • e11517b4d20eff5854f7fc11dc2c9093.jpg
    e11517b4d20eff5854f7fc11dc2c9093.jpg
    367.8 KB · Views: 0
  • 957c8f5550fef9e8132d73283589f6bc.jpg
    957c8f5550fef9e8132d73283589f6bc.jpg
    261.2 KB · Views: 0
  • 4933305fee48b874b36adf0ba629fdfe.jpg
    4933305fee48b874b36adf0ba629fdfe.jpg
    261.1 KB · Views: 0
  • 86977fcbfed433b2220e27210c66ec24.jpg
    86977fcbfed433b2220e27210c66ec24.jpg
    289.5 KB · Views: 0

lilscorpion

Well-known member
Joined
Mar 15, 2010
Messages
3,599
Location
Colorado
Steven -

The floor - dang that’s a lot of work. I’m with FinallyGotIt on how much easier a repour would seem in comparison but keeping an existing slab is probably the way to go coat and outcome-wise. It’s going to be so much nicer when you’re done.

The tooling rack is sweet. Really like how the inserts turned out. Do they press fit into the board or will they just lay in the hole and the tool leaves them behind nicely when you pull one out?

I’ve been looking into the Centroid Acorn stuff. Can’t believe that Centroid made their stuff more affordable for the DIYer. My conversion for the mill was $12k - $15k if memory serves. Think I could do it for maybe half that now but maybe I’m missing costs somewhere. Eagerly waiting to see your mill project start to take shape..
 
Last edited:
OP
S

slodat

ALLIANCE MEMBER
Joined
Feb 6, 2010
Messages
3,679
Location
Central-ish, WA
The inserts are a light press fit. The tools are nice and stable in the inserts. I have a chunk of 1” Baltic birch that would be perfect for this.

Centroid is really upping the ante with their DIY products. They have said the closed loop servo product lines (Oak and AllIn1DC) will get simplified pricing similar to Acorn for the software unlocks. I really love the way it all works.

The floor kinda is what it is. If I had the funds to replace the floor I would probably still do what I’m doing. It’s just work. Once this is done, the other half will be easy by comparison. I’ll keep working on it until it’s finished. The concrete patches will need to cure for a month so the moisture released doesn’t create more mold. I got more of the rough patch prepped last night. It’s slowly getting there. I think the mess it’s causing on the other half of the bay bothers me more than the work involved.

Today is the last day of my long break from the damjob. Moving the hot rod down the street for a while so I can get the mill going. A good friend is helping run conduit to the mill. Then back to the daily grind for a while. I’ve really enjoyed my two week break.

Thanks for stopping by guys!
 

Jayman17

Well-known member
Joined
Feb 6, 2017
Messages
3,793
Location
Seattle, Wa
Very nice updates and activities in your shop from the last time I checked in. The floor project looks brutal though! That's not easy work :(
Looking forward to seeing the finished product.

Jay
 
OP
S

slodat

ALLIANCE MEMBER
Joined
Feb 6, 2010
Messages
3,679
Location
Central-ish, WA
Dang Steven, that floor looks like a hell of a lot of work. Nice job.


Thank you, Mike. It’s a total **** job. Another that will make me smile every time I look at it.

Slodat
How is the floor project coming


Slowly. I got slammed at the day job went I went back after the holiday break. First day off is today.

Very nice updates and activities in your shop from the last time I checked in. The floor project looks brutal though! That's not easy work :(

Looking forward to seeing the finished product.


Jay


Thanks Jay! I’m ready for the floor to be done.

I’m going to be crazy busy with the day job for another month or so. Plan is to work on the floor in the evenings when I have the energy. Hopefully I can get it done in that same month and hour or two at a time. I’m really ready to have the shop back together.

I have managed to do a little over the last three weeks. Started getting the mill tooled up with some basics.

a0788ba75158ca04d055ed883c0d69a7.jpg

95d8ae086afb8d4f001130e3c32cc525.jpg

db6e528d39be851318a4a2db509d2d0e.jpg

Bench tested the new controls for the mill.
312edea39bdf5a580bc4223f21d153ea.jpg

Started panel layout on the mill.
2c4ea1ea1416bcf60f302b5cb8414a9b.jpg

12d583bfbef41294e6a5c1598ee20f06.jpg

Lots of room in the mill control cabinets. Should turn out pretty nice. I have a few days off that I’ll be enjoying in my shop. Doubtful I do much on the floor. I’m going to enjoy working on the mill and rejuvenate.

Thanks for following along!
 

Attachments

  • 12d583bfbef41294e6a5c1598ee20f06.jpg
    12d583bfbef41294e6a5c1598ee20f06.jpg
    607.5 KB · Views: 1
  • 2c4ea1ea1416bcf60f302b5cb8414a9b.jpg
    2c4ea1ea1416bcf60f302b5cb8414a9b.jpg
    722.9 KB · Views: 2
  • 312edea39bdf5a580bc4223f21d153ea.jpg
    312edea39bdf5a580bc4223f21d153ea.jpg
    353.1 KB · Views: 2
  • db6e528d39be851318a4a2db509d2d0e.jpg
    db6e528d39be851318a4a2db509d2d0e.jpg
    231.6 KB · Views: 1
  • 95d8ae086afb8d4f001130e3c32cc525.jpg
    95d8ae086afb8d4f001130e3c32cc525.jpg
    340.3 KB · Views: 0
  • a0788ba75158ca04d055ed883c0d69a7.jpg
    a0788ba75158ca04d055ed883c0d69a7.jpg
    301.8 KB · Views: 0
Last edited:
OP
S

slodat

ALLIANCE MEMBER
Joined
Feb 6, 2010
Messages
3,679
Location
Central-ish, WA
The bulk of the tool holders are imports to get me started. The Kurt was a compromise. I really want an Orange dual statin. Again, it will be enough to get me started.

Lots of work to do! :)
 

lilscorpion

Well-known member
Joined
Mar 15, 2010
Messages
3,599
Location
Colorado
The bulk of the tool holders are imports to get me started. The Kurt was a compromise. I really want an Orange dual statin. Again, it will be enough to get me started.

Lots of work to do! :)


Tool rack looks awesome! Import tools work just fine unless you need to hold tight tolerances. That’s all I really have and have done just fine over the years being within a few tho. CNC is where the magic happens anyway. End mills aren’t themselves +/- 0.000, so tool and backlash compensation is key to making a part come in (close-ish) to matching the drawing.

Love the Orange dual station. You going to mount it sideways? I opted for dual Kurt 688’s because they seemed more accessible on my table.
 
OP
S

slodat

ALLIANCE MEMBER
Joined
Feb 6, 2010
Messages
3,679
Location
Central-ish, WA
I think the import tool holders will be good for now. I did make the mistake of buying one Maritool ER32 holder. Man.. they make really nice stuff! The imports were about 1/4 the cost. And, I have plenty of the ER32 now and it didn't blow the budget. Next step is.. I think I want a HF 44" box to hold tooling and such next to the mill. I'll add more rows to the tool rack to fill the depth of the top of the box. I still need a 45 and 90 degree face mill, drill chuck, and, and and ;)

My thought on the Orange is to mount it sideways with the Kurt next to it. Time will tell. There's so much more work holding options built in to the Orange vises.
 
OP
S

slodat

ALLIANCE MEMBER
Joined
Feb 6, 2010
Messages
3,679
Location
Central-ish, WA
I’ve been eyeballing these latest generation HF tool boxes for a while. The additional depth and black paint really was the only thing holding me back. I had to run to town today to get a couple things for the mill.

533a88b5d30ca671d82001ef56af9678.jpg

The mini truck is perfect for stuff like this. Just rolled it out of the bed onto the floor.

928b39093eed39d559d5aa7cb4797e6a.jpg

Should work out well for mill tooling.
 

Attachments

  • 928b39093eed39d559d5aa7cb4797e6a.jpg
    928b39093eed39d559d5aa7cb4797e6a.jpg
    172.4 KB · Views: 0
  • 533a88b5d30ca671d82001ef56af9678.jpg
    533a88b5d30ca671d82001ef56af9678.jpg
    238.1 KB · Views: 0

lilscorpion

Well-known member
Joined
Mar 15, 2010
Messages
3,599
Location
Colorado
I’ve been eyeballing these latest generation HF tool boxes for a while. The additional depth and black paint really was the only thing holding me back. I had to run to town today to get a couple things for the mill.

533a88b5d30ca671d82001ef56af9678.jpg

The mini truck is perfect for stuff like this. Just rolled it out of the bed onto the floor.

928b39093eed39d559d5aa7cb4797e6a.jpg

Should work out well for mill tooling.


There was a little room left in that bed for more box. Just sayin
 

Attachments

  • 928b39093eed39d559d5aa7cb4797e6a.jpg
    928b39093eed39d559d5aa7cb4797e6a.jpg
    172.3 KB · Views: 1
  • 533a88b5d30ca671d82001ef56af9678.jpg
    533a88b5d30ca671d82001ef56af9678.jpg
    238 KB · Views: 2
OP
S

slodat

ALLIANCE MEMBER
Joined
Feb 6, 2010
Messages
3,679
Location
Central-ish, WA
It's funny you say that! I went with this box instead of the 44" because I wanted the deeper drawers. I think I'll add an end cabinet on each side for some smaller drawers. That's a lot of box for the price and should handle my cnc tooling quite well.
 

lilscorpion

Well-known member
Joined
Mar 15, 2010
Messages
3,599
Location
Colorado
It will be nice to have so much space, certainly enough to grow into. I recently was in HF looking around and I’ll admit that their toolboxes are nice and not unreasonable price-wise. I probably would have brought one home if I could have for one in the Jeep. [emoji1787]

Now you need to make some drawer/tooling organizers for your tools!
 
OP
S

slodat

ALLIANCE MEMBER
Joined
Feb 6, 2010
Messages
3,679
Location
Central-ish, WA
I do have some organization stuff to sort out!

Mill panels are starting to look like something.

aae2954b219050609bf338e12b11292e.jpg

5f0e322ca5b889494e53ad9f675b50d0.jpg
 

Attachments

  • aae2954b219050609bf338e12b11292e.jpg
    aae2954b219050609bf338e12b11292e.jpg
    268.8 KB · Views: 1
  • 5f0e322ca5b889494e53ad9f675b50d0.jpg
    5f0e322ca5b889494e53ad9f675b50d0.jpg
    298.9 KB · Views: 1
To avoid these ads, REGISTER NOW!
OP
S

slodat

ALLIANCE MEMBER
Joined
Feb 6, 2010
Messages
3,679
Location
Central-ish, WA
Got the mill control panel going together. Pleased with the results considering I used scrap aluminum plate and it’s the first try at this panel. Should do the trick.

I’ll have to make a keyboard tray.

1febd5cf5960305523352d68f9940189.jpg

fdc296c50f1002a57bbbd7196e42988e.jpg

0d9632a109f8d44faab655d1ec2c9dcc.jpg

6950198a8f9bf7ced4cf7f88ddeff0b6.jpg
 

Attachments

  • 6950198a8f9bf7ced4cf7f88ddeff0b6.jpg
    6950198a8f9bf7ced4cf7f88ddeff0b6.jpg
    594.8 KB · Views: 1
  • 0d9632a109f8d44faab655d1ec2c9dcc.jpg
    0d9632a109f8d44faab655d1ec2c9dcc.jpg
    684.3 KB · Views: 1
  • fdc296c50f1002a57bbbd7196e42988e.jpg
    fdc296c50f1002a57bbbd7196e42988e.jpg
    631.9 KB · Views: 0
  • 1febd5cf5960305523352d68f9940189.jpg
    1febd5cf5960305523352d68f9940189.jpg
    166.5 KB · Views: 0

lilscorpion

Well-known member
Joined
Mar 15, 2010
Messages
3,599
Location
Colorado
Got the mill control panel going together. Pleased with the results considering I used scrap aluminum plate and it’s the first try at this panel. Should do the trick.

I’ll have to make a keyboard tray.

1febd5cf5960305523352d68f9940189.jpg

fdc296c50f1002a57bbbd7196e42988e.jpg

0d9632a109f8d44faab655d1ec2c9dcc.jpg

6950198a8f9bf7ced4cf7f88ddeff0b6.jpg


Hyper organization there and that control is slick! Ya my wait to see it make chips. [emoji16]
 

Attachments

  • 6950198a8f9bf7ced4cf7f88ddeff0b6.jpg
    6950198a8f9bf7ced4cf7f88ddeff0b6.jpg
    594.8 KB · Views: 0
  • fdc296c50f1002a57bbbd7196e42988e.jpg
    fdc296c50f1002a57bbbd7196e42988e.jpg
    631.9 KB · Views: 0
  • 1febd5cf5960305523352d68f9940189.jpg
    1febd5cf5960305523352d68f9940189.jpg
    166.4 KB · Views: 0
  • 0d9632a109f8d44faab655d1ec2c9dcc.jpg
    0d9632a109f8d44faab655d1ec2c9dcc.jpg
    684.3 KB · Views: 0

xtremek

Well-known member
Joined
Apr 13, 2012
Messages
11,603
Location
St. Johns, Mi
Did I miss an update on the floor? Did you finish the repairs? I love the fact that the panel is a repurpose and it came out really nice.
 
OP
S

slodat

ALLIANCE MEMBER
Joined
Feb 6, 2010
Messages
3,679
Location
Central-ish, WA
I got slammed at the day job when I went back after the holiday break. I’m going to be crazy busy with the day job for another month or so. Plan is to work on the floor in the evenings when I have the energy. Hopefully I can get it done in that same month an hour or two at a time. I’m really ready to have the shop back together.

Thanks for following along!

I’m getting excited:

db079fa4b8f54e6b22b3c041fec87e06.jpg
 

Attachments

  • db079fa4b8f54e6b22b3c041fec87e06.jpg
    db079fa4b8f54e6b22b3c041fec87e06.jpg
    197.5 KB · Views: 0
Last edited:
OP
S

slodat

ALLIANCE MEMBER
Joined
Feb 6, 2010
Messages
3,679
Location
Central-ish, WA
Powered up the control for the first time today. Control panel is in and working. Lots left. Nice to see the screen up and running.

0d126078306c946a844bb045b84f6f81.jpg

The Intel NUC front panel is accessible from the side away from the spindle.The opening was existing. I’ll make a new cover that trims out the NUC front panel.

63d0373c307c0760785a98ae58b23cc6.jpg

2e9b373729b52b2d9ed4cdc92822a3ab.jpg

e433f1b2d8ed14147bc001e864dfca4c.jpg

dc01d673b7ed3a84c14bfb81330041c7.jpg

b0310d1795d837bd0c57643b7c9f519a.jpg
 

Attachments

  • b0310d1795d837bd0c57643b7c9f519a.jpg
    b0310d1795d837bd0c57643b7c9f519a.jpg
    770.5 KB · Views: 1
  • e433f1b2d8ed14147bc001e864dfca4c.jpg
    e433f1b2d8ed14147bc001e864dfca4c.jpg
    797.8 KB · Views: 1
  • dc01d673b7ed3a84c14bfb81330041c7.jpg
    dc01d673b7ed3a84c14bfb81330041c7.jpg
    794.5 KB · Views: 1
  • 2e9b373729b52b2d9ed4cdc92822a3ab.jpg
    2e9b373729b52b2d9ed4cdc92822a3ab.jpg
    583.4 KB · Views: 1
  • 63d0373c307c0760785a98ae58b23cc6.jpg
    63d0373c307c0760785a98ae58b23cc6.jpg
    603.1 KB · Views: 0
  • 0d126078306c946a844bb045b84f6f81.jpg
    0d126078306c946a844bb045b84f6f81.jpg
    680.4 KB · Views: 0

T-handle

Well-known member
Joined
Jun 17, 2019
Messages
440
Location
Northern Ostrobothnia Finland
Nice work sir!!

That mill is having a new Journey in your hands master man:thumbup:

Love your thread and it makes me want to dive in the g-code world. All I need is a cnc router, laser and a 3d printer:lol:

Keep on posting, this is very interesting:thumbup:
 
OP
S

slodat

ALLIANCE MEMBER
Joined
Feb 6, 2010
Messages
3,679
Location
Central-ish, WA
Thanks guys!

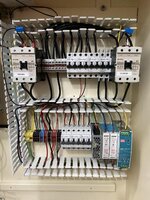
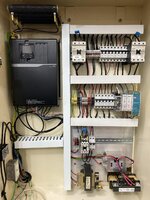
Received the Hitachi SJ-P1 drive for the spindle. This is a very nice drive. And, they are rated for single phase supply to very high HP levels. I bought the P1-00800-LFUF 15kW model rated for 31a output continuous when powered from single phase. Drive comes with bracket for wall or through wall mounting which places the heat sink and fans outside the enclosure. This is how the original drive was mounted when it was new. I had to open up the hole a little.

bcf5f1c2e06c820bdc74387f0cb68af7.jpg

b96ffa02e0aeb22f2f6caf9621ec56f6.jpg

61b055e15d2ace842d5e217753f85e7c.jpg

The spindle motor has an encoder and Hitachi has an encoder interface option for the P1 drive. I think I’m going to give closed loop sensor vector a try and see what that’s like. I’ll also have a chance to run the thermistor wire to the drive when I run the encoder wire and replace the motor main leads with modern VFD cable.

I’m adding a few relays when they get here. I want the spindle fan to run for a few minutes after the spindle stops, so I ordered an off delay timer. And, I need to replicate the spindle FWD and REV outputs to drive the spindle fan contactor.

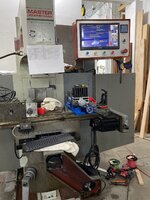
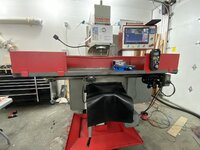
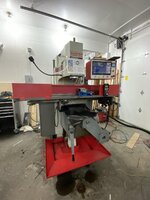
The machine is getting close. I’ll get the probe receptacle and spindle load meter wired and I’ll be pretty much done with the conversion. Very happy with the machine thus far.

Short video of the spindle and drive doing their thing.


Attachments

  • bcf5f1c2e06c820bdc74387f0cb68af7.jpg
    bcf5f1c2e06c820bdc74387f0cb68af7.jpg
    220.6 KB · Views: 2
  • 61b055e15d2ace842d5e217753f85e7c.jpg
    61b055e15d2ace842d5e217753f85e7c.jpg
    269 KB · Views: 0
  • b96ffa02e0aeb22f2f6caf9621ec56f6.jpg
    b96ffa02e0aeb22f2f6caf9621ec56f6.jpg
    185.8 KB · Views: 3
OP
S

slodat

ALLIANCE MEMBER
Joined
Feb 6, 2010
Messages
3,679
Location
Central-ish, WA
For the most part, the mill is ready to use. As I type that I realize I have some tidying up to do with the air stuff and the wire trough cover.

Used it for a real job tonight. The Y axis cover needed clearance for the position of the new motor pulley. There is a knockout in the cover. Used the probe to locate the existing hole. Mind blowing how well this works! I’ll make an appropriate cover for the opening.

bdb7375019e06f9b2095b1889f8a954b.jpg

As it sits now with chip shields in place. The table is really high when close to the quill. 48” in these photos.

0f2f38bdddd3ff0cb2db5e3e74c05a81.jpg

c23fb7d972bce2954fe9ccbf7e971bec.jpg

1c97e8cc4b29ec94917b57c945a40154.jpg

fb60540a29c9b261d3bd247c3512f56e.jpg

591c5d6cafd782cc50241feeda34dc8d.jpg
 

Attachments

  • c23fb7d972bce2954fe9ccbf7e971bec.jpg
    c23fb7d972bce2954fe9ccbf7e971bec.jpg
    236.8 KB · Views: 2
  • bdb7375019e06f9b2095b1889f8a954b.jpg
    bdb7375019e06f9b2095b1889f8a954b.jpg
    181.1 KB · Views: 1
  • 1c97e8cc4b29ec94917b57c945a40154.jpg
    1c97e8cc4b29ec94917b57c945a40154.jpg
    223.7 KB · Views: 1
  • fb60540a29c9b261d3bd247c3512f56e.jpg
    fb60540a29c9b261d3bd247c3512f56e.jpg
    178.9 KB · Views: 1
  • 591c5d6cafd782cc50241feeda34dc8d.jpg
    591c5d6cafd782cc50241feeda34dc8d.jpg
    178.3 KB · Views: 1
  • 0f2f38bdddd3ff0cb2db5e3e74c05a81.jpg
    0f2f38bdddd3ff0cb2db5e3e74c05a81.jpg
    246.1 KB · Views: 2

BORING HOP YARD

Well-known member
Joined
Jan 13, 2007
Messages
1,098
Location
Boring Oregon
Congratulations on getting your mill converted. It will serve you well and looking forward to see how you add it to your current bag of tricks.
Nice work!
 
OP
S

slodat

ALLIANCE MEMBER
Joined
Feb 6, 2010
Messages
3,679
Location
Central-ish, WA
Thanks guys! First part on the cnc mill. CAD and CAM all done in Fusion 360. A few issues.. for some reason it’s 0.295 instead of 0.340. G code looks good- 0.015 off the top and 0.145 off the bottom. If the machine was off, it would have hit the vise considering I left 0.025 above the jaws for OP2. At first I was thinking my probing is somehow off. Then I was chatting with my buddy and he suggested looking at some stuff in the software. I’ll have to look into it. And, the chamfers are weird on both sides. Not sure what’s up with that yet. Nice finish for my first part though. Been working through the NYC CNC online Fusion 360 CAD and CAM courses. They have helped a ton. Lots to learn.

Not terrible for my first part. Second try using completely new to me software for design and machining.

4a30b34b7a7c7ba3ef1792ea22a15096.jpg

396bfbccc65ab117e78e55b535f6b01a.jpg

ae7f3c8c489e81b6f1488f260119470a.jpg

After OP2:
5fbf75f274d444750d277149d26d4312.jpg

It’s making a big mess of chips and a lot of fun!
 

Attachments

  • 5fbf75f274d444750d277149d26d4312.jpg
    5fbf75f274d444750d277149d26d4312.jpg
    310.8 KB · Views: 0
  • 396bfbccc65ab117e78e55b535f6b01a.jpg
    396bfbccc65ab117e78e55b535f6b01a.jpg
    259.9 KB · Views: 0
  • ae7f3c8c489e81b6f1488f260119470a.jpg
    ae7f3c8c489e81b6f1488f260119470a.jpg
    153.6 KB · Views: 0
  • 4a30b34b7a7c7ba3ef1792ea22a15096.jpg
    4a30b34b7a7c7ba3ef1792ea22a15096.jpg
    169 KB · Views: 1
Last edited:
To avoid these ads, REGISTER NOW!
Top Bottom