To avoid these ads, REGISTER NOW!

Epoxy-Coat my Winter Application

AlphaGarage

Well-known member
Joined
Apr 16, 2008
Messages
1,298
Location
Every Garage, AnyTown, USA
Sorry about the dropped communications - an email error on my part. Our new guy is helping install a program which should help track info and emails etc., at least that's the plan.
 
To avoid these ads, REGISTER NOW!

WayneMik

New member
Joined
Sep 13, 2009
Messages
1
Location
Massachusetts
Fuzzy, just signed on here and been reading all the comments about your project. I too just purchased the epoxy-coat and it will arrive this Monday. I have a 3 car 705 sq. ft. garage that I stripped all the paint and hand sanded with 20 grit sandpaper, will make my spike shoes using deck nails and 1/2" plywood. My floor does get wet during the winter with snow and ice and plan on using the aluminum oxide and flakes. I would appreciate any advice you have to make this project somewhat easier lol.
Thanks.
Wayne
 

DeltaBrad

New member
Joined
Sep 17, 2009
Messages
2
2 week follow up on Epoxy-Coat

IMG00155-20091006-1324.jpg

IMG00154-20091006-1323.jpg

IMG00153-20091006-1323.jpg

IMG00144-20091001-1708.jpg

IMG00143-20091001-1708.jpg

Here's the pics from Epoxy-Coat, the grey is my garage and blue is my workshop in the basement. They look incredible, have held up to several paint spills, and almost look too nice to walk on! Nothing but good things to say about Jamie (sales guy) and Gary (installer), they both were great to work with. Gary came out and diamond grinded the floor, vacuumed, patched, and applied the coating. He made it look easy! I know this is usually a DIY forum, but for the peace of mind I was willing to pay the pro's on this one. I have a 4 car garage and 400sqft workshop, and total was under $2500. That included the grind, 20 mil coverage (more than twice the DIY kit), and liberal amounts of sand and flakes. I see some pics from other garages that don't have nearly the sand/flake coverage that Gary put down. I did notice his spike shoes were bolts and nuts, not drywall screws, in case others are making them.
 

maxslug

New member
Joined
Aug 29, 2010
Messages
1
I would like to bring this thread back from the dead to ask you garage epoxy experts a question...

I've got my floor all prepped after 8 hours of fun and I'm wondering about filling of cracks...
The epoxy coat instructions say "we recommend using acryllic latex caulk to fill cracks"
Is is alright to fill the expansion seams in the slab too? I'm referring to the lines that divide the slab into squares.

Thanks much, tomorrow is paint day.
-m
 

Jeremy W

Well-known member
Joined
Aug 27, 2010
Messages
95
I went to my local sherwin williams paint store and bought a 2 part epoxy crack filler and ground my cracks to a v and filled them with it. sets up in 2 hours. sanded them smooth after application. then they had another 2 part epoxy made for the expansion joints that remains flexible. it comes in a tube that fits in a caulking gun. was about $15 a tube. I didn't think acrylic caulk would hold up.
 

go_n_low88

Well-known member
Joined
Mar 15, 2010
Messages
85
Great write-up Fuzzy and the floor looks great. Question I have is I will be pouring my garage foundation mid Oct and was wondering what is the suggested wait period for concrete to settle, that I should wait before doing the Epoxy Floorcoating or can I do it right away?

cheers,
Parrish
 

rugerlady

Well-known member
Joined
Aug 15, 2008
Messages
1,378
Location
Michigan
Great write-up Fuzzy and the floor looks great. Question I have is I will be pouring my garage foundation mid Oct and was wondering what is the suggested wait period for concrete to settle, that I should wait before doing the Epoxy Floorcoating or can I do it right away?

cheers,
Parrish

Hi Parrish,
You need to let the concrete cure for a minimum of 30 days before applying an epoxy.
 

tcianci

Well-known member
Joined
Feb 7, 2009
Messages
4,242
Location
Walpole, Ma
Hi all, I have read every post in this thread with great interest and I do have a few comments of my own...I think that the epoxy professional whether it be Fred, Christine or anyone else should be respected to a degree for what they know and the experience afforded them by being in the business. They certainly have a bigger knowledge base than any of us DIY, self educated, dangerous with a search engine "experts". Many folks seem to have missed the stuff that all of these competitors agree on...prep, level of solids, attention to detail when mixing, etc.
There seems to be an extremely high level of defensiveness on the part of Fuzzy against anyone who would question his choice of product or method of application.I tend to agree with the 2 epoxy professionals who recommended top coating the flakes, it makes no sense at all to go through all the trouble of preparing a concrete slab for epoxy, placing the epoxy and then essentially surfacing the epoxy with vinyl flakes a few tenths of a mil thick as your first line of defense against staining, and abrasion not to mention that the actual adhesion of the flakes is completely outside of the control of the person distributing them and the intimate contact of the flake to the wet epoxy surface is totally random at best (this is true of ANY manufacturers product)

My first experience with this was with a DIY big box coating, not sure but I think it was Rustoleum , the uncoated flakes were the weak link in the system. So much so that I decided against flakes on any subsequent floor I installed. That floor is about 12 years old now and has looked like hell for about 10 of those years.
Also, 6 months is like a blink of an eye when it comes to gaging the performance of a floor system. Come back in 5 or 10 years and report on the condition of the floor. My 2nd oldest floor is now 10 years old and has no flakes, it was a 2 coat (primer/topcoat, both 2 part epoxies) and it has stood up to everything I can throw at it. Please note that I don't regard abrasion from moving vending machines, and chunks of heavy steel being dragged across it as a failure of the coating
 

moorer1

Member
Joined
Jul 9, 2008
Messages
5
tcianci,

Would you mind telling us the manufacturer of the product that's worked well for you for 10 years?

Bob
 

bigred292

Well-known member
Joined
Oct 5, 2010
Messages
377
Location
Rhode Island
Lots of great info so far but I have a question for anyone that can help.
I live in New England and am in the process of building my dream garage- 24x32 attached garage.
I'll be pouring the floor in a couple of weeks. The floor will have radiant heat with a thickness of 5 inches. Is there a certain outside temp that must be met to apply?
My cure time of 30 days puts me at about mid-December. My thought was to do it ASAP which would give it more time off of it.
Would I be better off waiting for spring or can I do it in the winter?
 

rugerlady

Well-known member
Joined
Aug 15, 2008
Messages
1,378
Location
Michigan
Lots of great info so far but I have a question for anyone that can help.
I live in New England and am in the process of building my dream garage- 24x32 attached garage.
I'll be pouring the floor in a couple of weeks. The floor will have radiant heat with a thickness of 5 inches. Is there a certain outside temp that must be met to apply?
My cure time of 30 days puts me at about mid-December. My thought was to do it ASAP which would give it more time off of it.
Would I be better off waiting for spring or can I do it in the winter?

You can apply epoxy as long as the floor is at least 40 degrees. With in floor heating I would not see a problem with you doing the floor any time of the year. The floor also must be dry, of course.
 

bigred292

Well-known member
Joined
Oct 5, 2010
Messages
377
Location
Rhode Island
Thanks Christine- Was wondering if you had a list of any Lowes in the New England area that carry your product---thanks
 

BoothRods

Well-known member
Joined
Feb 15, 2011
Messages
82
Location
Booth, Texas
Awesome post! Great info. The floor coating debate/choice is what brought my wife and I to Garage Journal. We have picked up alot of great info. We will be applying Epoxy-Coat to our 2800+ sq ft shop floor. I had already made up my mind on this system. Your meticulous post has definitely increased our confidence level on the application process. Looking forward to your updates.
 

reedtx

New member
Joined
Mar 7, 2011
Messages
1
BoothRods,

Did you complete the application on your 2800+ sf shop floor? We are looking for the best coating system for a 3000sf shop and would love your input. I feel very confident in Epoxy-Coat after reading this thread, but I'm worried about prep and application time on such a large area. Did you apply the product yourself? Do you have any suggestions?

Thanks!
 

BoothRods

Well-known member
Joined
Feb 15, 2011
Messages
82
Location
Booth, Texas
reedtx,

We're still trying to complete some overhead work first (electrical, etc.), so we haven't put down the Epoxy-Coat yet. But we did do an initial acid wash of the floor so far. We still have some small holes to patch and some more prep, so we're still 3-4 weeks away from being ready. And yes, we will be applying it ourselves. I will get back with you and let you know once we finish and how it went. Thanks!
 

gsspence

New member
Joined
Jul 11, 2011
Messages
1
reedtx,

We're still trying to complete some overhead work first (electrical, etc.), so we haven't put down the Epoxy-Coat yet. But we did do an initial acid wash of the floor so far. We still have some small holes to patch and some more prep, so we're still 3-4 weeks away from being ready. And yes, we will be applying it ourselves. I will get back with you and let you know once we finish and how it went. Thanks!

Thanks to Fuzzy and all of the others. I appreciate your input/info. Makes me feel better about my soon to coat project. Just wondering if you had an update on your project? TIA
 

Edger

Well-known member
Joined
May 18, 2011
Messages
623
Location
Melbourne Australia
New Member Today,

Sorry that happen! I'm NACE certified as a coating inspector level 1. Concrete floors are a passion. The surface temp. needed to be 50 degrees and raising. 50 and below slows down to stopping the curing process. Try not to park on for 20 to 30 days for total cure. The cold weather even slows the curing down. How is your gloss retention? If cures dull flat than the surface temp. was to low.

Glenn

I have never used a one part epoxy or the product you used which seems to be very good, but the slow curing worries me a little and I would take the advice above because when I had epoxy take too long to cure due to low temperature it never cured. However, your second application cured OK. With the first coat you had some part A left over which may cause longer cure and never reach hardness. As I said I am not familiar with this epoxy, but I commissioned an automatic mixing machine (expensive disaster) for epoxy floors and it went wrong delivering an incorrect ratio of A & B which caused a discolouration of the epoxy and it never got really hard plus it took ages to cure compared to the other sections. You might want to check with something (to dent it) to make sure both are as hard as each other before using the floor.

Fantastic post, great reading, excellent work.
 
To avoid these ads, REGISTER NOW!

hutcho

New member
Joined
Jun 4, 2012
Messages
2
just joined the board. led here in the research stage of my floor coat and read this whole thread just now. curious how its holding up at the 4yr mark?
 

lucasszy

New member
Joined
Jul 23, 2012
Messages
4
Just to keep an old thread alive, I wanted to jump in and add my two cents worth.

Over the last year or so, I dug around and researched a ton of the floor coating vendors. Ultimately decided on epoxy-coat, based on what I read, and was able to find out from this and other forums.

I ordered my kit (full kit with top coat) this past sunday, for a two car garage.

Will start a new thread and post on progress, along with pictures and details of how it goes.

No connection to the company (just another DIY'er), but epoxy coat seems to have a great reputation, and its mentioned in enough car guy forums for me to feel comfortable with using them.

More details to come, with links to my own thread.

Cheers
 

burleyfarm

Well-known member
Joined
Feb 19, 2009
Messages
401
Location
Northern Michigan
After watching this and other flooring threads for the last two years, my lovely bride convinced me it was time to epoxy our 1010 square foot garage. Gotta love that women. Being your typical DIY kind of guy I was all set to take a week off and "git er done". Well the truth of the matter is my wife felt I should leave it to the professionals. So I dialed up Christine at Epoxy-Coat and she invited us over to their store in Mount Clemens to take a look at their samples and further discuss DIY or hiring it done. I hate to admit it but I was leaning toward having it done.

I'm very happy to say that this one one of the best decisions I've ever made. Again, thank you wife.

Last Wednesday, John and Gary arrived at my home in Northern Michigan and installed a fantastic looking Epoxy-Coat flooring system. They started the project at 4pm finished with all the color and chips around 1am the next day and returned later that day for the clear and non-skid. So I only had to take 2 days off and not an entire week. I don't have the actual finished pictures yet and when I do, I'll start a new post that chronicles the process from grinding to clear coating.

Just wanted everyone to know what a great job Epoxy-Coat, Performance Flooring and Toledo Flooring is capable of doing. Both my wife and I are extremly satisfied with the results so far and are looking forward to a beautiful clean floor for years to come. Thanks Christine, John and Gary. You are true professionals.
 

lucasszy

New member
Joined
Jul 23, 2012
Messages
4
Over this weekend, I also just installed (layed down) my own epoxycoat floor!

Damn amazed at the product, and can say that it came out looking considerably better than I expected.

A few minor hiccups, and changes of plan, but nothing that I couldnt get resolved.

Going to do a complete write up with pics and more within the next few days.

Took about 24 actual hours to get it al done, and today Im applying the clear coat.

Love this floor!

LPczJ.jpg


And a quick before pic.

MVSGO.jpg
 
Last edited:

noma_pride

Member
Joined
Jul 13, 2012
Messages
15
Location
Davis, CA
Over this weekend, I also just installed (layed down) my own epoxycoat floor!

Damn amazed at the product, and can say that it came out looking considerably better than I expected.

A few minor hiccups, and changes of plan, but nothing that I couldnt get resolved.

Going to do a complete write up with pics and more within the next few days.

Took about 24 actual hours to get it al done, and today Im applying the clear coat.

Love this floor!

This looks great. I look forward to reading about your project. I notice you have a window--did you decide on a urethane top coat to prevent the epoxy from yellowing? I'm have a similar setup in the garage and am curious!
 

lucasszy

New member
Joined
Jul 23, 2012
Messages
4
This looks great. I look forward to reading about your project. I notice you have a window--did you decide on a urethane top coat to prevent the epoxy from yellowing? I'm have a similar setup in the garage and am curious!

Actually there are two BIG windows in the garage, on both sides, luckily neither get direct sun.

The window in the pics is yellowing, as the contractor who put it in, broke the seal between the panes, and moisture got inside, ruining the window. Its getting replaced next week.

Im almost positive that both have a UV protectant on the glass, similar to auto glass, but now I'm going to double check.
 

lucasszy

New member
Joined
Jul 23, 2012
Messages
4
Just finished putting down the epoxy-coat clear top coat, along with the aluminum oxide non slip material.

#watchingepoxydry
 

tcianci

Well-known member
Joined
Feb 7, 2009
Messages
4,242
Location
Walpole, Ma
tcianci,

Would you mind telling us the manufacturer of the product that's worked well for you for 10 years?

Bob

Since we're keeping an old thread alive... The product I used was called StonHard. It's a commercial grade epoxy and I had about 150,000 sq. ft of it in one of the buildings that I was the facilities engineer for. The building had a conductive (grounded) epoxy with moisture mitigation layers installed under it. All in all it was a 6 layer process I think.
My garage was much simpler. There was a 2 part primer and then a 2 part topcoat. The floor looked like **** before it was coated after years of auto repair and general messiness. I scrubbed off as much of the crud as I could, then acid etched the floor, let it dry and then applied the primer, and the next day the topcoat with a roller. It has been beaten to death as far as spills, abrasions, paint, oil, grease, brake fluid, solvents... you name it, I have gotten it on this floor.

The gloss is hurting but the coating is intact, no lifting, no peeling. It's the best thing I could have ever done!
 

spang43

New member
Joined
Jan 7, 2013
Messages
1
First time epoxy user - Lessons learned

I just finished my floor with epoxy coat and since this was my first time using an epoxy product, I made a few mistakes I'd like to share. After two weekends of prep work (Sweep, Leaf blower, Degrease, Rinse, Acid etch, Rinse, Rinse, Sand, Acid etch again (I purchased extra), Rinse, rinse). Like the author said, short of diamond grinding, I think I did everything I could to ensure a good bond. I was luck that after I took ownership of the house recently, that the garage was empty for four weeks prior to me moving in so no moving stuff out of the garage then back in. I have a 480 Sq ft two car garage so I marked off five sections I would do one at a time by myself. The kit said it would cover 500 Sq ft so I should have extra, Right?. Mistake #1. I needed help with small tasks that took me away from time critical items like spreading and rolling the epoxy out (it was very thick and did not spread well). The air temp was 55 F so maybe this was a factor. So after I completed my first section, I noticed I did not cover the total area I had marked off for that section. No problem, I have "extra". After section two was done, I started to panic as I was not half way completed (2 out of 5 sections done) and over half of the epoxy was gone. Three more sections to do with less epoxy it took me to do 1 3/4 of a section!!!!!!!!!! I started to spread the remaining epoxy uncomfortably thin for my taste on the remainder garage floor. I simply applied it to thick on the first two sections. Thankfully I was able to cover the entire garage but not without suffering what I think was a mild heart attack between section 2 and 5. LOL. After 24 hrs, I checked on the floor and as exspected, Section 1 and 2 was money (high gloss shine). Section 3-5 had dull spots and streaks that came out dull as I had to spread it to thin. ****!!!!! Do I order another 1 car kit and hope the gray tint matches? Do I cover it with a clear coat? Clear coat section 3-5 only? Would it match? ARGHHHHHH!!!! I made the decision to use epoxy clear coat the entire floor with a light coat on section 1 and 2 and a heavy coat on 3 - 5. IT worked!!! The flaws in section 3-5 are gone. They entire floor looks the same throughout. I know in the back of my head how thin the epoxy is in some areas so that is still a conern for me. I'm going to try to attach some pics so hopefully you can see what I ended up with. Oh, get the spikes for your shoes. I had to walk on fresh epoxy ALOT!!!!
 

Attachments

  • 9.jpg
    9.jpg
    147.1 KB · Views: 181
  • Dull.jpg
    Dull.jpg
    143.6 KB · Views: 149
  • 6.jpg
    6.jpg
    115 KB · Views: 144
  • 5.jpg
    5.jpg
    92.9 KB · Views: 119
  • 3.jpg
    3.jpg
    107.2 KB · Views: 125
  • 1.jpg
    1.jpg
    86.5 KB · Views: 131
  • After.jpg
    After.jpg
    128.1 KB · Views: 192

HotrodHR

Well-known member
Joined
Nov 22, 2009
Messages
445
Location
North Alabama
Glad it all worked out in the end for you!

Hi Christine:

I don't want to hijack this thread... but I will :D

I'm going to put down epoxy-coat soon... a couple of quick questions:

1) I'd like to do my shop in sections using the trowelled control joints to divide it up, probably a 1/2 at a time. I plan to batch part "A" (1.5 kits from Lowes) and then mix what I need for each section using ratio method... Is there an estimated amount of mixed product per square foot that I can used to determine what I need per section? I'm sure I can figure that out based on the est. coverage per kit but thought you might have a cheat sheet.

2) Slab went down in March last year and I just finished the "plastic and duct tape" test with no signs of moisture. My slab was machine trowelled. Other than cleaning and etching is there anything else I need to do before application? I really don't want to rent a sander if I don't have to...

3) I'm in north Alabama and it's been cold lately... we have some warm weather coming. Shop is insulated and sheet rocked, and I can heat it up with propane to get the slab to hold a consistent temp above 40 degrees (turning off stove before using coating of course)... do you see any problem with laying the floor if I can maintain a slab temp? The shop stays relatively cool in the summer and warm in the winter... Your thoughts please...

4) The control joints are about 1" wide by 3/4" deep... there's the typical stress crack running in the bottom... I hear folks saying to caulk these cracks before laying the epoxy-coat. I don't want to fill the entire joint and level, just fill in the hairline crack to keep water out in the future. Is this neccessary or will the epoxy-coat cover it? Also, what type of caulk (and brand name if possible) should we use?

Sorry for all the questions... I know most have been addressed on the journal somewhere. Unfortunately I've read enough to make my eyes bleed on the topic here and on the internet! :scared:

Thanks,

Craig
 

fedorsmith

New member
Joined
Jun 20, 2013
Messages
1
This is a very old thread, but one of the best I have seen on this subject, so I thought I would contribute what I learned during my first application of Epoxy-Coat. This will be long winded, but hopefully helpful - I know I prefer more detail in these maters.

Background - I have a three car garage (about 800sf) and an attached shop (350sf), and I am going to coat both floors, but started with the shop as a test run since fewer people would see the finished product.

The Key Things I learned:

-If at all possible, have a helper, as this would be much easier with two people
-If working alone, cover the floor in FEWER batches (maybe one big go), as the time you take to mix and pour will seriously complicate the important part: getting the stuff spread evenly across the floor and all the bubbles out
-Like any painting project it is ALWAYS better to do two thin coats rather than one thick one
-The materials you are using are expensive, and if you mess up it is hard to get it off, so invest in good tools: Buy measured mixing buckets (a few bucks each), a three gallon mixing bucket, a 22" squeegee that you can put on a long handle ($10), a heavy duty 18" roller frame ($16) and roller covers, a box of surgical gloves, and if you have the time some old school spiked golf shoes (I got a brand new pair off eBay for $20).
-Mix slowly, as air that gets mixed in will become bubbles on the floor
-back roll, back roll, back roll, then back roll again
-If you are a sweater, and it is hot out, wear a hat or headband, or you will be dripping sweat into the epoxy
-Cleanup: denatured alcohol will get this stuff off almost anything while it is still wet, or even tacky

How I learned this:
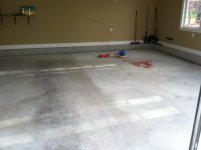
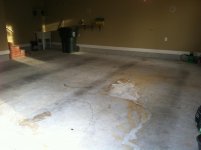
Since Epoxy-Coat implies that more is better, and does not imply that thick application is discouraged I decided to put down a full kit in my 350sf shop in one go. Since the product says self leveling, I was also hoping the thick coat would fix some imperfections in the floor. Before I started I gave the whole floor a light grinding, and a good washing. I got everything set up, and started mixing the first batch.

The first challenge is that the main bucket, in which they tell you to mix, is HUGE, and the amount you are mixing is small, so the mix is shallow. I was tilting the bucket to get some depth, and it worked fine. On the latter mixes, I found that if I stepped up the drill speed, I could get the stuff whipping like egg whites (big mistake). This is why I recommend you get a smaller bucket for the mixing process - it will make it easier to mix, and be more precise to pour.

I strapped on my spiked shoe things, and I poured the first section, cut it in as instructed, used my squeegee to pull it out (I had a 22" one lying around - I don't know how on earth you could effectively spread this stuff with the tiny squeegee that comes with the kit), and then took the supplied 9" roller to it. Went down well, so I moved onto the next section, which also went down well. By the time I was done, the first section had some bubbles, so I back rolled.

When I got to the third section, I was a bit rushed, as I could see bubbles in the first two and was worried about drying time. Threw down the third section, and then went back and re-rolled the first two as they both had bubbles. At this point, the first section was getting pretty tacky.

I did the final section, mixing furiously, then laying it down. Then I kept going back and back rolling. By this time the first section was so tacky that it kept pulling the roller off the frame. I was teetering around on those terrible spike plates, which dropped one or two bolts in the process even though I double tightened everything before starting, trying to keep the roller on the frame as I rolled through increasingly grabby epoxy. Since I had been mixing more aggressively on each successive round, each section had more bubbles than the one before.

Once it got too thick to roll, I pulled out a leaf blower and tried blowing, but it had minimal impact, so I just decided to let it dry and deal with it the next day.

The next morning there were bubbles in all the sections, but they were really bad in the third and fourth section. I let it dry for a few days, then took a random orbital sander and knocked down the bubbles, and roughed up the whole floor.

For my second round I re-tooled. I got a nice heavy duty double sided 18" roller frame at home depot. I bought a new big squeegee and put both on heavy duty extendable poles. I bought good measure and mixing receptacles and I got a pair of spiked golf shoes off ebay.

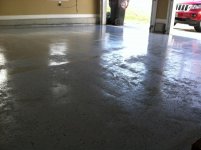
This time I mixed 3/4 of a kit all at once, being careful not to mix in too much air, poured it around the edge, and just took the big squeegee and spread everything around the shop so there was almost full coverage. I took a big brush (not the little chip brush in the kit) and pulled everything out to the edges, then took my roller and started working it back and forth, doing full passes of the shop. I let it sit for a few minutes, did another roll, re-brushed the edges (there is some discoloration when it first starts to set up) and left it for a while. Once I was confident there would be no bubbles, I broadcast my chips.

The bigger, stronger roller, increased mobility because of the golf shoes, and lower bubble count due to less air, not contaminants, and thinner application made a world of difference.

A note on broadcasting: even if you throw them in the air, you have to use SMALL amounts at a time, or you will get some clumping. You can also throw them horizontally at full pace and they spread, but I found it was actually best to grab a small handful and shake them at a reasonable height so a few sprinkled through my fingers at a time

The next morning everything looked great. That night I put down 3/4 of a kit of clear coat. It went well. I should have done one final roll, as this morning there were some small bubbles. In hind sight I actually would have done two very thin applications.

So, I will do the garage in a week or two. I plan to do two thin coats of epoxy, and two thin coats of clear coat. This stuff is thick, and DEFINITELY not self leveling, so on the very smooth garage floor I will be better off going thin coats. If anybody is interested, I will update with results.
 

ptr727

Member
Joined
Sep 14, 2013
Messages
7
Hi, getting ready to do my 19' wide x 23' deep garage in two sessions.

I can't do it in one go as I have some equipment that I can't relocate to the outside, but I can move it from one side to the other side.

In this thread it has been said that product support recommends the expansion joints be caulked.

I am concerned about this, as I'm near Los Angeles with earthquakes being common, my garage has several expansions joints, and the concrete slabs and steps and patio's around my house are always moving and cracking.

I see no value in filling the joints and trying to get a smooth surface, as the floor will simply crack.

Any advice?

P.
 

LegacyIndustrial

ALLIANCE MEMBER
Joined
Jun 7, 2010
Messages
7,994
Location
deerfield, IL
Yes, coat the floor. Fill the joints, post coating,with a self leveling joint filler in a complimentary color. This will prevent your coating from showing cracks across the joints.
 

Zmw

Well-known member
Joined
May 20, 2013
Messages
57
Where is the OP, Where is Fuzzy? Curious how its holding up
 
To avoid these ads, REGISTER NOW!
Top Bottom