To avoid these ads, REGISTER NOW!

Epoxy River Table advice

DGZRT

Well-known member
Joined
Apr 7, 2019
Messages
94
Location
Wisconsin, Stevens Point
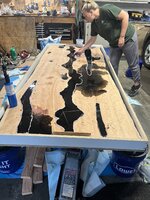
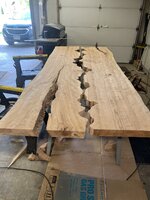
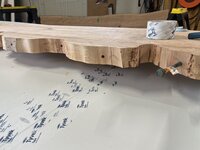
Building an Epoxy River Table for my daughter’s new house .

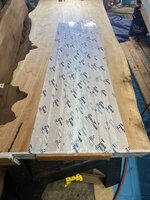
Does anyone have a technique for reinforcing the Epoxy in the river ?? I’ve seen people drill holes at angles into the sides of the river edges in hopes the Epoxy will fill the holes and provide some additional strength.

I’m thinking of pouring next weekend. The table is 2.5” thick . 48” wide and 9ft 6” long
 

Attachments

  • IMG_5528.jpeg
    IMG_5528.jpeg
    986.9 KB · Views: 293
  • IMG_5529.jpeg
    IMG_5529.jpeg
    891.9 KB · Views: 220
  • IMG_5532.jpeg
    IMG_5532.jpeg
    799.3 KB · Views: 184
  • IMG_5533.jpeg
    IMG_5533.jpeg
    723.5 KB · Views: 171
  • IMG_5534.jpeg
    IMG_5534.jpeg
    883.3 KB · Views: 169
To avoid these ads, REGISTER NOW!

glennm

Well-known member
Joined
Jul 29, 2009
Messages
207
Great looking slab. I have never reinforced any of the projects I have done but none are that big. I would get that in the form as soon as possible and clamp it down to be sure it doesn’t warp on you.

IMG_2579.jpeg
 
OP
D

DGZRT

Well-known member
Joined
Apr 7, 2019
Messages
94
Location
Wisconsin, Stevens Point
So a little background. My son-in-law. Is an Arborist so the idea was to take logs he has cut and build something. ( He has some good videos on YouTube under( Haas Tree Care ) . Good drone shots and hanging from the top of trees.
He supplies logs to a small business called Beneath The Bark LLC . This gentleman cuts one off slabs and agreed to donate the wood .
The Epoxy resin is under his owe brand but assured me it would make a deep pour .
He has a very large Kiln and the slabs are dried correctly.
Being a complete Nubie to the epoxy I chose to go with Black . Hopefully I can hide some mistakes! I did watch Blacktail studio videos ! He is a master!
My next step is to build the pour table . Hopefully I’ve done enough research.

Either way it’s been a good learning experience. Fingers crossed 🤞
 

glennm

Well-known member
Joined
Jul 29, 2009
Messages
207
Make sure you seal it up really well (the pour table). It will find its way out of any microscopic void and be all over the floor. Lots of patience as well, takes a lot of time to polish it up, etc. Here is another idea I tried a couple of times and I really like the effect.

IMG_2582.jpeg
 

shoot summ

Well-known member
Joined
Jun 8, 2010
Messages
2,948
A table that big I would use c channel inset underneath, nothing in the epoxy to reinforce.


The thing you have to know about doing a pour is that epoxy is really good about finding a way out. When you think you have it sealed well enough, go over it again. Double check your guy on the deep pour, it typically cures slower to help manage the heat. The product I use(Superclear) has a 72 hour cure. Watch Blacktail, he does a great job.
 

rsanter

Well-known member
Joined
Dec 22, 2007
Messages
18,487
Location
visalia ca
Watch what blacktail studios does.
Everyone I see does surface prep on the wood and then relays on the epoxy to wood bond.
There was even someone who tested that bond and showed it was strong.

Will the epoxy be se through? I see with the larger tables they imbed a steel Chanel into the underside for strength as well as long term stability
 
OP
D

DGZRT

Well-known member
Joined
Apr 7, 2019
Messages
94
Location
Wisconsin, Stevens Point
So looking for some advice on the pour table I’m going to cover it in Tyvek seam tape and the same with the sides . I’m then going to Silicone caulk all the seams .
I’ve decided to use bucket toppers to build a 2 ft high table . They are a top with grooves in them that you attach to a five gallon bucket . Then I will make a frame out of 2 x 4 and set the pour table on that . I’ll post pictures when I have it setup . Kind of hard to explain.
I will then make 5 or 6 cross PCs that will be used to hold the slabs to the frame and hopefully keep it from floating.

So my big question is should I silicone caulk around the bottom of the cut out for the river ?? This should add extra protection from the epoxy finding a way out . How hard do you think the top will be to remove from the pour table ?? Will it really stick and give me problems or will it release from the Tyvek tape .
And last I’m going to build a dam of silicone around the river on top . I was told to not let the epoxy run out over the top because it could warp it .
I do plan on having a fan blowing underneath the table to keep it cooler .
Anything I’m missing??
 
OP
D

DGZRT

Well-known member
Joined
Apr 7, 2019
Messages
94
Location
Wisconsin, Stevens Point
Make sure you seal it up really well (the pour table). It will find its way out of any microscopic void and be all over the floor. Lots of patience as well, takes a lot of time to polish it up, etc. Here is another idea I tried a couple of times and I really like the effect.

IMG_2582.jpeg
Beautiful table I’m hoping I can do half as well!
 

glennm

Well-known member
Joined
Jul 29, 2009
Messages
207
thanks for the compliment. I don’t think I would silicone under the river, the epoxy will only fill any voids where it’s not flat in the form. I’m not sure of the bonding on your product but you could do a shallow pour and let it harden up before the final pour, that would seal the bottom and if there were any leaks you would see them before your fully committed. You could silicone or hot glue the ends of the rivers if you are going to trim it off, That really helps with it coming around the sides. That will be a lot of epoxy but it should look great. Are you building the base? I’m always a bit disappointed when I see a beautiful slap with amazon screw on legs. There is a lot of work to get this to look great, not hard but you must be patient, especially with the sanding.
 

shoot summ

Well-known member
Joined
Jun 8, 2010
Messages
2,948
So looking for some advice on the pour table I’m going to cover it in Tyvek seam tape and the same with the sides . I’m then going to Silicone caulk all the seams .
I’ve decided to use bucket toppers to build a 2 ft high table . They are a top with grooves in them that you attach to a five gallon bucket . Then I will make a frame out of 2 x 4 and set the pour table on that . I’ll post pictures when I have it setup . Kind of hard to explain.
I will then make 5 or 6 cross PCs that will be used to hold the slabs to the frame and hopefully keep it from floating.

So my big question is should I silicone caulk around the bottom of the cut out for the river ?? This should add extra protection from the epoxy finding a way out . How hard do you think the top will be to remove from the pour table ?? Will it really stick and give me problems or will it release from the Tyvek tape .
And last I’m going to build a dam of silicone around the river on top . I was told to not let the epoxy run out over the top because it could warp it .
I do plan on having a fan blowing underneath the table to keep it cooler .
Anything I’m missing??
I haven't used Tyvek, but have used sheathing tape(red) for a number of pours. It ALWAYS has a leak of sorts, I plan on it, and it is a royal PITA to install and remove the tape. I would not use that method on a table the size you are building, I would mimic what blacktail does and get a sheet of melamine and make a form. A dam on top wont hurt, level your pouring form really well so your river doesn't want to over flow in a specific direction.

What is your plan for the base? Please put as much thought into the base as you do the top. I see too many of these builds where the focus is on the tops, and the base looks like it was an after thought.
 
OP
D

DGZRT

Well-known member
Joined
Apr 7, 2019
Messages
94
Location
Wisconsin, Stevens Point
I haven't used Tyvek, but have used sheathing tape(red) for a number of pours. It ALWAYS has a leak of sorts, I plan on it, and it is a royal PITA to install and remove the tape. I would not use that method on a table the size you are building, I would mimic what blacktail does and get a sheet of melamine and make a form. A dam on top wont hurt, level your pouring form really well so your river doesn't want to over flow in a specific direction.

What is your plan for the base? Please put as much thought into the base as you do the top. I see too many of these builds where the focus is on the tops, and the base looks like it was an after thought.
So far this was the winner for the base . My daughter’s house will not be done until September so I have some time . They want open underneath. I’m a little concerned about sway in the frame.
 

Attachments

  • IMG_5536.png
    IMG_5536.png
    1.8 MB · Views: 166
OP
D

DGZRT

Well-known member
Joined
Apr 7, 2019
Messages
94
Location
Wisconsin, Stevens Point
Everyone will have to tell me if I’m Nuts or if you think this will work .
I built a frame and set it on the bucket toppers. Then I built a 9ft-4” long table with 4” sides .
I still have some caulking to do and I might tape over all the corners. Should be ready soon for the pour .
 

Attachments

  • IMG_5589.jpeg
    IMG_5589.jpeg
    130 KB · Views: 144
  • IMG_5590.jpeg
    IMG_5590.jpeg
    166.6 KB · Views: 116
  • IMG_5591.jpeg
    IMG_5591.jpeg
    125.8 KB · Views: 116
  • IMG_5583.jpeg
    IMG_5583.jpeg
    133.7 KB · Views: 153

glennm

Well-known member
Joined
Jul 29, 2009
Messages
207
Make sure it is level (I imagine you did that}. I’m not sure if you intend to pour at the live edge on the outside but I assume not. I would clamp it down in the form and put some silicone or hot glue on the ends of the river and cuts to try and keep the epoxy from escaping the river and filling the mold. You could pour in a couple of sessions to be able to check for leaks? Good luck, it will look great when done, the only real problem would be a leak. It can be difficult to get it out of the mold, I have usually been able to do it with a mallet and a chisel. I have never tried a release aid but you may want to read up a bit before the pour and see if that makes sense? Looking forward to the finished product - and, you have a LOT of sanding to look forward to.
 
OP
D

DGZRT

Well-known member
Joined
Apr 7, 2019
Messages
94
Location
Wisconsin, Stevens Point
Make sure it is level (I imagine you did that}. I’m not sure if you intend to pour at the live edge on the outside but I assume not. I would clamp it down in the form and put some silicone or hot glue on the ends of the river and cuts to try and keep the epoxy from escaping the river and filling the mold. You could pour in a couple of sessions to be able to check for leaks? Good luck, it will look great when done, the only real problem would be a leak. It can be difficult to get it out of the mold, I have usually been able to do it with a mallet and a chisel. I have never tried a release aid but you may want to read up a bit before the pour and see if that makes sense? Looking forward to the finished product - and, you have a LOT of sanding to look forward to.
I plan on damming up the river and the two large cracks on each end with plastic lawn edging. It’s cheap and they claim the epoxy will release from it . After the Slabs are placed I will shim under the frame to level the table.
I plan on making 3 hold down bars over the top and clamping them down to the frame underneath. My idea is to silicone around the river and cracks and place them in the box . It should keep the epoxy from running out at least I hope !

I have read that by sealing the bottom of the slabs it will be difficult to remove from the table . My idea is to remove the sides and then use high tensile wire to slide between the slab and table bottom to slice off the silicone. If that idea is a bust then the guy who will level the slab said he will just machine the table bottom off .

My second idea is to Tyvek tape the bottom of the table to try and hold the epoxy in . Seems much easier but will it hold ??
Let me know if anyone has tried that . It would save some work if it would .
 
OP
D

DGZRT

Well-known member
Joined
Apr 7, 2019
Messages
94
Location
Wisconsin, Stevens Point
Happy Father’s Day to everyone! I got to relax and work on the table this morning.

I flipped one of the slabs over to the bottom side and Tyvek taped one of the cracks on the ends . I’m hoping this will keep the Epoxy from flowing out the bottom .

I re-siliconed the pour table on the inside and outside. I then dammed up the cracks with some left over Oak base trim . I added tyvek tape to the face of the dams to keep it from sticking. I then silicone it and stapled it on the ends .

I got as far as positioning one of the slabs in the table . I added a large lag bolt to the edge of the river . This gives me something to grab on to . The slabs are heavy for one man . I also drilled some holes in the face of the river . My idea is for the Epoxy to fill the holes and make it stronger.

My last task was to trace the outline of the River directly on the pour table . My idea there is to block up the slab and add a bead of silicone to the outline in an attempt to contain the Epoxy from running out of the river .
 

Attachments

  • IMG_5621.jpeg
    IMG_5621.jpeg
    781.2 KB · Views: 118
  • IMG_5622.jpeg
    IMG_5622.jpeg
    858.3 KB · Views: 116
  • IMG_5623.jpeg
    IMG_5623.jpeg
    795.3 KB · Views: 112
  • IMG_5624.jpeg
    IMG_5624.jpeg
    532.8 KB · Views: 115
  • IMG_5625.jpeg
    IMG_5625.jpeg
    632.8 KB · Views: 114
  • IMG_5626.jpeg
    IMG_5626.jpeg
    841.3 KB · Views: 133

glennm

Well-known member
Joined
Jul 29, 2009
Messages
207
Looks good so far. You can do a small pour first and let it stiffen up just to be sure that nothing is leaking. I’m not sure what you mean by “block up the slab”, but don’t give it any space under the slab or it will find a way to run in there. you will likely need to spend a bit of time at the end cleaning up the underside but that is to be expected.
 
OP
D

DGZRT

Well-known member
Joined
Apr 7, 2019
Messages
94
Location
Wisconsin, Stevens Point
Looks good so far. You can do a small pour first and let it stiffen up just to be sure that nothing is leaking. I’m not sure what you mean by “block up the slab”, but don’t give it any space under the slab or it will find a way to run in there. you will likely need to spend a bit of time at the end cleaning up the underside but that is to be expected.
Kind of hard to explain. Basically I positioned the Slab in the table where I expected it to be . I then traced the outline of the river so when I lifted the slab up and put a block under it . This will give me enough room to apply a small bead of caulk along the outline. I will do this to both sides and then lay them back down and put my beams across the top to hold the slabs from floating.

I’m trying to save the Epoxy from leaking out the bottom. I’m hoping to get by with 8 gallons. Fingers crossed. I am going to make a half pour and leave it over night to see if any leaks out .
 
To avoid these ads, REGISTER NOW!

mike93lx

ALLIANCE MEMBER
Joined
Dec 9, 2013
Messages
37,350
Location
Richmond, VA
Find a local cabinet shop that has a wide belt sander and pay them to do the surfacing like black tail does.

I'd say that tarp is inadequate... If you spring a leak, you are going to be scrambling to contain it
 

CraigStu

Well-known member
Joined
May 22, 2014
Messages
4,009
Location
Blacksburg, Va
Is there any problem w/ multiple pours bonding together? Would there be a visual clue as you look down through it? I have done plenty of diy fiberglass body work but never any pouring so just curious.
 
OP
D

DGZRT

Well-known member
Joined
Apr 7, 2019
Messages
94
Location
Wisconsin, Stevens Point
Find a local cabinet shop that has a wide belt sander and pay them to do the surfacing like black tail does.

I'd say that tarp is inadequate... If you spring a leak, you are going to be scrambling to contain it
I do have access to a large shop with a 60” belt sander . This will be my second option because it’s 90 miles away . First option is the shop I got the slabs from . He has a very large CNC router table that he uses for leveling. Hopefully he can handle 9 ft long .

The tape on the bottom is just an attempt to contain the Epoxy. It’s on the bottom and will be pressed down from the top of the slabs .

Hopefully I’ll find out soon . Helping to build the daughter house is getting in the way .
 

mike93lx

ALLIANCE MEMBER
Joined
Dec 9, 2013
Messages
37,350
Location
Richmond, VA
I do have access to a large shop with a 60” belt sander . This will be my second option because it’s 90 miles away . First option is the shop I got the slabs from . He has a very large CNC router table that he uses for leveling. Hopefully he can handle 9 ft long .

The tape on the bottom is just an attempt to contain the Epoxy. It’s on the bottom and will be pressed down from the top of the slabs .

Hopefully I’ll find out soon . Helping to build the daughter house is getting in the way .
I was referring to the tarp on the floor. I think the tape and melamine form will probably be good, but if it isn't, I think you will want more of the floor covered.
 
OP
D

DGZRT

Well-known member
Joined
Apr 7, 2019
Messages
94
Location
Wisconsin, Stevens Point
I was referring to the tarp on the floor. I think the tape and melamine form will probably be good, but if it isn't, I think you will want more of the floor covered.
My wife thinks the same way you do . I did think tarp was supposed to be tape . lol 😂. I’m hoping to have the daughter and her hubby over to watch around the table for leaks . I’ve got a roll of gorilla tape and pee pads ready .
 
OP
D

DGZRT

Well-known member
Joined
Apr 7, 2019
Messages
94
Location
Wisconsin, Stevens Point
Is there any problem w/ multiple pours bonding together? Would there be a visual clue as you look down through it? I have done plenty of diy fiberglass body work but never any pouring so just curious.
From the little bit I’ve learned . Deep pours take 4/5 days to cure out . So if I do half a pour it should be just tacky the next morning.
Tacky is ok to pour over if it drys to the touch let it cure out then sand the poop out of it before another layer .
 

shoot summ

Well-known member
Joined
Jun 8, 2010
Messages
2,948
From the little bit I’ve learned . Deep pours take 4/5 days to cure out . So if I do half a pour it should be just tacky the next morning.
Tacky is ok to pour over if it drys to the touch let it cure out then sand the poop out of it before another layer .
I've poured several deep pours with Super Clear Epoxy in multiple steps. No issues with the epoxy, you might see some variation in the color on the edge depending on tint, or Mica powder.
 

Hank11

Well-known member
Joined
Aug 19, 2019
Messages
1,137
Location
Tennessee
I think you are good to go. I would pour about a half inch and let it cure to the point of not being sticky but still flexible, then pour more or the entire fill. Read and follow all the instructions you can find on the particular resin and hardener you are using.
 
OP
D

DGZRT

Well-known member
Joined
Apr 7, 2019
Messages
94
Location
Wisconsin, Stevens Point
I almost always do multiple pours and have never seen any issue. I sometimes color the bottom layer and finish the pour with clear and that always works.

IMG_0573.jpegIMG_0562.jpeg
Nice work 👍. If I can get my table to work I plan on some smaller projects like desks for the Grandkids. This looks awesome !
 
OP
D

DGZRT

Well-known member
Joined
Apr 7, 2019
Messages
94
Location
Wisconsin, Stevens Point
Did you get any further along with your project?
Yes Sir and all of you gave me good advice . My pour table worked flawlessly so far ! No leaks but you were all 100% correct when you said it will find a way out .

So in trying to keep the Epoxy in the middle river I failed. lol 😂. My Son in law wanted a raw edge on the table and at this point he will not get that . The epoxy found a way after about 3 hours to flow out to the sides so now I need to fill the edges in . So I need more Epoxy and mica . I had two cracks form after curing last night . I still need about a 1/2” in the main river and the edges so I’m hoping they fill in .

I will take some advice on how to prevent the cracks . Do I need it cooler in the room ?? It was only about 68 degrees in my garage.

I will update with some pics next week we have company coming for a few days .
 

glennm

Well-known member
Joined
Jul 29, 2009
Messages
207
I have never experienced cracks but the added epoxy should just flow into them and seal them up I think? I usually just pour about 1/4” in the river for the first pour and then let that set in to try and seal the bottom of the river, that way if there are any leaks it won’t be much. Looking forward to the pictures.
 

glennm

Well-known member
Joined
Jul 29, 2009
Messages
207
Looks. good so far. Now for the sanding . Did you seal it first? If not it may stain a bit where it ran over the top and you will need to do some extra sanding there. I usually run them through the planer if they fit, if not I have a drum sander that works for larger pieces, this is likely too big for that as well so it would be all with the orbital I assume? Keep posting pic, looking forward to the next chapter.
 
OP
D

DGZRT

Well-known member
Joined
Apr 7, 2019
Messages
94
Location
Wisconsin, Stevens Point
Looks. good so far. Now for the sanding . Did you seal it first? If not it may stain a bit where it ran over the top and you will need to do some extra sanding there. I usually run them through the planer if they fit, if not I have a drum sander that works for larger pieces, this is likely too big for that as well so it would be all with the orbital I assume? Keep posting pic, looking forward to the next chapter.
Next step is to bring it back to the business we got the Slabs from . He has a very large CNC router table. For 90$ he will flatten it .

My guess is he will need to skim about a 1/8” from the top and bottom . Hopefully that will take care of the over flow . Getting closer .

Next step for me is research finishing. Kind of need a food grade finish that will polish up to a shine . Some oil with a polished finish is where I’m starting. Open to suggestions!
 

glennm

Well-known member
Joined
Jul 29, 2009
Messages
207
I have used and love Rubio Monocoat. I use the pure version and have been very happy with it. It does leave kind of a satin smooth finish but I this it is perfect for live edge tables. It won’t dull the epoxy, the difficult part is polishing the epoxy without burnishing the wood. If you’re not after a “mirror like” finish on the epoxy you will be fine, just sand it as far as you like. They suggest 220 it think, I have gone further but if you go too far (1500-3000) the finish can’t soak in. This is Rubio on live edge ash

IMG_2641.jpeg
 

CraigStu

Well-known member
Joined
May 22, 2014
Messages
4,009
Location
Blacksburg, Va
Are you going for a gloss finish? If so, after it is cnc'd how about brushing on a few coats of your epoxy covering the entire table. Brushing it on you can do it in several coats so it never gets thick enough to flow so no need to try to contain it or have it perfectly level. Also you won't have to try to maintain flatness while sanding two materials that are different in hardness. You could also spray an automotive clear in however many coats you need. My experience in auto f-glass work is you can sand all the way to a 2000 grit which would then need very little buffing to bring to a gloss. If you call around to auto paint suppliers some of them offer auto paint mixed and put into rattle cans. They will also have several primers and clears on the shelf already in rattle cans so you know you are getting good stuff.
 
OP
D

DGZRT

Well-known member
Joined
Apr 7, 2019
Messages
94
Location
Wisconsin, Stevens Point
Not a lot to report. I filled in the edges and removed the sides on the table . It seems everyone is enjoying a vacation right now. So I’m guessing middle of August to get to the finishing .

Daughter house is moving along . Should have the roof on by next Monday .
 

Attachments

  • IMG_5707.jpeg
    IMG_5707.jpeg
    160.5 KB · Views: 88
  • IMG_5706.jpeg
    IMG_5706.jpeg
    168.4 KB · Views: 71
  • IMG_7630.jpeg
    IMG_7630.jpeg
    175 KB · Views: 69
  • IMG_7627.jpeg
    IMG_7627.jpeg
    178 KB · Views: 66
  • IMG_7629.jpeg
    IMG_7629.jpeg
    145 KB · Views: 58
  • IMG_7595.jpeg
    IMG_7595.jpeg
    167.3 KB · Views: 51
  • IMG_7613.jpeg
    IMG_7613.jpeg
    149.4 KB · Views: 72
OP
D

DGZRT

Well-known member
Joined
Apr 7, 2019
Messages
94
Location
Wisconsin, Stevens Point
More progress on the Daughters house than on the table . It’s starting to look good . I wish I had there Shed
 

Attachments

  • IMG_5778.jpeg
    IMG_5778.jpeg
    962.4 KB · Views: 56
  • IMG_5780.jpeg
    IMG_5780.jpeg
    767.3 KB · Views: 52
  • IMG_5772.jpeg
    IMG_5772.jpeg
    721.7 KB · Views: 56
  • IMG_5774.jpeg
    IMG_5774.jpeg
    926.1 KB · Views: 65
To avoid these ads, REGISTER NOW!
Top Bottom