To avoid these ads, REGISTER NOW!

Above 1200 Sq/FT Ernie's Place

Wokspaces above 1200 squarefeet.

strength_and_power

Well-known member
Joined
Apr 26, 2015
Messages
1,392
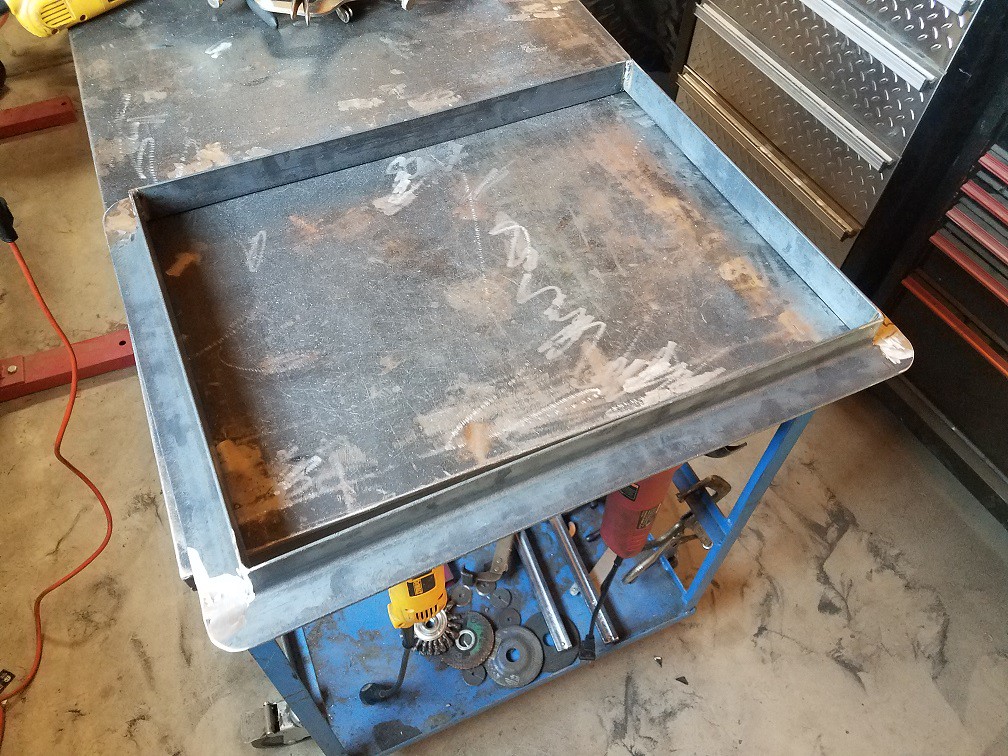
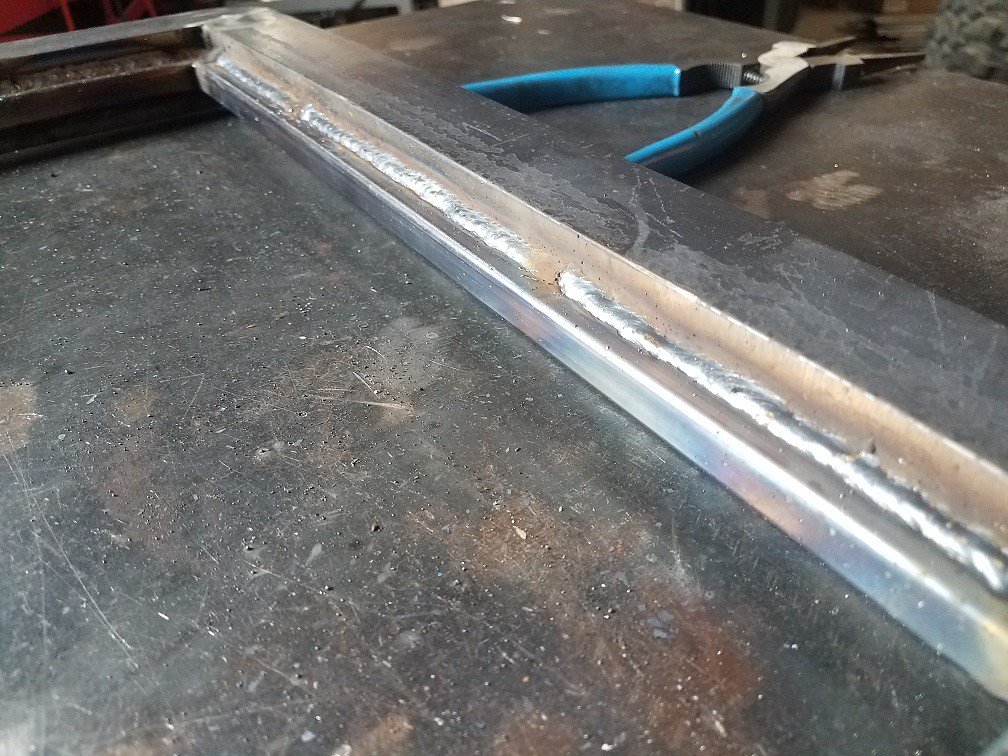
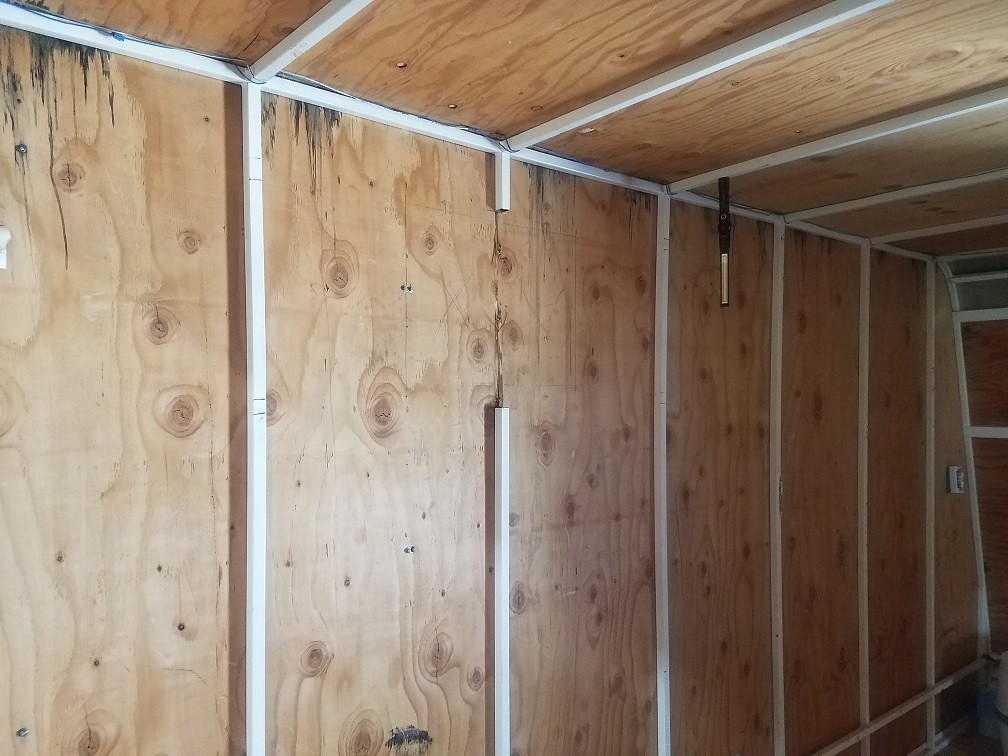
Vertical tubes dropped in for a test-fit after all the notching has been done
20180304_142640

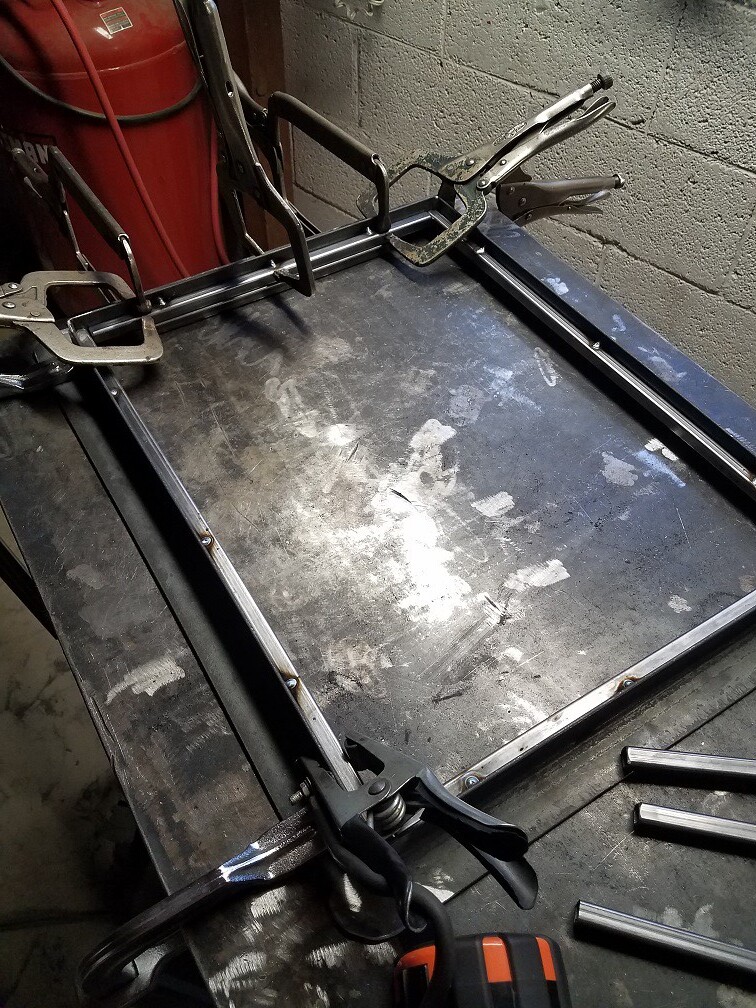
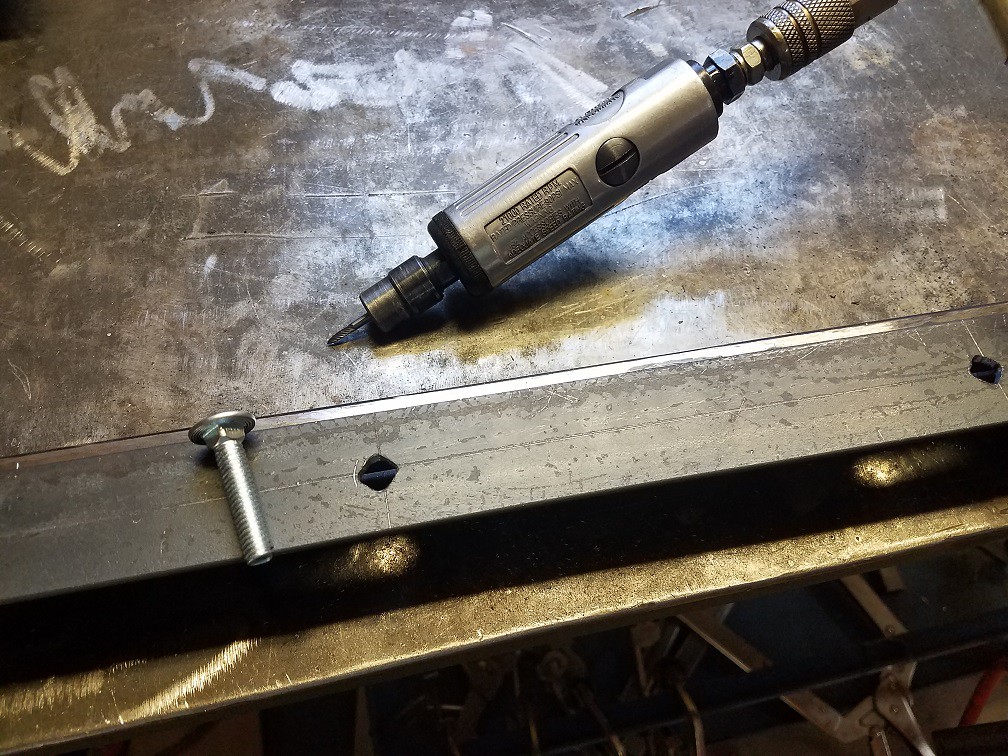
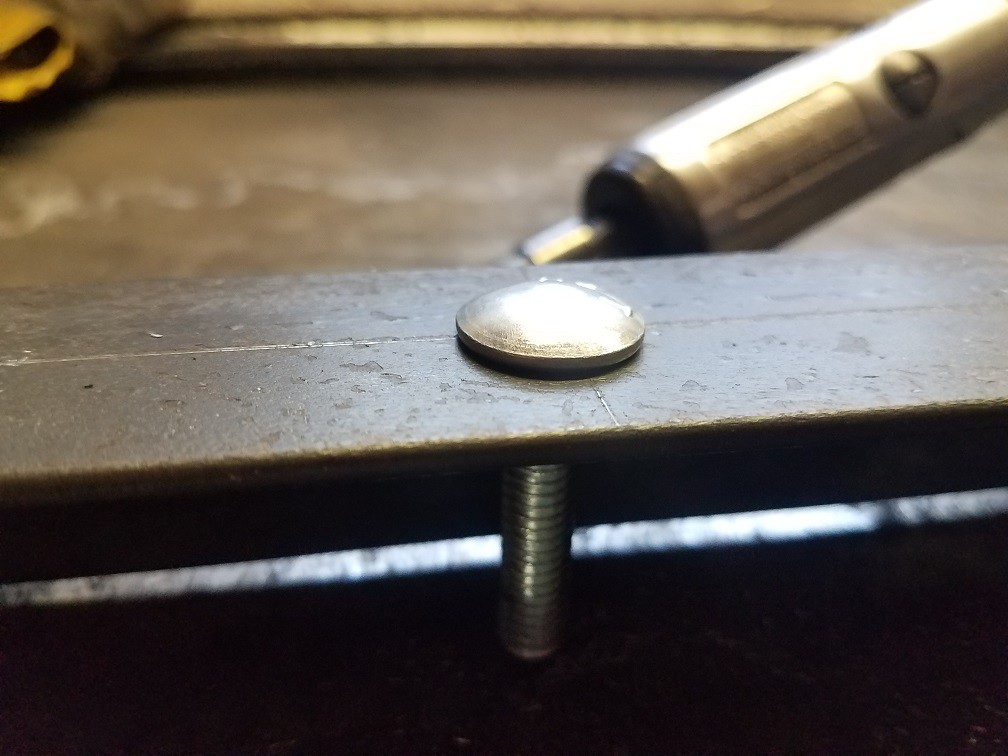
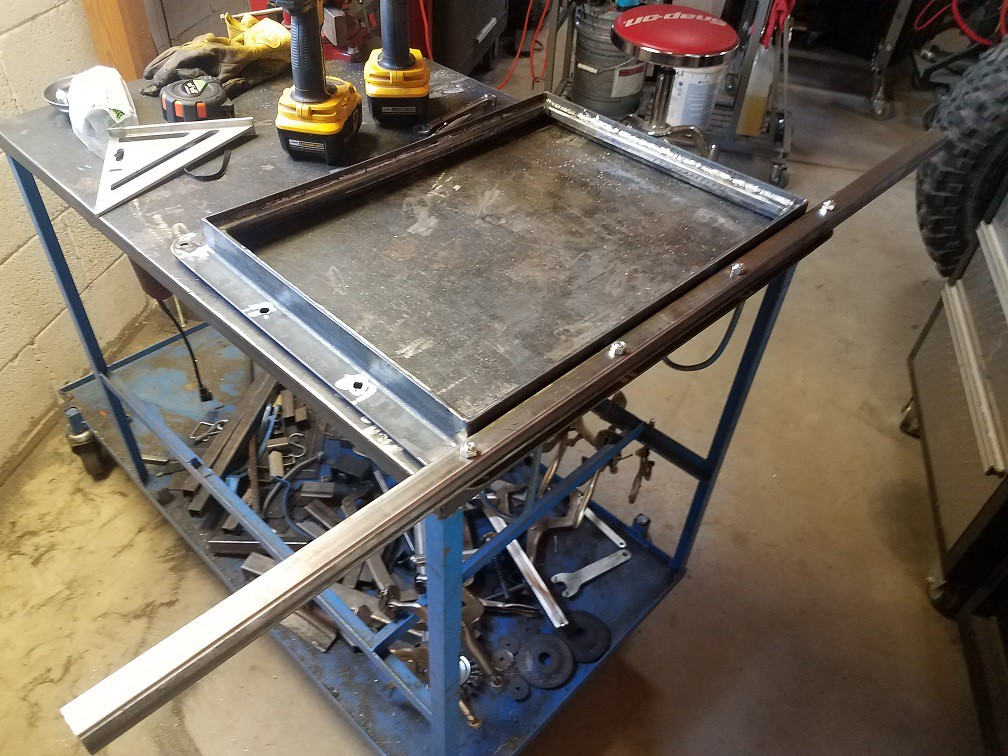
Welded in some supports to keep everything square and smaller pieces to evenly space the top and bottom tubes.
20180304_160341

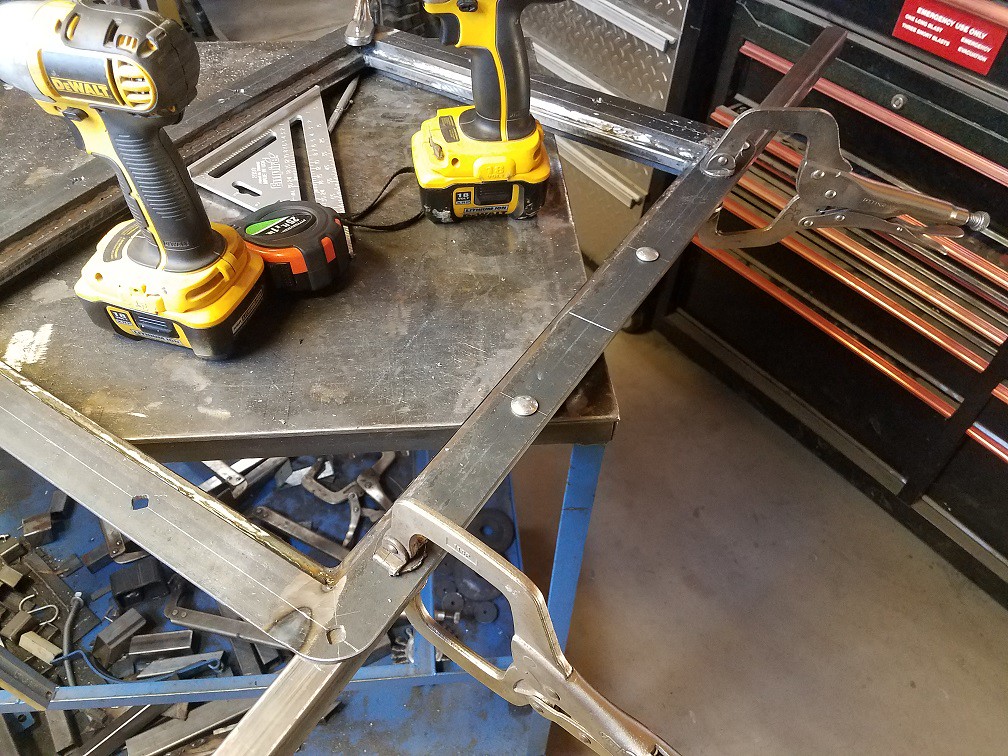
Everything clamped up (need more of these long clamps)
20180304_155443

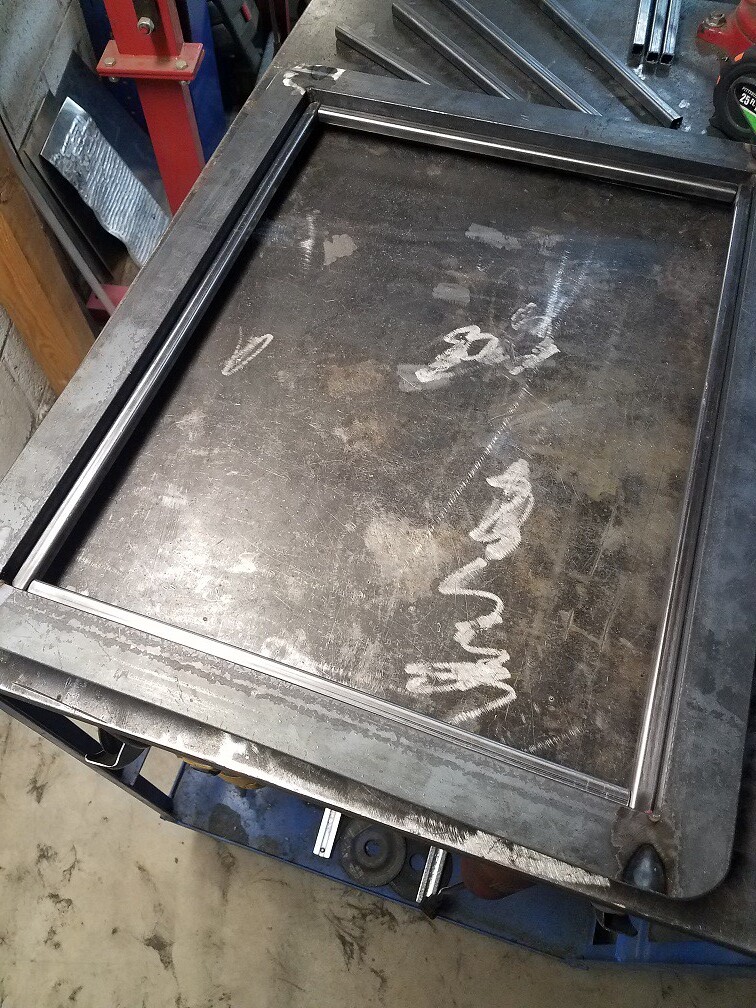
Tacked the one side while it was on the ground then pulled it out of the jig and suspended for tacking the other side.
20180304_161341

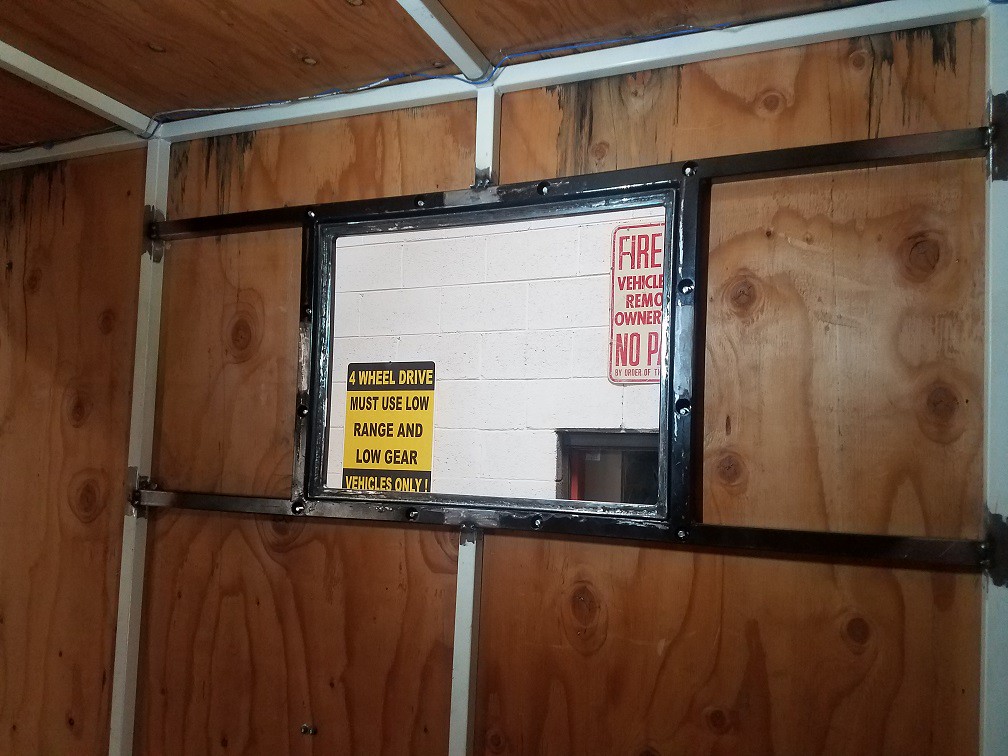
Walked it out front and did a test fit and it looks really good. Of course almost all of the sections between the posts are slightly different widths, so all I have to do now is measure how long the top/bottom tubes need to be and then center it on the jig. Here’s another shot of the whole thing
20180304_163710

From this point it should be assembly-line work to put the rest together. More cutting and welding…

Anyone in the Phoenix area know a good powder coat place, other than Glendale Powder Coating? The cost of getting these coated is almost double what I’ll have into making the panels themselves, including what I have into the saw.


I’m curious if you will have any issues with the fence panel curling as the notches take a lot of rigidity away and the heat from welding will pull to the notched side regardless of how tight you clamp it.

Powdercoat is going to be pricy for sure, lot of linear feet in those panels.

I have a similar band saw. Decided early on that the accelerated wear from not using coolant was worth not having to deal with the mess of coolant. Started using a high quality bi-metal blade and never looked back

Nice shop. I grew up in Mesa and still get home for the holidays


Sent from my iPhone using Tapatalk
 
To avoid these ads, REGISTER NOW!
OP
S

StormcrowAz

Well-known member
Joined
Nov 3, 2011
Messages
750
Location
Phoenix, AZ
My kind of man..... great garage and owns an HMC4 !!!

I have a 97 HMC4 !! And looking for an XLC2 if you know of anyone.

Thanks! I looked long and hard at those pick-ups for a while. If I remember correctly they made quite a few in 2003 as some sort of fleet vehicle. Unfortunately I don’t personally know of any for sale. For the right price I’d be willing to sell you another nice ’97 HMC4. ;)


I’m curious if you will have any issues with the fence panel curling as the notches take a lot of rigidity away and the heat from welding will pull to the notched side regardless of how tight you clamp it.

Powdercoat is going to be pricy for sure, lot of linear feet in those panels.

I have a similar band saw. Decided early on that the accelerated wear from not using coolant was worth not having to deal with the mess of coolant. Started using a high quality bi-metal blade and never looked back

Nice shop. I grew up in Mesa and still get home for the holidays

I had read quite a few similar comments on the band saw coolant. I realize it is probably overkill, but it makes me feel better and really didn’t cost a whole lot.

Regarding the fence panels curling…Not exactly sure what you are referring to with the notches and pulling? While putting the notches in the angle does take away strength from the length of the piece, they are really only there for locating purposes. It aligns each ½” tube 5” apart and then spaces them half-way up the 1” top and bottom rail. They pretty much just free-float in there. The clamps squeeze the top and bottom tubes against the jig itself, making the overall height of each panel (hopefully) consistent. For the first test panel I tacked the front and back of each ½” tube, figuring if things went sideways it would be easier to hit the tacks with a cutting wheel to take it all apart. Now that I’m happy with it how it works, I’ll be putting the tacks to the left and right of each tube, so I don’t have to flip it over each time. Seems to be enough to hold it in place for the final burn-in.

That all being said, they definitely are not 100% flat and true. Even with doing all this work on my highly-calibrated, 30 year old, concrete floor - the panels do seem to be picking up a slight warp to them. This is the first one, fully welded up, and the other end is sitting flat on the deck:
20180316_163705

20180316_163737

Seeing as each panel is around 10’ long, I think there should be enough flex in the assembly that I can forcibly straighten it out when anchoring it to the brick posts?

For the next couple of panels I’ve weighted down the ends of the jig, thinking maybe it was flexing on the floor, so maybe that will help? I’ve also been setting a length heavy of steel tube across the ½” tubes while tacking them in, attempting to ensure they are fully seated in the notches.

Thank you for the feedback, if you have additional comments or suggestions I’m all ears!


Unfortunately progress has been slow, a couple weeks ago I hurt my knee (still not sure how, ***** getting old…can’t even say I did it doing something crazy or fun) and the wife finally talked me into having it looked at. End results are a “Partial tear medial meniscus”, so I’ve been taking it easy on the physical activity. Put two more panels together yesterday and all the kneeling didn’t feel so good. Makes me yearn for a nice big work table, may have to reconsider where that project is on the priority list…

20180318_150211
 
OP
S

StormcrowAz

Well-known member
Joined
Nov 3, 2011
Messages
750
Location
Phoenix, AZ
Haha! I like the way you guys think!

Unfortunately my insurance deductible or copay or whatever it is, is very far away from being met, so my out of pocket would make it a crazy expensive table to be worthwhile. If i wouldn't have to fork out so much cash up front, it would be worth looking into. ;)
 
OP
S

StormcrowAz

Well-known member
Joined
Nov 3, 2011
Messages
750
Location
Phoenix, AZ
Slow progress, but progress none-the-less.

Half of the panels now tacked together. Looking forward to getting the rest done so I can get off the floor and use the gantry to suspend the panels on top of the cart for welding. Would really like to get this done sooner rather than later. I have a feeling the blazing hot weather is just around the corner.
20180326_172957

The piles are slowly dwindling. I bought extra of the 1” and if I did my math right, I should have enough left to do the framework for the parts cabinet.
20180326_173034
 
OP
S

StormcrowAz

Well-known member
Joined
Nov 3, 2011
Messages
750
Location
Phoenix, AZ
Excellent progress! :thumbup:

How's the knee?

:beer:

Dan - It seems to be getting better, thank you for asking! I can walk across the parking lot without limping. Mostly. I don’t foresee any 5k runs or 5 mile hikes in my near future, though. Bending is ok, but any twisting motion is not pleasant.


Cookin' right along. Looks great so far.

Mike – Thanks for stopping by! I’ve been following your 2.0 thread and those Jeep bumpers turned out really nice!


I stripped one of those cheap Harbor Freight (I guess “cheap” and “Harbor Freight” is kind of redundant, eh?) clamps. Don’t know of these are supposed to be light-duty, wood-only use, or just junky, maybe combination of each. Lesson learned and I’ll be treating them a bit more gently for the remaining panels.
20180329_175506

Something else I’ve been doing is scribing each panel number. Of course whoever built the walls made sure to make each section just a slightly different width, so they are all custom-fit. Not sure these numbers make it through powder coat? Thinking I might take a 1/8” carbide bur to the end-caps and route out the numbers .050” - .060” deep, just to be safe.
20180329_175336
 
OP
S

StormcrowAz

Well-known member
Joined
Nov 3, 2011
Messages
750
Location
Phoenix, AZ
All 20 panels tacked together
20180402_163850

Finally able to get off the ground and permanently burn these in
20180404_162801

Not stacking dimes, but should at least keep them together. The little stuff is difficult, seems like when you strike the arc there isn’t time to get into a rhythm before you have to stop. I suppose TIG would be better, but still not anywhere near proficient and unsure if it would look any better if I did. Pretty sure the increased time investment would be significant.
20180405_044415

Some are better, some are worse.
20180405_044440

Already getting a little sweaty in the shop. Think I’ll head out early in the mornings this weekend while it’s still cool to make some progress.
 

theundermount

Well-known member
Joined
Jan 17, 2016
Messages
489
Location
ON
looking great to me! keep it up I'm sure by the last section you'll have it down pat haha

Sent from my SM-G935W8 using Tapatalk
 
OP
S

StormcrowAz

Well-known member
Joined
Nov 3, 2011
Messages
750
Location
Phoenix, AZ
looking great to me! keep it up I'm sure by the last section you'll have it down pat haha

Isn’t that the truth! By panel # 18 I’m thinking: “Hey, I think I got this now!” ;)


Not a whole lot of progress during the week, but on the weekends I have been rolling out of bed at normal times instead of sleeping in, which means I’m in the shop by 4:30 or so.
20180407_050038

More rinse and repeat action
20180407_044838

The lower back was starting to get a little sore from leaning over, so added a tote to the equation. Now welding standing straight up which helped a lot.
20180414_072023

Finally finished all 20 panels and started in on the brackets. They sell these things, but again…crazy expensive, especially considering I need 80 of them. A 10 foot section of square tube and angle iron is dirt cheap in comparison.
20180415_063153

Got about half of them done when I ran out of shielding gas. Good time to take a break, I guess.

My twin girls have been keeping me company lately:
20180414_072016

And speaking of girls…half way through April and I’ve been negligent on this month’s calendar posting:
20180408_094426
 
OP
S

StormcrowAz

Well-known member
Joined
Nov 3, 2011
Messages
750
Location
Phoenix, AZ
Started working on the cargo trailer A/C. Going to make a hatch out of angle iron and bolt it to the internal frame of the trailer.

Picked up the A/C unit
20180430_172353

Welded up the frame and rounded the corners.
20180503_174718

Added some 1/2" tube to the inside, which is kind of a frame-within-the-frame. Basically this is what the hatch will seal against
20180503_190700

20180503_191213


Made it 1" larger overall, so there will be about 1/2" clearance all around for wiggle-room. Figured weather-stripping of some sort should easily fill that gap when in use.
20180503_191048


Meanwhile, back at the ranch...the powder coating of the panels were completed ahead of schedule
20180503_071732

20180503_162629

20180503_162727


Plan is to get up early tomorrow morning and knock that out. Looking forward to those being in place.
 

rattle_snake

Well-known member
Joined
Jun 25, 2015
Messages
5,144
Location
Chandler, AZ
Why the A/C in the cargo trailer?

Hope the panels just drop into place and fit right, before it get too hot outside. They look so nice, are you going to take them with you when you sell the place?
 
OP
S

StormcrowAz

Well-known member
Joined
Nov 3, 2011
Messages
750
Location
Phoenix, AZ
Dan and Mike – thanks for the compliments and words of encouragement! This is a project I have been looking forward to completing for many years now and excited to have it done!

Justin – The cargo trailer will serve multiple purposes, not only for hauling junk around, but also for a mini toy-hauler as well as a camper. It will be nice to have climate control for those times when camping in the heat. Heading to Mexico next month and camping on the beach, which is motivating me to get this in place before-hand. Regarding the fence panels – those, all the gates, and everything else built for the property will stay with the house/property. It just wouldn’t feel right to tear them out, even if it was my time and money. I don’t really appreciate the previous owner’s choice to do so and will not subject a future occupant to my same frustrations.

Got up early Saturday morning and started to process of panel installation. Turns out the numbers I scribed weren’t nearly deep enough as the power coating erased all hint of their existence. So we had to play the puzzle game and figure out where each went, wasn’t too bad though. Since the wall is pretty far from the house I hauled the generator out there so I could use the hammer drill for the expansion bolt anchors.
20180505_063353

Some “before” pictures:
20180505_063346

20180505_063420

20180505_063435

20180505_063453

While we were in the middle of putting these up a sheriff rolled up and chatted with us for a bit. Evidently Friday night some punks broke into at least a dozen vehicles on our street, targeting those that were unlocked. Nothing disturbed in ours, so they must have not gotten this far or maybe the dogs scared them off. Glad to have the fencing up and security cameras have been bumped up on the priority list.

Installation went smoothly otherwise and we were able to finish before noon. Thankfully the trees on the front and side provided shade for almost all of the process and we didn’t suffer the heat too much. I think we exceeded 100 degree mark this weekend.
20180505_163831

20180505_163843

20180505_163854

Satisfied with the results and am very happy to have this checked off the list!!
 
To avoid these ads, REGISTER NOW!

rnmcaasi

Member
Joined
May 7, 2018
Messages
7
Damn I can't load the pics for some reason =[ but with the comments I could tell it looks Splendid!
 

theundermount

Well-known member
Joined
Jan 17, 2016
Messages
489
Location
ON
great job those fence pieces look great, powder coating looks very tough too

Sent from my SM-G935W8 using Tapatalk
 
OP
S

StormcrowAz

Well-known member
Joined
Nov 3, 2011
Messages
750
Location
Phoenix, AZ
Wow. Outstanding!!!
Thank you, thank you! I’ll be here all week! ;)


Looks real good Todd. Where did you end up getting the powder coating done
Thanks! After calling several places I ended up going to Glendale Powder Coating. Comparable costs and they even completed them ahead of schedule. Under promise and over-deliver – good policy.


Damn I can't load the pics for some reason =[ but with the comments I could tell it looks Splendid!
Hmm…that’s a bummer. After the great Photobucket Debacle of 2017 I switched over to Flickr, not sure what the disconnect is?


great job those fence pieces look great, powder coating looks very tough too
Thank you! Yes, hopefully it will hold up for many years to come. The pigeons have already started their attack!


Now that the panels have been checked off the list, I can continue with the trailer A/C modifications. Welded up the ½” tubes inside the frame:
20180506_175331

Drilled the holes that will mount the frame to the trailer and then squared them for the carriage bolts
20180508_171008

20180508_171022

Cut some sections of 1” tube that will make the interior framework of the trailer where the hatch-frame will bolt to. Lined it up with the hatch and drilled matching holes for them to bolt together. Once the new interior framework has been completed I’ll weld it in place and that should be my guide for cutting a hole in the side of the trailer.
20180508_174844

20180508_175302

Supposed to be 105° today and it’s already pretty sweaty in the shop. Need to clean out and prep the swamp cooler this weekend. (Justin – you officially **** for having A/C now :) )
 

rattle_snake

Well-known member
Joined
Jun 25, 2015
Messages
5,144
Location
Chandler, AZ
Supposed to be 105° today and it’s already pretty sweaty in the shop. Need to clean out and prep the swamp cooler this weekend. (Justin – you officially **** for having A/C now :) )

Thanks for the 'official' suckage Todd. I do still use my swamp as a outdoor workbench for painting.
:beer:
 

Finallygotit

ALLIANCE MEMBER
Joined
Jul 6, 2013
Messages
4,076
Location
Tucson, AZ
Justin, love the moat you have at the front of the property. Now you need to stock it some gators to fend off those punks.

:beer:
 
OP
S

StormcrowAz

Well-known member
Joined
Nov 3, 2011
Messages
750
Location
Phoenix, AZ
Thanks for the 'official' suckage Todd. I do still use my swamp as a outdoor workbench for painting.
:beer:

Funny, that’s what my old A/C unit from the house is currently doing. It’s a good height and don’t care what I get on it.


Justin, love the moat you have at the front of the property. Now you need to stock it some gators to fend off those punks.

:beer:

Yes, having irrigation is nice. It’s even better if you have desert landscaping and don’t have to water at all. ;)


Spent the weekend working on the trailer A/C project.

Cut out a section of interior framing
20180519_130151

Welded in the replacement, used the new framework as a guide and cut out the hole
20180519_155233

Fits like a glove!
20180519_155326

Cut some 1/8” plate to size and welded bolts to it for a handle
20180519_155426

20180519_155608


Needed some way to hold the hatch in place. Some cutting, drilling, and grinding…
20180519_122756

And welding
20180520_142410

20180520_153333

Looks like it will work
20180520_165256


Next up is to figure out how to support the A/C unit when installed.
 
OP
S

StormcrowAz

Well-known member
Joined
Nov 3, 2011
Messages
750
Location
Phoenix, AZ
Why are you making the A/C removable?

I don't always camp when it's hot out, usually it's up north in the pines where no A/C is needed. Why haul it all over if cold out? In retrospect I guess I'm hauling some of that weight in the metal frame-work. Also, I don't want it sticking out the side of the trailer all the time and I'm not willing to sacrifice internal square footage by committing to some form of cabinet design. The roof-top units are a bit expensive and more difficult to replace if/when they die.

Additionally, I am thinking about making my own wood-burning stove for heat. I can make another insert for the chimney flue to pass through.

If the weather is perfect I'll make a small screen and it will just be window ventilation.

Going for a modular, multi-purpose, set-up.
 
OP
S

StormcrowAz

Well-known member
Joined
Nov 3, 2011
Messages
750
Location
Phoenix, AZ
Nice solution on the cover and retention system for it.

Thank you! Trying to not overly-complicate it, but that can be a challenge for me at times.


Next up is to make the platform to support the A/C unit.

Started off by welding this little bracket in place
20180522_175529

So I can flip the cover over and use the same stud/wing-nut to hold it in place
20180522_175651

20180522_175705

For the outside of the trailer I cobbled together this support system. Had to permanently mount the holder part to the outside of the trailer, but the arm itself is removable and utilizes the other stud/wing-nut for fastening.
support concept

20180526_111754

The A/C unit also came with some attachment for the top, which I’m guessing is for the upper window sill. Didn’t really work for me, but I did use the piece to get the hole pattern and made my own bracket to put in its place. Welded a couple wing nuts to some all-thread and then matching nuts to the top of the frame there. This will secure the unit from the inside, assuring it won’t go anywhere, either accidental bumps or if someone on the outsides thinks they need it more than me.
20180526_135941

How it looks outside the trailer
20180526_135951
 
OP
S

StormcrowAz

Well-known member
Joined
Nov 3, 2011
Messages
750
Location
Phoenix, AZ
Took it all apart, painted everything, and re-installed
20180605_184546

20180605_184555


Also added this feature – cut a large chain link in half and welded them to the frame
20180602_104257

The distance corner to corner is just about perfect for hanging a hammock!
20180602_104315


Towed the trailer down to Mexico for an extended weekend and put the A/C unit to the test. Happy to report that everything went smoothly. It wasn’t too horribly hot, maybe 90-ish with some humidity. Didn’t really need to use the A/C as much as I thought I would. Hanging out in/around the campsite during the day there wasn’t much need as the ocean breeze felt pretty good in the shade. It was really nice to have in the morning, though. At sunrise that box started to heat up. Made sleeping in a couple extra hours enjoyable. Thought about sleeping with the ramp down and door open, but felt more comfortable, security-wise, with the doors all locked up tight.

Here it is all set up. I just ran an extension cord into the trailer through the hole where the old double-sided outlet was. I made a temporary removable patch-panel for traveling/storage.
20180607_192843

The hammock was fantastic in there. Back of the trailer faced south towards the ocean, so inside was always in the shade. With the ramp down and side door open a nice breeze flowed through. Naps happen.
20180608_114834

Night-time set-up. I kept the A/C box with the foam inserts for traveling and used it as a nightstand. Also took advantage of the shore power and extension cord for use with the air mattress and some LED rope lights, held up with a few magnetic hooks.
20180607_192940

My buddy tagged along with and crashed in a tent. He said it was actually a little chilly at night, but in the morning it heated up a bit. Here’s our site
20180610_112805
 

njhoudini

Well-known member
Joined
Feb 27, 2018
Messages
351
Location
Central Jersey
Just finished going through your thread. Very impressed with your welding skills and fabrication. The garage is definitely enviable. Subscribed!
 

rpcraft

Well-known member
Joined
Aug 14, 2014
Messages
1,057
Location
Waco
That's my kind of trailer for roughing it. I think once I get my LS swapped Jimmy project finished and running I'm going to start looking for a 6 x 10 enclosed trailer for hauling a couple of offroad bikes in. My goal is to set it up to have a generator with a water tank/pump for a sink, cooking, and heated shower station with a couple of fold down cots and HD mounting points for a hammock and AC unit like you have done.
 
OP
S

StormcrowAz

Well-known member
Joined
Nov 3, 2011
Messages
750
Location
Phoenix, AZ
Wow, six months since my last post here. Crazy how time gets away from you.

I was pretty dormant during the summer months. Got real de-motivated when it reached 120° outside, so not much progress on projects. Still managed to get out of the house occasionally.

Camp trip
20180824_075404

Had a blow-out on the freeway, 70mph middle lane, and the front passenger tire let go. Fun stuff.
20180928_053843

Ended up bowing the fender out a bit
20181103_043726

Took the fender flare off and bent it back best I could. Not show-car quality, but good enough for my daily driver.
20181103_051812


We did some volunteer work for a nearby rescue/adoption shelter
20181006_163558

Took a few days off and headed up north to visit the Grand Canyon, Bearizona, etc.
20181012_142934
 
OP
S

StormcrowAz

Well-known member
Joined
Nov 3, 2011
Messages
750
Location
Phoenix, AZ
Managed to get a hike or two in here back home
20181027_072450

Tragedy struck on Veteran’s Day, my buddy of 10+ years finally left this world. It still hurts and I miss him greatly.
Echo

But life goes on, and since the weather has been fantastic it’s time to get in gear. The wife has the opportunity to work at home for a couple days a week, so we turned one of the rooms into an office. Bought one of those cheap corner desks off Amazon. It didn’t make it intact from China (shipping damage) so sent it back. Figured I might as well just try to make one. Even if that other one had arrived in good shape it was still pretty flimsy. Started with some 2” square tubing
20181123_103948

Ventured into the wood-working realm, which I’m not altogether comfortable with. Had some oak plywood stuff left over from a bookshelf build and figured it would make for an acceptable desktop. A few coats of lacquer and didn’t turn out too bad.
20181201_160106

Used some of this fancy leaf-trim stuff around the edges.
20181201_160033

Added a power plug thing
20181201_160020

Installed a pencil tray thing underneath the desk. Also made a small shelf below and towards the back where the docking station lives. Figured it gets more clutter and wires from off the top working space.
20181201_160047
 
OP
S

StormcrowAz

Well-known member
Joined
Nov 3, 2011
Messages
750
Location
Phoenix, AZ
And now finally, I believe for the first time, I will post something on the Garage Journal about….my garage. As garages tend to do…it’s been used mainly for storage of “stuff”. I finally had enough and got motivated to clean it out and park our vehicles in there. Here’s the before
20181110_104758

20181110_104805

So while I’m at it….see the water heater in the corner? Six years ago my plumber buddy took a look at that and commented: “oh man, that’s a really old unit”. So that’s been in the back of my mind. On top of that, it’s an 80 gallon tank set up for a remote solar heated circulation panel. Which was rotted out when we moved in. So it’s just been heating up 80 gallons all day for no particularly good reason. Out with the old, in with the new. After some research and first-hand experience from a good friend of mine…I went with a tankless set-up. I had to run two extra 220 lines (it takes three total), which was a fun crawl through the attic. At least it wasn’t August. Here’s the end-result:

20181213_081228

And while I’m at it…might as well run some extra power in the garage…considering the previous occupants only felt it necessary to have a grand total of ONE outlet in there. So I added four more and since there was all those new 220 lines figured another place to plug the welder in would be nice, too.

Part of the reason for not parking in there was the garage door opener. It was ancient. Like there were no safety sensors involved. No remote controls for it. So that had to go, too. The new unit is pretty nice. Very quiet, remote controls, the opener on the wall has a little display with the time and temperature, and you can operate it from your phone. Technology. Oh, and while I was at it…I got rid of the old bulb fixtures and put a couple 4’ LED shop lights up there, too.
20181213_081327

And finally we’re both able to park in there.
20181213_081315


She had to have a new TV in her office, so got a 50” and made a wall mount for it. 2” flat stock and cut/welded a couple small pieces of “C” channel with a key-hole pattern drilled into it. I think most TV’s (at least the Samsung’s I’ve seen) have a standard bolt pattern on the back for those universal wall mounts. The TV’s are so light now I couldn’t see paying for one when you can pretty much just hang them like a picture. A couple of metric bolts later and I did just that. Forgot to take a picture of it, but this is basically it. Small holes in the strap mount the bracket to the studs.
TV mount

So that’s about it for now. Plenty of projects still on my plate, just need more time to finish them.
 

Finallygotit

ALLIANCE MEMBER
Joined
Jul 6, 2013
Messages
4,076
Location
Tucson, AZ
Nice work Todd! :thumbup:


So tell me about this little gem.


46250872892_56852b28de_b.jpg


What size breaker was needed to be added to the breaker box? Are you happy with it so far? How long has it been in service.


Thanks in advance!


:beer:
 
OP
S

StormcrowAz

Well-known member
Joined
Nov 3, 2011
Messages
750
Location
Phoenix, AZ
Hello Dan!

It’s an Eco Smart 27. Requires three 40 amp breakers, running 8 gauge wires. The “smart” part (so they advertise) is that there’s three heating elements involved, one 220 leg to each element. If you crack the hot water valve in your kitchen sink it registers the usage and only fires up one of the elements. If you take a hot shower at the same time it kicks on the second element. If you run two showers and sink then it activates all three legs of the circuit. So it’s only using electricity as-needed. I figured that had to be better than heating up 80 gallons of water for most of the day when we’re not even using it.

I hooked it up around November 15th and have been using it since then. From the garage to my basement bathroom it takes approximately 30 seconds for the hot water to reach. I have the unit set to 120° and it’s hot at the shower. The wife tested it out and it will run hot as long as you have water and electricity. When one shower is running and you turn on another one, there is a temporary drop in temperature while the other circuit kicks in and it evens out. After that both showers run hot no problem. I haven’t tested out running three hot showers at once.

So far, so good and I’m pleased. Today I’m going to hit Home Depot and grab an Eco 8 for the shop, as that water heater is just as old and I’m looking forward to gaining a few cubic feet of space back!
 

bad_idea

Well-known member
Joined
Jun 11, 2011
Messages
4,329
Location
Pasquotank, NC
Just read through the thread. Great shop space and I see you put it to good use! Lot of info there, so I hit the high points. Forgive me if my suggestions/input has already been covered.

As far as the band saw- put a bucket under the back side of the tube to catch the fluid that runs out the back. After cutting all day you can pour the half gallon or so of fluid back in the tray. Put a green scouring pad (greenie) over the pan drain leading to the holding tank as a filter element. Put one under the spot the fluid hits the pan and it will also filter and act as a damper to reduce splashing.

As far as numbering assemblies - in the shop at work we weld numbers onto the backside of a piece to be seen after they go to the paint shop.

Last but not least, got a VA or NC plate? I can mail you a couple if you like.
 
To avoid these ads, REGISTER NOW!
Top Bottom