rattle_snake
Well-known member
Well, that's a crappy deal.
")
Evidently running pipe/conduit over septic access is common. Same at my place.
Evidently running pipe/conduit over septic access is common. Same at my place.

 . I wonder about him) The septic guy recommended putting in plastic covers as well but he also installed plastic collars to make the access now at ground level. While I had him there, I also had him install a filter between the tank and the leach field. This way the leach field won't clog up anytime soon due to floating debris. I just uncork one of the lids (stand back for that one), pull the filter out and clean it.
 The leach field/pit filter sounds like a good idea. I am concerned that the leach pit might be a problem. Hopefully just me being worried. The septic guys didn’t seem too concerned about it, but they’re not the ones that have to fork over the money to fix it.
  20191021_171031
 20191022_163904
  20191022_165405
  20191005_130959
  20191005_130842
  20191026_144247
  20191026_164243
  20191026_180555
  20191026_170114 They did tell us that it should be a permanent fix and after recovery he should be pain-free, but will most likely have some arthritis there when he gets old. It only took him two days after the procedure before he wanted to run and play again, even with meds in his system. Trying to keep him in recovery mode is a challenge. Puppy energy…
 20191022_153844
Todd, I love it all!
 20191102_150922
  20191102_150909
  20191102_150944
 20191102_110529
  20191102_110502
  20191102_114400
  20191103_115250
  20191103_115238
 Bigger tires/more lift.... always!
Anyhow, nice mod to genny
Bigger tires/more lift.... always!
Anyhow, nice mod to genny
 20191104_162922
 20191104_163010
 Or taller axle mounting plates.
Todd, I like the big tires and a flexible wheelie bar would look good. Or maybe a couple of cane bolts on the round tubes, with or without casters. Slide them down to park and slide them up to travel. These are a little spendy but I bet some tubing and steel rod would do the trick.
keep up the great work and quit bragging that your weather is perfect now that it's November cause I remember when you were sweating your **** off a few months ago.
sunny and cold today in the PNW.
cheers
We do live inside an oven for a couple months, but the rest of the year is great. No white stuff falling from the sky here. Todd,
Those tires look like a nice fit and should solve all your issues!
 20191108_181745
  IMG_0900
  20191109_144712
  20191109_140449
  20191109_144515
  20191117_130815
  20191112_152329
 20191117_130849
  20191117_130831
  20191117_134849
  20191114_163720
  20191114_165648
  20191116_101632
  20191116_152304
  20191116_165601
  20191116_165448
  20191116_165526
 20191123_125006
  20191123_125001
 20191123_134118
  20191123_162929
  20191123_162902
  20191129_092840
  20191130_102240
 20191130_102253
  20191130_103856
 20191130_104050
  20191130_104744
  20191130_123842
  20191130_145829
  20191201_182955
  20191201_184112
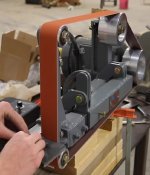
 Finally got motivated to start on the belt sander, too.......
Deviated somewhat from the original how-to. My square bar is a lot smaller than the one he used in the video, plus I don’t have a 700 pound table to smack it against…
Interested to see the finished grinder design.
not sure what you made....
Nice progress. I've been eyeballing a finger brake for some time now.....
Interested to see the finished grinder design. Keep up the good work.
Storm: so even with the Jeep project and all those cool tools you are able to keep your cars in the garage too? or since it's room temps outside now you are ok letting your daily drivers sit outside while you do some cool work inside?
not sure what you made, but wish you were closer so i could loan you a few of my clamps cause i have more than a few. cheers!!
It was probably mentioned higher up in the thread, but since I'm too lazy to go look for it, I just let YouTube search for me and I think this is what is being made here:
 20191202_181130
  20191202_181138
  20191202_181208
  20191204_162042
 20191204_162059
 20191207_183741
  20191208_132747
 20191214_172919
  20191214_175321
  20191214_182612
  20191214_191018
 20191215_133454
 20191215_133507
  20191215_145337
  20191215_145638
  20191215_160021
 I hate it when this happens

I almost back-flushed my nose with coffee on this one. Been there, done that.
Hopefully you’re holidays are going well and you have a Happy New Year! Some seriously awesome projects here! I love the harbor freight bin set up!
 20191218_170214 So essentially I had to drill and tap 4 new holes in that plate. Fortunately there’s enough real-estate available, so just more time and effort involved. And the plate now looks like swiss cheese.
  20191221_085227
  20191221_102926
  20191221_114541
  20191221_125917
  20191222_143357
  20191222_163636
 20191222_164943
  20191222_174707
 20191226_135829
  20191227_120329
 20191228_082252
  20191228_090617
 20191228_115346
  20191228_124852
  20191228_124908
  20191226_140809
  20191226_145021
  20191226_145119
  20191227_090924
  20191227_092730
  20191227_092819
 20200102_181022
  20200102_181032


I practice, do you think you will rotate the machine or just the workpiece?
Anyhow, nice work as always.
 20200105_093714
  20200105_100209
 20200108_174327
  20200108_174333
  20200108_174342
  20200108_174606
 20200108_174648
  20200108_174820
 20200108_175107
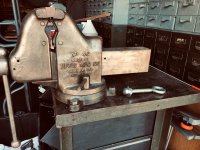
  That piece of equipment looks store bought.