zmotorsports
ALLIANCE MEMBER
I'm willing to bet a 6cyl Jeep on 40's isn't towing much.
Just wait 'til he transplants that V8 into it. Then it will do some haulin', haulin' *** that is...


I'm willing to bet a 6cyl Jeep on 40's isn't towing much.
I'm willing to bet a 6cyl Jeep on 40's isn't towing much.
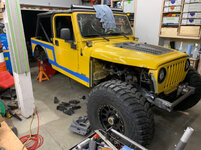
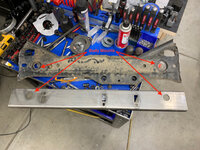
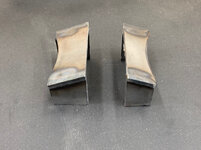
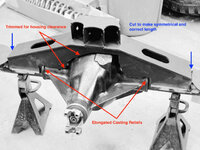
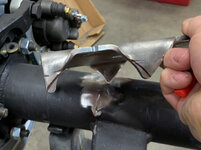
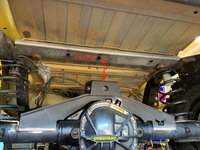
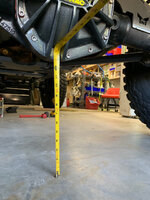
That's a lot of metal taken out. I guess as long as it's not pulling any heavy trailers or anything it doesn't really matter since it's behind the rear axle?
Great progress Matt.
I've been away to Ouray for our annual Colorado wheeling trip and had to check in on your progress. Fantastic if I do say so myself.
") )
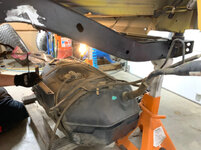
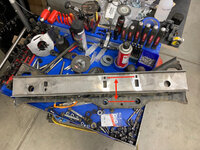
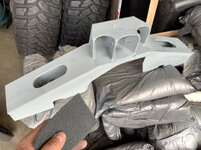
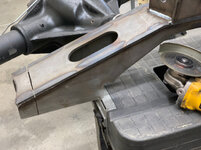
)Wow this is some serious work! I naively had no idea these stretch kits involved this much fab.
That's a lot of metal taken out. I guess as long as it's not pulling any heavy trailers or anything it doesn't really matter since it's behind the rear axle?

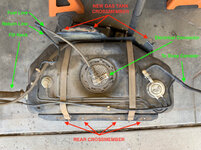
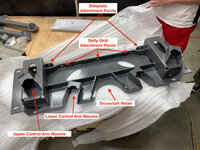
Seems like there is enough room above and to the rear of the new coil bucket to add gusseting or channel to strengthen the frame rails.

He has mentioned that is one of his design considerations. Trying to build a safe rig his son can learn in.
Just wait 'til he transplants that V8 into it. Then it will do some haulin', haulin' *** that is...


This stage is sooo much fun! Thanks for sharing. Sorry to hear of the loss in the family.
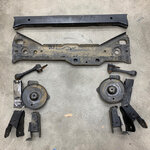
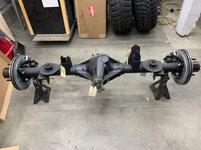
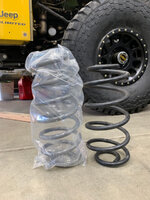
 I'll bet you guys were ecstatic after picking them up.


I have to get that tape off of the Jeep (according to Andrew)..
The good stuff ain’t cheap but does come off easily.
I’m with him, it looks much better. I think he was tired of showing his friends pictures around the blue tape.
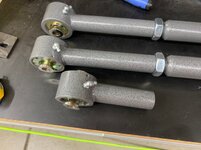
5/16-18 is the coarse thread btw. Bolts must have just been undersized.
When I replaced the top on my BMW Z3 I taped up the hole with frog tape for protection and I wish I didn't. I pulled off a bunch of clear coat, and now it's falling off the whole quarter panel. A couple of little dings would have been NBD. I'm super weary of every putting tape on a car now.
Mods are looking great, thanks for all the detail you put into the thread.


Looking fantastic!! Can’t wait to see this puppy back together
Lookin' good Matt.
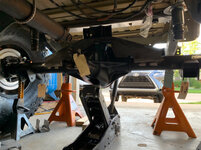
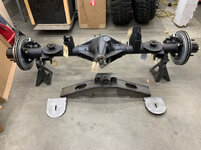
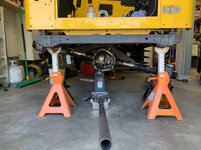
Thanks guys! Only a matter of days and we'll have it on all 4's again. Can't wait.
Thanks guys! Only a matter of days and we'll have it on all 4's again. Can't wait.
Matt,
What a great learning and hair growing experience for your son. He will come to appreciate the time and effort for this build when he experiences the capabilities you've built into this (soon to be) beast!
That is a big milestone on a project like this. I remember about a year ago when we were doing the suspension on my son's WJ that I kept thinking getting it sitting on all 4's will at least make me feel like we're making progress.


I'm not a 4x4 guy and I don't know much about them. This build makes me want to build one someday! I am blown away by the whole thing!! Bad ***!
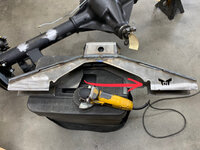
Nice write up as always! I really like how the lower links french into the skid plate on the chassis end. You don't hear about TNT much, but their products look really well made.
I'm not going all out on the low center of gravity for my Jeep because I don't want to get into cutting up the body but I do want to keep my suspension travel and not limit the hell out of it just to run 37's and keep it low. I still need some lift to get over the rocks/obstacles due to these buses (Jeep JKU's) having such a low breakover angle but I am trying to keep it around that 4 inch range and at least keep that belly high enough to get over most of the obstacles on the trails that I run. I currently have 4.5" linear rate BDS coils in the front with the ACOS spacers at nearly the lowest setting which is netting me right about 4.25" overall lift over stock and still around 4.25" of uptravel and 5.75" of droop for a 42/58 uptravel/downtravel percentage.
With my 4.5" Currie overland rear coils and a 1" spacer I am in the 3.5" range due to the weight of my Jeep. The Metalcloak dual rate springs I just ordered have about 1.5" longer free length and a little stiffer rate so I am hoping that is the magic number to get me right to that 4" lift height in the rear without having to remove any of my "stuff".
It's funny as I have pretty much given up on the "keeping the Jeep light" thing as I carry so many tools, fluids, gear, etc. that there is no way to keep it light.... A lighter Jeep would get over the obstacles easier and down the trail better but I guess that's why I had to add HP to the equation.
That’s right about where I am but running more acos and less coil. Have been thinking about flipping that and going to a taller coil. Honestly, I’m not sure it will make much of a difference either way.
What shocks are you running? I am currently running Fox 2.0 shocks and really like the way they are valved right out of the box. I've had Bilstein as well as BDS on it and I would take the Fox's over either of them for a daily driver/weekend wheeler. They seem to be a nice balance of compression and rebound yet still the travel I sought.
I just can't bring myself to go the coil over direction because in my opinion they have just as many cons as they do pros. With coil over's being all the rage lately it still befuddles me that many Jeep owners don't know why they have them other than the "cool" factor". If you need the actual wheel travel then yes, the coil overs are hard to beat when you get past that 12 inch travel range. However, if you are in the 8 to roughly 11 inch range of travel and you have the proper coil spring and shock there really is no advantage of a coil over. Actually more disadvantage in my mind because of initial cost and then the annual maintenance and don't even get me started on the squeaks/noises. Also I don't feel that overall suspension travel is end all/be all of what makes a car perform off-road. To some the whole suspension travel thing is just how high you can climb an RTI ramp or how far you can droop out the front axle but if you can't convert that to traction and climbing up an obstacle it is all for not and you can only have so much uptravel for a given application. I've seen people droop out so far that the front tire routinely gets caught under a ledge and can't climb up and over vs. a car right behind them with smaller lift and limited grab the edge of the rock and climb right up and over.
Are you thinking there’s a benefit of the longer free rate or is it all about the final/net lift height on this swap? I do want another .5"-.75" of lift in the rear end of my Jeep, however, I am leaning more towards the benefit of additional spring rate moreso than just the free length, although the free length is about 1.5" more on these new ones that I just ordered.
I have a theory, and it is just a theory at this point. During my initial trip to Moab in April I wasn't able to fully test my theory because I had a major interference in the front with my bumper and a minor interference in the rear with my inner fender but now that I have them corrected I've been playing with bumpstop and now spring rate to prove/disprove my theory. I have taken notice over the past couple of times off-road that when I am climbing a fairly steep grade and the weight shifts to the rear of my Jeep that I may be compressing a bit more than I should and therefore possibly unloading the front end a bit and losing some traction. My thinking is that by adding some additional resistance to compression in the rear (added spring rate) that the rear will compress less on these steep obstacles and therefore help to keep the rear off of the bumpstops and keep the front end planted more firmly resulting in better traction at the front tires. I had added the spacers to the rear and really didn't notice any difference other than a little bit of raised height in the rear so this has directed me to look more at spring rate vs. merely overall length of the coil spring.
I am concerned about two things. One possible negative aspect of having a stiffer spring rate in the rear having the opposite affect on descending these steep obstacles and having the rear unload easier due to the weight shift and higher spring rate lifting the rear. The second concern is overall ride comfort on the pavement as right now it rides fantastic and I don't want to sacrifice that with a harsh ride.
Again, this will require some testing once I get the springs installed but I've been "mulling" this over in my head for the past few trips now and finally feel I have a good enough seat of the pants feel that I can replace the springs and give my theory a try.
If weight was a concern, neither of us would be driving a JK, we’d have LJ’s. [emoji41]
It’s easy to pack and carry too much stuff but “too much” is subjective. For a while I carried everything I thought I might need. To your point through, because I came prepared (tools and a correctly equipped and configured vehicle), I rarely used my tools on my rig, but almost always on other’s rigs who didn’t come adequately prepared (tools or configured vehicle). If I had a welder and a 4 1/2” grinder, I’d find myself doing a 3 hour trail repair on a vehicle that’s not even running with my group and most likely had no business on that particular trail. When I had the business it made sense because it served as a means to advertise, but now it doesn’t...so I’ve started to pack only what I need based on how I’m equipped...but light(er) now for sure than before.
I agree 110% with ya Matt. Similar to when I was racing, I would bring my welder and all other tools with me to the track and end up working on everyone else's stuff that brought theirs to the track knowing I would have the necessary tools and equipment. In my Jeep I carry the tools that I think I might need and try to keep it maintained that I don't need to use them on mine but have them "just in case". Like you, I have used my tools more on other people's Jeeps on the trails but that's ok because at least we're able to get them off the trail and not leave them behind. I don't carry welder or anything of that sort in my Jeep but have assisted on a few trail repairs of others that have had them and would just as soon try to prevent that kind of failure on the trail because trail repairs never turn out ideal and always need to be cut back apart or just replaced once off the trail.
Adding HP makes everything better junk in the trunk or not.
Agreed completely on the fox shocks observation - out of the box the balance I’d rebound an compression is a good mix. The Bilstein shocks have a dis-proportionate rebound to compression ratio heavily favoring the rebound even though they share the same category as the Fox 2.0 - listed as mono-tube gas charged. According to the specs, the fox shocks are factory set to roughly 300psi whereas the Bilstein shocks are less at 200psi. Irrational as it may seem, the fox actually seem soother all likely due to the valving differences. Right now I'm running the Bilstein's and about to switch back to Fox. Think you're in a good spot personally, wouldn't change a thing.I am currently running Fox 2.0 shocks and really like the way they are valved right out of the box. I've had Bilstein as well as BDS on it and I would take the Fox's over either of them for a daily driver/weekend wheeler. They seem to be a nice balance of compression and rebound yet still the travel I sought.
primary (and two biggest) differences between coils and coil-overs is that the coils ride on the shock body which enables the design/configuration of the coil to be altered by how it's mounted. e.g. - tipping the coil-over assembly to a 30* angle defeats/reduces the deigned spring rate of the coil itself. As a result, we can take a 250lb coil and, by changing the mounting angle of the shock, dial it in to a more exact force up to 250lbs. A conventional coil doesn't allow that, it must run near perpendicular to the ground or it could be damaged. We have even more tuning options given that most offer dual coil setup which gives us the ability to have primary and secondary coil rates as well as adjustment to when the primary transitions into secondary. Valving and maintenance on the coil-overs vs. non is a isn't really any different assuming you're comparing the same class of shock - both will require the same amount of maintenance.I just can't bring myself to go the coil over direction because in my opinion they have just as many cons as they do pros. With coil over's being all the rage lately it still befuddles me that many Jeep owners don't know why they have them other than the "cool" factor". If you need the actual wheel travel then yes, the coil overs are hard to beat when you get past that 12 inch travel range. However, if you are in the 8 to roughly 11 inch range of travel and you have the proper coil spring and shock there really is no advantage of a coil over. Actually more disadvantage in my mind because of initial cost and then the annual maintenance and don't even get me started on the squeaks/noises. Also I don't feel that overall suspension travel is end all/be all of what makes a car perform off-road. To some the whole suspension travel thing is just how high you can climb an RTI ramp or how far you can droop out the front axle but if you can't convert that to traction and climbing up an obstacle it is all for not and you can only have so much uptravel for a given application. I've seen people droop out so far that the front tire routinely gets caught under a ledge and can't climb up and over vs. a car right behind them with smaller lift and limited grab the edge of the rock and climb right up and over.
Weight transfer from front to rear isn't the greatest when attempting a climb. Stiffening up the springs may help but I'm not sure it will overcome acceleration and inertia...especially when your go pedal is attached to a 450hp. Unfortunately Physics isn't my strong suit so I can't back it up with data. Theoretically I'd agree with you so I'm super interested in what you find once you get a chance to test your theory.I have a theory, and it is just a theory at this point. During my initial trip to Moab in April I wasn't able to fully test my theory because I had a major interference in the front with my bumper and a minor interference in the rear with my inner fender but now that I have them corrected I've been playing with bumpstop and now spring rate to prove/disprove my theory. I have taken notice over the past couple of times off-road that when I am climbing a fairly steep grade and the weight shifts to the rear of my Jeep that I may be compressing a bit more than I should and therefore possibly unloading the front end a bit and losing some traction. My thinking is that by adding some additional resistance to compression in the rear (added spring rate) that the rear will compress less on these steep obstacles and therefore help to keep the rear off of the bumpstops and keep the front end planted more firmly resulting in better traction at the front tires. I had added the spacers to the rear and really didn't notice any difference other than a little bit of raised height in the rear so this has directed me to look more at spring rate vs. merely overall length of the coil spring.
I am concerned about two things. One possible negative aspect of having a stiffer spring rate in the rear having the opposite affect on descending these steep obstacles and having the rear unload easier due to the weight shift and higher spring rate lifting the rear. The second concern is overall ride comfort on the pavement as right now it rides fantastic and I don't want to sacrifice that with a harsh ride.
Like you, I have used my tools more on other people's Jeeps on the trails but that's ok because at least we're able to get them off the trail and not leave them behind.


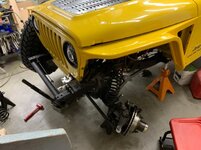


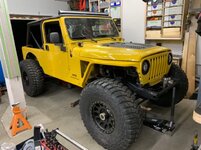
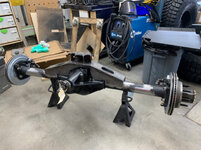
That last pic put a smile on my face - this build is so awesome!
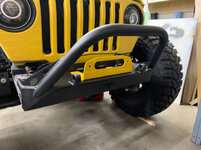
Awesome color! The brighter the better! You and Mike (zmotorsports) have awesome fab skills. I'm envious of your skills and shop.....
I got some heat from some of my friends initially for picking yellow, like “...but why yellow?”. Now I’m glad, it’ll stand out.