To avoid these ads, REGISTER NOW!

#FabSpace

csp

Well-known member
Joined
Mar 23, 2010
Messages
5,719
Location
Franktown, CO
The glass on mine is 12x24. I bought a sheet of 36x24 at Lowes and had them cut it into (3) 12x24 pieces.

I have an extra, brand new pedal that's yours if you want it.
 
To avoid these ads, REGISTER NOW!

Jo Diesel

Well-known member
Joined
Aug 26, 2015
Messages
402
Location
St. Johns MI
would it be possible to run cellophane under the glass in your blast cabinet? Roller on each side of glass and extend a crank outside so when it gets cloudy you could just give it a couple of turns
 

zmotorsports

ALLIANCE MEMBER
Joined
Oct 20, 2009
Messages
21,312
Location
Northern Utah
Great job on the powder coating Matt. Also the fixturing was a great idea and appears to work perfectly.

That's another thing I never really thought I wanted to do in my home shop was powder coating, but now maybe you've got me thinking.:confused:
 
OP
L

lilscorpion

Well-known member
Joined
Mar 15, 2010
Messages
3,599
Location
Colorado
Nice powder coat system addition. I like the jigs you made to coat the bolts.


Thanks! They work slick. Now I need to make all the different sizes that I’ll commonly coat. I’m a little curious if the coating will mess with the hex in smaller bolts so I might try 10-24 or 32’s next and find out.

would it be possible to run cellophane under the glass in your blast cabinet? Roller on each side of glass and extend a crank outside so when it gets cloudy you could just give it a couple of turns


Interesting idea. The internals are under pressure so the material would need to be sealed where it enters and exits the cabinet. There’s a little plastic film (and some replacements) that they put on the inside of the glass which works the same way. The film was junk after a short part day of blasting. I don’t think it’s really up to the task.

The glass on mine is 12x24. I bought a sheet of 36x24 at Lowes and had them cut it into (3) 12x24 pieces.

I have an extra, brand new pedal that's yours if you want it.


I took your recommendation and headed to Lowe’ and got the same sheet for $15 cut into 3. Whomever designed these things needs a course in function.

92a0c856d9c77ec2d1b8d478e14ddbce.jpg

The glass retainer is held on by screws and nuts, nuts being on the inside. 5 minutes and Inhad the entire thing switched over to rivnuts. So much better.

d689bdcaf9940af4544cf6447fc7ccfe.jpg

Since The class is just single pane, I decided to leave the original lexan above it. The glass is 3mm and I doubt it’ll shatter while blasting but I’m not sure I want to find out especially since I tend to get my face kinda close to it. Much clearer.

Now that I was able to see, it took me much less time to blast the remaining flat head bolts. This new view has about an hour of blast time in it and is crystal clear.

8af16bcb1bd3155dc8ee889b72544e2d.jpg
 

Attachments

  • d689bdcaf9940af4544cf6447fc7ccfe.jpg
    d689bdcaf9940af4544cf6447fc7ccfe.jpg
    25.4 KB · Views: 0
  • 8af16bcb1bd3155dc8ee889b72544e2d.jpg
    8af16bcb1bd3155dc8ee889b72544e2d.jpg
    26.9 KB · Views: 0
  • 92a0c856d9c77ec2d1b8d478e14ddbce.jpg
    92a0c856d9c77ec2d1b8d478e14ddbce.jpg
    32.6 KB · Views: 0
OP
L

lilscorpion

Well-known member
Joined
Mar 15, 2010
Messages
3,599
Location
Colorado
That's another thing I never really thought I wanted to do in my home shop was powder coating, but now maybe you've got me thinking.:confused:


I always views the oven coating thing as a ShadyTree capability and must have mentally discounted and then discarded the idea if having a setup. Now that I’ve played with it, I’m sorry I did. Taking parts to someone else is not only really expensive but it’s such a time drain on projects. What blows my mind is parts that I coat are ready for install FASTER than if I had rattle canned them and many times more durable.

The Columbia Coatings setup I have might be a little more than I really needed. They have their older generation (HyperSmooth) for $500 and its many times better than a hobby gun. With a used basic kitchen oven and a HyperSmooth, you could be pro-quality coating under $600. That’s insane.

And you have the shop space to build a real oven...one that could do bumpers, suspension parts, etc. There exists DIY PC oven build guides that give you step by step for full Size ovens for under $1k. This is my latest rabbit hole...
 

beelsr

Well-known member
Joined
May 6, 2007
Messages
1,324
Location
NE PA, USA
using rigid duct fiberglass panels, you can make a "tunnel" to replace the door on a regular oven and do long parts. fit doesn't need to be perfect but it works fine. Used a pair of crappy jackstands and a piece of rebar for the stick-out end. would have worked better with a convection fan but the pieces weren't that long...
 
OP
L

lilscorpion

Well-known member
Joined
Mar 15, 2010
Messages
3,599
Location
Colorado
using rigid duct fiberglass panels, you can make a "tunnel" to replace the door on a regular oven and do long parts. fit doesn't need to be perfect but it works fine. Used a pair of crappy jackstands and a piece of rebar for the stick-out end. would have worked better with a convection fan but the pieces weren't that long...


Have pictures of a tunnel? That’s a neat idea especially if the oven was convection...

I recently found a video online where a guy cut a double oven and converted it into a single. I checked our double oven and it would go from being only 19” high to being 32” high. Could easily find one locally...
 

csp

Well-known member
Joined
Mar 23, 2010
Messages
5,719
Location
Franktown, CO
I did the same exact thing re: the rivnuts for the glass. I should have mentioned that, but you had the aha moment!
 

beelsr

Well-known member
Joined
May 6, 2007
Messages
1,324
Location
NE PA, USA
so holy it needed to "L"s... :lol:

i wish my younger self would have thought of the extra heating element.
 

beelsr

Well-known member
Joined
May 6, 2007
Messages
1,324
Location
NE PA, USA
i know the expression. was an english joke, really. which, since i have to explain it, means it wuz lame.

holy, "L" = hell... ba-dum-tush....

holly jolly dolly molly?
and just how does "moly" (as in molybdenum) pronounce the same as "molly"?
 
OP
L

lilscorpion

Well-known member
Joined
Mar 15, 2010
Messages
3,599
Location
Colorado

Duker

Well-known member
Joined
Sep 25, 2010
Messages
10,861
Location
Livingston, TX
Then this is not a thread you should read.

https://www.powdercoatguide.com/2014/09/how-to-build-powder-coating-oven.html?m=1

And you should not look at this kit.

Powder Coating Oven Controller Kit w/Light and Fan Control, 240V 50A 12000W (KIT-PCO402) https://www.amazon.com/dp/B073X1CCY1/?tag=atomicindus08-20

[emoji41]


Damn you Matt! Now you have got me thinking as well.... I am going to be lazy and see which one Mike picks as I think he took the bait as well!


Sent from my iPhone using Tapatalk Pro
 
OP
L

lilscorpion

Well-known member
Joined
Mar 15, 2010
Messages
3,599
Location
Colorado
ROFL!!

Damn you Matt! Now you have got me thinking as well.... I am going to be lazy and see which one Mike picks as I think he took the bait as well!


Mike won’t tell us until he dies his first post so we’re probably not going to know for at least a few weeks.

Ummmm. WHO is the enabler?! :)

I already know how this is going to go, you have plenty of space, and you’re maybe 3x as productive as I am on a good day, so I ‘spect you be coating something monstrous like a frame or one of your benches in a full sized oven by Christmas!
 
OP
L

lilscorpion

Well-known member
Joined
Mar 15, 2010
Messages
3,599
Location
Colorado
Got up early and knocked out a few more fixtures (for different sizes bolts before work.

4379b049f8a076e0b53dfff3baf46ee5.jpg

1/4-20 and 7/16-14.

9aa7872614e4bbfd95dfab68c5a9726f.jpg

Sand blasted a set of 1/4-20. These will be match coated to the Jeep’s Bright white.

c53f2bbcf4394bfa5b7191b7ca70f508.jpg

A few 7/16 bolts to match the bumper.

712acdd0f8edf7662dd459b030b42a3c.jpg

and 5/16 bolts for the front fenders (I need some more bolts, I only had one?!)

f6c10453baa6acef599ab89f3af394be.jpg

For now, I’m keeping the jigs in the oven. Eventually I’ll have some drawers next to the oven for all of my masking and and coating fixtures.

5cfc41e41aa8db87e45b33387651f69d.jpg

Clearly there’s plenty of space for a fairly hefty bolt/part run as long as the fixtures keep things organized. I’ll need to build my own rack so the hooks don’t slide around.

Part of the way there, I’ll need to get more aluminum so I can make a duplicate set in fine thread.
 

Attachments

  • 9aa7872614e4bbfd95dfab68c5a9726f.jpg
    9aa7872614e4bbfd95dfab68c5a9726f.jpg
    30.1 KB · Views: 0
  • c53f2bbcf4394bfa5b7191b7ca70f508.jpg
    c53f2bbcf4394bfa5b7191b7ca70f508.jpg
    24 KB · Views: 0
  • 712acdd0f8edf7662dd459b030b42a3c.jpg
    712acdd0f8edf7662dd459b030b42a3c.jpg
    23.5 KB · Views: 0
  • f6c10453baa6acef599ab89f3af394be.jpg
    f6c10453baa6acef599ab89f3af394be.jpg
    32.2 KB · Views: 0
  • 5cfc41e41aa8db87e45b33387651f69d.jpg
    5cfc41e41aa8db87e45b33387651f69d.jpg
    41.8 KB · Views: 0
  • 4379b049f8a076e0b53dfff3baf46ee5.jpg
    4379b049f8a076e0b53dfff3baf46ee5.jpg
    36.5 KB · Views: 0
To avoid these ads, REGISTER NOW!

elvee

Well-known member
Joined
Nov 1, 2006
Messages
309
Location
Atlanta, GA
Clearly there’s plenty of space for a fairly hefty bolt/part run as long as the fixtures keep things organized. I’ll need to build my own rack so the hooks don’t slide around.

Part of the way there, I’ll need to get more aluminum so I can make a duplicate set in fine thread.

Just a thought, but why not cross drill your existing holders at 90 degrees to the first set of holes to get double the capacity out of them? Either more of the same, or do one set course thread and the other set fine thread? You may have to watch out for thread damage from blasting and coating overspray, but I think that could be managed.
 
OP
L

lilscorpion

Well-known member
Joined
Mar 15, 2010
Messages
3,599
Location
Colorado
Just a thought, but why not cross drill your existing holders at 90 degrees to the first set of holes to get double the capacity out of them? Either more of the same, or do one set course thread and the other set fine thread? You may have to watch out for thread damage from blasting and coating overspray, but I think that could be managed.


I thought about that but not hard enough. I could plug the primary side of each hole with a set screw for sand boasting and a silicone plug during coating and then easily re tap the back sides after. Suppose I should try one and see how much fussing around it actually is. Would be slick to have half as many jigs. I should try it.

Edit: got any ideas on how to fixture washers?

Edit2: I need fixtures to powder coat screws too.

Now I won’t be able to sleep. [emoji2957]
 
Last edited:

beelsr

Well-known member
Joined
May 6, 2007
Messages
1,324
Location
NE PA, USA
seal the ends of the tubes to protect the threads. If you through drilled the tubes and that's a worry, use masking tape on the back side holes to keep the dust out while blasting and the powder out while spraying; remove it for the bake in the oven. or use kaptan tape and just leave it on (pricey though, compared to masking).

for your racks, all you need to do is use binder clips (https://www.google.com/search?q=binder+clips) to space out the hooks and keep them from sliding around.
 
OP
L

lilscorpion

Well-known member
Joined
Mar 15, 2010
Messages
3,599
Location
Colorado
seal the ends of the tubes to protect the threads. If you through drilled the tubes and that's a worry, use masking tape on the back side holes to keep the dust out while blasting and the powder out while spraying; remove it for the bake in the oven. or use kaptan tape and just leave it on (pricey though, compared to masking).

Yeah I could easily use some high temp tape but, damn I’m lazy. The reason I made the jigs in the first place was to eliminate the tape process and get to a way to blast and coat multiple bolts with no setup or cleanup.

You’re point is valid tho - maybe thru holes is in fact the problem. They’re easier to machine but if I spent a little extra time, I would have a back-side to worry about and could do way more per fixture.

for your racks, all you need to do is use binder clips (https://www.google.com/search?q=binder+clips) to space out the hooks and keep them from sliding around.

2 things:

1) I had no idea those things were called binder clips. I always thought they were called spring clips.

2) that’s an ingenious idea. I’m gonna raid my wife’s desk and see if she has any.
 

svrider

Active member
Joined
Sep 6, 2018
Messages
33
Location
USA
I've been following this thread from the beginning. Great fabrication and creative problem solving skills and I love all the tips and tricks I've picked up.

I have a powder coat set up similar to yours and I'm interested to see what you come up with for a spray booth. That's currently the most lacking part of my setup.
 
OP
L

lilscorpion

Well-known member
Joined
Mar 15, 2010
Messages
3,599
Location
Colorado
I've been following this thread from the beginning. Great fabrication and creative problem solving skills and I love all the tips and tricks I've picked up.


I have a powder coat set up similar to yours and I'm interested to see what you come up with for a spray booth. That's currently the most lacking part of my setup.


Thanks, glad some of my ideas have been useful. I feel like I owe so many on here (either payback or paying it forward) for doing the same for me. It’s an awesome community.

A coating booth is in the works. It’s taken me a little time to figure out how to get the right amount of filtration and vacuum to recirculate into the shop instead of externally vent. Now I’m fussing with trying to make it all work in the limited space I have. I’m waiting on some parts and I’ll start posting when they get in. Hope it works.

The only teaser I’ve got at the moment is the skeleton which is made out of pre-finished Baltic birch. Outside dimensions are 41” wide, 24” deep, 52” high. It’ll be much deeper after I put the wings on it...

6c6754570cc3e1604b7a4f51c25e0312.jpg
 

Attachments

  • 6c6754570cc3e1604b7a4f51c25e0312.jpg
    6c6754570cc3e1604b7a4f51c25e0312.jpg
    33.7 KB · Views: 0
OP
L

lilscorpion

Well-known member
Joined
Mar 15, 2010
Messages
3,599
Location
Colorado
While I’m waiting for parts, the wife convinces me to do a refresh of the office.

1d570c1e9784dbe3a00924d6cfd38a6a.jpg

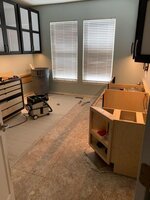
The way it’s set up today is with a 10’ long desk for 2 along the right wall and a larger drawer base where we keep our office supplies and 31” desk for the iMac which is our family computer.

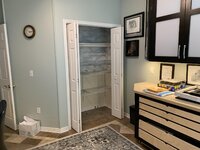
To the left of the drawer base is a close which we’ve stuffed with all kinds of junk (though my wife does keep it well organized)....here it is emptied ready for demo.

614ce7265850fde2858bf90dafdfbcfe.jpg

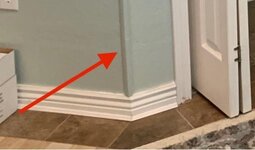
This closet was added by one of the two previous home owners who did a really hack job. Instead of finishing the drywall corner, they used edge molding where there was any angle transition between sheets. Thus kind of **** drives me nuts.

1994bf038ef7aa4811d0c764e4d7408f.jpg

Our goal on this build is to remove the closet and replace it with a new large L-shaped desk with upper Cabinets. Good thing about the hackers is the addition was easily removed and the previous finish was still fully intact, even the fancy wall paper.

846cbb4f69887ff4e4d2ce5a53002d3f.jpg

The whole family helped demo the tile floor next and then laid hardiebacker on one half of the room.

c084eccdf21fa28488133f9013672ebf.jpg

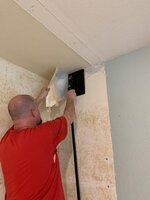
Oh, wanted to share this gem I found inside the closet wall after we demo’d it. The PO extended the wires from the original outlets (plug and switch) through these metal cover plates. Nice touch.

98d4c7438c9ed8d7884674cade5235a8.jpg

When I pulled them out of the box they shorted and blew the breaker. Hell of a thing to hid inside a wall cavity.

d87f188988f75d1988d3340c5fe5d836.jpg

Here’s a better shot of the main desk before we disassembled it.

1242bb7a80d1ab8442d7a32bc6012cde.jpg

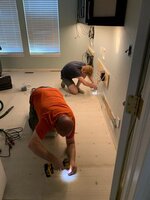
After doing so, we finished up the HardieBacker and Andrew and I then set all of the screws, a **** ton. I completely appreciate having Andrew lend a hand. Together we made short work of a non-trivial task.

d18b931e1c9a1fc634688a16e46d0f4c.jpg

I thought that I’d be able to lay the tile in about a day. Here’s all I got done...28 tiles (12” x 25”) in about 6 hours.

e289ee09e02d4be0f4cd654094497344.jpg

I thought larger tiles would be easier. I actually found them more difficult to level than 12x12’s. What made it so exhausting was going from crouch to standing maybe 5 or so times per tile. I’m wiped out.
 

Attachments

  • e289ee09e02d4be0f4cd654094497344.jpg
    e289ee09e02d4be0f4cd654094497344.jpg
    25.8 KB · Views: 0
  • d18b931e1c9a1fc634688a16e46d0f4c.jpg
    d18b931e1c9a1fc634688a16e46d0f4c.jpg
    26.1 KB · Views: 0
  • 1242bb7a80d1ab8442d7a32bc6012cde.jpg
    1242bb7a80d1ab8442d7a32bc6012cde.jpg
    27.1 KB · Views: 0
  • d87f188988f75d1988d3340c5fe5d836.jpg
    d87f188988f75d1988d3340c5fe5d836.jpg
    32.8 KB · Views: 0
  • 1d570c1e9784dbe3a00924d6cfd38a6a.jpg
    1d570c1e9784dbe3a00924d6cfd38a6a.jpg
    212.3 KB · Views: 0
  • 614ce7265850fde2858bf90dafdfbcfe.jpg
    614ce7265850fde2858bf90dafdfbcfe.jpg
    183.6 KB · Views: 0
  • 1994bf038ef7aa4811d0c764e4d7408f.jpg
    1994bf038ef7aa4811d0c764e4d7408f.jpg
    16.7 KB · Views: 0
  • 846cbb4f69887ff4e4d2ce5a53002d3f.jpg
    846cbb4f69887ff4e4d2ce5a53002d3f.jpg
    28.7 KB · Views: 0
  • c084eccdf21fa28488133f9013672ebf.jpg
    c084eccdf21fa28488133f9013672ebf.jpg
    30.9 KB · Views: 0
  • 98d4c7438c9ed8d7884674cade5235a8.jpg
    98d4c7438c9ed8d7884674cade5235a8.jpg
    233 KB · Views: 1
Last edited:

wasfast

Well-known member
Joined
Apr 10, 2014
Messages
874
Location
San Diego CA
Indeed larger tiles are more challenging to get level/flush with it's neighbors.
1) The recommended notched trowel is 3/4" which seems crazy but it's to allow full contact and for variations in flatness of the floor.
2) Using tile leveling clips makes it way easier to get things flush on all sides.
There are various systems but this is a basic one that does work, available at the orange store near you:
https://www.homedepot.com/p/QEP-LAS...-System-Clips-Part-A-96-Pack-99730Q/300872872
https://www.homedepot.com/p/QEP-LASH-Tile-Leveling-System-Pro-Pliers-99757Q/300873467
https://www.homedepot.com/p/QEP-LASH-Tile-Leveling-System-Wedges-Part-B-100-Pack-99726/311182534
 
OP
L

lilscorpion

Well-known member
Joined
Mar 15, 2010
Messages
3,599
Location
Colorado
Indeed larger tiles are more challenging to get level/flush with it's neighbors.
1) The recommended notched trowel is 3/4" which seems crazy but it's to allow full contact and for variations in flatness of the floor.
2) Using tile leveling clips makes it way easier to get things flush on all sides.
There are various systems but this is a basic one that does work, available at the orange store near you:
https://www.homedepot.com/p/QEP-LAS...-System-Clips-Part-A-96-Pack-99730Q/300872872
https://www.homedepot.com/p/QEP-LASH-Tile-Leveling-System-Pro-Pliers-99757Q/300873467
https://www.homedepot.com/p/QEP-LASH-Tile-Leveling-System-Wedges-Part-B-100-Pack-99726/311182534


I’ll be damned.
 
OP
L

lilscorpion

Well-known member
Joined
Mar 15, 2010
Messages
3,599
Location
Colorado
For large format tiles you actually want these https://www.homedepot.com/p/QEP-LAS...-System-Clips-Part-A-300-Pack-99758/311182483

Also, you can do the levels by hand, but your fingertips will HURT. Spend the cash and buy the little ratchet tightening tool. Your hand will thank you.
Ask me how I know.....


I can confirm...it’s a be-yatch on the fingers, elbows, and knees. I should have made a trip to the big box but didn’t...still got there with my wit (and stubbornness).

8e9e4246423765b5b0dc28b5380465a6.jpg

Continued to refine the process as I went and managed to get into a rhythm. By the last tile I was able to lay the mastic and get the tile level (per my digital inclinometer) within .1 degree. If better is needed, the floor gods can bite me. [emoji89]

a0fa6cad80bbfa9170fb2a96503c2809.jpg

Now to remove that fancy wallpaper. We haven’t had to do a removal since the kids bathroom in our old house where we used goop, scrapers, and this roller cutter thingy. More or less, it sucked so we researched alternative methods. We ended up purchasing this Mcculloch Steam Cleaner to get it done.

McCulloch MC1375 Canister Steam... https://www.amazon.com/dp/B00G00BT72/?tag=atomicindus08-20

The reviews on YouTube seemed too good to be true but quickly we became believers as we
Got the hang of it.

69eff98c6adb984254eac7d0ee572fd9.jpg

After a few tries I was able to start at an edge and slowly pull a strip completely off all the way down the wall.

5934bd9840ad223fbf78d9c812e11206.jpg

It works far better than anyone on YouTube actually demonstrated.

593cb67f3ccb2871e067d1900da35108.jpg

I think it took about an hour but an easy no cussing hour it was. I’ll take it.

7de4c56c3899fd314d59ef0b01687a8f.jpg

Next is grout.
 

Attachments

  • 5934bd9840ad223fbf78d9c812e11206.jpg
    5934bd9840ad223fbf78d9c812e11206.jpg
    19.6 KB · Views: 1
  • 7de4c56c3899fd314d59ef0b01687a8f.jpg
    7de4c56c3899fd314d59ef0b01687a8f.jpg
    24.1 KB · Views: 1
  • 8e9e4246423765b5b0dc28b5380465a6.jpg
    8e9e4246423765b5b0dc28b5380465a6.jpg
    26.1 KB · Views: 0
  • 593cb67f3ccb2871e067d1900da35108.jpg
    593cb67f3ccb2871e067d1900da35108.jpg
    23.3 KB · Views: 0
  • a0fa6cad80bbfa9170fb2a96503c2809.jpg
    a0fa6cad80bbfa9170fb2a96503c2809.jpg
    27.1 KB · Views: 0
  • 69eff98c6adb984254eac7d0ee572fd9.jpg
    69eff98c6adb984254eac7d0ee572fd9.jpg
    23.9 KB · Views: 0
Last edited:
OP
L

lilscorpion

Well-known member
Joined
Mar 15, 2010
Messages
3,599
Location
Colorado
Wow you’re getting stuff done!!


No kidding. Wife and I were talking about it tonight - we’ve done more house projects this year than we’ve ever done before in a single year...maybe more than we’ve done in the past few years together!

Got the grout done tonight. Been dreading this step. Not sure why, it went fast.

48b13b07221d55a691dac639b960541a.jpg
 

Attachments

  • 48b13b07221d55a691dac639b960541a.jpg
    48b13b07221d55a691dac639b960541a.jpg
    28.6 KB · Views: 0
OP
L

lilscorpion

Well-known member
Joined
Mar 15, 2010
Messages
3,599
Location
Colorado
I always find the task of grouting intimidating also. Probably the insecurity of doing a bad job...:scared:


It’s a messy job. In the process it’s nothing more than smearing gritty goo all over the floor. It’s difficult to tell if you’re doing it right...can you do it wrong? I dunno, I go through the motions running at a 45* angle to the joints multiple times slowly across the floor. I know I’m doing it right but there’s no indication I have. I probably could have done it faster if there was.

Not the work ahead is more time on the knees cleaning half a dozen times. The first one is the worst.

99468d189ea92947ec34d5447e65c0e9.jpg
 

Bob Heine

ALLIANCE MEMBER
Joined
Oct 24, 2009
Messages
10,703
Location
Boca Raton, Florida
Got the grout done tonight. Been dreading this step. Not sure why, it went fast.

48b13b07221d55a691dac639b960541a.jpg
Matt, last time I spent more than 15 seconds in that position I regained consciousness with more grout on me than the floor. You have my sympathy and admiration at the same time. Someday you will do another floor tile job. Women eventually forget the pain of childbirth and men eventually forget the pain of floor tile birth.
 

beelsr

Well-known member
Joined
May 6, 2007
Messages
1,324
Location
NE PA, USA
i put on rounded kneepads and just roll side to side. much easier on the back, for me. squatting like that would have me in ibuprofen for a week.

just remember every time you think doing grout is bad:
you could be mudding drywall. :lol:
 
OP
L

lilscorpion

Well-known member
Joined
Mar 15, 2010
Messages
3,599
Location
Colorado
i put on rounded kneepads and just roll side to side. much easier on the back, for me. squatting like that would have me in ibuprofen for a week.

just remember every time you think doing grout is bad:

you could be mudding drywall. :lol:

Sadly, I gots some of that to do as well but you’re right, it’s way worse. It’s a dumb activity.

Explain the rounded knee pads? Seems high tech compared to the ones I have...

Matt, last time I spent more than 15 seconds in that position I regained consciousness with more grout on me than the floor. You have my sympathy and admiration at the same time. Someday you will do another floor tile job. Women eventually forget the pain of childbirth and men eventually forget the pain of floor tile birth.

LOL...Bob, you absolutely should not get in that position then. I hate to disagree with you but I won’t have enough time between tile jobs to forget, she wants the laundry room done “soon”. To me that means I’m sleeping in the backyard if that new TIG welder arrives first. [emoji1787]


Sent from my iPhone using Tapatalk Pro
 

beelsr

Well-known member
Joined
May 6, 2007
Messages
1,324
Location
NE PA, USA
i just just mean knee pads that are rounded on the sides, kinda like a motorcycle tire - so you can lean left and right and roll on the knee without the bump that happens with the style that's more like a car tire, with a defined/squarish shoulder.

or, for the super-fly, get rolling kneepads.
 
To avoid these ads, REGISTER NOW!
Top Bottom