To avoid these ads, REGISTER NOW!

Finally building the Ultimate.

OP
M

mws444

Well-known member
Joined
Jan 2, 2011
Messages
245
Location
Texas
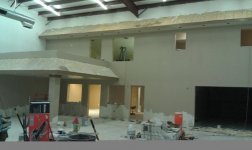
That texture job is superb! I wonder if it's worth the extra dough to have the finish coat covered by a glaze? There are some real artists out there who specialize in faux finishes, glazes, troweled marbleized treatments, 'ragged' paint application, and other $pecial processes. But, hey, why not give that facade a really special look, even if it doesn't cost just peanuts; you do it because you (pe)can! :lol_hitti
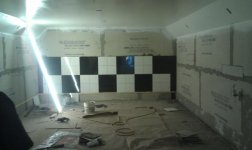
You can have different 'storefronts' done in their own finish technique. This way you can explain to the wife that the cost is justified because you want her to see what finishes she'll want to use in her house remodel.:thumbup:

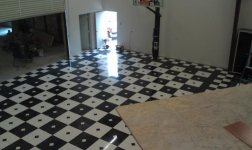
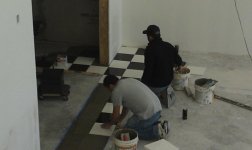
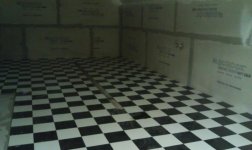
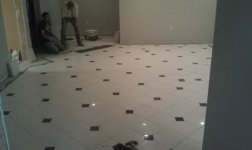
I thought about the glaze or troweled venetian plaster, but with a high gloss procelain tile all over the floor I am opting for something a little softer. The shine on the shop floor is going to pretty overwhelming, hence the stone and XS paint on the walls.
 
To avoid these ads, REGISTER NOW!
OP
M

mws444

Well-known member
Joined
Jan 2, 2011
Messages
245
Location
Texas
Well we have started priming and painting. Also found a couple of problems with the mud job once the primer was up so it looks like Thursday or Friday before any real painting gets going. Trying to get the upstairs painted so we can get the hardwood floor down, then we can install the doors and kitchen cabinets. With the layout we have to finish the apartment before we get the tile down in the shop so we are'nt walking over it while they are laying it. We will have two tile contractors and the finish carpenter working at the same time.
I am really starting to get antsy to get this place done. I have two projects waiting for my lift, the 2010 Camaro needs a ****** swap and the "69 Camaro needs the rear end swapped and exhaust. Getting kind of hard to just stare at the uninstalled lift. I think it is going to be hard to get any work done at the plant with this shop only 200 feet from my office.
Here is a picture of the 8 pallets of tile and two pallets of hard wood for the floor, yup another semi load of materials.
 

Attachments

  • IMAG0190 (800x478).jpg
    IMAG0190 (800x478).jpg
    34.8 KB · Views: 563
Last edited:
OP
M

mws444

Well-known member
Joined
Jan 2, 2011
Messages
245
Location
Texas
Thanks guys! I will post up some more pics of the progress this weekend. We started painting the apartment today and hope to start putting doen the hardwood tomorrow. Should start priming the walls of the shop later this week.
I have ordered the Moduline cabinets, but still lack the race deck flooring for the lift area. I also still lack buying the first stick of furniture, a task I hate.
 
OP
M

mws444

Well-known member
Joined
Jan 2, 2011
Messages
245
Location
Texas
Finally, color on the walls and starting the tile on the floor!
Trying to finish the painting this weekend, so the tile guys can get after it. Hardwood should start going down Monday as well. The tile is a premium porcelain, so this amazing tile group is setting it like marble, the grout line is only 1/16 of an inch. We will run a course checkered like these all the way around then switch to a 4' x 4' pattern so it's not so busy looking.
 

Attachments

  • IMAG0191 (800x478).jpg
    IMAG0191 (800x478).jpg
    39.8 KB · Views: 686
  • IMAG0192 (800x478).jpg
    IMAG0192 (800x478).jpg
    30.1 KB · Views: 646
  • IMAG0198 (800x478).jpg
    IMAG0198 (800x478).jpg
    33.8 KB · Views: 752
  • IMAG0199 (800x478).jpg
    IMAG0199 (800x478).jpg
    17.9 KB · Views: 623
  • IMAG0202 (800x478).jpg
    IMAG0202 (800x478).jpg
    36.1 KB · Views: 833
OP
M

mws444

Well-known member
Joined
Jan 2, 2011
Messages
245
Location
Texas
Ok Guys, here is this weeks update. The hardwood is all down, cabinets have been installed and granite counter tops should be installed next week.
I took a picture of the floors to show the color of the Brazilian Cherry 3/4 wood.

Next we have a pic of the cabinets, not that I planned it but they match the floor pretty well.....go figure

The floor in the conference room is probably the most plain looking in the photo, but it is a nice floor as well. Dont worry about the lines between the tiles, they are only 1/8 of an inch and should all but disappear with the nonsanded color matched grout.

The picture of the soda shop shows the detailing on the floor with the 4" x 4" black diamond inserts. This is taking a lot of time as all of the tiles have to be cut. I an doing something similar of the floor of the shop only it will be a two by two square alternating black and white with a diamond insert of the opposite color.

The last photo is of the back wall in the washbay. It shows the two by two alternating black and white with a black border.

I hope everyone has a Blessed Thanksgiving!
I know personally I have much to give thanks for, and pray everyone has plenty, and their blessings continue.
 

Attachments

  • IMAG0220 (800x478).jpg
    IMAG0220 (800x478).jpg
    32.3 KB · Views: 768
  • IMAG0216 (800x478).jpg
    IMAG0216 (800x478).jpg
    21.1 KB · Views: 671
  • IMAG0211 (800x478).jpg
    IMAG0211 (800x478).jpg
    23.5 KB · Views: 770
  • IMAG0208 (800x478).jpg
    IMAG0208 (800x478).jpg
    29.6 KB · Views: 840
  • IMAG0210 (800x478).jpg
    IMAG0210 (800x478).jpg
    30.2 KB · Views: 690
OP
M

mws444

Well-known member
Joined
Jan 2, 2011
Messages
245
Location
Texas
Well guys I actually got to do a little work myself this weekend. I trimed in one door (the front one to the apartment), contractor said he did not understand what I was talking about. :dunno:
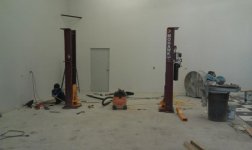
I guess this will teach him to leave all the materials and tools there.:lol:
I also installed the lights in the washbay, well 7 out of 9 anyway. I ran out of good bulbs, (GE daylight, 6500's) left one set of the bad ones on the left so you can see the difference. Note to self, contractor packs of lights are not the way to go.
We should get a bunch of stuff done this week I will post up as things move along. I am also hoping the Moduline cabinets get shipped this week. I still have to order the race deck, but will wait until the tile work is done.
 

Attachments

  • IMAG0221 (800x478).jpg
    IMAG0221 (800x478).jpg
    45.1 KB · Views: 959
  • IMAG0222 (478x800).jpg
    IMAG0222 (478x800).jpg
    26 KB · Views: 516
Last edited:
OP
M

mws444

Well-known member
Joined
Jan 2, 2011
Messages
245
Location
Texas
Hey I had a question I hope someone can help me with. For you guys that have the intior of your garages walls covered with metal, how is the noise? I am trying to figure out if I should do the interior dividing walls with one side metal and one side drywall or both sides metal. Since I am dividing up the building into three parts with the center one being the shop.
Thanks for the insight.
5.jpg

huang4.jpg

huang3.jpg

I did the same thing with my place, the shop is in the middle. I used metal on the outside of the partition walls and drywall on the interior for that very reason. I have other buildings that are all metal and sound does resonate quite a lot. Things like shutting a door rattle the whole thing. With the drywall it just sounds a lot more sturdy, I am sure the 2x4's we ran every 12" help there a lot as well.
 
OP
M

mws444

Well-known member
Joined
Jan 2, 2011
Messages
245
Location
Texas
Thanks guys!

Well here is a sneak peek at where we are right now. Most of the roof tile is on, ran out of birdstops, should be in and up by the end of next week.
Windows are in, we went with 7/16 thick single pane. If you ever have to use single pane, go thick! They are really almost sound proof, not to mention so much more durable...think gearheads after a few too many leaning on them or more likely falling into them.
Slate is almost completed on the walls downstairs, really set it off.
Had to order more black tile, so the rest of the floor should be done this next week. With the floor being so dusty it is hard to tell but it will be about mirror like in appearance. Hence the race deck for the working part.
Should have the two post lift installed tomorrow. My favorite part!
Also need to ge the basketball goal up for the kids tomorrow as well.
We are staining the trim upstairs, still waiting on the granite guys to set the kitchen counters. About ready to give them to boot as they have been putting me off for two weeks.
All in all it looks like the contractors should all be done in two weeks.
Racedeck takes about two weeks to get in, and the moduline cabinets should arrive next week sometime.
The only real hold up will be in the soda shop, it will take about 4 to 5 weeks to get the booths in.:(
Still need to clean up the parking side, seal the floor and install the tire equipment.
With any luck and a lot of hard work we should have the annual Cristmas Eve bash at the shop this year. :beer:
 

Attachments

  • IMAG0233 (800x478).jpg
    IMAG0233 (800x478).jpg
    48.9 KB · Views: 1,615

Mmfh

MEMBER EMERITUS
Joined
Oct 8, 2011
Messages
1,423
Location
Portland Oregon
I just caught your project at its tail end, but I'm glad I did! I can only imagine how proud your wife and family must be of you.

Very fun reading about your project, Thanks very much for sharing!

Mm
 
OP
M

mws444

Well-known member
Joined
Jan 2, 2011
Messages
245
Location
Texas
Thanks Guys! I am relly trying to make a place where I can shut and lock the door and make the world go away for a little while. Hoping I can get a few hours out there every day.
 
Last edited:
OP
M

mws444

Well-known member
Joined
Jan 2, 2011
Messages
245
Location
Texas
It took about three hours cleaning up after the contractors so that part sucked. I guess I am kind of a neat freak I hate to be tripping over stuff and having to spend all of my time looking for a part or tool.
We did get the lift bolted in, still need to wire and plumb in the hydraulics We will get that done in the morning. We had to massage the concrete a little to get it perfectly flat, man I love my big grinder!
Funny how this thing just kind of blew up in scale and a lot more fancy extras. However the best part of the whole shop is the 25' x 23' where I can work on my cars! I guess I am still just a gearhead at heart, I just love to turn a wrench on cars.
Also got the kids Basketball goal up.....they are really liking the shop now!
 

Attachments

  • IMAG0235 (478x800).jpg
    IMAG0235 (478x800).jpg
    29 KB · Views: 751
  • IMAG0236 (800x478).jpg
    IMAG0236 (800x478).jpg
    25.1 KB · Views: 725
  • IMAG0237 (800x478).jpg
    IMAG0237 (800x478).jpg
    29.3 KB · Views: 849

rburke65

Well-known member
Joined
Nov 10, 2007
Messages
12,349
Location
Canfield, Ohio
Are they installing that column next to a control cut in the floor? Looks too close to me. Also, what were the concrete specs required for the Mohawk lift? you have a great build there. Good for you and congratulations!
 
To avoid these ads, REGISTER NOW!
OP
M

mws444

Well-known member
Joined
Jan 2, 2011
Messages
245
Location
Texas
Are they installing that column next to a control cut in the floor? Looks too close to me. Also, what were the concrete specs required for the Mohawk lift? you have a great build there. Good for you and congratulations!

Thanks!
The concrete is 3500 psi with 3/4 gravel, also added 3 lbs of fiber per yard. The slab is 6 to 7 inches. Also ran heavy (1/4") remesh and is tied with footers running every 50' 18" x 18" with 6 1/2" rebars running in them and round the perimeter.
The spec calls for 3,000 psi concrete at 12" for 24" under the lift. I think we will be safe. The 3/4" anchors are 5" deep and were torqued to 100 ft. lbs. without any cracking. It is hard to tell but the lift is massive, where is bolts down it is 29" x 14" and each has 8 anchors.
I doubt I will ever have 10,000 lbs on it but the added saftey was worth the extra cost.
I will keep an eye on though, should any cracking occur I can always saw cut it and go big on a footing for it.:thumbup:
 
OP
M

mws444

Well-known member
Joined
Jan 2, 2011
Messages
245
Location
Texas
I Love the build. My garage is average compared to this Dream build. Can't wait for more updates.

LOL....Yeah this thing just kind of blew up on me. Believe me when I started planning it about 10 years ago it was a lot smaller and did not have the fancy goodies.
 
OP
M

mws444

Well-known member
Joined
Jan 2, 2011
Messages
245
Location
Texas
Despite the lack of updates we are getting a lot done. They should have the shop floor all grouted this next week. It will take a little time as they will have to use black on the black tile and white on the white tile, so lots of tape.
We got the Moduline cabinets in today, hopfully we can get them installed this next week, if the race deck gets here.
All in all we should wrap this thing up this next week. I will post up pics when things start getting finished.
 

flybefree

Well-known member
Joined
May 18, 2008
Messages
1,111
Location
Ohio/Kentucky
Wrapped up this next week!?! That's crazy good news. Black grout on black and white on white....first class. Can't wait to see the final product. Next week...wow.

Shaun
 
OP
M

mws444

Well-known member
Joined
Jan 2, 2011
Messages
245
Location
Texas
Hey Shean, I have not forgotten about your request for some pics of the pecan harvesting equipment. We are harvesting so I figured action shots would make a lot more sense.
In the pictures below you can see the sweepers putting all of the leaves and pecans into windrows, the harvestors pick them up, blow off the leaves and put the pecans into the carts behind them. I also got a shot of the tree shaker, it has a large arm that grabs the tree then uses an out of balance spinning weight to shake the nuts loose. From there they have to go through a cleaning plant to remove the black hulls, sticks and dirt. The cleaning plant also seperates the heavy pecans from the lighter ones via air. I will try to get some pics of the cleaning plant soon.
 

Attachments

  • IMAG0264 (800x478).jpg
    IMAG0264 (800x478).jpg
    69.4 KB · Views: 646
  • IMAG0263 (800x478).jpg
    IMAG0263 (800x478).jpg
    76.2 KB · Views: 648
  • IMAG0260 (800x478).jpg
    IMAG0260 (800x478).jpg
    81.7 KB · Views: 610

R1chy

Well-known member
Joined
Sep 3, 2007
Messages
232
Location
Fairfax, VA
Looks like the tree shaker has street sweeper brushes in front and back of the wheels to keep some pecans from being crushed, is that correct?
 
OP
M

mws444

Well-known member
Joined
Jan 2, 2011
Messages
245
Location
Texas
Looks like the tree shaker has street sweeper brushes in front and back of the wheels to keep some pecans from being crushed, is that correct?

That is exactly correct, they are plumbed so the front ones run in forward and the rear in reverse. The ones on the steering tire rotate with the tire, amazing how many pecans they save.
 
OP
M

mws444

Well-known member
Joined
Jan 2, 2011
Messages
245
Location
Texas
Looks like the same technique they showed on Dirty Jobs. Would love to see that in action, just looks cool.

LOL that picture was taken early in the morning, there was still some dew on the leaves. When it gets dry it is a real dust maker. The leaves go thru the fan so it shreads them. If the wind dies, you quite literly can't see your own feet within about 50" of the discharge side of a harvester.
 
OP
M

mws444

Well-known member
Joined
Jan 2, 2011
Messages
245
Location
Texas
Now we're talking! Got all of the race deck but the cuts around the lift in and down. Was too excited about the cabinets to take the time to get them cut on Sunday.
Also got if the Moduline cabinets, they are all installed now but I only have a pic of the short wall. I will try to get a couple of pics of all of them once we get the floor cleaned up. Man I am drooling about shopping for enough tools to fill these puppies up.
 

Attachments

  • IMAG0267 (800x478).jpg
    IMAG0267 (800x478).jpg
    39.4 KB · Views: 1,179
  • IMAG0272 (800x478).jpg
    IMAG0272 (800x478).jpg
    30.4 KB · Views: 1,066

flybefree

Well-known member
Joined
May 18, 2008
Messages
1,111
Location
Ohio/Kentucky
WOW...thanks for showing us the pecan harvesting equipment...that's neat. Never saw the "Dirty Jobs" episode. Every new photo looks better than the last...amazing space, can't wait to see the tools.

Shaun
 

Nighttrain

Well-known member
Joined
Aug 6, 2009
Messages
2,682
Location
Dripping Springs, Tx
You really should have gone with red cabinets. I'll take those black ones from you, no charge I'll even come up and get them if you throw in 10lbs of pecans.
 
OP
M

mws444

Well-known member
Joined
Jan 2, 2011
Messages
245
Location
Texas
WOW...thanks for showing us the pecan harvesting equipment...that's neat. Never saw the "Dirty Jobs" episode. Every new photo looks better than the last...amazing space, can't wait to see the tools.

Shaun

I still owe you the cleaning plant pics, when its running it really does look like a Dirty Jobs episode. Removing the black husk creats a really acidic fine dust. We have a lot of exhaust fans but when the breeze is wrong it and still get bad.

Soda shop furniture is going to drag out until January for arrival. Then decorating this place is going to take a long time. I guess I need to hit some auctions and spend more time on the internet for all of that.
Then with the new room I guess I need to add to the stable...LOL
 
OP
M

mws444

Well-known member
Joined
Jan 2, 2011
Messages
245
Location
Texas
Simply spectacular! Those trees have been very, very good to you. Who'da'thunk you could make a living waiting for nuts to drop. lol

LOL...The farming side has been pretty good the last few years. However I have done better on the otherside, buying and shelling others pecans. Also do some realestate developing, farming houses so to speak. The economy really hasnt affected us there either...yet.
So I guess you could say I make a living busting nuts.:lol_hitti
 
OP
M

mws444

Well-known member
Joined
Jan 2, 2011
Messages
245
Location
Texas
Here are some pics of the floor work I was talking about. Grout on the black goes down first then they clean the overage off the white, tape and put down the white grout.
We are going to clean up the floor tomorrow so we can seal the grout, should look much better than in this picture.
 

Attachments

  • IMAG0277 (800x478).jpg
    IMAG0277 (800x478).jpg
    34.3 KB · Views: 750
  • IMAG0275 (800x478).jpg
    IMAG0275 (800x478).jpg
    44.1 KB · Views: 813
To avoid these ads, REGISTER NOW!
Top Bottom