To avoid these ads, REGISTER NOW!

Finally getting a shop! Interior finishing advice?

jtuttle4

Active member
Joined
Aug 14, 2016
Messages
27
Location
Missouri
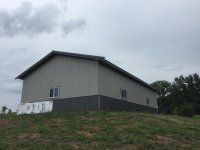
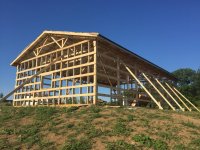
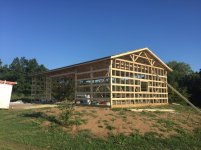
Updated-Finally getting a shop! Build thread.

Well the long wait is over and now I have a short, but longer feeling wait for the build to start. Got the green light and have the funds. Start date is first week of August but may get pushed up if someone ahead of me doesn't have their site quite ready.

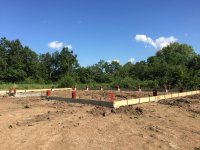
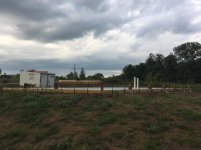
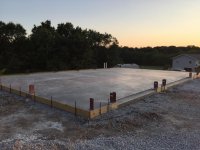
I just got the dirt work done and boy did I luck out on that. I had a guy give me a bid of almost 2k to level my pad(low corner was about 3' out). I came home from work the next day to find a dozer working terraces in the field next to my property. I want and talked to the operator and he said he only had a couple hours work left in the morning and could come right over and work it over for me, ended up charging $390 as his equipment was already there and he had nothing else lined up for the day! I did a little fine smoothing with my tractor and rear blade after and it looks great.

Anyway, the building I'm having put up is a 30x50x12. It will be an open building except for a small storage/ compressor room. I will have one side with my woodworking stuff and the other for auto and welding. It will be a post frame building but will be built with a concrete pier system instead of the traditional post in ground. 27ga steel with 50 year warranty, 16" overhang with gutters, a 16x10 and a 10x10 insulated overhead doors on the long side, 4 windows, double bubble under the roof, house wrap on the sides, and 4" floor for $32k, sound about right?

I will be finishing the interior myself. I'm planning on running water for a hose and sink. I will be using r19 batts in the walls and will blow in cellulose over a white metal ceiling. I plan on heating with a radiant tube, maintaining above freezing in the winter and turn it up when working. I've been getting excited so I've been picking up stuff on sale when I can. I bought 24 8' 4 bulb t8 fixtures for lighting, hoping this will be bright enough for me, arranged in 4 rows of 6 fixtures. Also picked up a 200amp square d box and some misc wiring and electrical supplies.

In stuck on what I want to finish the interior walls with. I like the idea of white metal like I'm going to use on the ceiling but don't like the difficulty of hanging stuff on the walls and having the gaps behind work benches. I do not want drywall. I'm leaning towards osb but am concerned with how well it will take paint and water damage to the bottoms if I wash something out inside the building. Any suggestions?

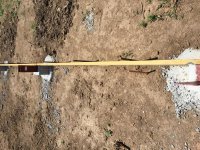
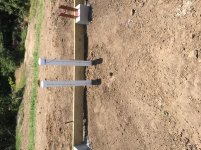
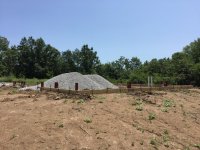
Here are the pad pics and I will update as progress is made.
 

Attachments

  • IMG_1713.jpg
    IMG_1713.jpg
    147.8 KB · Views: 152
  • IMG_1715.jpg
    IMG_1715.jpg
    146.2 KB · Views: 146
Last edited:
To avoid these ads, REGISTER NOW!

Falcon67

Well-known member
Joined
Jun 11, 2009
Messages
18,371
Location
Merkel, TX
I have an OSB interior - un-painted - and I like it. It's tough and you can hang things anywhere. I just backed the wife's race car into the shop and used rear bumper contact with the back wall to locate where to park in the slot LOL. Try that with drywall. If you plan on much of any splash work in an area, I would just use either 1x4 or 1x6 treated for ground contact - or 1x4 or 1x6 LP SmartSide trim as a "baseboard" and set your OSB on top. Space the baseboards off the concrete maybe 1/8~1/4" to allow air circulation.

I can tell you that OSB does not fall apart like a Walt Disney flower on contact with water. I used OSB on the walls in the old shop and the SW corner would regularly bleed water under the plate in heavy rain. There is also an unpainted OSB shed in the yard behind us, it's been there for 6 years now. It's just fine, if a little discolored.

The generally posted paint solution for OSB is a oil base primer - to prevent much lifting of the OSB surface - followed by coat(s) of latex.
 

Firebrick43

Well-known member
Joined
May 12, 2015
Messages
14,035
Location
West central Indiana
Really metal is not that bad to work with. Benches just need a back stop applied to keep gaps from being a problem. Either a 1/4"x4" strip of steel welded to a steel bench or a 1x6 screwed to the back of a wood bench.

Depending on how the cabinets are made a strip of 1"x2" pine applied to the back perimeter and the use a compass to scribe the metal profile and a coping or jig saw to cut it out. Take 15 min max.

You will spend far more time painting OSB and install than dealing with the metal and the metals ease of cleaning and good reflection of light make it a real winner.
 

njc41980

Well-known member
Joined
Jun 21, 2017
Messages
617
Location
Idaho Falls
I'm going through the exact same thing in my shop right now.

I chose to use OSB. As said above, it's not going to come apart with a little splash of water. It takes a little paint to cover it, but once done, I'll have a durable wall that can always be touched up when needed.

I'm probably over-thinking things, but my main concern has been at the base. If it's going to get worn and rotten, that's where it will happen, so I'm first painting my epoxy on the floor to seal out moisture, then caulking with a good urethane caulk, than I'll use some rubber base that will be sealed with another bead of caulk.

I'll post a picture later.
 

Joeys79

Well-known member
Joined
Nov 28, 2013
Messages
50
Location
Southern Indiana
OSB for me. I wanted to be able to hang anything anywhere, and didn't want it to dent or put a hole if bumped. Ran a quick swipe of latex calk between the panels with a putty knife just for good measure. Kilz original oil primer x2 coats, then exterior semi gloss latex x2. I read the water base latex directly on the OSB could cause it to melt the glue holding it together and cause it to flake up. Trimmed it out like an old Gulf station. It was a bit of work, but I figure I'm only doing it once.

There's a Rust Bullet floor down there, and Frog tape pressed onto all the nooks and crannies can give nice clean paint lines. I plan on metal for the ceiling.

Good Luck to ya...:beer:
 

Attachments

  • DSCF4310.jpg
    DSCF4310.jpg
    142.2 KB · Views: 264
  • DSCF4303.jpg
    DSCF4303.jpg
    142.9 KB · Views: 248
  • DSCF4139.jpg
    DSCF4139.jpg
    191 KB · Views: 265
  • DSCF3923.jpg
    DSCF3923.jpg
    141.4 KB · Views: 282
  • DSCF3902.jpg
    DSCF3902.jpg
    146.7 KB · Views: 261

ducksface

Banned
Joined
Oct 25, 2012
Messages
2,477
The only advice that pertains:
Finish it to suit you (or for resale if the 'you' part is too weird.)
 

Falcon67

Well-known member
Joined
Jun 11, 2009
Messages
18,371
Location
Merkel, TX
Joeys79, like your color scheme. I was a Gulf station rug rat when I was a kid LOL. Ride my bike up there just to get peanuts for a penny out of the machine, and bug the mechanics.

>didn't want it to dent or put a hole if bumped.
LOL - jumped in the golf cart, put it in the wrong gear, stabbed the gas - BOOM. That did crunch in some of the OSB. However, if the wall had been finished with drywall the cart would have been sitting outside in the yard.
 
OP
J

jtuttle4

Active member
Joined
Aug 14, 2016
Messages
27
Location
Missouri
Thanks for the input. I really like the idea of being able to hang most anything wherever I like without issue. For those with osb wall coverings, what thickness are you using?
 

jetnow1

Well-known member
Joined
Jun 27, 2016
Messages
511
Location
CT.
I am amazed that so many claim drywall is weak- it is not as strong but is easy to patch,
and much more fire resistant than osb. Looks much better painted as well. I think the ideal
solution would be metal on the bottom 4 feet, drywall above, but you need to do it to fit your needs or as pointed out above, a future buyer. To me the ultimate use of the space
will determine the best material- heavy metal work would use metal for fire resistance as well as material damage prevention, woodworking would use drywall. My garage will get drywall as it is used for woodworking and automotive, a little metal fabrication but not enough to spend the extra. I do not park by ear though.
 

Falcon67

Well-known member
Joined
Jun 11, 2009
Messages
18,371
Location
Merkel, TX
Thanks for the input. I really like the idea of being able to hang most anything wherever I like without issue. For those with osb wall coverings, what thickness are you using?

Regular 7/16".

LOL, drywall is weak when you hit it with a 3000 lb race car or a 900 lb golf cart moving at full bore. It's also a PITA to find a stud and to cut/mod things like shelving to fit the stud spacing. I can attached shelf brackets using 1 5/8 deck screws to any square inch of my walls without any prep work. Iron air piping runs along the walls and down to the drop connection, can run those anywhere I need or like because the screw holding the pipe clamp will bite hard anywhere.

As for the fire resistant thing, which comes up in EVERY discussion about OSB, we use a 4x4 chunk of it for setting off fireworks. Haven't got it to burn yet. I would say that if your welding table is against a wall, 1) that's a bad place for welding table as it greatly limits the use of the table and 2) if you are worried about fire, back that portion of the wall with a sheet of HardiPanel, back side out. Very thin, greatly fire resistant.

The main thing about fire is to pay attention to what you are doing. The old shop had nothing but a bit of OSB in places and exposed kraft paper walls and ceiling. Lots of welding, grinding, torch work, etc and no fires or even scorch marks on the paper.
 
Last edited:
OP
J

jtuttle4

Active member
Joined
Aug 14, 2016
Messages
27
Location
Missouri
Update! I was moved ahead on the schedule and they came out Friday and set the grade boards, metal column brackets, and poured the concrete piers. They are bringing in gravel today. Tonight when I get home from work I'm going to install 2 ground rods and rough in some pvc for water line coming in and a drain out. If weather cooperates, floor should be poured by the end of the week. Getting excited now.
 

Attachments

  • IMG_1756.jpg
    IMG_1756.jpg
    145.3 KB · Views: 104
  • IMG_1759.jpg
    IMG_1759.jpg
    148.4 KB · Views: 104
  • IMG_1762.jpg
    IMG_1762.jpg
    146.2 KB · Views: 95
  • IMG_1765.jpg
    IMG_1765.jpg
    147.7 KB · Views: 102

rburke65

Well-known member
Joined
Nov 10, 2007
Messages
12,349
Location
Canfield, Ohio
I have a similar build with metal ceiling liner and I didn't want either drywall or OSB so I discovered LP Smart Siding. Comes in 4x8' sheets and I was able to buy it in 4x10' sheets. Comes primered, ship lapped, will hold a nail or screw with no need to hunt for a stud. I screwed it to the studs so, if necessary later, I can remove it relatively easy. I like it.good luck!
 

matt_i

Well-known member
Joined
Mar 14, 2008
Messages
10,726
Location
SE Michigan
You could improve the OSB by pre-painting the saw-cut edges before installation, possibly the entire backside on the lowest piece. This takes some work and planning to handle all of the sheets ahead of time, and then take the time to paint and cure any custom-cut pieces that yous saw on-site as you are finishing.

Also, using some sort of a fan, ceiling, pedestal or otherwise, works wonders to dry things out after they got wet. For example, wash off a car, then set a 4 hour timer for the fan to run. Unless its very humid or raining outside, it will dry pretty fast.

I don't do any washing in my shop but keep the ceiling fan running on low 24x365 to prevent moisture issues.
 

Bib Overalls

Well-known member
Joined
Dec 4, 2006
Messages
3,318
Location
Jonesboro, Arkansas
I used 7/16" OSB. Gave it two coats of Kilz oil based primer followed with two coats of latex; grey from the floor to the 4' line and white above. Used 4" wide strips of 1/4" luan painted dark grey as an accent line. Impossible to paint a line on OSB without bleeding under the masking tape.
 

n20junkie

Well-known member
Joined
Aug 22, 2010
Messages
538
Location
Grand Island, NY
I prefer 1/2 BC plywood.

With 2 coats of paint, it looks just like drywall, nice and flat. The seams can be finished, but I chose to leave them as they are. Just think about where your junk will go, and have your seams hide mostly behind that stuff.


I also prefer screwing in case a panel needs to be removed or replaced.
 

Farrier

Well-known member
Joined
Mar 27, 2011
Messages
982
Location
California Foothills
The good thing about OSB is if you have an fire, the OSB will super heat the fire to help insure that more of the contents within the building burn.
 

gasserdan

Well-known member
Joined
Nov 27, 2012
Messages
80
I really like this forum, but it seems like a lot of the posts start out with someone wanting advice or help and then someone ends ups being sarcastic.
 
To avoid these ads, REGISTER NOW!

Falcon67

Well-known member
Joined
Jun 11, 2009
Messages
18,371
Location
Merkel, TX
The good thing about OSB is if you have an fire, the OSB will super heat the fire to help insure that more of the contents within the building burn.

BS - I've welded on it and I use a 4' square chunk for fireworks in the driveway to keep from marking the concrete.
 

slimcake

Well-known member
Joined
Sep 27, 2016
Messages
929
I went with sheetrock. Looks much better IMO. I will probably put something on the bottom 4' in the back area where the work will be done. Hoist gets installed today but this should give you an idea.
 

Attachments

  • IMG_20170507_164404203.jpg
    IMG_20170507_164404203.jpg
    123.4 KB · Views: 174

Catadj78

Well-known member
Joined
Aug 11, 2014
Messages
1,009
Location
Alabama
I did the osb thing as well.

What I learned and my suggestions are

Get it all put up and then sand it. Nothing too time consuming but pay attention to where the **** joints are.

Prime it with oil based. I used Kilz and two coats.

Mix some drywall mud so you can roll it on.

Sand it again. More time spent here the smoother the surface obviously

Then paint with some good paint.

Mine turned out so well that from even 5' you can't tell it's osb cept in the places where I didn't spend enough time to sand good
 

Toomanytools?

Well-known member
Joined
Nov 4, 2010
Messages
855
Location
Washington
I did the osb thing as well.

What I learned and my suggestions are

Get it all put up and then sand it. Nothing too time consuming but pay attention to where the **** joints are.

Prime it with oil based. I used Kilz and two coats.

Mix some drywall mud so you can roll it on.

Sand it again. More time spent here the smoother the surface obviously

Then paint with some good paint.

Mine turned out so well that from even 5' you can't tell it's osb cept in the places where I didn't spend enough time to sand good
That's a bit labor intense, but I can see were a thin coat of mud would even out the fibers and give a smooth finish.
 
OP
J

jtuttle4

Active member
Joined
Aug 14, 2016
Messages
27
Location
Missouri
That's a bit labor intense, but I can see were a thin coat of mud would even out the fibers and give a smooth finish.

I agree, that seems to be more work than I'm planning to do as far as wall covering. I think I'm going to go with 7/16" OSB, caulk the seams, and paint it with a decent paint/primer in one and see how that does.

Also more updates. Large pile of gravel has been delivered, I installed 2 grounding rods near where I will be installing electrical service, and dug out/set 3" PVC for water line coming in and for sink drain(miserable work with 110 degree heat index and humidity. I'll post some more pics soon. Now for the concrete guys to arrive and spread the gravel, vapor barrier, rebar, and to pour. They should be here Friday or Monday to start.
 

morrillm06

Well-known member
Joined
Jul 21, 2015
Messages
106
Location
Moultonborough NH
Jtuttle, that is exactly what I am doing in my 32x40 right now 7/16 osb, caulk the seams and paint, I would advise against paint primer, I tried it and was not satisfied. I used kilz for primer and the cheapest semi gloss white glidden paint that lowes had and it turned out well. the oil based primer is the key to making osb look decent, it just seem to drink it if the first coat is not oil based
 
OP
J

jtuttle4

Active member
Joined
Aug 14, 2016
Messages
27
Location
Missouri
Jtuttle, that is exactly what I am doing in my 32x40 right now 7/16 osb, caulk the seams and paint, I would advise against paint primer, I tried it and was not satisfied. I used kilz for primer and the cheapest semi gloss white glidden paint that lowes had and it turned out well. the oil based primer is the key to making osb look decent, it just seem to drink it if the first coat is not oil based

I'll keep that in mind on the oil based primer. Are you just using standard painters caulk on the seams? Any pictures of how it's looking?
 

n20junkie

Well-known member
Joined
Aug 22, 2010
Messages
538
Location
Grand Island, NY
The good thing about OSB is if you have an fire, the OSB will super heat the fire to help insure that more of the contents within the building burn.

I have 55 gallon drums of methanol, acetylene and oxygen cylinders, nitrous..... the last concern I have is the painted plywood.
 
OP
J

jtuttle4

Active member
Joined
Aug 14, 2016
Messages
27
Location
Missouri
Update, grounding rods installed, roughed in some pvc for water, line in and a drain. They will be starting the concrete work tomorrow unfortunately I'll be out if town for work so I won't be able to see the results for a few days.
 

Attachments

  • IMG_1777.jpg
    IMG_1777.jpg
    147.2 KB · Views: 55
  • IMG_1778.jpg
    IMG_1778.jpg
    148.4 KB · Views: 51
  • IMG_1779.jpg
    IMG_1779.jpg
    148.2 KB · Views: 52
  • IMG_1776.jpg
    IMG_1776.jpg
    147.5 KB · Views: 51

*JJ*

Member
Joined
Mar 21, 2011
Messages
19
Location
Texas
A good idea that I read about on this forum is to take pictures of plumbing locations in the ground, prior to concrete, and pictures of the walls and location of wiring, etc. That way when it's covered up, you'll know what's in there.
 

onthefence777

Well-known member
Joined
Feb 19, 2012
Messages
404
A good idea that I read about on this forum is to take pictures of plumbing locations in the ground, prior to concrete, and pictures of the walls and location of wiring, etc. That way when it's covered up, you'll know what's in there.

AND have a tape measure in close focus to a known corner in all relevant places!
 

farmall400

Well-known member
Joined
Mar 18, 2012
Messages
304
What brand building? I've been getting quotes and your price for a 30x50 with floor for 32k sounds incredible.
 

Farrier

Well-known member
Joined
Mar 27, 2011
Messages
982
Location
California Foothills
So in our 40' sea train firefighting burn props, the OSB we use to demonstrate flash over really isn't burning?? I never knew that. I'll be sure to pass it along to our training chief.
 

NUTTSGT

Super Moderator
Staff member
Joined
Sep 14, 2009
Messages
50,946
Location
Northern Central Ohio
So in our 40' sea train firefighting burn props, the OSB we use to demonstrate flash over really isn't burning?? I never knew that. I'll be sure to pass it along to our training chief.

OSB is a wood product and it does burn. It can be quite hard to get started at times.

However when you use it during fire training in 40' steel containers, it's probably hanging on the side walls from chains and the fire is fueled by burning wood pallets and constantly refueled. Those instructors are trying to make the hottest fire they possibly can get for the trainees. . . like 1000°F at the ceiling.

The drywall/OSB debated has been repeated many times over the years. No reason to :deadhorse
 
OP
J

jtuttle4

Active member
Joined
Aug 14, 2016
Messages
27
Location
Missouri
What brand building? I've been getting quotes and your price for a 30x50 with floor for 32k sounds incredible.

I don't know what area you are from but it's a local company here in MO, Generational Buildings. I received quotes from several builders and most were within $500 of each other or so, with the exception being Morton and Cleary that were almost 10k higher and the specs were very similar.
 
OP
J

jtuttle4

Active member
Joined
Aug 14, 2016
Messages
27
Location
Missouri
update

Progress update...
Floor was poured and finished about 2 weeks ago. Monday afternoon a truck arrived to drop off materials. Yesterday(Tuesday) the crew was on site and hard at it by 6 a.m. Tuesday afternoon walls were up and roof steel installed. Today they put up the ridge vent, finished interior stud walls, tyvek, windows, man door, and most exterior steel and trim.
 

Attachments

  • IMG_1820.jpg
    IMG_1820.jpg
    139.8 KB · Views: 29
  • IMG_1819.jpg
    IMG_1819.jpg
    149.2 KB · Views: 32
  • IMG_1818.jpg
    IMG_1818.jpg
    147.5 KB · Views: 30
  • IMG_1817.jpg
    IMG_1817.jpg
    145.1 KB · Views: 27
  • IMG_1812.jpg
    IMG_1812.jpg
    142.7 KB · Views: 28
  • IMG_1809.jpg
    IMG_1809.jpg
    144.7 KB · Views: 31
  • IMG_1821.jpg
    IMG_1821.jpg
    143.6 KB · Views: 32
To avoid these ads, REGISTER NOW!
Top Bottom