To avoid these ads, REGISTER NOW!

First timer - TIG welds are gray - tried everything :(

handyman2020

Well-known member
Joined
Sep 22, 2019
Messages
222
Location
Toronto
hi,
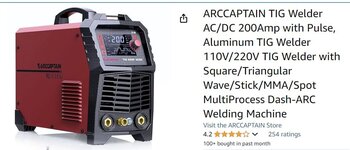
I am practicing TIG welds for first time so i can do welding on my custom headers, welder is running at 120V


The settings I used are with 100% argon
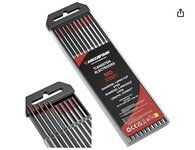
tried DC TIG + 4T + NO PULSE + 0.3seconds pre flow + 3 to 4 seconds post flow + cup 5 pink + 1.6mm red Tungsten Electrode Red - 2% Thoriated
tried DC TIG + 4T + PULSE + 0.3seconds pre flow + 3 to 4 seconds post flow + cup 5 pink + 1.6mm Tungsten Electrode Red - 2% Thoriated
tried DC TIG + 2T + PULSE + 0.3seconds pre flow + 3 to 4 seconds post flow + cup 5 pink + 1.6mm Tungsten Electrode Red - 2% Thoriated
tried DC TIG + 2T + NO PULSE + 0.3seconds pre flow + 3 to 4 seconds post flow + cup 5 pink + 1.6mm Tungsten Electrode Red - 2% Thoriated

Tried changing argon flow from 10to 22
there are no leaks in torch for argon, the ball stays down unless i start welding


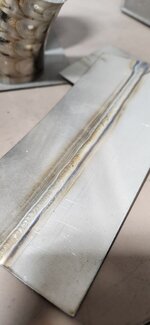
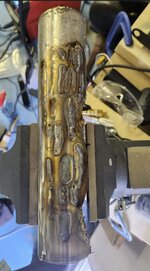
Material is Stainless Steel, first, I buffed surface with 80grit sanding wheel and then acetone and then tried welding

I tried with and without TIG filler rod to rule out one more factor, i.e. I ran the torch on surface of steel and just moved it without putting filler rod.
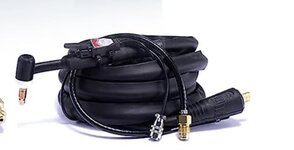
Torch;
tried bigger and smaller arc length as well like holding torch close enough to surface and far enough.
tried sanding TIG rod pointy angle at different angles, 30 and 60
tried extending and reducing tig rod length out of cup
tried holding torch and certain degrees as well.

I see that the metal gets red hot while doing welds, but when I reduce amps to 25, the filler rod wont melt/flow


tried 20A, 35A, 45A, 65A, all way to 120A with above settings

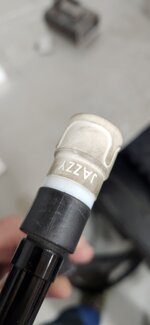
I do not have foot pedal for this welder and there is a simple switch on torch handle to turn on/off

there is no air coming in the room from anywhere, the garage is not ventilated unless I open door.

or what is wrong or going on here? why cant i get clean weld or the welds I did below are acceptable?

what is that I needed to buy to have some improvements in the welds?

Thankyou and Happy Weekend.
 

Attachments

  • tig1.jpg
    tig1.jpg
    67.7 KB · Views: 225
  • weld1.jpg
    weld1.jpg
    191.7 KB · Views: 294
  • weld2.jpg
    weld2.jpg
    60.9 KB · Views: 326
  • weld3.jpg
    weld3.jpg
    174.3 KB · Views: 306
  • tig rods.jpg
    tig rods.jpg
    39.8 KB · Views: 261
  • tig rod.jpg
    tig rod.jpg
    56.5 KB · Views: 185
Last edited:
To avoid these ads, REGISTER NOW!
OP
H

handyman2020

Well-known member
Joined
Sep 22, 2019
Messages
222
Location
Toronto
Are you wiping down your filler rods?

You electrode is definitely contaminated in the picture and needs broke off and reground.
well, i tried just passing the torch without any filler rod, still the surface turned dark / gray

i sanded it and made it look nice and pointy when i started, but still was doing gray welds.

no, I never cleaned filler rods when I tried with filler rods
 

Firebrick43

Well-known member
Joined
May 12, 2015
Messages
14,037
Location
West central Indiana
well, i tried just passing the torch without any filler rod, still the surface turned dark / gray

i sanded it and made it look nice and pointy when i started, but still was doing gray welds.

no, I never cleaned filler rods when I tried with filler rods
Ok, but was that with the electrode contaminated like that? Also are you welding in a windy or breezy place?
 
OP
H

handyman2020

Well-known member
Joined
Sep 22, 2019
Messages
222
Location
Toronto
Ok, but was that with the electrode contaminated like that? Also are you welding in a windy or breezy place?
no, in the beginning, electrode was sanded down and was shiny and clean.

no, i forgot to add in main post, there is no ventilation where I am trying to practice. like i have to open door when i need fresh air.
 

Firebrick43

Well-known member
Joined
May 12, 2015
Messages
14,037
Location
West central Indiana
When you tap the foot pedal and the gas starts, can you feel it on your cheek.

Just make sure you let off the pedal so you don't get HF to the cheek.

It definitely looks like your not getting flow to cover the puddle.
 
OP
H

handyman2020

Well-known member
Joined
Sep 22, 2019
Messages
222
Location
Toronto
When you tap the foot pedal and the gas starts, can you feel it on your cheek.

Just make sure you let off the pedal so you don't get HF to the cheek.

It definitely looks like your not getting flow to cover the puddle.
i dont have foot pedal, all I have this click switch on the torch handle.
 

Attachments

  • torch handle button.jpg
    torch handle button.jpg
    23.3 KB · Views: 221

Firebrick43

Well-known member
Joined
May 12, 2015
Messages
14,037
Location
West central Indiana
do i need foot pedal?

do I need bigger cup size?
You don't have to have a foot pedal. I am not sure on what exactly you have as there a multiple different styles and functionality differences in on torch controls but I have used them successfully at times. I do prefer a foot pedal when its possible to use it.

If you click the button real quick do you hear the solinoid opening? Does it stay open for several seconds even if you choose not to weld?
If so can you physically feel flow from the cup?

It wouldn't hurt to have a bigger cup or even a gas lens but you your cup size should work regardless.
 

cvairwerks

Well-known member
Joined
Aug 12, 2016
Messages
7,214
Location
Within hearing distance of Texas Motor Speedway
As Jody said, he was using the foot pedal, but could have used a finger switch torch just as well. I'm not a stainless guy, but it looks like too much area heat and not enough localized. If you noticed, Jody was using about 100 amps and chill bars all around the welding area. Granted he was working with .125" thick stock. Try setting the current at 2/3rds of what the chart says for same thickness steel you are using and set up some type chill bar and see how things go.
 
OP
H

handyman2020

Well-known member
Joined
Sep 22, 2019
Messages
222
Location
Toronto
You don't have to have a foot pedal. I am not sure on what exactly you have as there a multiple different styles and functionality differences in on torch controls but I have used them successfully at times. I do prefer a foot pedal when its possible to use it.

If you click the button real quick do you hear the solinoid opening? Does it stay open for several seconds even if you choose not to weld?
If so can you physically feel flow from the cup?

It wouldn't hurt to have a bigger cup or even a gas lens but you your cup size should work regardless.
yes, I hear the solenoid and gas flow and i also see ball on the argon cylinder goes up and down.
 
OP
H

handyman2020

Well-known member
Joined
Sep 22, 2019
Messages
222
Location
Toronto
As Jody said, he was using the foot pedal, but could have used a finger switch torch just as well. I'm not a stainless guy, but it looks like too much area heat and not enough localized. If you noticed, Jody was using about 100 amps and chill bars all around the welding area. Granted he was working with .125" thick stock. Try setting the current at 2/3rds of what the chart says for same thickness steel you are using and set up some type chill bar and see how things go.
i have a bare steel stock, not stainless, i will try practicing on that.
 

PCustoms

Well-known member
Joined
Jul 23, 2011
Messages
22,825
Location
VT
Have you ever TIG before?

What weld process are you proficient with?
 

dogdog

Well-known member
Joined
Nov 15, 2011
Messages
12,711
well, i tried just passing the torch without any filler rod, still the surface turned dark / gray

i sanded it and made it look nice and pointy when i started, but still was doing gray welds.

no, I never cleaned filler rods when I tried with filler rods

what you gave up on aluminemuemm?

with stainless steel...

gas coverage ? I do at least 12CFH or 15CFH when I did my exhaust.

back purge is a real thing. back purge with argon or solarflux

I like this guy's series... good info.


found this guy on one of the podcast with weld.com... he seems to be good. offers classes online with a personal feedback or something to that extend.


welder4956

Well-known member
Joined
Apr 8, 2010
Messages
3,070
Location
Birmingham, AL USA
Try holding the distance between the tip of the tungsten and the puddle to no more than 1/8". Also, a #5 cup opening is 5/16", so the tungsten should not stick out more than the cup diameter (5/16" in this case) for good gas coverage. Amps should not be more than 60-70 depending on the thickness of the stainless header tubes.

Any idea what grade of stainless the tubes and filler wire are?
 

slowtwitch73

Well-known member
Joined
Apr 18, 2019
Messages
5,876
Location
Hellgate
You need a bunch of properly ground, cleaned, and sized electrodes handy. As soon as the electrode gets looks bad, swap it out. If it happens immediately something is wrong... no gas, bad gas, dirty electrode, split/cracked electrode, wrong type, handle not plumbed right, bad cup, etc etc

Having a bunch of them ready helps to rule out variables faster and zero in on the problem.

Get your pre and post flow set up on the heavy side (few seconds each) and keep the torch close to the weld even after you let off the juice to keep the gas purging.

Make sure there's no fan or breeze where you are welding...
 

Firebrick43

Well-known member
Joined
May 12, 2015
Messages
14,037
Location
West central Indiana
yes, I hear the solenoid and gas flow and i also see ball on the argon cylinder goes up and down.
I have seen hoses in the machine not clamped correctly and and pop off and torch hoses pop off. That is why you must feel for flow as it will sound normal and show flow but nothing out to the tip
 

Donnie O

Member
Joined
Jul 30, 2021
Messages
22
Get yourself a gas lens. I use a jazzy 10 from furick. This is .040 stainless
 

Attachments

  • 20240720_144754.jpg
    20240720_144754.jpg
    307.7 KB · Views: 179
  • 20240720_144708.jpg
    20240720_144708.jpg
    164.2 KB · Views: 159
To avoid these ads, REGISTER NOW!

Dakotadadv8

Well-known member
Joined
May 30, 2021
Messages
1,483
Also looking for a MIG TIG welder getting into the action learning something new. Repairing beater truck, looking at Lincoln Mig welder from Home Depot. Using 6500 generator for the work should be plenty of power.
 
OP
H

handyman2020

Well-known member
Joined
Sep 22, 2019
Messages
222
Location
Toronto
Have you ever TIG before?

What weld process are you proficient with?
Never TIG before, no prior experience with welding, just basic brazing with propane torch

what you gave up on aluminemuemm?

with stainless steel...

gas coverage ? I do at least 12CFH or 15CFH when I did my exhaust.

back purge is a real thing. back purge with argon or solarflux

I like this guy's series... good info.


found this guy on one of the podcast with weld.com... he seems to be good. offers classes online with a personal feedback or something to that extend.


gave up on aluminium because it was only one time project, and its holding weld somehow
just for practice, why I need backpurge, i have backpurge system ready but unless I cant figure out simple stuff, i cant do backpurge, i tried 10 to 20CFH while doing those welds in photo.

Try holding the distance between the tip of the tungsten and the puddle to no more than 1/8". Also, a #5 cup opening is 5/16", so the tungsten should not stick out more than the cup diameter (5/16" in this case) for good gas coverage. Amps should not be more than 60-70 depending on the thickness of the stainless header tubes.

Any idea what grade of stainless the tubes and filler wire are?
304 stainless steel
https://www.amazon.com/dp/B00GJU69XC?tag=atomicindus08-20 is the listing for filler rod

You need a bunch of properly ground, cleaned, and sized electrodes handy. As soon as the electrode gets looks bad, swap it out. If it happens immediately something is wrong... no gas, bad gas, dirty electrode, split/cracked electrode, wrong type, handle not plumbed right, bad cup, etc etc

Having a bunch of them ready helps to rule out variables faster and zero in on the problem.

Get your pre and post flow set up on the heavy side (few seconds each) and keep the torch close to the weld even after you let off the juice to keep the gas purging.

Make sure there's no fan or breeze where you are welding...

there is no ventilation or fan running in the room, yes, i have a lot of red TIG rods or I can grind this tig rod again i will do 3 seconds pre flow and 3 seconds post flow
Get yourself a gas lens. I use a jazzy 10 from furick. This is .040 stainless
alright

What polarity are you attaching the torch to on the machine?
NEGATIVE, right side looking from front
How sure are you the shop didn't give you a bottle of C25 instead of pure argon?
I have receipt, it says argon
Put a new SS wire brush on your shopping list, Just for welding ss.
Does your regulator drop when you turn the machine off ?
yes, the ball drops when machine is off


--------------

how can I just get it to not make any dark area even without any filler rod, is it possible to do that for test/practice?
just run the torch without filler rod?
 
Last edited:

dogdog

Well-known member
Joined
Nov 15, 2011
Messages
12,711
gave up on aluminium because it was only one time project, and its holding weld somehow
just for practice, why I need backpurge, i have backpurge system ready but unless I cant figure out simple stuff, i cant do backpurge
For practice you probably don’t need back purge on SS. For actual stuff you do to prevent sugaring or what ever that term is. The second video probably explains it better than I do. You do you, seems like you know what you are doing already, probably more expert than everyone on this thread. Probably one of the CWE/CWI/CWS or CWT folks.
 

welder4956

Well-known member
Joined
Apr 8, 2010
Messages
3,070
Location
Birmingham, AL USA
10-15 CFH is fine for a #5 cup. Your photos look like overheating or poor shielding gas coverage. Once you get the puddle started, speed up your travel and see if it looks better. If you have too much tungsten stick out or tungsten is too far away from the puddle, you will have poor shielding coverage. People new to TIG seem to have trouble seeing the puddle and intinctively pull away causing shielding gas issues. Keep the arc and gas cup as close as you can to the puddle. The other thing I see people do is try to weld like it is a brazing torch. In TIG the melting comes from the arc, not like a flame torch. Keep practicing and watch some of the videos linked above, it will get better.
 

American Locomotive

Well-known member
Joined
Jan 8, 2017
Messages
10,958
Location
Rhode Island
Some tips for stainless:
1) When you let go of the torch button to kill the arc, keep the torch over the area until the metal stops glowing. You want the post-flow to keep the weld protected.

2) Keep your tungsten clean. You mention "sanding" - make sure the tungsten is clean after you sharpen it. You don't want any build up or contaminants anywhere.

3) Keeping your filler rods clean is important. If you dip your filler rod into the molten pool, then pull it out and let it touch air, the stainless in the filler rod will become contaminated, and you will need to cut off the end. As you pull the filler rod out of the weld puddle, make sure the tip stays in the shield gas flow until the filler rod cools down.

4) Use a stainless steel wire brush to clean the weld area prior to welding.

5) I recommend using denatured alcohol instead of acetone to wipe down. Acetone can leave a residue that might contaminate your weld.

6) I highly recommend you get a pedal for your welder. It's very difficult (for me) to control heat while TIG welding at a fixed setting. Being able to adjust it on the fly with the pedal is a life saver.

7) The basic TIG welding process is pretty straight forward to get the hang of, but it's very difficult to get good at it. It takes a lot of practice. Don't expect to get good after a couple hours of practice.
 
OP
H

handyman2020

Well-known member
Joined
Sep 22, 2019
Messages
222
Location
Toronto
Some tips for stainless:
1) When you let go of the torch button to kill the arc, keep the torch over the area until the metal stops glowing. You want the post-flow to keep the weld protected.

2) Keep your tungsten clean. You mention "sanding" - make sure the tungsten is clean after you sharpen it. You don't want any build up or contaminants anywhere.

3) Keeping your filler rods clean is important. If you dip your filler rod into the molten pool, then pull it out and let it touch air, the stainless in the filler rod will become contaminated, and you will need to cut off the end. As you pull the filler rod out of the weld puddle, make sure the tip stays in the shield gas flow until the filler rod cools down.

4) Use a stainless steel wire brush to clean the weld area prior to welding.

5) I recommend using denatured alcohol instead of acetone to wipe down. Acetone can leave a residue that might contaminate your weld.

6) I highly recommend you get a pedal for your welder. It's very difficult (for me) to control heat while TIG welding at a fixed setting. Being able to adjust it on the fly with the pedal is a life saver.

7) The basic TIG welding process is pretty straight forward to get the hang of, but it's very difficult to get good at it. It takes a lot of practice. Don't expect to get good after a couple hours of practice.
1. yes, i did that
2. I didnt clean Tunsten rod after sanding
4 i will try that
5 okay, i have 99% alcohol from store, i will use that to clean
6 i will order pedal
7 yes, i see that coming :(
 

slowtwitch73

Well-known member
Joined
Apr 18, 2019
Messages
5,876
Location
Hellgate
how can I just get it to not make any dark area even without any filler rod, is it possible to do that for test/practice?
just run the torch without filler rod?
Yeah u can for sure run w/o filler.. preferably with pulse, but not mandatory. It's good practice.
 

manwithtools

ALLIANCE MEMBER
Joined
Aug 24, 2015
Messages
13,849
Location
Lebanon, TN
How sure are you the shop didn't give you a bottle of C25 instead of pure argon?

I got a bottle of bad argon... seemed like a long shot, but after pulling my hair out I bought one from somewhere else and problem solved.

This^, I had the same experience the OP is having when I first tried TIG. I got super frustrated and tried everything I could, thinking I was doing something wrong. Finally exchanged tanks and suddenly everything was fine.
OP, do you know someone you could borrow a known good tank of Argon from, just to eliminate bad (or wrong) gas in your tank?
 
Last edited:
OP
H

handyman2020

Well-known member
Joined
Sep 22, 2019
Messages
222
Location
Toronto
This^, I had the same experience the OP is having when I first tried TIG. I got super frustrated and tried everything I could thinking I was doing something wrong. Finally exchanged tanks and suddenly everything was fine.
OP, do you know someone you could borrow a known good tank of Argon from just to eliminate bad (or wrong) gas in your tank?
good idea, i will try that, my friend has a small argon tank
 
OP
H

handyman2020

Well-known member
Joined
Sep 22, 2019
Messages
222
Location
Toronto

Attachments

  • pedal.jpg
    pedal.jpg
    149.9 KB · Views: 133

cosmokenney

Well-known member
Joined
Oct 18, 2017
Messages
275
Location
Loyalton, CA
Learning to tig on stainless is going to be frustrating -- especially without a foot pedal. You should start with some mild steel with a similar thickness. When you can weld that nice and shiny with some ER70s-2 or s-6 rod, then you should progress to stainless.
But remember that stainless retains heat much more than mild steel.
So, you have to weld fast, and counterintuitively hot on stainless. You weld fast to get ahead of the heat. And you should dab filler faster than mild steel. Start your weld by double/triple dabbing at the start of the weld. That will cool down the puddle after you get the base metal liquid. But if you cannot move and dab ad a good pace then keep practicing on mild steel until moving and dabbing are second nature.
Also, on SS, fit-up is super important. There needs to be no gaps especially on thin wall stuff like headers.
 
OP
H

handyman2020

Well-known member
Joined
Sep 22, 2019
Messages
222
Location
Toronto
Practiced for 3-4hours today, I am little excited now, can you have a look, changed TIG welder to spot and then pulse and here are the result, with spot and pulse + I have to put torch really close, like 2mm above the surface, not sure why, but I changed these 3 things and i dont have gray anymore. I have uploaded 5 videos, 30seconds each

@Firebrick43
@cvairwerks
@PCustoms
@dogdog
@welder4956
@slowtwitch73
@Donnie O
@OccupantRJ
@rlitman
@Dakotadadv8
@steel 35
@American Locomotive
@manwithtools
@cosmokenney


I uploaded videos so you can check whats going, so far I have managed to not have gray without filler rod, now is there something wrong with my filler rod, my stainless steel is 304 exhaust tubes and mandrel bends from china ( cheap quality) the issue i am facing is filler rod is taking too long to melt and by that time the weld area is getting dark gray/black as i have to keep it at one place to get filler rod molten.

which filler rod to buy? i have 1/16 inch, not sure if that is too thick for my job?
SS 304 steel tube thickness is exactly as measured is 1.5mm
ss 304 steel mandrel bend ( from china ) thickness is exactly as measured is 1.45mm

this is rod I am using https://www.amazon.ca/dp/B00GJU69XC?tag=atomicindus04-20 1/16inch


Attempt 1

Attempt 2


Attempt 3


Attempt 4


Attempt 5
 
Last edited:

welder4956

Well-known member
Joined
Apr 8, 2010
Messages
3,070
Location
Birmingham, AL USA
Looking better, but may still need to reduce the amps so you have time to add filler wire. Try reducing to 40 amps.

Also, 0.035" or 0.045" diameter wire would be a better choice for thin exhaust tubing.
 
To avoid these ads, REGISTER NOW!
Top Bottom