To avoid these ads, REGISTER NOW!

Above 1200 Sq/FT Garage Refurb®

Wokspaces above 1200 squarefeet.
OP
N

NUTTSGT

Super Moderator
Staff member
Joined
Sep 14, 2009
Messages
50,903
Location
Northern Central Ohio
Re: garage refurb

NUTTSGT -

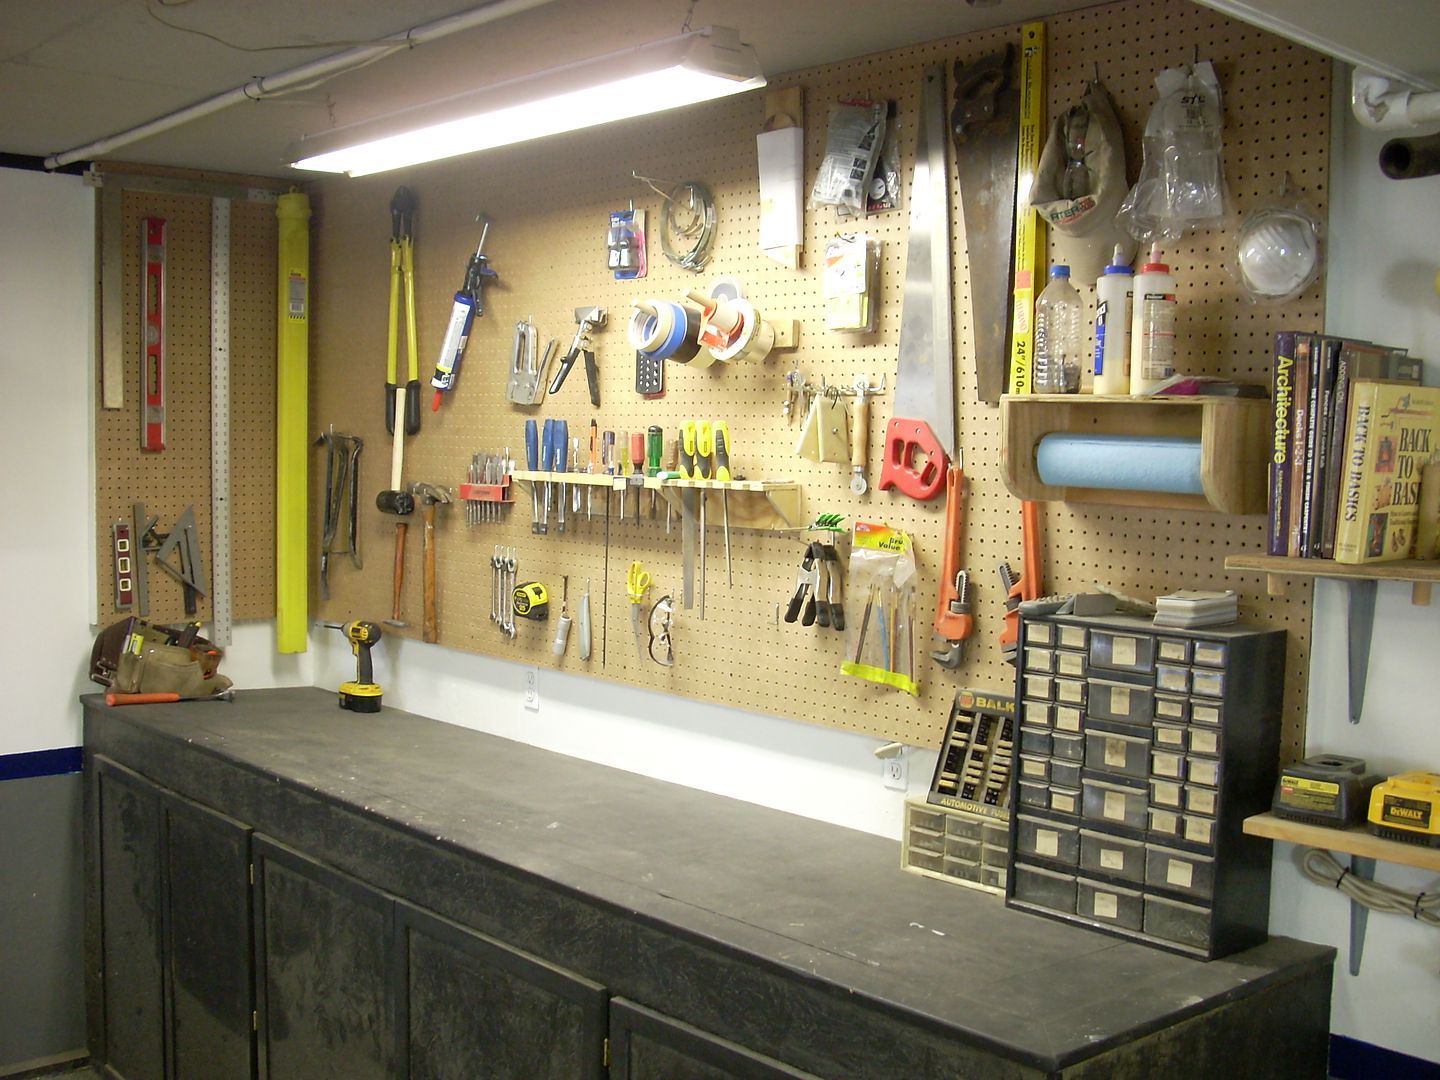
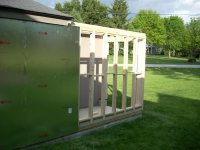
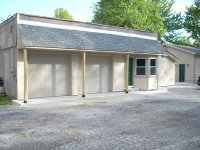
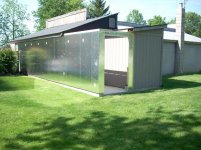
I spend part of last evening & early this morning going through your complete thread. Great vision, planning & execution on the complete rehab / refurb of your garage & shop space. Really nice job and the results speak for themselves.

Also I love the Call Boxes on the wall - super character addition ! :thumbup:

Best regards - Dave

Thank you sir and you have a very nice up there in the corner of the state.
 
To avoid these ads, REGISTER NOW!

jeffmoss26

Well-known member
Joined
May 25, 2011
Messages
12,854
Location
Cleveland, Ohio
Re: garage refurb

Yeah it looks like it has the hex screw in the middle. Some have those but no key lock, it's easy to over tighten and crack the plastic.
 
OP
N

NUTTSGT

Super Moderator
Staff member
Joined
Sep 14, 2009
Messages
50,903
Location
Northern Central Ohio
Re: garage refurb

Here's a picture I took tonight after hanging everything back up on the peg board. Most of it in about the same area.

041312garage002.jpg


Another view off to the side.
041312garage003.jpg


I'm not sure how much this small wall above has ever shown in my pics. The hoses and belts were here when we bought the place. The saw was handed down to me from the family. The Firestone tire displays, I found in the crawl space as I was replacing the floor a few years back. The Autolight battery sign came from an old battery rack from a guy I know.

041312garage005.jpg
 

Attachments

  • GR269.jpg
    GR269.jpg
    110.9 KB · Views: 16
  • GR270.jpg
    GR270.jpg
    141 KB · Views: 16
  • GR271.jpg
    GR271.jpg
    121 KB · Views: 19
Last edited:
OP
N

NUTTSGT

Super Moderator
Staff member
Joined
Sep 14, 2009
Messages
50,903
Location
Northern Central Ohio
Re: garage refurb

Yeah it looks like it has the hex screw in the middle. Some have those but no key lock, it's easy to over tighten and crack the plastic.

I just used a regular screw out of my electrical fasteners box. It's there to stay now, nobody should mess with it. :lol_hitti
 
OP
N

NUTTSGT

Super Moderator
Staff member
Joined
Sep 14, 2009
Messages
50,903
Location
Northern Central Ohio
Re: garage refurb

I got the siding brake down off the wall today to start on the outside. Granted, I didn't do much but I wasn't expecting too. I need to finish up the front before I go on to the side.

04152012006.jpg


This is what I needed to wrap. One of the guys at work suggested I try this to cover the J channel.

This is what it came out like.
04152012007.jpg


Then I added another piece above it. Since it had to be bent different, I used two pieces.
04152012009.jpg
 

Attachments

  • GR274.jpg
    GR274.jpg
    122 KB · Views: 15
  • GR273.jpg
    GR273.jpg
    51.1 KB · Views: 13
  • GR272.jpg
    GR272.jpg
    44.8 KB · Views: 13
Last edited:
OP
N

NUTTSGT

Super Moderator
Staff member
Joined
Sep 14, 2009
Messages
50,903
Location
Northern Central Ohio
Re: garage refurb

Eric,

That shop is just so cool. It just goes to show what persistance can do. Congrats.

And the corner trim is just what it needed to finish off the details.

Thank you. :beer:


I caulked a few spots that I never got around to. So those areas need touched up with some gray paint. I had some mixed up but it's not quite a match but close enough for a garage. Maybe one day in the winter when I'm low on the project list, I repaint all the gray paint. I know repainted the light gray on the ceiling will be on that list also.
 
OP
N

NUTTSGT

Super Moderator
Staff member
Joined
Sep 14, 2009
Messages
50,903
Location
Northern Central Ohio
Re: garage refurb

Since it was awesomely nice day out, I got to start and finish what I planned to today. As most of you know, I have talked about closing in the rear corner of the garage. Once I started looking at things, I found out a while back that I'd have to lay up a course of block or the siding wouldn't cover the wood sheathing on the walls.

This is the back corner of the garage I've talked about. Closing it in and only opening it from the outside will give me a small "shed" area. The one main thing to store there is the log splitter. Which is great to have but the storage of it takes up an odd ball area.

04172012garagepics001.jpg
You can see the block I picked up last week and stacked in the corner. That concrete was poured when we poured the new garage floor about 18 months ago.

I knew what I had planned on doing but the first thing I did was lay out the block to rough everything up. Doing this also allowed me to mark where I would drill for some rebar.

04172012garagepics002.jpg


Then I removed the block and drilled about 10 holes for rebar, yep I like over kill. It's easier to over kill now than got back and redo something later. :lol_hitti

04172012garagepics003.jpg
 

Attachments

  • GR275.jpg
    GR275.jpg
    106.7 KB · Views: 11
  • GR276.jpg
    GR276.jpg
    144 KB · Views: 12
  • GR277.jpg
    GR277.jpg
    111 KB · Views: 13
Last edited:
OP
N

NUTTSGT

Super Moderator
Staff member
Joined
Sep 14, 2009
Messages
50,903
Location
Northern Central Ohio
Re: garage refurb

I like to cut rebar the easy way, it makes life simple.
04172012garagepics004.jpg


Once the rebar was cut, it went it with a little help from the 3 lb sledge (BFH).
04172012garagepics006.jpg

Somewhere in the progress, I cut a couple of block down. One got cut in half and the other got a notch cut in it. Some of my wonderful idea to widen the doorway and gain maximum door width.

Then I laid up the first block on the corner and another against the wall.

04172012garagepics008.jpg


04172012garagepics007.jpg
 

Attachments

  • GR281.jpg
    GR281.jpg
    114 KB · Views: 12
  • GR280.jpg
    GR280.jpg
    119.4 KB · Views: 11
  • GR279.jpg
    GR279.jpg
    118.1 KB · Views: 11
  • GR278.jpg
    GR278.jpg
    118.1 KB · Views: 12
Last edited:
OP
N

NUTTSGT

Super Moderator
Staff member
Joined
Sep 14, 2009
Messages
50,903
Location
Northern Central Ohio
Re: garage refurb

Then I proceeded to fill in the area between the block and finished it up.

04172012garagepics009.jpg


04172012garagepics010.jpg


Tomorrows plan is to fill the block and put the anchors in, unless the weather looks liek rain.
 

Attachments

  • GR282.jpg
    GR282.jpg
    117.7 KB · Views: 9
  • GR283.jpg
    GR283.jpg
    120 KB · Views: 8
Last edited:
OP
N

NUTTSGT

Super Moderator
Staff member
Joined
Sep 14, 2009
Messages
50,903
Location
Northern Central Ohio
Re: garage refurb

Not adding much here but since I had the camera out, I snapped a picture of the block filled with the anchors.

04212012013.jpg
 

Attachments

  • GR284.jpg
    GR284.jpg
    106.2 KB · Views: 10
Last edited:

Wingnut65

Well-known member
Joined
Apr 21, 2010
Messages
3,170
Location
Tampa Bay, FL
Re: garage refurb

Those filled cells don't look like much progress, but the time to hand mix small batches and then fill each cell really does take time. Looks like a few hours at best.

Agreed, Looking good! :thumbup:
 

gumbudah

Well-known member
Joined
Jul 20, 2009
Messages
290
Location
Northern Wisconsin
Re: garage refurb

Some may disagree, but the way I look at it, as long as I get one small job done every day (however small it is), it's progress in the right direction, so it's been a good day!!!
 
OP
N

NUTTSGT

Super Moderator
Staff member
Joined
Sep 14, 2009
Messages
50,903
Location
Northern Central Ohio
Re: garage refurb

Looking good, I like what you did on the front. Nice progress.
Thanks, I'm sure a siding guy wouldn't have any problems but I tried to do the best I couldwith my limited knowledge.

Those filled cells don't look like much progress, but the time to hand mix small batches and then fill each cell really does take time. Looks like a few hours at best.

Agreed, Looking good! :thumbup:
If I mix a larger amount, I'd borrow the neighbors mixer, I mixed that up in the wheelbarrow. The motar was mixed in a mason tub, just asmall amount at a time as I'm no mason either.

Some may disagree, but the way I look at it, as long as I get one small job done every day (however small it is), it's progress in the right direction, so it's been a good day!!!

I try to set small goals to get done. Get them done and it makes you feel better. Set the goal too big and it's nothing but aggravation when you can't accomplish your gaol day after day.
 
OP
N

NUTTSGT

Super Moderator
Staff member
Joined
Sep 14, 2009
Messages
50,903
Location
Northern Central Ohio
Re: garage refurb

I've been tryin gto plug away slowly and that's about all I get done. Since I'm siding over the block wall, I added some firring strips. 5 Tapcons in each one makes me glad to have my Dewalt cordless tools, especially the impact driver.

04302012011.jpg


I had to take the fence down and move it over so it would clear the siding. . . . being careful not to destroy the wife's hosta plants.

I ran the firring strips all the wall down the wall. Since I don't have the walls up yet for the outside storage, I had to stop.

The bottom strip is a PT 1x4, which should survive the mooisture. . . .I hope.

04302012010.jpg
 

Attachments

  • GR286.jpg
    GR286.jpg
    115.4 KB · Views: 11
  • GR285.jpg
    GR285.jpg
    108 KB · Views: 11
Last edited:
OP
N

NUTTSGT

Super Moderator
Staff member
Joined
Sep 14, 2009
Messages
50,903
Location
Northern Central Ohio
Re: garage refurb

Things are looking up some what, we're actually getting holiday pay now as long as we astay in budget. Since I worked Easter, I had a few extras bucks on my last pay. I tried to spend it wisely to keep the project rolling.

Some lumber to frame up the back storage room. If you look closely, you can see the header already built for the doorway.
04302012016.jpg


I also picked up some OSB (not pictured but I bought the foil backed stuff, instead of using wrap) and some 3/4" styrofoam to insulate the walls under the sheeting.
04302012013.jpg


Since the rain was moving in, I did some work inside. I cut what I need for the firring strips. Then I got to clean up all those little white styrofoam beads.
04302012017.jpg
 

Attachments

  • GR287.jpg
    GR287.jpg
    66.5 KB · Views: 9
  • GR288.jpg
    GR288.jpg
    65.4 KB · Views: 9
  • GR289.jpg
    GR289.jpg
    50.6 KB · Views: 10
Last edited:
OP
N

NUTTSGT

Super Moderator
Staff member
Joined
Sep 14, 2009
Messages
50,903
Location
Northern Central Ohio
Re: garage refurb

04302012013.jpg


One thing you might notice in this picture (yes, posting it again) is the siding I picked. Well as the story goes. . . . .

I saved big money at MENARD'S

This is the same siding that I had bought some of last year. It's a color they stock but not the "Double 4". I decided to see what they still had left and surprisingly, I think the pile was exactly the same as it was last fall. I tried to do a count but it was hard the way it was piled up.
I came up with 2 full boxes, 1 box with 14 pieces, 12 pieces stretch wrapped together and the rest loose pieces and dirty. A grand total of 117 pieces which is just over 9.5 squares of CertainTeed/Wolverine siding. I went in and talked to one of the sales guys, one that I happened to know in a round-about way. I asked what the regular price was and we had to find the SKU and do some searching.
We came up with a regular price of $5.33/each. Since it was normally special order I asked what they would sell it for to get rid of it. His reply, gotta talk to a manager who happened to be close. We went back out, got an official count and back inside. The manager gave me a price after a little figuring of $2.50 a piece, which is less that half price. I told him I would take it.

117 x $5.33= 623.61
117 x $2.50= 292.50
623.61 - 292.50= 331.11 plus another 20 bucks or so in sales tax.

woo hoo, that made my day :pimpflash

So now, hopefully, this 9.5 SQ plus the two plus SQ I still have should be enough to finish the garage or atleast come close to finishing it. :beer:
 

Attachments

  • GR290.jpg
    GR290.jpg
    65.4 KB · Views: 5
Last edited:

flybefree

Well-known member
Joined
May 18, 2008
Messages
1,111
Location
Ohio/Kentucky
Re: garage refurb

Good progress Eric, your garage is really looking good thanks to your hard work. I love those cordless impact drivers for jobs like this.

Shaun
 
OP
N

NUTTSGT

Super Moderator
Staff member
Joined
Sep 14, 2009
Messages
50,903
Location
Northern Central Ohio
Re: garage refurb

Forgot to add a picture last night. I did get one sheet of OSB hung while the weather was trying to make up it's mind.

04302012015.jpg


Then I got some supervision. . ..

04302012014.jpg
 

Attachments

  • GR292.jpg
    GR292.jpg
    118.1 KB · Views: 10
  • GR291.jpg
    GR291.jpg
    105.4 KB · Views: 10
Last edited:
To avoid these ads, REGISTER NOW!

JC23

Well-known member
Joined
Dec 31, 2009
Messages
11,718
Location
Northcoast
Re: garage refurb

Somebody's gots to keep ya on the straight and narrow!

Nice work!
 

mysta2

Well-known member
Joined
May 9, 2007
Messages
115
Re: garage refurb

There was a little dilapidated service station a little down the street from us when we moved in:

station.jpg


My dream was to do exactly what you did, and had I been able to buy it I would have. Sadly it was torn down a year or so ago by the people who do actually own it.

You're living the dream man! Congrats.
 
OP
N

NUTTSGT

Super Moderator
Staff member
Joined
Sep 14, 2009
Messages
50,903
Location
Northern Central Ohio
Re: garage refurb

Somebody's gots to keep ya on the straight and narrow!

Nice work!

He does a fine job, helps with keeping my sanity too.

There was a little dilapidated service station a little down the street from us when we moved in:

station.jpg


My dream was to do exactly what you did, and had I been able to buy it I would have. Sadly it was torn down a year or so ago by the people who do actually own it.

You're living the dream man! Congrats.
Thank you
 

IONH

Well-known member
Joined
Feb 12, 2010
Messages
2,043
Location
Central Massachusetts
Re: garage refurb

Is there any benefit of using the silver coated insulation versus the pink stuff?

If this were a wooden wall instead of masonry, do you still need to use the furring strips? If so, between what layers would the vapor barrier be located?
 
OP
N

NUTTSGT

Super Moderator
Staff member
Joined
Sep 14, 2009
Messages
50,903
Location
Northern Central Ohio
Re: garage refurb

If it was a wooden wall like other parts of the garage, I'd just resheet it with some OSB and not use the firring strips. The silver coated stuff is simply OSB not insulation

From the Menards sales flyer.

Increases Energy Efficiency * Walls - Housewrap and wall sheathing combined * Faster and easier than installing housewrap separately; * Roofs - Radiant Barrier and sheathing combined * Blocks up to 97% of the sun's radiant heat through the roof * Dual use structural OSB SKU 124-2729
 

IONH

Well-known member
Joined
Feb 12, 2010
Messages
2,043
Location
Central Massachusetts
Re: garage refurb

Thanks for filling me in.

In my case, I am going to be replacing my shake siding with vinyl. I was planning on using insulation board to space it out a bit as the shake siding is much thicker standard vinyl siding. Plus the minimal insulation property. I believe I was looking at some board which was around $50 and folded. Probably R1 if not less, but better than just wood and cheaper at that.
 
OP
N

NUTTSGT

Super Moderator
Staff member
Joined
Sep 14, 2009
Messages
50,903
Location
Northern Central Ohio
Re: garage refurb

I actually had a fairly nice day with minimal interuptions. It seems the past week or so, it has either rained or threatened rain. Not so much as just rain but T-storms. It was warm and muggy the other morning and then it started to cool off rapidly like a stoorm was blowing up. I quit working and put stuff away only for nothing to happen.

About all I could get done was hang a two sheets of OSB. Today I went out stuck some insulation in and took a few pics.
05062012backgarage001.jpg

Then I hung the last two sheets until I frame up the wall. The worst thign about this foil backed OSB is the glare from the Sun, it'll damn near blind you. You can see the reflection of the grass in this picture. I didn't realize the fence and bush reflection was there too.
05062012backgarage002.jpg
 

Attachments

  • GR293.jpg
    GR293.jpg
    94.8 KB · Views: 8
  • GR294.jpg
    GR294.jpg
    111.1 KB · Views: 11
Last edited:
OP
N

NUTTSGT

Super Moderator
Staff member
Joined
Sep 14, 2009
Messages
50,903
Location
Northern Central Ohio
Re: garage refurb

Since I was ready to proceed to building the wall frame I needed to know where exactly the block ended and get a measurement. I thought about assuming it was a full block on the top row but I decided against it. I had to pull some siding off and went to work on the upper wall. That became the project for the day.

This is what it looked like before. . . .above that roof line.
04302012010.jpg

After the siding was ripped off.
05062012backgarage003.jpg

Notice the white, that's 1/4" hardboard. That was the exterior at one time. That is the cheesy stuff I've had to deal with and correct on the house and garage.
 

Attachments

  • GR295.jpg
    GR295.jpg
    115.4 KB · Views: 9
  • GR296.jpg
    GR296.jpg
    80.3 KB · Views: 14
Last edited:
OP
N

NUTTSGT

Super Moderator
Staff member
Joined
Sep 14, 2009
Messages
50,903
Location
Northern Central Ohio
Re: garage refurb

I ripped that **** out, took the vent out and removed the motion light too. I had to crawl up in the attic to disconnect the wiring, nice hot, dusty and no air moving.
05062012backgarage004.jpg

Then I cut a piece of osb, 1/2" as I had no 7/16" for this project. I was planning on using it for the roof but it was cheaper to use the half inch rather than to run to town for a sheet of 7/16".
It actually took me a bit to lay this out and cut it. There are two different roof line pitches, the lower one ends, and I wanted to make it even with the top plate on the block wall. It also included keeping the ends vertically straight. It might be easy for some of you contractor types, but me, just a hack with a hammer, it took some measuring, measuring and drawing lines.
05062012backgarage005.jpg


I cut the hole for the vent, and put on some tar paper.
05062012backgarage007.jpg


Granted, once it's done, this back wall will be under the roof but until then, it had to get covered. I also had to rework my step flashing for the shingles at the wall. I think it's ok. We will find out tomorrow as it's supposed to rain.
 

Attachments

  • GR299.jpg
    GR299.jpg
    87.5 KB · Views: 13
  • GR298.jpg
    GR298.jpg
    79.9 KB · Views: 14
  • GR297.jpg
    GR297.jpg
    87.9 KB · Views: 13
Last edited:

sooperdave

Well-known member
Joined
May 28, 2010
Messages
283
Location
NY
Re: garage refurb

I'd like to insulate the outside of my concrete and cinder block using the same approach. Whats the R-value of this setup? Thanks, looking very good.
 
OP
N

NUTTSGT

Super Moderator
Staff member
Joined
Sep 14, 2009
Messages
50,903
Location
Northern Central Ohio
Re: garage refurb

I'd like to insulate the outside of my concrete and cinder block using the same approach. Whats the R-value of this setup? Thanks, looking very good.

White extruded polystyrene has a R-value of 5 per 1", this being 3/4" should yield an R-value of 3.75.


The foil backed OSB (google RoyOMartin) doesn't claim any R-value. It's claim is not having to use a house wrap product such as Tyvek. Once it was up, I taped over the screw holes and seams.

Although a Google search for OSB R-values says 7/16" is .51 for a total of R4.26 :dunno:

This wall that I have pictured above has 7/16" exterior sheeting (R.51), 3/4 Foam (R3.75), fiberglass on the interior ( R11 or R13 can't remember) interior walls of 7/16" OSB (R.51) with a hollow block wall (R1.11). So if you total the numbers, it comes out to R16.88 or 18.88 at absolute max and that's being gracious with the numbers.

My main reason to add the 3/4" foam to the outside was that I needed to add firring strips to the outside to attach the vinyl siding, so it was a no brainer, spend a few bucks on insulation (9 sheets @ $5ea=$45) It also created a thermal break.

I used the foil backed OSB as it was on sale and about 3 dollars more a sheet, cost me 30 dollars more for the 10 sheets I purchased.


While my line of thinking maybe wrong, I just did what seemed to be the best route for me in what I was doing. Any other questions, please feel free to ask, it's the whole reason I've tried to detail my refurb. :beer:
 

a-fordable

Well-known member
Joined
Jan 2, 2010
Messages
46
Re: garage refurb

been watching from start to now. You have made it a great place---PS--I dig the fire collection*
 
OP
N

NUTTSGT

Super Moderator
Staff member
Joined
Sep 14, 2009
Messages
50,903
Location
Northern Central Ohio
Re: garage refurb

I tried to make some noticable progress today but mid-afternoon, the rain fell. I started the morning off by framing up the side wall for the "garage shed". Honestly, the name gargae shed just clicked yesterday. I have been trying to figure out what to call it, it is outside storage, not really part of the garage yet it is and basically a storage shed.
Since I have a nice flat floor in the garage now, I thought I would put it to use. I had laid out the marks on the top and bottom plate yesterday. First thing was to nail the wall studs to the top/bottom plates. The pneumatic framing nailer made it quick work and I squared the wall section up. Once it was square, I screwed a couple of firring strips across the studs. These also gave me a place to carry the wall out and place.
05092012garageshed004.jpg

Fopr those of you that don't know, squaring the wall section is just a matter of measuring diagonally corner to corner, adjusting one side or the other till both measurements are the same. Once this is done, something either 2x4s (I used firring strips like mentioned above) or part or all of the wall sheathing is nailed in place. This keeps the wall square and prevents it from racking.

Once the wall was carried out and put in place, a few nails held the bottom plate to the sill plate. Then a horizontal piece was screwed to the wall after a level was put on it and checked for plumbness. After that, I tap conned the end of the wall into the existing concrete block wall. Once it was done, I thought that maybe I should have used a piece of tarpaper to keep the untreated 2x off the block wall. I didn't fell like taking it back apart.
05092012garageshed005.jpg
 

Attachments

  • GR300.jpg
    GR300.jpg
    62.5 KB · Views: 10
  • GR301.jpg
    GR301.jpg
    106.8 KB · Views: 8
Last edited:
OP
N

NUTTSGT

Super Moderator
Staff member
Joined
Sep 14, 2009
Messages
50,903
Location
Northern Central Ohio
Re: garage refurb

I tap conned the last firring strip to the block wall and along with the top horizontal piece. You can see that in the above picture. I added a few more firring strips to bring the studded wall out flush with the already prepped and sheeted block wall. Then I cut a few strips of polystyrene insulation, put them in place and measured/cut the OSB. About this time the clouds were getting dark so I tried to hurry up a bit. As I started screwing on the OSB, I realized in the rush, I forgot to apply some construction adhesive. Damn rain.
05092012garageshed005.jpg

Once it was OSB was on, I took a short break and the slight shower passed. I wiped off the foil and taped the seam and screw holes. I measured and cut some blocking for between the studs. I also checked the radar and saw another shower was coming. I walked over to the neighbors house and let the contractor putting on the new roof that another front was coming with more rain.
Blocking added.
05092012garageshed005.jpg

Here's a view from inside as you can see the insulation behind the OSB.
05092012garageshed008.jpg
 

Attachments

  • GR304.jpg
    GR304.jpg
    107.3 KB · Views: 10
  • GR303.jpg
    GR303.jpg
    106.8 KB · Views: 10
  • GR302.jpg
    GR302.jpg
    106.8 KB · Views: 12
Last edited:
OP
N

NUTTSGT

Super Moderator
Staff member
Joined
Sep 14, 2009
Messages
50,903
Location
Northern Central Ohio
Re: garage refurb

I finished framing the end today, screwed the firing strips to the side and added some blocking at the top between the studs to hold the insulation.

05102012gararageshed007.jpg

From another angle.
05102012gararageshed009.jpg
 

Attachments

  • GR305.jpg
    GR305.jpg
    98.1 KB · Views: 12
  • GR306.jpg
    GR306.jpg
    100.9 KB · Views: 12
Last edited:
OP
N

NUTTSGT

Super Moderator
Staff member
Joined
Sep 14, 2009
Messages
50,903
Location
Northern Central Ohio
Re: garage refurb

Closing in that back corner for the garage shed gives me a storage area 5'x9' in size. Not huge but it'll nothing but storage space. I'll gain a little bit more when I add the roof, following the taller roof line. I'll be able to throw a few things on top of the shorter roof.

While I had the camera out, I walked out front. I snapped a few pictures since the front is done, other than the last section above the porch roof.

05102012gararageshed010.jpg


Something I noticed in this picture (above) is the color match on the siding. It was bought from two different places but the same manufacturer. I must say with modern technology, batch mixing has got pretty good. Although the house is a "triple 3" (has three smaller section per piece of siding) and the garage is a "double 4" (two larger sections) It came out pretty damn good in my opinion. I think it helps matching the door colors too.
05102012gararageshed011.jpg
 

Attachments

  • GR307.jpg
    GR307.jpg
    145.9 KB · Views: 14
  • GR308.jpg
    GR308.jpg
    121.6 KB · Views: 13
Last edited:
OP
N

NUTTSGT

Super Moderator
Staff member
Joined
Sep 14, 2009
Messages
50,903
Location
Northern Central Ohio
Re: garage refurb

While it's not much, I did snap a few pics this afternoon. I didn't realize that I had not taken a picture with the garage shed walls finished.

05152012005.jpg


I made a trip to HD today to pick up some lumber for the next stage. Here's a pile of mostly 2x6 lumber.
05152012003.jpg

I snapped a picture of the OSB still on the trailer as that's when I went and grabbed the camera.
05152012002.jpg


I'm going to continue the vertical wall above the roof so it looks the same a what's there. The lower roof will match the upper roof and I should be able to fix the nasty "corner" mess that has been a problem for years where the metal roofs are.
05152012006.jpg


Tommorrow will start will moving some stuff inthe back of the garage, and opening the ceiling. I'm going to construct a beam for part of the roof wall to sit on. It should be interesting as I'll have to pop up a small section of standing seam roofing.
 

Attachments

  • GR309.jpg
    GR309.jpg
    134 KB · Views: 15
  • GR310.jpg
    GR310.jpg
    64.5 KB · Views: 15
  • GR311.jpg
    GR311.jpg
    146.7 KB · Views: 14
  • GR312.jpg
    GR312.jpg
    118.5 KB · Views: 16
Last edited:
To avoid these ads, REGISTER NOW!
Top Bottom