To avoid these ads, REGISTER NOW!

LocalF9

New member
Joined
Jan 1, 2024
Messages
4
Location
PNW
I saw @restorick's recent post looking for input on a Media Blasting Mask/Hood. Their question resonated with me because I was in the same boat just a few weeks ago. I needed something I could wear for extended periods without constantly clearing a foggy visor. Being a bit of a 3M fanboy, their Versaflo system seemed perfect, but the price tag (around $1500) was a bit steep. So, I decided to design my own bootleg version (w/ Fusion360) that I could print and assemble myself based on this harbor freight Blasting Hood. Thanks to @JradM for the nudge to share this here! Check out my original post for more details. If you're interested in the Fusion files or the print files, or more details just let me know. (y)
FAN BOX.pnghood side.pnghood rear.pngair distro v113.pngMY AIR v30.pnginside.png
 
To avoid these ads, REGISTER NOW!

JradM

Well-known member
Joined
Sep 4, 2019
Messages
1,811
Location
Alberta
This isn't my invention, but I discovered it because I had a DIY idea and then saw that someone already had the same one and posted a Youtube about it.

Yesterday I spotted this abrasive blaster with vacuum and thought it could be pretty handy. I have an old pickup I'm working on and will be blasting the rust off - but I don't want crushed glass media all over my driveway if I can avoid it.
9218652_A1C0_00_01.jpg

However, it occurred to me that I could make a vacuum attachment for my blasting gun and, while it wouldn't recycle the media automatically, it might achieve something pretty similar for a fraction of the price. Lo and behold, someone thought the same thing:

You can also buy just the gun attachment separately on Amazon or Aliexpress (which might be even better since it's likely more robust), but they seem to be kind of expensive (e.g. I'm seeing them for about $150 Canadian):
618v2VE7vdL.__AC_SX300_SY300_QL70_ML2_.jpg
 

Jgaz

Well-known member
Joined
Dec 16, 2016
Messages
1,628
Location
AZ
Made my version of a metal bender on saw on “the gram”. The bender I copied was was welded.

The two pieces of angle iron were salvaged from a previous project.
Note: Only the holes marked with red and black were used with the bender. All other holes were preexisting.
1/2” square stock, 3 1/2” long, drilled and tapped 1/4-20
IMG_4420.jpeg

A 1” and a 24mm socket approx OD 1.4“ installed on the bender
I made the posts this long as I have several larger, deep sockets that have stepped down OD. I might want to use them on this bender.

Sockets can be slid in relation to each other to accommodate different metal thicknesses.
IMG_4419.jpeg


Underside showing CS holes for screws I had on hand
IMG_4432.jpeg

practice bends in 1/8”x 2” mild steel. No heat required.
IMG_4421.jpeg
Easy project that only required the purchase of a 12” stick of 1/2” sq. stock
 

JradM

Well-known member
Joined
Sep 4, 2019
Messages
1,811
Location
Alberta
Made my version of a metal bender on saw on “the gram”. The bender I copied was was welded.
Clever! Looks like something I could copy out of leftover scrap in my shop. Thanks for the idea!
 

larry4406

Well-known member
Joined
Jan 27, 2006
Messages
18,939
Location
Northern Virginia
Made my version of a metal bender on saw on “the gram”. The bender I copied was was welded.

The two pieces of angle iron were salvaged from a previous project.
Note: Only the holes marked with red and black were used with the bender. All other holes were preexisting.
1/2” square stock, 3 1/2” long, drilled and tapped 1/4-20
IMG_4420.jpeg

A 1” and a 24mm socket approx OD 1.4“ installed on the bender
I made the posts this long as I have several larger, deep sockets that have stepped down OD. I might want to use them on this bender.

Sockets can be slid in relation to each other to accommodate different metal thicknesses.
IMG_4419.jpeg


Underside showing CS holes for screws I had on hand
IMG_4432.jpeg

practice bends in 1/8”x 2” mild steel. No heat required.
IMG_4421.jpeg
Easy project that only required the purchase of a 12” stick of 1/2” sq. stock
So the upright posts engage the socket drive hole? What are the threaded ends for?
 

Jgaz

Well-known member
Joined
Dec 16, 2016
Messages
1,628
Location
AZ
So the upright posts engage the socket drive hole? What are the threaded ends for?
Yes, they engage the socket drive hole.
I figured it was just about as fast to drill and tap both ends while I had the drill press vice set up to center drill the square stock.
 

Jgaz

Well-known member
Joined
Dec 16, 2016
Messages
1,628
Location
AZ
Simple one here.
I recently replaced a cracked, plexiglass, oversized router base with this aluminum base.
IMG_4452.jpeg
I drilled two bolt patterns so this will fit both of my full sized routers.
Also, I made the center hole large enough to accept my largest round over bit.
 

yhprum

Well-known member
Joined
Jul 27, 2006
Messages
1,379
Location
Brisbane Australia
I made this oil filter cutter from 30mm square steel tube using a pipe cutter wheel and two skateboard bearings. I initially had cutters, but that didn’t t work so well. The moving post part was a piece of hardwood that the all thread rod pushes against. Time for cleanup and paint to hide my bad welds haha.
 

Attachments

  • IMG_2247.jpeg
    IMG_2247.jpeg
    548.3 KB · Views: 120

Beemer

Well-known member
Joined
Jun 21, 2020
Messages
1,388
Location
Northeast
On a trailride about 10 miles out into the forest I snagged the bike's shift lever on a rock and bent it badly.
Luckily someone had been there before and discarded what might be thought of a a home made tool; riding buddies couldn't believe that a classic Coke bottle could be used to bend aluminum. I never gave it a second thought, just grabbed the bottle and straightened out the lever putting the tip of the lever into the bottle neck.
 

rslaback

Well-known member
Joined
Jul 24, 2010
Messages
4,061
Location
Westcentral Wisconsin
Didn't even think about this tool until I posted about making a smaller one today.
This is a farm magazine design for pulling out brush. You put the chain through the pipe and around the trunk and hook it on the grab hook. It cinches down and forces the trunk into the corner of the pipe and grab hook to get a bite and pulls it out pretty well.

20240706_145537-jpg.2142883
 

Jgaz

Well-known member
Joined
Dec 16, 2016
Messages
1,628
Location
AZ
Too warm to work in the garage right now so I thought I’d show a miter saw stop for short pieces I designed for my miter saw.

I build a lot of boxes with figured wood and seemed to find myself needing numerous, accurate, repeatable pieces for the ends and side. This also has been useful to make the machinist box drawers in a couple recent builds.

This miter stop design has been tweaked, tuned, and refined over several years.

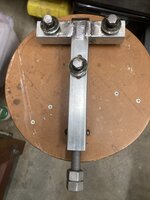
First, I mounted this short section of T slot track to the moveable miter saw fence.
IMG_4547.jpeg

Then I made some of the prototype stop pieces out of wood. The maple block quickly cracked so I added the triangle reinforcement plate that held fine for the next couple years.

IMG_8249_Original.jpeg

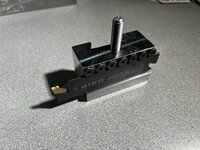
The moveable, maple clamp block can hold the adjustable stop rod in either end.
Here it is close to the blade
IMG_1503_Original.jpeg
The rod is installed here in the other end.
Note the stop collar on the adjustable rod. This allows the stop to pivot up out of the way to cut longer stock and return to its original setting with great repeatability.
IMG_8247_Original.jpeg

First (crude) attempt to add an aluminum disk to allow stop to be used with thinner stock.
No access to a lathe so…… we will call it a proof of concept.

IMG_8657_Original.jpeg
Time to replace wood with aluminum.
No access to a mill (one drawback to retirement) so I used my router table.
IMG_3520_Original.jpeg
Almost finished part
IMG_3521_Original.jpeg
Made the black block to replace the original wooden piece.
I was able to get time on a friend’s lathe to make a better looking stop disk.
I promptly screwed up and made the diameter a bit to small.
Friend’s lathe is torn down to move it so the washer shown will have to suffice for…..?
IMG_3540_Original.jpeg
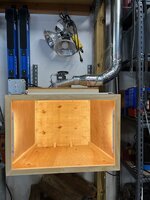
With the saw fence adjusted to the left and the stop rod installed as shown I can easily cut 16” with this stop block before I need to install my removeable fence on the LH bench .
IMG_4548.jpeg

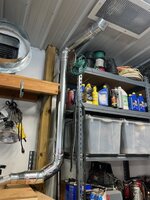
Storage for the stop and all the needed wrenches.
IMG_0146_Original.jpeg
I’m pleased with it and have found it to do what I want.
Other than my screw up on the aluminum disk diameter I wouldn’t change anything.
 
Last edited:

Rabid Badger

Well-known member
Joined
Apr 2, 2018
Messages
1,338
I couldn't find a decent pin vise, so I bought a Dremel 4486 chuck to make my own. Then I found out that the spindle thread is proprietary, so I had to get creative. I threaded the base with a 3/8-24 die and then designed and printed a handle that lets me actuate the chuck jaws with an M6 socket head screw.

PXL_20240728_204742103~2.jpgpin_vise.PNG
 
Last edited:

Jgaz

Well-known member
Joined
Dec 16, 2016
Messages
1,628
Location
AZ
I made this circle cutting jig for my bandsaw a long time ago. Used it today and thought I’d share.

IMG_4563.jpeg

Push the blank straight in until the mahogany stop that you can see in the above picture contacts the front edge of the table.
IMG_4561.jpeg

Spin the blank on the pivot pin for perfect circle.
IMG_4562.jpeg
I made quite a bit of side money (for once) with this jig.

My neighbor was into really large model rockets. The rocket size was such that he needed a really tall step ladder to assemble the stages!
I was able to cut the exact size plywood disks needed to join the different diameter rocket stages together.
I cut a bunch of disks for the neighbor and his fellow club members and was able to hold a very tight tolerance on the requested diameter.
 
To avoid these ads, REGISTER NOW!

larry4406

Well-known member
Joined
Jan 27, 2006
Messages
18,939
Location
Northern Virginia
I made this circle cutting jig for my bandsaw a long time ago. Used it today and thought I’d share.

IMG_4563.jpeg

Push the blank straight in until the mahogany stop that you can see in the above picture contacts the front edge of the table.
IMG_4561.jpeg

Spin the blank on the pivot pin for perfect circle.
IMG_4562.jpeg
I made quite a bit of side money (for once) with this jig.

My neighbor was into really large model rockets. The rocket size was such that he needed a really tall step ladder to assemble the stages!
I was able to cut the exact size plywood disks needed to join the different diameter rocket stages together.
I cut a bunch of disks for the neighbor and his fellow club members and was able to hold a very tight tolerance on the requested diameter.
I cut steel circular blanks once with a torch using similar concept. Pivot bolt thru disc, torch bolted down at proper radius.
 

Outlawmws

Well-known member
Joined
Aug 9, 2011
Messages
39,081
Location
The Badlands
I cut steel circular blanks once with a torch using similar concept. Pivot bolt thru disc, torch bolted down at proper radius.


I went the opposite way: magnet mount plate from an antenna with a socket head bolt for the center, and a "Beam compass" with a "cart" I made than had a bearing for the torch to rest in. We cut a lot of stove ends and doors with that setup.
 

Jgaz

Well-known member
Joined
Dec 16, 2016
Messages
1,628
Location
AZ
I really like the tray that attaches to my 5’ step ladder. I use it all the time.
IMG_4576.jpeg

My 8’ step ladder is old enough that it doesn’t accept the tray so I cut, drilled and fit three blocks to allow me to use it on the taller ladder.
IMG_4577.jpeg
IMG_4578.jpeg
The was a bit of “fiddling“ to get the angle right and the holes drilled correctly but I’m really happy with how it turned out
 

tamaraw

Well-known member
Joined
Jun 6, 2022
Messages
842
Got a router recently, so I decided to make a larger base plate for it

Used an old door knob from a local vintage re-use/recycle place, I believe it was originally threaded 3/8" 20tpi? Designed to go onto a square threaded post with two set screws to stop it from twisting.

Couldn't find any bolts with that pitch locally, so ended up drilling it out and tapping for m12x1.75. That was it's own project since the allen fastener had an OD of 24mm and I didn't have a countersink bit that large, so I had to machine it down to 19mm OD. The set screw holes were an equally oddball pitch, so I cross-threaded some nylon screws, then shaved the heads off to make a flush surface so your fingers don't catch. Also made a little wooden spacer for the step on the bottom of the knob.

1000011657.jpg1000011658.jpg1000011659.jpg
 

Mike007

Well-known member
Joined
Dec 4, 2010
Messages
2,593
This is a cool thread. Wish I did this a long time ago. There's over spray from spray painting brackets and other things on everything in my garage. I made this small paint booth, had all the materials on hand except the lights. It works great. The blower is a furnace draft inducer that was going for scrap because the wheel is out of balance. I didn't want to drill a hole in the wall so I terminated it at my exhaust fan. I'm going to make a Lazy-Susan and add a bar to hang stuff from and I'll be done.
 

Attachments

  • IMG_0725.jpg
    IMG_0725.jpg
    153.8 KB · Views: 97
  • IMG_0727.jpg
    IMG_0727.jpg
    157.6 KB · Views: 96
  • IMG_0726.jpg
    IMG_0726.jpg
    161.2 KB · Views: 96

Outlawmws

Well-known member
Joined
Aug 9, 2011
Messages
39,081
Location
The Badlands
Roller bender, 4-1/2" between the posts, outboard rolls for round stock.

I'm very impressed! that is outstanding for home brew! I always had plans for making something similar for re-arching race car springs but never got around to it other than collecting a few random parts; then we moved to torsion bars..
 

Jgaz

Well-known member
Joined
Dec 16, 2016
Messages
1,628
Location
AZ
This is not nearly on par with @PudgetDude and others DIY tools but it might help someone.
There was a question in another thread about making an exact size large hole (>4”?) in a piece of wood. I’m not sure what post asked a question. I hope the person sees this.

I made this pair of templates which, when combined with different size router bits and collars, can produce extremely accurate, round holes without needing to purchase an expensive holesaw you might not need again.
I used 1/4” MDF for my templates.
IMG_5072.jpeg

This is the chart that shows which collar/bit combination will produce a certain hole size.
IMG_5069.jpeg

A fly cutter, and a bit of trial and error on a scrap piece, will allow you to make a very accurate template hole
IMG_5073.jpeg
For those who might not be familiar with a router collar, here is a collar installed in a router base plate.
IMG_5076.jpeg

And for a bit of GJ overkill, I laid out and cut eight different large radii on the corners of the two templates.
 

dscheidt

Well-known member
Joined
Apr 26, 2017
Messages
2,880
Working a buick, and couldn't get the radiator drain petcock tight. it's a plastic half-turn thing, with a finger turning tab. drain-petcock.jpg You can see it, sort of, and touch it with your fingers, but getting a tool on it is not really possible, without some disassembly of stuff you don't want to mess with. I got it loose with great difficulty, and getting it tight is a bear. It only needed to turn a tiny bit, to compress that oring fully, I think. I tried tapping with a screw driver, and then a dowel, but the angles are all wrong. So, notch in the end of a scrap of aluminum bar. The notch let me get it on the corner of the petcock, and being a 1/8" flat bar, it could bend a bit to get lined up properly. One light tap with hammer is all it took.

IMG_3945.jpeg
IMG_3946.jpeg
 

Milton Shaw

Well-known member
Joined
Feb 11, 2011
Messages
4,835
I was a small engine mechanic when I started out over 60 years ago. I modified a pair of Channellock pliers to make it easier to install Briggs and Stratton condensers. Remember the ones where you had to squeeze a spring and then slip the coil wire in the hole. The little plastic button supplied in the kit was a pain to use, so I came up with a modified Channellock pliers with a grove ground in one jaw to compress the spring and permit seeing while you insert the coil wire.
 

Beerhippie

Well-known member
Joined
Oct 13, 2023
Messages
9,606
Location
Far NE Oregon
I needed a tool to make opening and closing this sticky gate valve (which has since been replaced with a globe valve):

54467232076_9eed058253_o.jpg

So I made one.

Searching the boneyard out back, I found a 12" X 1" X 1/4" scrap of cold-rolled plate. I found a shortish steel shaft from something--3/8" X 4".

A little lay-out, cutting, some drilling, countersinking and fine fitting to get the two 1 1/2" pieces of shaft to an interference fit in the bar and then fill the counter-sinks with the MIG--what I call a "belly button weld":

54467424519_cfa2785baf_o.jpg

Because the counter-sinks went the full thickness of the bar, I was able to grind them flush, while still having a plenty strong weld:

54467582685_2c913ca198_o.jpg

Test fit:

54467232081_f0159791e9_o.jpg

Some paint, a couple of dips in Plasti-Dip and:

54470197680_95a75a8908_o.jpg

54470197685_1e69cd7394_o.jpg

Good news is that it fits the new valve, too.

Not quite as fancy as a lathe, but....
 
Last edited:

WWheeler

Well-known member
Joined
Jun 23, 2015
Messages
4,105
Location
Middleofnowhere USA
Went to add a set of new-to-me snappy crowfoot flare nuts to my box and realized my crowfoot sets were taking up entirely too much real estate on the cheap plastic holders that I've put up with for years. I sure didn't have enough room to do the same with my new-to-me set. I also never liked the crowfoots on this style socket holder because they can be difficult to remove, especially the smaller ones.

crowfoot & crowfoot flare nut sets taking up too much real estate.jpg

So I decided to fab up my own like sort of I've seen other people do. Made them pretty crudely out of 3/8 bar stock. Cut each to length, drilled out the ends for some cotter pins, then chucked them in a 1/2 drill as straight as I could so I could taper the ends on the bench grinder while they were spinning. That was fun, not really, but it sort of worked - at least good enough for the girls I roll with.

Then I slightly ground down each of the sides just a smidge and broke the edges so the crowfoots would slide on the bar stock a little easier, and then spent a few minutes on a belt & disc sander trying to mask the worst of the grinder marks before I heated them up with propane and dropped them in oil to give them a bit of bluing so they hopefully won't rust so easy.

Lastly, I rigged up some cotter pins and ball bead chain so I won't so easily lose them. Didn't turn out too bad at all.

DIY bar stock crowfoot organizers.jpg

Most importantly to me, all four sets now take up a fraction of the drawer space the three sets used to. :willy_nil

crowfoot oranization much better.jpg
 

spyerx

Well-known member
Joined
Dec 29, 2019
Messages
134
Location
SoCal
I needed a tool to make opening and closing this sticky gate valve (which has since been replaced with a globe valve):

So I made one.

Searching the boneyard out back, I found a 12" X 1" X 1/4" scrap of cold-rolled plate. I found a shortish steel shaft from something--3/8" X 4".

A little lay-out, cutting, some drilling, countersinking and fine fitting to get the two 1 1/2" pieces of shaft to an interference fit in the bar and then fill the counter-sinks with the MIG--what I call a "belly button weld":

Ha, nice, looks like a 911 fan wrench!
 
To avoid these ads, REGISTER NOW!
Top Bottom