To avoid these ads, REGISTER NOW!

Installing a standby generator with ATS

mm08822

Well-known member
Joined
Jan 13, 2012
Messages
5,866
Location
NJ
Since your new ATS is now considered the main disconnect/panel, you will also need two ground rods spaced 6 ft or more apart and connect them to the new ATS with #6 Copper. New equipment has to meet the current code requirements. (You can still use the old ground rod for one of these.)

I was considering this, but wasn't sure it was required. What I am not sure about is the proper connection at the service. You say "connect them to the new ATS". The current bare copper is connected to the neutral in the meter base. If I add a ground rod I would run one continuous piece of new #6 copper to both rods.
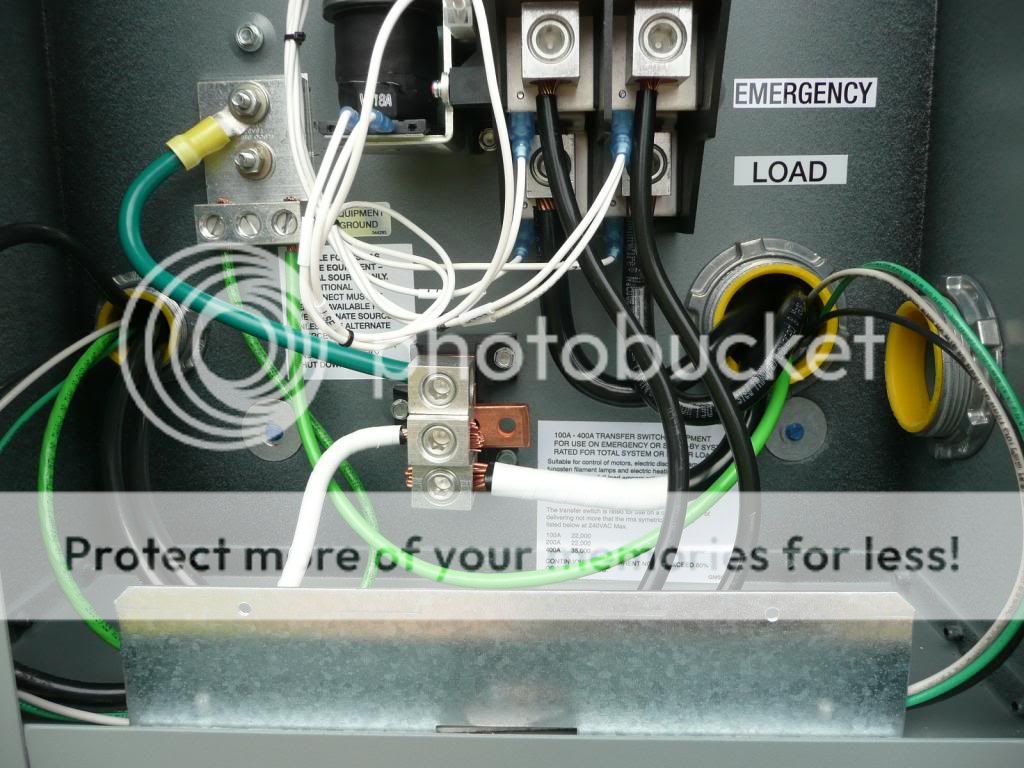
Yes loop the conductor through the first acorn clamp.Where should I terminate it in the service? The meter or the ATS? Terminate it in the ATS right next to the green bonding jumper on that ground block (not the neutral block.) Bring it out of the bottom of the ATS with a ½” romex clamp.

Since you only have a concentric KO on one end of that ****** between ATS and meter pan, you can use a bonding locknut on the ATS side - not the meter side.

Will do. Do I need any other bonding or grounding locknuts or bushings anywhere else? No, bonding is only for service equipment – in your case it is only: meter pan, ******, ATS.
Did you install a double locknut (back-back i.e. – interior/exterior) on the new ****** from ATS into the old panel? It needs to have this to meet code and be considered a grounding means for that ******.

I did not. I could not get one through the wall without opening up the hole in the brick all the way through. I only opened it up deep enough to make room for the rainproof hub on the back of the ATS. How important is it that the main panel be grounded via the ******? It will be grounded with a #6 copper via the 4 wire sub panel feed. That’s what I figured. You are right, the sub panel will be grounded with that #6, but one locknut isn’t meeting code. Your call on that! (FYI – the exterior locknut on the utility riser conduit into the meter pan is installed upside down – teeth need to bite into the meter pan enclosure.)

I saw that, but there is no way to correct it short of having the POCO kill the power at the pole so the meter base could be removed. Agreed – it was FYI only.
I also wanted to bring up that the interior side of the wall that the (oldmain) new sub panel is located on needs to be sheet-rocked for fire protection.

The rest of the room is paneling, as was the area around the main panel before I removed it for access. It will be recovered when I finish. FYI – paneling by itself has no fire rating.
The LB covers must remain accessible. Doesn’t matter if they contain splices.
I wasn't sure if they had to be accessible or not, since they do not contain any splices. But I planned to make a removable (mounted with screws) access plate for them anyway. If any of that wiring ever had to be changed/modified they would have to be opened up.
Too late to change the job to get rid of those - too much to backtrack on to eliminate.

What is the purpose of the ¾” T?
At the T the control cable between the generator and ATS will pass through, but the CAT 5E network cable will exit and continue in free air to the attic and on to my router. Before I pull that cable I will add a cable clamp to that opening, for strain relief and to seal up the conduit.
Your Cat 5 cable needs to be rated at least 300 volt to be in that conduit.
Your panel looks flush with the studs – it should be raised 3/8 - 1/2” for sheet-rocking.

Pictures can be deceiving, it is raised. OK good – nevermind!!

Once you have the old feed to the panel removed from the meter, ATS utility side fed from the meter, and before replacing meter, I suggest you do the following:
Label and remove all branch circuits,
Remove the panel entirely,
add a KO seal to the back of the panel opening from the old ****** – peen the ends over,
remove the old ****** from the meter pan and KO seal that opening,
seal the wall
replace the new ****** with a longer one (3/8 – ½” longer) and locknut
install the panel, locknut and bushing
Feed the panel from the ATS load side through the new ****** – identify neutral and ground wires with tape
One by one – re-install each branch circuit cable with proper connectors and staple each within 12” of panel
Remember the new grounding block(s) – neutrals and grounds are separated now
(You may want to provide a horizontal nailer above the panel first to give easy access to staple)

I had considered replacing the entire panel, but could not find a justification to do so. If it was smaller would be a reason, but it is already 200A. If I needed more circuit spaces would be a reason, but I have spaces left over. The existing panel should be fine – I wouldn’t replace it.I had not considered pulling it out just to seal the old opening to the meter. Also, it does not need to be repositioned to be flush with the finished wall, so would not need the longer ******. I realise that I will have it 90 percent removed because I am going to remove all the branch circuit wires to add the NM cable clamps. It is nailed in place, so those would be more difficult to remove than if it was screwed in. So the only reason to remove it would be to take out the ****** to the meter base, or to add the lock nut to the exterior of the ****** to the ATS (if necessary, see above). I planned to just seal both ends of that ******. Would that be good enough? If my house, I would do it. At least put duct seal in both ******* to keep out air flow/condensation out of enclosures.
If the nails are through the sides of the panel into the studs, you could take a sawzall and quickly cut the nails without concern of damage to the panel.I have a new ground bar for separating the neutrals and grounds.

I had not thought about adding a horizontal nailer above the panel, but I will. Thanks for the suggestion.

To your question about oxide inhibitor – I use it on all exterior lug connections, including removing the lug set screw and applying to those threads – prevents galling and allows for better torque applied onto the conductor instead of just torque between set screw and lug body.

I guess I need to look for oxide inhibitor listed for copper. All I have seen before says it is for aluminium. Most aluminum oxide inhibitors are also used for al–cu connections. I’m not saying to use on the cu conductor, but use it on the threads of the lugs. Sorry if I confused the point.

!!!!!!>>>>I missed this first pass through – you have 2 sets of thw conductors (not cables) run in the wall going into the panel. Those have to be either put in conduit or replaced with NM cable. That is just as bad as the romex splice 2 feet above the panel.<<<<<<!!!!!! Now is the time!
 
To avoid these ads, REGISTER NOW!
OP
S

soj

Well-known member
Joined
Dec 3, 2007
Messages
729
Location
North Georgia
Your Cat 5 cable needs to be rated at least 300 volt to be in that conduit.

That conduit will contain only low voltage cable. I checked specs. on some random Cat 5E cables, seems they were all rated 300V.

If my house, I would do it. At least put duct seal in both ******* to keep out air flow/condensation out of enclosures.

I think I am going with duct seal. I had not thought about sealing the new ******, but it sounds like a good idea.

!!!!!!>>>>I missed this first pass through – you have 2 sets of thw conductors (not cables) run in the wall going into the panel. Those have to be either put in conduit or replaced with NM cable. That is just as bad as the romex splice 2 feet above the panel.<<<<<<!!!!!! Now is the time!

I wondered when someone would catch that. One of those is the A/C circuit, the other is the oven. Both would present a major problem getting the entire circuit in conduit, or replacing with the correct wire. This is what I was considering doing:

The A/C: Run a conduit from the box up through the top plate into the attic. The hole in the top plate is large enough for at least 1", possibly 1 1/4". Pull the wires back into the box through that conduit and correct the remainder of the circuit later. (minimum time in the attic during 100 degree weather) With that conduit in place I could later either continue with conduit (not likely) or replace the entire circuit with #8 NM cable (more likely) The current wire is #6, but A/C nameplate calls for Minimum Circuit Ampacity of 28.6. I know that could be #10, but the A/C is all the way on the other end of the house (70'). I feel like the bigger wire would be worth it to reduce voltage drop. The real problem is getting from the attic down to the crawl space at the A/C location. IF I could use one of the existing wires as a pull rope for the NM cable, that would be great. Otherwise, paneling has to come off a bedroom wall.:sad: The other route is through the crawlspace, but that utility room where the breaker panel is has a concrete floor. That entire end of the house is either garage or that room. So to get to the crawlspace, I still have to start out in the attic. I am aware of the code violation, but haven't decided how to correct it, and am open to suggestions.

The stove: There are plans to replace the electric stove with gas. Probably won't happen until we do a full kitchen remodel. How soon that is we are not sure. But there is more to that circuit than meets the eye. It is also feeding the dishwasher! Where and how the blind monkey made the conversion from 240V to 120V I am not sure. Hopefully in the wall behind the dishwasher, where I could find it during a kitchen remodeling. So I am considering running an empty conduit from the breaker box into the attic now. That way I could run a proper 120V dishwasher circuit during the kitchen work. Again, any other suggestions?
 

mm08822

Well-known member
Joined
Jan 13, 2012
Messages
5,866
Location
NJ
Try and re-use what you can from each of those circuits if the conductors are in good shape. 1” conduit will work for 3 #6 thw’s. If the conductors are damaged along the way, then consider the romex option instead for speed. Also pull a dedicated circuit for the dishwasher and get that off of the stove circuit – that is a fire hazard for sure.
Some people can’t sleep knowing stuff like this exists in their house. I would be more worried about not waking up. Forget the generator – fix this stuff now.
 
OP
S

soj

Well-known member
Joined
Dec 3, 2007
Messages
729
Location
North Georgia
Try and re-use what you can from each of those circuits if the conductors are in good shape. 1” conduit will work for 3 #6 thw’s. If the conductors are damaged along the way, then consider the romex option instead for speed. Also pull a dedicated circuit for the dishwasher and get that off of the stove circuit – that is a fire hazard for sure.
Some people can’t sleep knowing stuff like this exists in their house. I would be more worried about not waking up. Forget the generator – fix this stuff now.

Well, I slept OK last night, AND woke up this morning! I am going to chance it a few more days while I finish the generator install. I will fix what I can get to while I am working at the panel, and correct what I can after that.

Thanks for the advice, just because I don't stop on the generator and fix code violations doesn't mean I don't take you seriously. Everything I can find wrong (including tearing into the walls) will get corrected.
jp
 
OP
S

soj

Well-known member
Joined
Dec 3, 2007
Messages
729
Location
North Georgia
I mentioned earlier about converting from NG to LP gas. It couldn't be easier. Just move a hose and fitting from one port to another, and plug the port where you moved the fitting from. This is it the way it comes:
P1030721.jpg


And after conversion:
P1030728.jpg


You also have to unplug a timing wire. This pair of wires come plugged together to set the engine timing for NG. Just unplug to change the timing for LP. You can see in the pic above (the wires sticking up next to the red fuel solenoid), I taped them up, but it's probably not necessary, both terminials are insulated after unplugging.
P1030722.jpg


Gas hook-up and conversion complete.
jp
 
OP
S

soj

Well-known member
Joined
Dec 3, 2007
Messages
729
Location
North Georgia
I wired as much as I could without pulling the meter. I pulled the power wires and the battery charger circuit in the 1 1/4" conduit and made the connections in the generator.
P1030726.jpg


These are the connections in the ATS:
P1030729.jpg


The generator wires come in on the left. They connect to the emergency lugs, to ground and to neutral. The big wires (2/0 copper) coming from the load terminals go into the main panel in the house. At this point they are just hanging out in the room. There is NO power on any of these wires now.The smallest wires (12G, Black, White, Green) are just passing through the ATS. That's the battery charger circuit. It is powered from the main panel (GFCI breaker) so the battery charger is powered whether on normal or emergency power.

Notice the neutral and ground lugs are bonded with a dark green wire. This panel is the first means of disconnect (there is a MAIN breaker at the top of the box) so this is the only place the neutral and ground is bonded. The main panel will be rewired as a sub panel, with separate neutral and ground bars.

Next we pull the meter and make it all hot.
jp
 
OP
S

soj

Well-known member
Joined
Dec 3, 2007
Messages
729
Location
North Georgia
I got an early start on changing over the service entrance to the ATS, hoping to have power back in the house before it got dark. I turned off the main breaker, to remove any load on the meter socket, and pulled the meter. When I went to remove the wires from the main breaker I turned the lugs clockwise to see if they were tight. They tightened up about 1/4 turn, proving that being loose is what caused the heat discoloration on the wires. But... when I backed off on the lugs, they only turned about 3/4 turn before getting tight. I tried penetrating oil and running them back and forth to free up the threads, but they only got tighter, and finally galled the threads beyond use. The excess torque also snapped off the insulation sticking up on both sides of the breaker. This is what I wound up with:
P1030740.jpg


You can see the galled threads on the left lug screw:
P1030741.jpg


I was seriously considering replacing the panel anyway, but this decided for me. A quick trip to town to get a new SquareD panel. SquareD so I could reuse my breakers.

By pulling the old panel out I was able to get a lock nut on for the back side of the panel:
P1030731.jpg

This will satisfy code and my trusted advisor, mm08822! (from post #41):

Did you install a double locknut (back-back i.e. – interior/exterior) on the new ****** from ATS into the old panel? It needs to have this to meet code and be considered a grounding means for that ******.

I did not. I could not get one through the wall without opening up the hole in the brick all the way through. I only opened it up deep enough to make room for the rainproof hub on the back of the ATS. How important is it that the main panel be grounded via the ******? It will be grounded with a #6 copper via the 4 wire sub panel feed. That’s what I figured. You are right, the sub panel will be grounded with that #6, but one locknut isn’t meeting code. Your call on that!

This is the finished new panel. A few ground wires had to be spliced to reach, but all the hots and neutrals were long enough. I am hoping some electricans will take a look and point out anything I did wrong, if any. Just to clarify some things that might not be clear in the pic: All grounds (bare or green) go to the ground bus in the lower left, all white neutrals go to the neutral bus bars (one on each side), the neutral is NOT bonded to the panel (I did NOT put in the green screw)
P1030732.jpg


A closer view:
P1030733.jpg


Not shown: I added a 2X4 across the stud space about 8" above the panel to staple the NM cables to.

This is the (almost) finished wiring in the ATS. The only thing missing is the low voltage control wire from the generator. The dealer's service man is bringing that when he comes for startup.
P1030734.jpg


And a closer view:
P1030735.jpg


I put duct seal on both ends of the ****** going from the ATS to the panel, per a suggestion from mm08822.

I am hoping it passes "inspection" by the GJ electricians. If it doesn't, I know they will let me know!

This is the new wiring in the meter base:
P1030736.jpg


And the new ground wire... sorry, "grounding electrode conductor" to the existing "grounding electrode": That is the phone wire on the left side of the hole.
P1030738.jpg


I am glad I dug that up, it is just a piece of 1/2" rebar, and I have no idea how long it is. I connected the new wire to it and that wire will continue on at least 6' to a new 8' copper coated ground rod. Opinions please: Do I need to add two proper ground rods since that one is unknown length rebar?

I got everything wired back up and power back on just after lunchtime. I thought replacing the panel would be a major setback, but it may have actually saved some time, except the trip to town to get it.

I also bought a battery (Group 51, fits a lot of small Hondas & some small Chrysler products) and installed it. Now I am just waiting for the dealer to come start it up.
 

frankzlt1

Well-known member
Joined
Sep 5, 2011
Messages
80
Location
Beacon Falls ct
You will need 2 ground rods 6' or more apart. The rebar may go to the structure of the concrete foundation which is now required by new code standards, because you were suppose to have a water bond and ground rods. Because of new construction and a lot of changing of water pipes to plastic there's no copper piping to bond to. The installation of the generator looks pretty good you should've just got a main lug only panel you could've saved yourself some coin, sense you have a service rated transfer switch. The solid wire looks like #8 wire that's only good for 100amp service looks like you have a 200amp service, if so its going to have to be #4 for the 200amp service ground wire. If you don't have city water and all you have well you can either use the rebar ad your secondary ground or any copper pipe that's connected to the well system, which never made sense to me in the code to connect a well system to the secondary ground because the pipe from the well to the pump is plastic lol.
 
Last edited:

frankzlt1

Well-known member
Joined
Sep 5, 2011
Messages
80
Location
Beacon Falls ct
How is the bond jumper wire connected to the neutral bar, it almost looks like its in the lug doubled up with the neutral wire. You can't double up wires unless the lug is rated for it.
 

mm08822

Well-known member
Joined
Jan 13, 2012
Messages
5,866
Location
NJ
Besides the obvious issue you found with the main breaker lugs in the old panel, replacing the panel prompted you to clean up all of those other details mentioned – good!
The 1” conduit in the sub panel looks like it is missing a locknut and needs a bushing for #6 and larger conductors. If you want to pass inspection, do the same for the 3 conductors on the right side of the panel – at least stub it up into the attic for now.

Your ECG sure does look like #8, it needs to be #6 Copper.

If you did double up the neutral from the meter and the bonding jumper in the ATS, it will be an issue for inspection unless the instructions (for a UL approved system) state to do so. Here is how you can easily get around that – remove the neutral conductor between meter and ATS. Remove the green bonding jumper. Replace the neutral conductor from meter to ATS with a longer piece and pass it through the neutral lug and run it right into the grounding block or lug on the grounding block. Several inches of exposed copper between neutral lug and ground block is ok in this instance.

I didn’t dig back through the posts, but check your fill/ampacity on the conduit carrying the gen power and charger power. 4 - 6 current carrying conductors in a conduit causes all conductors to be derated to 80% of listed ampacity.

It looks like you duct-sealed the bottom weep holes in the ATS – don’t do that – that’s the drain in NEMA 3R equipment.

Check all lugs again in day or 2 after copper sets.
 

1/2 Cup

Member Emeritus
Joined
Apr 28, 2012
Messages
19,283
Location
Shepparton. Victoria. Australia
::Lurking with keen interest, to see how it is done in your part of the world, we do not have many gas powered units here in Australia, mostly diesel.


Cheers :thumbup:
 
Last edited:
OP
S

soj

Well-known member
Joined
Dec 3, 2007
Messages
729
Location
North Georgia
How is the bond jumper wire connected to the neutral bar, it almost looks like its in the lug doubled up with the neutral wire. You can't double up wires unless the lug is rated for it.

The Kohler ATS install book shows the neutral lug rated for up to 3 #6 wires.
 
OP
S

soj

Well-known member
Joined
Dec 3, 2007
Messages
729
Location
North Georgia
You will need 2 ground rods 6' or more apart. The rebar may go to the structure of the concrete foundation which is now required by new code standards, because you were suppose to have a water bond and ground rods. Because of new construction and a lot of changing of water pipes to plastic there's no copper piping to bond to. The installation of the generator looks pretty good you should've just got a main lug only panel you could've saved yourself some coin, sense you have a service rated transfer switch. The solid wire looks like #8 wire that's only good for 100amp service looks like you have a 200amp service, if so its going to have to be #4 for the 200amp service ground wire. If you don't have city water and all you have well you can either use the rebar ad your secondary ground or any copper pipe that's connected to the well system, which never made sense to me in the code to connect a well system to the secondary ground because the pipe from the well to the pump is plastic lol.

I will have 2 ground rods after I add one, I was wondering if I should add one more, since I have no way of knowing how long the rebar is, or what it's resistance is. I am leaning toward two NEW 8' rods, just to be sure I have a good ground. All pipe in and leading to the house is plastic.

As for the main lug panel, I got what I could find on short notice. I wanted to get power back on before the house got hot or we had to spend a night without power.

I will check the size of the ground wire. It was from a partial roll I have had for quite a while, don't even remember what job it was from. I just went by the size that was already there, and matched that. I should have known better, considering all the other code violations I have uncovered.

Thanks for the critique.
 
OP
S

soj

Well-known member
Joined
Dec 3, 2007
Messages
729
Location
North Georgia
Besides the obvious issue you found with the main breaker lugs in the old panel, replacing the panel prompted you to clean up all of those other details mentioned – good!
The 1” conduit in the sub panel looks like it is missing a locknut and needs a bushing for #6 and larger conductors. If you want to pass inspection, do the same for the 3 conductors on the right side of the panel – at least stub it up into the attic for now.

Your ECG sure does look like #8, it needs to be #6 Copper.

If you did double up the neutral from the meter and the bonding jumper in the ATS, it will be an issue for inspection unless the instructions (for a UL approved system) state to do so. Here is how you can easily get around that – remove the neutral conductor between meter and ATS. Remove the green bonding jumper. Replace the neutral conductor from meter to ATS with a longer piece and pass it through the neutral lug and run it right into the grounding block or lug on the grounding block. Several inches of exposed copper between neutral lug and ground block is ok in this instance.

I didn’t dig back through the posts, but check your fill/ampacity on the conduit carrying the gen power and charger power. 4 - 6 current carrying conductors in a conduit causes all conductors to be derated to 80% of listed ampacity.

It looks like you duct-sealed the bottom weep holes in the ATS – don’t do that – that’s the drain in NEMA 3R equipment.

Check all lugs again in day or 2 after copper sets.

I agree about the new panel, except for the added expense, I am glad I replaced it. Got that lock nut on the back side too, hope you liked that!

That 1" conduit is plastic. I never knew they needed two lock nuts. And what good would a plastic bushing do in plastic conduit? Just asking...
The other 3 conductors are for the stove, they will be coming out when we convert to gas.

The bare ground is something I had on hand, and it matched what was there. I will check the size and go with what is right.

The neutral and ground lugs are rated for multiple conductors. The ground for 3 #14 to 1/0, and the neutral for 3#6 to 250 MCM.

The generator output has a 70A breaker. I used #4 THHN/THWN. The chart I use ("Wiring Simplified", 2011 code edition, page 27) shows 95A (up to 3 current carrying conductors) for that wire, so derating to 80% is 76A, if I calculate correctly. So those should be OK. The 120V circuit is on #12 THHN/THWN, which is good for 20A, derated to 16. I used a 20A GFCI breaker. Should I change that to a 15A? I can use the 20A GFCI to protect some outside / in the garage circuits. Also, I just checked, I have one bathroom outlet that is not GFCI protected, so I can reuse the 20A GFCI for something if I need to get a 15A for this circuit. This circuit is only for a battery trickle charger and possibly a carb. heater, if ever needed. 15A should be plenty. Would changing that breaker bring that conduit up to code?

When I was duct sealing the conduit I saw the holes in the bottom corners of the ATS and thought it would be a good idea to seal them to keep bugs out. The box looks watertight at the top, but I suppose condensation could be a problem, so I will remove the sealer. Good catch, eagle eyes!:bowdown:

I will check all lugs, as suggested.

Thanks again for the inspection and the suggestions, you have been a great help.
 

Gooch

Well-known member
Joined
May 30, 2009
Messages
676
Location
Petersberg, IA
The generator output has a 70A breaker. I used #4 THHN/THWN. The chart I use ("Wiring Simplified", 2011 code edition, page 27) shows 95A (up to 3 current carrying conductors) for that wire, so derating to 80% is 76A, if I calculate correctly. So those should be OK. The 120V circuit is on #12 THHN/THWN, which is good for 20A, derated to 16. I used a 20A GFCI breaker. Should I change that to a 15A? I can use the 20A GFCI to protect some outside / in the garage circuits. Also, I just checked, I have one bathroom outlet that is not GFCI protected, so I can reuse the 20A GFCI for something if I need to get a 15A for this circuit. This circuit is only for a battery trickle charger and possibly a carb. heater, if ever needed. 15A should be plenty. Would changing that breaker bring that conduit up to code?

Since you have THHN that is rated for 90*, start with the number in the 90* column and apply your derrating, use this number if it is less than 75* column, if not, use 75* column number. this applies to the #12 aswell, but can't exceed 20 A. IIRC #12 THHN is good for 25A IIRC(might be 30) but either way you're good with the 20 A breaker
 

mm08822

Well-known member
Joined
Jan 13, 2012
Messages
5,866
Location
NJ
The 1” conduit in the sub panel looks like it is missing the locknut of the inside of the panel in the pic as best I can see. If you have one on the inside then you are done – it doesn’t show, however. No one is saying 2 are needed. Bushings are above #6 - my bad – nevermind.

Since you have changed out the panel, there is no grand fathering of the old violation as pre-existing for the 3 #6’s for your stove. That entry point and method into the new panel is considered new work now. Add a length of pvc from panel into the attic as you did for the other and your inspection will pass. ( Just remember for the future, your dishwasher is putting a load on that “ground”.)

Drive a 2nd new grd rod and all q’s are done on that subject - $15 - rod and acorn clamp. And get the #6 cu.

Again the pics are hard to tell, but it looks like you have 4 conductors in a place where only 3 are listed. So is it 3 wires or 4 wires installed in the neutral block?

#12 THHN is listed as 35 Amps for derating purposes only, so 80% of that is 28A. Code limits its overcurrent protection to a max of 20A so you are good with 20A gfci breaker. The 4’s sound ok at 80%.
 
OP
S

soj

Well-known member
Joined
Dec 3, 2007
Messages
729
Location
North Georgia
Since you have THHN that is rated for 90*, start with the number in the 90* column and apply your derrating, use this number if it is less than 75* column, if not, use 75* column number. this applies to the #12 aswell, but can't exceed 20 A. IIRC #12 THHN is good for 25A IIRC(might be 30) but either way you're good with the 20 A breaker

Thanks Gooch, all help appreciated.
 
OP
S

soj

Well-known member
Joined
Dec 3, 2007
Messages
729
Location
North Georgia
The 1” conduit in the sub panel looks like it is missing the locknut of the inside of the panel in the pic as best I can see. If you have one on the inside then you are done – it doesn’t show, however. No one is saying 2 are needed. Bushings are above #6 - my bad – nevermind.

OK, I understand now. Since I knew there was one on the inside, I took it to mean one should be on the outside.

Since you have changed out the panel, there is no grand fathering of the old violation as pre-existing for the 3 #6’s for your stove. That entry point and method into the new panel is considered new work now. Add a length of pvc from panel into the attic as you did for the other and your inspection will pass. ( Just remember for the future, your dishwasher is putting a load on that “ground”.)

I am going to pass on this one. I understand the violation, and if the electric stove was going to stay, I would correct it with a new NM cable run during the kitchen remodel. Even if I add conduit from the panel to the top plate, there is still open wire in the attic and down the wall to the stove. The dishwasher will receive a dedicated circuit at kitchen remodel. Both problems WILL be corrected, just not right now.

Drive a 2nd new grd rod and all q’s are done on that subject - $15 - rod and acorn clamp. And get the #6 cu.

I already bought a new ground rod, had direct burial clamps on hand, and will get the #6.

Again the pics are hard to tell, but it looks like you have 4 conductors in a place where only 3 are listed. So is it 3 wires or 4 wires installed in the neutral block?

The neutral block has 3 lugs. The bottom one is the feed into the main panel, the center one is coming from the meter, and the top one is the #4 from the generator, combined with the #6 green bonding jumper. The Kohler ATS install book lists it this way: "(3) #6 AWG - 250 MCM). I took that to mean I could install multiple wires in that lug, or does the 3 in parentheses mean there are 3 lugs on the block? There is a copper bar with a hole in it behind the center lug, I could bolt a new lug there if needed.

#12 THHN is listed as 35 Amps for derating purposes only, so 80% of that is 28A. Code limits its overcurrent protection to a max of 20A so you are good with 20A gfci breaker. The 4’s sound ok at 80%.

Good. But since I discovered my outside outlets are not GFCI protected, I may add a gfci to that circuit. I know I could do it cheaper with an outlet in the first box on that circuit, but figuring out which is first could be a problem, I would rather just do it in the panel and save the head scratching. :headscrat

Again, thanks for all your assistance.
jp
 

mm08822

Well-known member
Joined
Jan 13, 2012
Messages
5,866
Location
NJ
The neutral block has 3 lugs. The bottom one is the feed into the main panel, the center one is coming from the meter, and the top one is the #4 from the generator, combined with the #6 green bonding jumper. The Kohler ATS install book lists it this way: "(3) #6 AWG - 250 MCM). I took that to mean I could install multiple wires in that lug, or does the 3 in parentheses mean there are 3 lugs on the block? There is a copper bar with a hole in it behind the center lug, I could bolt a new lug there if needed.

It means there are provisions to hook up three wires in that assembly and each of the 3 wires can range in size from #6 through 250MCM. But only 3!!! So your #4 and #6 together in one lug is a problem. Checkout using that copper lug or do what I already suggested.
 
OP
S

soj

Well-known member
Joined
Dec 3, 2007
Messages
729
Location
North Georgia
The neutral block has 3 lugs. The bottom one is the feed into the main panel, the center one is coming from the meter, and the top one is the #4 from the generator, combined with the #6 green bonding jumper. The Kohler ATS install book lists it this way: "(3) #6 AWG - 250 MCM). I took that to mean I could install multiple wires in that lug, or does the 3 in parentheses mean there are 3 lugs on the block? There is a copper bar with a hole in it behind the center lug, I could bolt a new lug there if needed.

It means there are provisions to hook up three wires in that assembly and each of the 3 wires can range in size from #6 through 250MCM. But only 3!!! So your #4 and #6 together in one lug is a problem. Checkout using that copper lug or do what I already suggested.

I will have to use the copper lug, for two reasons: One, the three lugs in the ground block are already in use, and two, even if there was an open lug, they are only rated for up to 1/0 wire, so the 2/0 service neutral is too big. The problem was created by Kohler. In their drawings of the ATS, they show the bonding jumper connected to that copper lug with a ring terminal, like it is on the ground bar end. They took one of my three lugs!:mad:
 
To avoid these ads, REGISTER NOW!

cowboyjosh

Well-known member
Joined
Mar 11, 2010
Messages
1,066
I like the NEW SQD panel; I know it was an added expense and more time, but it was probably the best solution to correct the deficiencies that your other one had; funny how things work out.
 

Glue Sniffer

Member
Joined
Sep 10, 2013
Messages
5
soj: Your sediment trap isn't setup right.

Call the company and see if they will send you replacement parts for the ones that are cracked, if you haven't done so already.
 
OP
S

soj

Well-known member
Joined
Dec 3, 2007
Messages
729
Location
North Georgia
I like the NEW SQD panel; I know it was an added expense and more time, but it was probably the best solution to correct the deficiencies that your other one had; funny how things work out.

In the end I am glad I replaced it. Besides the heated connections I got rid of the mangled knock outs in the top of the panel.
 
OP
S

soj

Well-known member
Joined
Dec 3, 2007
Messages
729
Location
North Georgia
Wow, that is an awesome set up you have now. great job ! :thumbup:

Thanks for the kind words. Several people told me a generator with ATS was not a DIY project, and I wouldn't recommend it for a first time electrical project. But, if you have done several electrical projects (including at least one sub panel) it is really not that difficult. Get help on things you are not sure about (like I did here), be careful and all should go well.
jp
 
OP
S

soj

Well-known member
Joined
Dec 3, 2007
Messages
729
Location
North Georgia
soj: Your sediment trap isn't setup right.

Call the company and see if they will send you replacement parts for the ones that are cracked, if you haven't done so already.

Glue Sniffer, welcome to GJ.

Would you care to elaborate on the deficiencies of my sediment trap, or are you just going to leave me hanging?
 

Glue Sniffer

Member
Joined
Sep 10, 2013
Messages
5
Glue Sniffer, welcome to GJ.

Would you care to elaborate on the deficiencies of my sediment trap, or are you just going to leave me hanging?

One way to hook up a Sediment Trap.

SedimentTrap_zps678c72a6.png


1066338_1283770835878_o_zpse0f8b886.jpg


dsasdas_zps85006a19.png


ottawa-generator_zpse5b7628a.jpg


Another way to hook up a sediment trap.

f0865-02_zpsc72fd62d.png


trtr_zpsa9e5cd1a.jpg


Sorry I haven't posted back quicker, my health isn't that great so I sleep most of the time.


The top four pics, the gas flows through to the sediment trap and hits the end cap before coming up and going into the T. This allows the gas to carry any debris into the trap before flowing up into the T to the appliance.

The last two pics, the gas hits the sidewall of the T with any debris falling down into the trap.
 
Last edited:
OP
S

soj

Well-known member
Joined
Dec 3, 2007
Messages
729
Location
North Georgia
Glue Sniffer has sniffed out a flaw in my gas piping that others have overlooked. He is correct, the sediment trap must create a 90 degree turn, not just go straight over the lower leg. Here is info from the International Residential Code (IRC): (I added the bold)

QUOTE:
SECTION G2419 (408)
DRIPS AND SLOPED PIPING

G2419.4 (408.4) Sediment trap.
Where a sediment trap is not incorporated as part of the gas utilization equipment, a sediment trap shall be installed downstream of the equipment shutoff valve as close to the inlet of the equipment as practical. The sediment trap shall be either a tee fitting with a capped ****** in the bottom opening of the run of the tee or other device approved as an effective sediment trap. Illuminating appliances, ranges, clothes dryers and outdoor grills need not be so equipped.

Sediment traps are designed to cause the gas flow to change direction 90 degrees at the sediment collection point, thus causing the solid or liquid contaminants to drop out of the gas flow. See Commentary Figure G2419.4(1).

Sediment Trap

The ****** and cap must not be placed in the branch opening of a tee fitting, because this would not create a change in direction of flow and would allow debris to pass over the collection point.

Sediment Trap
sediment_trap_Prohibited_IRC_Commentary.jpg

Commentary Figure G2419.4(2) illustrates an improper sediment trap that is prohibited by this section.
END QUOTE

This can be corrected by running the gas line at the level it is at the regulator and doing the drop down above the point where it enters the generator.

Any thoughts from others on how necessary it is to correct this? I will have to completely redo the gas piping, but if it makes a significant difference, I will do it.
jp
 

Glue Sniffer

Member
Joined
Sep 10, 2013
Messages
5
Here's one more picture.

DSC00033_290153418_std_zpse46cd607.jpg


I personally have never seen or heard of a sediment trap having anything in it. Some places in the U.S. don't even require you to install one.

A little tiny piece of trash in the line can easily shut down your generator, and during a winter storm, that would be a very bad thing. Sediment traps are just a precautionary measure.
 

Glue Sniffer

Member
Joined
Sep 10, 2013
Messages
5
I found two really good setup pics that would work perfect for you, if you decide to redo your gas line.

IMG_3781_zps90644e9c.jpg

IMG_3780_zps303caa46.jpg
 
OP
S

soj

Well-known member
Joined
Dec 3, 2007
Messages
729
Location
North Georgia
Your ECG sure does look like #8, it needs to be #6 Copper.

I went to purchase #6 bare copper for the ECG and the dealer had printouts from the local power companies and both required #4 for 200A service. Ouch!, almost twice the price!:mad: But that is what I got, and this is the result:

Inside the ATS:
P1030743.jpg


Down the wall:
P1030747.jpg


Connected to the original ground rod:
P1030745.jpg


In the trench 7' to a new ground rod:
P1030744.jpg
 
OP
S

soj

Well-known member
Joined
Dec 3, 2007
Messages
729
Location
North Georgia
soj: Your sediment trap isn't setup right.

Thanks to Glue Sniffer for pointing this out, and following up with lots of examples of how to do it right. It wasn't hard to change, and this is the result:
P1030748.jpg


Each elbow adds 8' to the calculated length, starting at the regulator. Each tee is equal to an elbow, and I am speculating that two 45 elbows should be equal to one 90.

Previously I had appx. 9' of pipe and 4 elbows, which is 41 calculated feet.

This arrangement is appx. 9' of pipe and 6 elbows, for 57 calculated feet. I am just outside the max of 50' for 3/4" pipe. After I get the unit started I will check gas pressure at the valve under full load. I will also check with the water heater running at the same time.

It also allowed me to address the issue with the conduit being supported on the gas pipe:
bjones said:
Nice gas piping job. I like the 45s back to the wall and the drip leg. It’s a very professional, neat looking job. Also, you did a very neat job outside with the PVC conduit and liquid tight conduit. Although you cannot support the electrical conduits using the gas piping. NFPA70 Article 300.11B and Article 356.60

Closeup of the conduit supports:
P1030751.jpg


I got these at Lowe's. They also have a flat plate for mounting. Just add 3/8" threaded rod and jam nuts.

Without the supports the flex conduit was pulling the sweep elbows down and twisting the conduit along the wall.

Tomorrow the dealer comes to do the startup and warranty registration.
 

Gooch

Well-known member
Joined
May 30, 2009
Messages
676
Location
Petersberg, IA
I went to purchase #6 bare copper for the ECG and the dealer had printouts from the local power companies and both required #4 for 200A service. Ouch!, almost twice the price!:mad: But that is what I got, and this is the result:

Did those printouts specify #4 when connected to ground rods? The NEC doesn't require anything larger than #6, weather its 200 amp or 2000 amp service. It does require larger for other ground electrode connections.

There is nothing stopping the power company from having their own requirements, just rare.
 
OP
S

soj

Well-known member
Joined
Dec 3, 2007
Messages
729
Location
North Georgia
Did those printouts specify #4 when connected to ground rods? The NEC doesn't require anything larger than #6, weather its 200 amp or 2000 amp service. It does require larger for other ground electrode connections.

There is nothing stopping the power company from having their own requirements, just rare.

And, since nothing, or no one, stoped them, they set their own standards. The attachment is a page from their "Customer Installation Standards". There are several other drawings for overhead and underground service, they all specify a #4 ground wire.

This is from the 2013 edition of their standards. I also found a 2008 edition, and it had a footnote on the #4 wire size: "For sole connection to rod, plate or pipe type electrode, #6 AWG CU is allowed. The footnote was removed for all the 2013 drawings.
jp
 

Attachments

  • Entergy installation_standards_2013_CIS_Manual page 81.pdf
    73.6 KB · Views: 9
Last edited:
OP
S

soj

Well-known member
Joined
Dec 3, 2007
Messages
729
Location
North Georgia
The dealer's service man came this morning, installed and connected the control cable, and started the generator. Everything went well.

After it ran for a few minutes I turned the thermostat down to get the AC on. After it started, I turned on the oven and all top elements on the stove. Several lights and at least one fridge were on at the same time. It ran fine and the gas pressure held steady at 10.5"wc. Under light load, or no load, the gas pressure was a full 11"wc. 1/2" variation is nothing since the allowable range (per Kohler) is 7-11". I didn't check it with the water heater on at the same time since I didn't want to hold up the serviceman. I will check that later, just for peace of mind.

I think that puts a fork in this project. Thanks again to all the electricians and gas guys who contributed to its success. I could not have done it with out 'ya.
jp
 

Glue Sniffer

Member
Joined
Sep 10, 2013
Messages
5
Glad to see everything is working fine. It all looks good too, and sorry about hounding you with all those pics.
 
OP
S

soj

Well-known member
Joined
Dec 3, 2007
Messages
729
Location
North Georgia
Glad to see everything is working fine. It all looks good too, and sorry about hounding you with all those pics.

No, all your pics helped make it clear how a proper sediment trap should be built, and the theory of how it functions.

After the service man left I did another loaded test on the gas pressure. With the generator powering the AC, oven and 4 stove elements, I opened 4 hot water faucets, including the tub. The gas pressure (at the generator solenoid valve) dropped from 11" to 10", only .5" more drop than without the water heater on. I turned the gas regulator adjustment screw 1/2 turn, which brought it back up to 10.5". Probably wasn't necessary, but it made me feel better.:rocker: I am confident I can take a shower during a power outage.:thumbup:
jp
 
OP
S

soj

Well-known member
Joined
Dec 3, 2007
Messages
729
Location
North Georgia
Thunderstorm yesterday. Power went off for about an hour. Generator worked perfectly. Never thought I would want the power to go off, but it was good to get a real world test so soon after installation.
-jp
 

Teken

Well-known member
Joined
Jan 2, 2010
Messages
8,214
Location
The Bad Lands
This is one of the best back up generator threads on this forum thus far. Thank you so much for taking the time to show the steps, and the journey of the install. Can you show case the online App, along with the user interface for the system.

I would like to know your feelings and impressions of the iOS / Andriod App and how well it functions in terms of use, awareness, and alert notifications.

Any details about this area would be appreciated. As I have reconsidered going with the the brand you used, instead of the Generac. Only because I found the panel and cell / computer interface better suited and well thought out.

Teken . . .
 
To avoid these ads, REGISTER NOW!
Top Bottom