
You are using an out of date browser. It may not display this or other websites correctly.
You should upgrade or use an alternative browser.
You should upgrade or use an alternative browser.
Jake's Projects ...... or, .... How I waste my time
- Thread starter jakemac
- Start date
Outlawmws
Well-known member
Jake, nice job on the anvil. That could easily be from the late 50's or so as I have (or my daughter does now) one that was my dad's, and I know he had it in the late 50's
Jake, nice job on the anvil. That could easily be from the late 50's or so as I have (or my daughter does now) one that was my dad's, and I know he had it in the late 50's
I was thinking 70's because of the original green paint reminded me of that time, but 50's makes more sense given the style and vast amount of imports from japan during the 50's and early 60's.

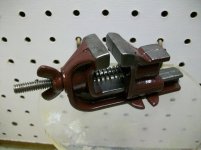
Not a clue, it isn't marked as such. In fact, other than the Stanley logo's and model number stamped on the top of the slider, there are no cast markings at all. I wonder if there was a sticker on the front jaw originally ? One of the vise experts might have a better idea though. 
I can't help but I used a 4 1/4 inch Reed at work for years. They make great set of brass soft jaw covers for that vise, too. I think Reed is still around (Erie PA). They are directed toward the plumbing industry. It wouldn't be cheap but maybe they could supply parts.
drivesitfar
Well-known member
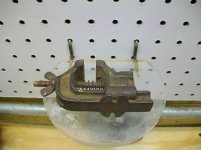
Jake: i'm not sure you saw my little vise i posted on the vise thread, but it looks very similar to yours except a previous owner most likely cut off the clamp part and ground the bottom smooth on mine. that way he (or me now) can just mount it on top with a couple screws.
not saying to cut the clamp off of your nice little vise you restored, but if you see one with a broken or missing clamp piece it's an option you might not of thought of. pictures of mine for your thread to show what it looks like.
also on a side note you posted a few pictures of your furnace with your freshly painted vise hanging off it. did you install that yourself or buy the house with it already installed because it is an awesome looking one. do you have radiant heat or those old fashioned radiators or how does the steam heat your house. Also would you mind sharing or PM(ing) the brand name because i'm looking for a replacement to my 30 year old gas furnace?
Attachments

No pictures, but I achieved an accomplishment today.
After 4 years of sitting on my bench, I finally got around to putting a new carburetor in my POS Poulan weedwhacker. I always kept putting it off, and worked around it for years. I had the part the whole time, but still kept procrastinating. Once I got going, it only took me 10 minutes to have it up and running.
Check one more thing off that To-Do list that doesn't exist.

There's a nice little video on this webpage that shows you how to figure out the fuel lines to and from the primer bubble. It saved me a lot of experimenting.
A little over a week ago I found a surprise in the back of my truck that I had forgotten about.
Story here.
So, this week I cleaned, polished, and painted it. Here are the pics, old and new.
Story here.
So, this week I cleaned, polished, and painted it. Here are the pics, old and new.
Attachments

Woo HOOO !!!!!!! 
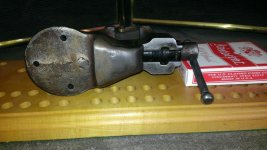
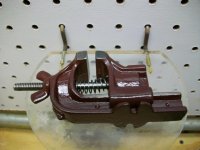
It's taken almost 2yrs, but I think I just found a three footed swivel base for my Reed 204 1/2 ! It's paid for and waiting to ship. It's just the base only. Now I just need to come up with the locking hardware and center bolt.
I'll have a better idea when it shows up in about a week.
The seller agreed to lower the price for me, but I still paid more for the base than the rest of the vise.
On a sad note, I just broke the rest arm on my Cman belt/disk sander (103.08011) this evening. A piece I was sanding got wedged underneath and the cast arm snapped off before I could save it.
LET THE HUNT BEGIN !!!!!!!!!!!
Last edited:
Jake, I broke the rest on mine as well, pissed off when I did it too...Luckily, it welds easily with flux core mig wire. I simply cleaned up the broken edges with a grinder and added a slight bevel, then filled with weld. I wouldn't trust it to drive on, but for a simple rest it should hold.

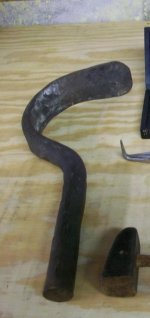
This weeks project/distraction was to clean up a homemade body spoon that I picked up recently. It weighs 5lbs. This is the piece that broke the support arm on my sander. Grrrrr.
I only have a cropped before picture of the spoon, but it was fairly greasy and pitted with rust.
It started with a 2-day bath in EvapoRust. Then a quick trip to the wire wheel.
After that I used a hand grinder to smooth out the flat surface, then on to the sander to even things out and finish removing the pitting. (This is when I got careless and let the tip slip under the guard and caused it to snap off)
The next step was with the angle die grinder and Rotolocs. Brown, Red, Blue.
Then Mr. Polisher gets a visit. Red and White rouge.
Now the face gets masked off, and the spoon gets a coat of RO satin black.
Once dry, the polished face got a rub down with NevrDul and buffed with a soft cloth.
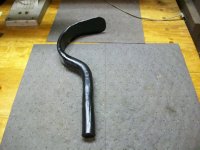
I think it turned out well. I left the hammer marks and other dings on the non-working surface to keep it's history. I just smoothed out the working face so that it wouldn't mar the panels it may get used on.
This afternoon's project will be a pair of 2-1/2" C-clamps that I picked up last weekend. I won't bother to post about that one because I've done it with others in earlier posts. These will get the same treatment.
By reading this thread some may get the impression that I'm a tool polisher and need to have all my tools sparkle. I admit that a certain amount of OCD is involved, but if you saw my tools you would know that's the last thing on my mind. It's just that if I have to strip the rust off a tool, then I might as well finish the job so that I never have to do it again. I don't mind a little dirt, I just can't stand a rusty tool. Especially if it impedes it's use. Besides, these little projects keep me busy while I'm doing my day/night/day/night/day/night/day/night/day/night/day/night/day/night ...... job. [breath]
I only have a cropped before picture of the spoon, but it was fairly greasy and pitted with rust.
It started with a 2-day bath in EvapoRust. Then a quick trip to the wire wheel.
After that I used a hand grinder to smooth out the flat surface, then on to the sander to even things out and finish removing the pitting. (This is when I got careless and let the tip slip under the guard and caused it to snap off)
The next step was with the angle die grinder and Rotolocs. Brown, Red, Blue.
Then Mr. Polisher gets a visit. Red and White rouge.
Now the face gets masked off, and the spoon gets a coat of RO satin black.
Once dry, the polished face got a rub down with NevrDul and buffed with a soft cloth.
I think it turned out well. I left the hammer marks and other dings on the non-working surface to keep it's history. I just smoothed out the working face so that it wouldn't mar the panels it may get used on.
This afternoon's project will be a pair of 2-1/2" C-clamps that I picked up last weekend. I won't bother to post about that one because I've done it with others in earlier posts. These will get the same treatment.
By reading this thread some may get the impression that I'm a tool polisher and need to have all my tools sparkle. I admit that a certain amount of OCD is involved, but if you saw my tools you would know that's the last thing on my mind. It's just that if I have to strip the rust off a tool, then I might as well finish the job so that I never have to do it again. I don't mind a little dirt, I just can't stand a rusty tool. Especially if it impedes it's use. Besides, these little projects keep me busy while I'm doing my day/night/day/night/day/night/day/night/day/night/day/night/day/night ...... job. [breath]
Attachments
Last edited:
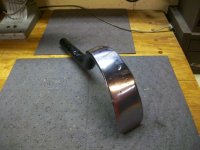
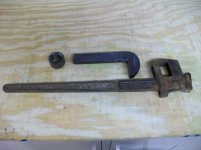
Here's a "when I get to it" project I'm working on. It's a 24" Stillson wrench I picked up last week. The dynamic jaw and nut have been wire wheeled. I'm hemming and hawing over the handle/static jaw. Since I can't take it apart (rivets), I'm wondering how I'll clean up the parts underneath to match the rest of the wrench. Wire wheel or EvapoRust then wire wheel. The other conundrum is whether or not to paint it. Maybe black jaws and red handle. How do I get the paint under the parts I can't remove. Hmmmmmm. I'll probably leave it on the bench for a while (years) until I get sick of looking at it and then whack it out in an hour.
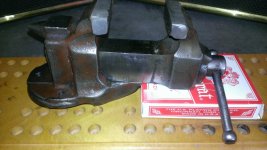
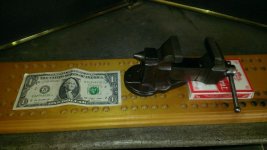
The other picture is a bit of good news on a project that's been sitting under my bench for a year. I found the vise about a year ago, but it was missing the swivel base. Well, I found one on eBay last week that I hope will work. Now I just need the center bolt and locking hardware. One step closer to the restoration.
The other picture is a bit of good news on a project that's been sitting under my bench for a year. I found the vise about a year ago, but it was missing the swivel base. Well, I found one on eBay last week that I hope will work. Now I just need the center bolt and locking hardware. One step closer to the restoration.
Attachments

Last edited:
Fretters
Well-known member
The Stilson's are a pain to tidy up properly with them being riveted, aren't they. I have the same problem at the moment. Four of them turned up here a week or two ago, ranging from numbers 8 to 18. I've ended up just whacking two of them in the electrolysis vat, brush cleaning them as best as possible and then getting what else I can out of the pivoting section with a bit of rag. I've just left them bare.


drivesitfar
Well-known member
Jake: that is a great looking wrench. with all the work you did to remove everything why not use the boiled linseed and really make that old steel shine?
nice work
i see you opted for the 3 legged swivel base. good luck on putting it all together.
nice work
i see you opted for the 3 legged swivel base. good luck on putting it all together.
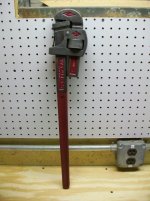
Back to the 24" Walworth Stillson wrench today.
After wobbling back and forth about painting the wrench, I finally settled on that dirty little four letter word that seems to confuse the US Congress ............ Compromise !
I painted the handle and labeling Krylon Satin Burgundy and left the rest bare metal. The color was inspired by Fretters' "favourite colour of choice". I'll oil the metal later after the paint has a chance to fully cure. I was hoping the color would be brighter, but I should have known to trust the cap.
Oh well, I still like it.
Attachments
Last edited:
Fretters
Well-known member
Now that looks classy, (and I'm not just saying that due to it being one of my favourite colour types ). Nicely done.
). Nicely done. Outlawmws
Well-known member
Now that looks classy, (and I'm not just saying that due to it being one of my favourite colour types
Yes you are!


Nicely done Jake,
Fretters
Well-known member
Well, maybe just a little bit.
oldtimehockey
Well-known member
Hi jakemac...
Have you ever considered getting a sand blaster that is sized to fit your needs and then take the item to the wire wheel and buffer after a blaster cleaning???
...There are lots of blasting media from which to choose...
Have you ever considered getting a sand blaster that is sized to fit your needs and then take the item to the wire wheel and buffer after a blaster cleaning???
...There are lots of blasting media from which to choose...
Yeah, I thought about it. Unfortunately, my compressor is too small for a cabinet. I have one of the small bucket kits from HF to use outside, but even that has my compressor freaking out when it isn't constantly clogging.
Besides, standing at the wire wheel dodging wire shrapnel is therapeutic.
Besides, standing at the wire wheel dodging wire shrapnel is therapeutic.
Outlawmws
Well-known member
Uh-oh...
taumac
Well-known member
Jake, Just found this thread. Great projects and great sense of humor. You seem a lot like me always poking fun at yourself. Great thread.
I have to admit your good. Never seen a vise painted pink turn brown before. LMAO
5 Stitches Garage
http://www.garagejournal.com/forum/showthread.php?t=211899
Florida GJ Group
http://www.garagejournal.com/forum/group.php?groupid=117
I have to admit your good. Never seen a vise painted pink turn brown before. LMAO
5 Stitches Garage
http://www.garagejournal.com/forum/showthread.php?t=211899
Florida GJ Group
http://www.garagejournal.com/forum/group.php?groupid=117
Last edited:
I have to admit your good. Never seen a vise painted pink turn brown before. LMAO
I used "special" paint. View media item 38280
taumac
Well-known member
OK if you say so LOL
Last edited:
Fretters
Well-known member
drivesitfar
Well-known member
Jake: so what is the magic mix for Fretter's burgundy colour? did you put boiled linseed oil on the parts of the wrench that you didn't paint. you could have done much worse than taking after Fretters on this one and i actually like that combo.
nice work.
nice work.
I'd tell you the secret, but then I'd have to kill you. 
Actually, it's very simple, I went to the store and bought a spray can of Krylon's Satin Burgundy and pointed it away from my face before pushing the button.
The bare metal on the stillson wrench was slathered with boiled linseed old yesterday. It will take about a week for it to dry enough to be handled.
Last edited: