You are using an out of date browser. It may not display this or other websites correctly.
You should upgrade or use an alternative browser.
You should upgrade or use an alternative browser.
JC Quick's dream
- Thread starter JCQuick
- Start date


well after tweaking we can now see some errors but I will take it knowing we did it ourselves. once we got the door to close to the frame evenly we were not quite square in the door opening  But it will do door works great and seals. Now I have to seal up the frame to jamb. I'm planning to caulk it up real good but feel I need to trim it out as well
Now for the big question would it be a good idea to buy some expandable foam and fill the steel door cavity there fore also giving the caulking a place to land on I have close to a 1/4" in some spots

But it will do door works great and seals. Now I have to seal up the frame to jamb. I'm planning to caulk it up real good but feel I need to trim it out as well Now for the big question would it be a good idea to buy some expandable foam and fill the steel door cavity there fore also giving the caulking a place to land on I have close to a 1/4" in some spots

Last edited:
Bib Overalls
Well-known member
I would use foam in a heart beat.
shortykorte
Well-known member
Being in palmetto bug land I second the foam.
Bib Overalls
Well-known member
Use closed cell foam. Don't think I have ever seen open cell foam in an aerosol can. Check the label before you buy.
Foam is neat stuff to work with but you have a bit of a learning curve. A small squirt from the can will make a lot of foam. Resist the urge to give it a little bit more until you are familiar with the product.
Foam is neat stuff to work with but you have a bit of a learning curve. A small squirt from the can will make a lot of foam. Resist the urge to give it a little bit more until you are familiar with the product.
Foam is neat stuff to work with but you have a bit of a learning curve. A small squirt from the can will make a lot of foam. Resist the urge to give it a little bit more until you are familiar with the product.
well I read this But it just didn't sink in.
 but I taped the area up with blue tape cut little slits in the tape and applied the foam. waited about an hour and a couple of beers, pulled the tape only to find that I was way short. So I retaped all of the areas that needed more and that's were I got stupid and applied way to much thank fully I only did 1 side and the top

I was able to clean it up and the end results is all good now to chaulk it up and if it doesn't look good I'll find a way to trim it out

Last edited:
shortykorte
Well-known member
Hey that looks just like one of my foam jobs!!!!
Sunbimmer
Well-known member
Could not have done it better myself 
")
Time to caulk it up. Since my son seam seals cars a lot I let him be in charge that turned out to be a good decision
he started by tapping it up


then we layed on the caulking

we gave it 20 mins to tack up and removed the tape

I think it came out real good not perfect has the door is not perfect in the opening


he started by tapping it up
then we layed on the caulking
we gave it 20 mins to tack up and removed the tape
I think it came out real good not perfect has the door is not perfect in the opening
 we'll see if we have the drainage right


shortykorte
Well-known member
Caulking looks good and keeps the bugs out. I guess this weekend will be great test weather. Stay dry.
they say call 811 before you dig so I did all week long I waited and no signs of them being out. I painted the white lines so they would know where I'm digging. So I go online and check on it they have it marked as all cleared. Well they are wrong cause I knew there was a phone line right there I had to have them move the box as its in the way of connecting to the house. I call them and tell them to resend the guy out in the mean time I dug a little and found it  this should give them a hint you think


I call them and tell them to resend the guy out in the mean time I dug a little and found it this should give them a hint you think Well the call before you dig guys came back out  I'm sure they we not happy as it was clear I knew where stuff was but they marked it for me

it still wasn't right the orange line is my phone and runs over by the truck and the bug thru the neighbors back yard yet he made a left turn to the power pole


I'm sure they we not happy as it was clear I knew where stuff was but they marked it for me it still wasn't right the orange line is my phone and runs over by the truck and the bug thru the neighbors back yard yet he made a left turn to the power pole
Last edited:
shortykorte
Well-known member
Maybe you have buried treasure. Lol
don long
Well-known member
Just read through you thread
Nice work you have done building your garage
Must be nice to have a crew of sons willing to help out.
Are you going to put a ceiling in the garage or leave the open look??
Nice work you have done building your garage
Must be nice to have a crew of sons willing to help out.
Are you going to put a ceiling in the garage or leave the open look??
Just read through you thread
Nice work you have done building your garage
Must be nice to have a crew of sons willing to help out.
Are you going to put a ceiling in the garage or leave the open look??
Thank you it has been an interesting build and my sons have been a great help and well it should just add to what this garage is all about.
Ceiling is a must and one of those things I haven't decided on just yet but most likely will be dry wall.
My main goal at this point is get "basic power" in and get my final. after that I hope to add some much better updates but it will take some time
I have seen your thread its an honor to have you comment on my small build
Its little by little but some progress got the trench dug for the electric. Again my sons handle the hard labor


We found some sprinkler pipe I knew we were close as I had installed it and not a big deal needs to be redone once the driveway is in

The surprise came when we hit the 1-1/4" line from the well to the house. Didn't kill it but its insulted and will be dealt with

got the trench dug for the electric. Again my sons handle the hard labor We found some sprinkler pipe I knew we were close as I had installed it
and not a big deal needs to be redone once the driveway is inThe surprise came when we hit the 1-1/4" line from the well to the house. Didn't kill it but its insulted and will be dealt with
Last edited:
Here is my big problem. the ground from the main feed to the house is in the way of lining up the conduit with the box and due to the main feed line being where it is I can't quite get my 18" depth as call by code. I'm hoping the inspector will help me here. We are thinking of heating the conduit and bending it


I installed a water line for an out door faucet or at least if its found that's my story

I installed a water line for an out door faucet
or at least if its found that's my story
Last edited:
shortykorte
Well-known member
Drive the ground rod down out of the way then put a new one in that's out of the way or if you could heat the conduit and put a slight S in it like they do with metal conduit. Does the conduit have to use that particular knock out on the meter box?
Major Progress has been made, I have been waiting on 2 of my brother in laws to do this for me and with it being a huge favor I didn't push them turns out they were waiting on me
So Friday 1 bil arranged for me to pickup more supplys from a big commercial electrical supply house 3 185ft lengths of 2/0 wire and 185ft of something smaller
  1 8ft 4lamp t8 light
  plus other small goodies. Oh and a Transaxle for my son's project 65 bug

My 2 bill's arrive at 8:45 am Saturday morning I was supposed to meet up with the Fla garage group guys at big daddys but decided to stay and help by doing what I can which mostly consisted of getting anything we forgot


it was quite a job pushing that wire bundle and we used the thin line that we vacuumed for pulling it as we pushed but we got after about 45 mins and a few breaks in between

So Friday 1 bil arranged for me to pickup more supplys from a big commercial electrical supply house
3 185ft lengths of 2/0 wire and 185ft of something smaller 1 8ft 4lamp t8 light plus other small goodies. Oh and a Transaxle for my son's project 65 bugMy 2 bill's arrive at 8:45 am Saturday morning I was supposed to meet up with the Fla garage group guys at big daddys but decided to stay and help by doing what I can which mostly consisted of getting anything we forgot
it was quite a job pushing that wire bundle and we used the thin line that we vacuumed for pulling it as we pushed
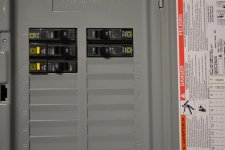
but we got after about 45 mins and a few breaks in betweenNow before anyone says why did you stop with the recepticals on the 1 wall This is what I like to call electrical phase 1 My permit calls for 3 outlets and 2 lights once the building is signed off we will then move to phase 2 we ran 125amp service out there and I'm sure the inspector will be wise to whats up

This build has been a design change every time we go to do something I had planned to put the breaker panel in the short wall between the man door and the roll up but wanted the outside cutoff to be on the out side left of the man door so the breaker box was put were all we had to do is thru the wall. and I'm fine with it

This is what I like to call electrical phase 1 My permit calls for 3 outlets and 2 lights once the building is signed off we will then move to phase 2 we ran 125amp service out there and I'm sure the inspector will be wise to whats up This build has been a design change every time we go to do something I had planned to put the breaker panel in the short wall between the man door and the roll up but wanted the outside cutoff to be on the out side left of the man door so the breaker box was put were all we had to do is thru the wall. and I'm fine with it


I was really surprised at how much light the 1 8ft 4 bulb fixture put out but now we don't have to extension cords out there for power

we didn't install the gable end light cause I need to install the hardie board but we did wire it up to a plug in cord and hung it on a nail to see if its what I want

pretty bright for a small unit

The man door light is installed its also LED and on a photocell but in the middle of the night it is a bit much inside the house so it will get changed out to something else. I have it switched so I can turn it off

we didn't install the gable end light cause I need to install the hardie board
but we did wire it up to a plug in cord and hung it on a nail to see if its what I wantpretty bright for a small unit
The man door light is installed its also LED and on a photocell but in the middle of the night it is a bit much inside the house so it will get changed out to something else. I have it switched so I can turn it off
taumac
Well-known member
Looking good sir and another step forward.
cbacres
Well-known member
Seeing the cable strung out on the driveway reminded me when we pulled the main feed to my shop.
It's about a 250' run and you couldn't see one pull point to the other. It was just me, my son and his four wheeler, my wife and daughter.
I had the cables strung out back and forth in front of the shop and it was pulled at the house. I was by myself at the shop, the son on the wheeler, my wife pushing down on the pull rope ( ground pull box) and my daughter running back and forth for our communication.
It was a job for about 20 minuites but we got it done.
And then I detailed the layout of the shop machines and where I wanted the air compressor was right in front of the panel.
That's what they make LB fittings for. We moved it and alls be good since.
It's about a 250' run and you couldn't see one pull point to the other. It was just me, my son and his four wheeler, my wife and daughter.
I had the cables strung out back and forth in front of the shop and it was pulled at the house. I was by myself at the shop, the son on the wheeler, my wife pushing down on the pull rope ( ground pull box) and my daughter running back and forth for our communication.
It was a job for about 20 minuites but we got it done.
And then I detailed the layout of the shop machines and where I wanted the air compressor was right in front of the panel
.That's what they make LB fittings for
. We moved it and alls be good since.CB that 4 wheel drive 4 wheel came up in conversation more than once in our planning stage. And I had left the conduit unglued at the 90 around the A/C unit but my BIL insisted on putting it all together and pushing and pulling. that wire went down the drive way and across the front yard. My son was on the string and BIL #2 was at the panel BIL #1 was feeding him and I was at the tail feeding him
cbacres
Well-known member
The unglued 90 is what we did at the house end, other wise I would of been pulling or feeding at the panel inside the garage. I ran the 2" through the stem wall and chipped out the floor a little for the conduit, didn't want it surface mounted outside.
I then left the conduit low at the shop to make it easier to feed. The from wall of the shop was just framing in this area at the time.
I was feeding, keeping it unkinked and squirting lube all at the same time.
I built a funnel of sorts so the wire would not get skinned going in.
I then left the conduit low at the shop to make it easier to feed. The from wall of the shop was just framing in this area at the time.
I was feeding, keeping it unkinked and squirting lube all at the same time.
I built a funnel of sorts so the wire would not get skinned going in.
Watching BIL 2 heat this up and bend it was well very redneck but worked great

This is the photo cell man door light that may or may not stay


I don't want the front of the shop lit up out front unless I'm needing it the there will be spot lights in the corners to handle that so I think I will use this one for when I just want a little. this was the one we had on the nail

but worked great This is the photo cell man door light that may or may not stay
I don't want the front of the shop lit up out front unless I'm needing it the there will be spot lights in the corners to handle that so I think I will use this one for when I just want a little. this was the one we had on the nail
shortykorte
Well-known member
Great feeling once the power is hooked up and you have overhead lights.
I notice that the slab isn't off grade by very much. Hope you will have gutters because with our rain that man door will be flooded.
I notice that the slab isn't off grade by very much. Hope you will have gutters because with our rain that man door will be flooded.
Great feeling once the power is hooked up and you have overhead lights.
I notice that the slab isn't off grade by very much. Hope you will have gutters because with our rain that man door will be flooded.
Yes getting power feels like I can get this finished now

As far as the water it has stayed dry so far I have a thresshold that has not been installed yet I do plan on some gutters but much later
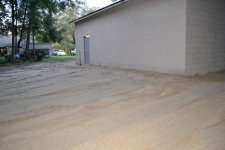
as far as the off grade I'm not real good with construction terms
. I was very worried about how water would drain as before I built it a small river would form going back there and then naturally flow to the right of where I put the building. And so far that has not changed I am planning a 15-20' pad with a walk way to the man door. I figure if we give it a slight slope I will be ok. But that's after its signed off after all its a storage building
Here's a better pic of how my lot slopes rare in Florida
Attachments

shortykorte
Well-known member
I didn't realize you had a gentle slope there. That will definitely help. Grade is final grade or final elevation of soil. A house floor should be a min. of 6" above final grade so moisture doesn't get to bottom plate of wall. With concrete block, you're good to go.
I didn't realize you had a gentle slope there. That will definitely help. Grade is final grade or final elevation of soil. A house floor should be a min. of 6" above final grade so moisture doesn't get to bottom plate of wall. With concrete block, you're good to go.
There again I learn something
Thank you Shorty I do plan to throw some Bahia sod around it to see what happens I doubt much