To avoid these ads, REGISTER NOW!

Kansas Camaro Corral

OP
C

camarosrus69

Well-known member
Joined
Aug 7, 2013
Messages
243
Location
South central Kansas
continued....
IMG_20181229_180603096.jpg IMG_20181229_180706158.jpg

IMG_20181229_180727540.jpg IMG_20181229_180743517.jpg

and the after shots, with lights and fan installed...

IMG_20190109_183313022.jpg IMG_20190109_183331275.jpg

Then I went out and put in the anchor bolts for the AC compressor.

IMG_20190106_171540947.jpg

We're now up to date. Well, almost. I have the compressor bolted down, but it was getting dark, so I don't have a shot of that yet.
 
To avoid these ads, REGISTER NOW!

Toothaker

Well-known member
Joined
Nov 25, 2016
Messages
1,367
Location
Wichita, Kansas
If you look back at post #5 and #32, you'll see the different colors. The red is trim board, and the blue is peg board. My attached garage is done the same way.

North wall (2).jpg South wall.jpg

Very nice. :thumbup: I had to go back to those older posts, and I realize now I didn't see them as pegboard. I just thought the wall was blue.
 
OP
C

camarosrus69

Well-known member
Joined
Aug 7, 2013
Messages
243
Location
South central Kansas
It's easy to see why you might have thought that. I don't recall if Sketchup has a texture that resembles pegboard, and while I know I've mentioned my plans to people I've talked to about my shop, I don't remember mentioning it here.(And I'm not going to review my thread to find out.) I'm using the thicker stuff that I think holds up better, and I think the perforations help in toning down the echo in the big hollow room.
 

roll_the_dice

Well-known member
Joined
Apr 23, 2017
Messages
69
Location
Savannah, GA
Just read your entire thread! Great job on doing a ton of work! Nice car also...I am restoring a 1965 Chevy C10 LWB Stepside and I wish I had a lift...makes work so much easier and nicer.
 
OP
C

camarosrus69

Well-known member
Joined
Aug 7, 2013
Messages
243
Location
South central Kansas
Update on my progress. Last week I finished cutting and shaping the trim boards for the bottom edge of the sheetrock. On Sunday, I got them painted. Hopefully, I will get the up this weekend. There are more of them than I need for the sheetrock, because they will be used on the bottom of the pegboard as well. That will be next. I still haven't found the color I want for the pegboard. I'm trying to match the blue of the lift.
 

Attachments

  • IMG_20190129_164934977.jpg
    IMG_20190129_164934977.jpg
    121.6 KB · Views: 57
  • IMG_20190129_164922516.jpg
    IMG_20190129_164922516.jpg
    95.3 KB · Views: 60
  • IMG_20190129_164913019.jpg
    IMG_20190129_164913019.jpg
    146.7 KB · Views: 63
  • IMG_20190124_162325116.jpg
    IMG_20190124_162325116.jpg
    97.8 KB · Views: 51
  • IMG_20190124_162301109.jpg
    IMG_20190124_162301109.jpg
    85.9 KB · Views: 52
  • IMG_20190124_162249398.jpg
    IMG_20190124_162249398.jpg
    62.9 KB · Views: 53
  • IMG_20190124_162242309.jpg
    IMG_20190124_162242309.jpg
    115.1 KB · Views: 56
OP
C

camarosrus69

Well-known member
Joined
Aug 7, 2013
Messages
243
Location
South central Kansas
Early this week I managed to get the upper trim installed.
IMG_20190203_160725767.jpg IMG_20190203_160710339.jpg
IMG_20190203_160706024.jpg

Then this weekend, I started cutting and temp installing the pegboard.
So far, I have finished the west and south wall.

IMG_20190203_193100544.jpg IMG_20190206_193957301.jpg
IMG_20190209_194131743.jpg IMG_20190209_194116946.jpg

I started working the north wall today, but got stopped, when I realized I need to have the window trimmed before I can do the peg board trim. Time to buy some more wood.
 
OP
C

camarosrus69

Well-known member
Joined
Aug 7, 2013
Messages
243
Location
South central Kansas
Today's lesson is on shop safety. I think everyone has a healthy fear of table saws, however, it is easy to get in a rhythm of doing something and forget, or skip a step of a procedure and expose yourself to unnecessary harm. In my case that step is lowering the blade, so that it is only as high as it needs to be to cut the thickness of the wood being cut.

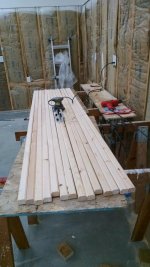
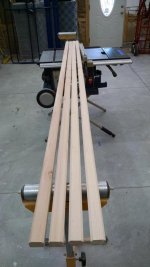
It all started from me being the tight *** that I am, and deciding to trim out the window with some left over 2X4s rather than buy something that was already milled to approximate size. I cut the board down to 2.5 inches wide
and then was going to rip it down to about 5/8 thick. I set the fence, and then decided to run a scrap piece through to check the thickness. The scrap piece I used, was the leftover from the previous cut, which was about 3/4 inch tall. The fence was too close for the guard, so it wasn't there. As I was pushing it through, I noticed that my pusher stick was wider than the cut and was hitting the blade as well. At the same time, I was reaching in with my left hand to pull away the scrap piece, so it wouldn't kick back at me. With the distraction, I wasn't looking at what my left hand was doing,,,, and bamm!!

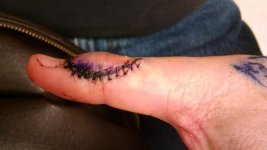
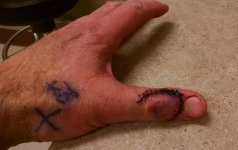
The blade caught my glove, pulled it down, and kicked it back at me. My first thought was "Damn, that was close!" Then the feeling started to come through. Then "Is my thumb still there?" Wiggle, wiggle, yup, still attached. Time to inspect the damage. so I shut off the saw and pulled off the glove. There it is. A nice notch on the top of my thumb, between the thumbnail and the first knuckle, and lots of blood. Then, of course, there is; find something to wrap it up with, shut everything off, and go up and tell your wife what a dumb-*** you are. The resulting blood trail made the shop look like a crime scene.

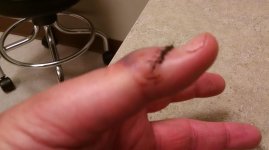
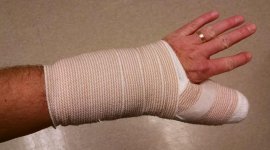
That was three weeks ago. Since then there has been; one Minor ER visit, one Orthopedic specialist visit, one out patient surgery visit, and two after-surgery specialist visits. Along with; one big *** splint, 18 stitches, a big *** cast, another, smaller splint, and finally my thumb back, with a beaut of a scar.

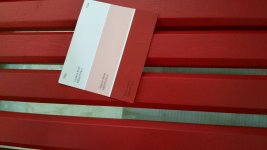
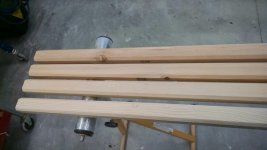
Needless to say, not a lot has been accomplished since then. But some has. I bought some properly sized trim wood to finish out the window, and all of the peg board is now cut and installed. Now for paint and cabinet installation.

I took some pictures, and I really think you need to see them.
 

Attachments

  • IMG_20190220_134807025.jpg
    IMG_20190220_134807025.jpg
    95.4 KB · Views: 86
  • IMG_20190220_134759710.jpg
    IMG_20190220_134759710.jpg
    103 KB · Views: 77
  • IMG_20190220_134752560.jpg
    IMG_20190220_134752560.jpg
    146.2 KB · Views: 84
  • IMG_20190220_134345074.jpg
    IMG_20190220_134345074.jpg
    127.6 KB · Views: 73
  • IMG_20190220_134336814.jpg
    IMG_20190220_134336814.jpg
    142.3 KB · Views: 77
  • IMG_20190213_183124121.jpg
    IMG_20190213_183124121.jpg
    37.5 KB · Views: 82
  • IMG_20190213_183058913.jpg
    IMG_20190213_183058913.jpg
    61.5 KB · Views: 88

TA462

Active member
Joined
Mar 25, 2007
Messages
44
Location
Colborne, ONTARIO
You got lucky. One thing I learned in shop class in High School 35 years ago was to never wear gloves around table saws, band saws and circular saws. I always thought it was dumb NOT to wear them until I saw what happened to a friend of mine. Same as you, the blade grabbed the glove but he ended up losing a couple fingers.
 

Toothaker

Well-known member
Joined
Nov 25, 2016
Messages
1,367
Location
Wichita, Kansas
Ouch ouch ouch ouch ouch.

I took a corner off my left thumb many years ago. It was a very shallow cut - didn't even go through all the layers of the skin. Never felt a thing, but at some point I realized there was blood all over the wood and table saw.

I agree with TA462, no gloves around saws, drill presses, lathes or other powered tools. Yes, the skin gets cut and you bleed, but the gloves get grabbed and wrapped around, taking fingers and hands along.
 
OP
C

camarosrus69

Well-known member
Joined
Aug 7, 2013
Messages
243
Location
South central Kansas
Let's fast forward a little bit. The last couple months I have been finishing out the interior walls. We left off with me putting up peg board and trim and trying to slice my thumb off. As of now the walls and trim are up and painted. I installed the garage door opener, and installed all of the overhead cabinets.
Here is a spin around the room in early April:
IMG_20190401_181153128.jpg IMG_20190401_181239164.jpg
IMG_20190401_181313346.jpg IMG_20190401_181259418.jpg
IMG_20190410_193302572.jpg IMG_20190410_193311824.jpg
IMG_20190410_193203039.jpg

(continued)
 
Last edited:
OP
C

camarosrus69

Well-known member
Joined
Aug 7, 2013
Messages
243
Location
South central Kansas
I also finished wiring the air compressor and ran it though its 20 minute break-in run. That thing is one loud mother pumper! Earlier, I was debating whether to build a closet for it. That is a definite future project. I wanted to work on the AC next, but spring snuck up on me and I had to switch gears, and work on the yard for a while. I'm sure many of you know we've had an extremely wet spring so far. A neighbor said he's measured 17 inches so far this month. I did manage to have a few days strung together, of dry weather, and had a guy regrade the area around the shop. The local sod place dropped off a couple pallets of sod, and I managed to get it down before the next deluge could wash all the dirt away again. That was last weekend. It has been almost nonstop rain since then. I guess on the plus side, I haven't had to run the sprinklers, and it looks like sod is taking hold and growing well. I had the area in the front, that was destroyed by the trucks, tilled up, and reseeded as well. Too soon to tell if the rain was good or bad for it. I still have more yard work to do, but. as you can see, I managed to get a little more done on the AC. I put up the line set covers last night, and ran the lines from the compressor into the shop today. I had to stop there, because I found my tubing flaring tool isn't big enough for 5/8" tubing
 

Attachments

  • IMG_20190526_182917692.jpg
    IMG_20190526_182917692.jpg
    149.4 KB · Views: 62
  • IMG_20190526_182900826.jpg
    IMG_20190526_182900826.jpg
    148.1 KB · Views: 70
To avoid these ads, REGISTER NOW!
OP
C

camarosrus69

Well-known member
Joined
Aug 7, 2013
Messages
243
Location
South central Kansas
Well, summer is past and the shop has had its second birthday, but still isn't complete. However progress has been made, and I think I see the light at the end of the tunnel. The next item on the agenda was getting the A/C running. You can see from the previous pictures that I was working on connecting the inside to the outside. That was fraught with some minor setbacks in the form of kinked copper tubing, and chasing down a leaky union, but I was ultimately successful, and now have hot and cold running air. Now I'm up to the task of installing the scissor lift. The next several photos show the computer layout of my rebar for avoiding the mounting holes of the lift, and the fun task of digging holes, shaping holes, drilling rebar holes, bending rebar, and installing rebar and plastic.

pit layout.jpg IMG_20190707_190505220.jpg

IMG_20190713_203131861.jpg IMG_20190713_203147211.jpg

IMG_20190721_162058458.jpg

Also included, is the "ingenious method" I used, to get a dozen 20 ft long pieces of rebar home from the lumber yard.

IMG_20190728_142145178.jpg

IMG_20190728_143431634.jpg

(continued)
 
Last edited:
OP
C

camarosrus69

Well-known member
Joined
Aug 7, 2013
Messages
243
Location
South central Kansas
more:

IMG_20190818_115624521.jpg IMG_20190823_203651061.jpg

IMG_20190823_203706245.jpg IMG_20190902_192913851.jpg

IMG_20190902_192928884.jpg IMG_20190902_192957483.jpg

Talked to a concrete guy this last week, and set up a time with him to place the concrete on Friday the 20th. I'm in the process of making the forms now, and will post some pics of them when they are finished.
 

AlpineSeven

Member
Joined
Jun 17, 2019
Messages
8
Location
Charleston, SC
Just read through you'll build thread. Great work!! I'm in the planning phase of my garage build right now. Hopefully breaking ground soon! I'm also planning scissor lift. In fact it was your post in the scissor lift thread where I learned about the Atlas FM9SL
option. Only a few bucks more and you don't have to deal with a company in China and the shipping / logistics issues that creates.

How is the lift install progress? Have you got it up and running?
 
OP
C

camarosrus69

Well-known member
Joined
Aug 7, 2013
Messages
243
Location
South central Kansas
Thanks Seven, and welcome to The Garage Journal. Looks like I got your first post.
As promised last week, I have the forms done, and the concrete arrived, and was placed yesterday. I'll be pulling off the forms on Sunday. Here are a few pictures of the last week's events.

IMG_20190916_203033055.jpg IMG_20190916_203059638.jpg IMG_20190917_193144447.jpg

What you won't see is a couple diagonal braces that I added after the forms were in the pit. I noticed that the boxes were getting out of square as I was shifting them around to get the position right. You won't see them in the next photos either because they were the first ones removed to get better access to the bottom. They went from the middle upright on the inboard side to the outer front corner of each box. I was concerned about the weight of the concrete in the center trying to bow the middle of both walls out. I'm happy to say the walls are very straight.

IMG_20190920_212616994.jpg IMG_20190920_212631185.jpg
IMG_20190920_212649903.jpg IMG_20190920_212703557.jpg

You'll notice that the cross braces are out. That was done when he was edging the concrete because, while I had them about 1 1/2 inches up to clear his floats, they wouldn't clear the handle of his edger. At this point we decided that the concrete had set up well enough that the 2 x 6's would hold everything in place. You may notice a couple extra x-braces as well. I had the wood, the screws, and the saw, and decided I'd rather be safe than sorry.

4-12-2020
I'm going to add an edit here to mention while the walls looked straight at first glance, after installing the lifts, it became apparent that as I expected, the weight of the concrete wanted to push the inner walls outward. And the way I had it braced, that pushed the outer walls outward as well. If I was ever doing this again, I would put a third 9 ft long 2x4 running across both pits, in the middle, and tied it to the floor, like the other two. The diagonal braces didn't do the job well enough. The bow isn't real bad, and I'm probably the only person that ever notices it, but it did cause me to spend more time dickin around with the position of the lifts to get the gaps to look even.
 
Last edited:

KSJeff

Well-known member
Joined
Dec 19, 2011
Messages
764
Location
Andover, Kansas
Howdy neighbor! Greetings from a fellow Camaro owner out in Andover. Very nice looking shop.

Camaro-M.jpg
 
OP
C

camarosrus69

Well-known member
Joined
Aug 7, 2013
Messages
243
Location
South central Kansas
Thanks, Chateau, and Jeff. I don't have any real blueprints, but I worked out the design using Sketchup, which is an online 3D modeling app. I ordered it as a kit from Menards, which you should find plenty of, in your neck if the woods. The one thing I might do differently, if I were starting over, is go with a 9 foot wall instead of 10, but the place feels spacious, as a result. If you go with the attic setup like I have, you need to pay attention to the "heel height",of the trusses, to make sure the scissor trusses match the attic trusses. Expect to spend about 40 large to get what you see here.
 
OP
C

camarosrus69

Well-known member
Joined
Aug 7, 2013
Messages
243
Location
South central Kansas
That's a good question, Alpine. I've seen it done both ways, here. I think my method was cheaper, because I did everything except pour the concrete. But I paid for that savings with time. At my age, I need to quit doing that. Also, I think the quality of the forms and their placement, are better than anything I could have bought. But I'm a picky *******. As many have said, having the lift on hand, before you pour the pits, is a very safe bet, unless you want to go with large gaps to be sure it will fit.
If you haven't read it yet, "Atlas FM9SL Scissor Lift Flush-Mount Install", by jtbinvalrico, is an excellent resource for these installations. Doing it all at once, does have the advantage of locating the big tube, from the lift to the controller, exactly where you want it, and the ability to trim the end better. The hole I left in my floor allowed +/- 4" movement front to back and +/- 3" side to side, for the final pit locations, but I ended up putting it right in the middle. Part of that was because of the already buried big tube, but also because it just worked. Sometimes you just get lucky. I think holding the forms in place (for the single pour) would be a little tricky, but since I wasn't doing it that way, I didn't research it much. I guess, after all this rambling, what I'm trying to say, is if you don't have the lift, split the pour. If you do have the lift, save the time, and watch them like a hawk with form building and placement.
 

Chateau Slate 66

Well-known member
Joined
Nov 4, 2008
Messages
408
Location
Twin Cites, MN
There's a lot of discussion about wall height when installing a lift. Do you think the 10 foot side walls and scissor trusses will give you adequate room to raise a vehicle?
 
OP
C

camarosrus69

Well-known member
Joined
Aug 7, 2013
Messages
243
Location
South central Kansas
If you look back to post #32, you'll see my Sketchup model of the Camaro on the lift with plenty of clearance. With the hood up it will be close. I'm not not sure about my pickup. I think it will clear the ceiling. I'm not sure about an open garage door. The lift model in the picture doesn't match mine well, but I positioned it to represent the height of mine. Also the pads are missing in the picture, but I added them later. Also, in my case, I have a 6" stem wall, so 10 1/2 foot tall walls. That 6" wall cost me $600 extra, and added a complication factor to the construction, because it wasn't even. We had to shim the stud wall on the north side, to keep the sill plate straight. I wanted the stem wall to avoid moisture induced wood rot from a wet floor, and to get the extra ceiling height, so it was worth it to me.
 
Last edited:
OP
C

camarosrus69

Well-known member
Joined
Aug 7, 2013
Messages
243
Location
South central Kansas
Back again. I am making progress towards getting the lift installed. I made a 6 foot tall hoist frame, by recycling the wood from the forms. I doubled up the 2x4s and 2x6s, and doubled a 2x8 for the cross beam. I then used the plywood to gusset everything. I stole the casters off my HF moving dollies, for the wheels. I'm thinking of drilling a hole, and putting a screw thru a couple of the casters to lock them down, but haven't figured out how to make sure they are parallel. I have a chain for the crossbeam and it holds the hoist close to the beam. I gave it a test lift on Sunday, and it appears to be tall enough.
IMG_20191021_203833381.jpg
I then turned my attention to the lift itself. I hooked up the air, electric, and hydraulic lines, and filled the reservoir. Time for the first test. I flipped the breaker and went over and turned on the power switch. Every light on the control panel lit up, which according to the sketchy manual seems right. I pressed the up button and... nothing. As it turns out, all of the lights aren't supposed to come on. It should have been only a couple. Turns out I didn't have it wired up right. jtbinvalrico straightened me out, and after correcting my mistake, the lift had its maiden voyage. It is quieter than I imagined it would be. I have yet to install a couple of limit switches, one of which sets off a buzzer. I'm not looking forward to that functionality. My plan is to pour some self-leveling concrete into the bottom of the pits on Friday and install the lifts this weekend. I have a few pics on my phone but the charger cord is jacked up and won't transfer them to my laptop. So that will have to wait until I get a new cord. And I'll have more new pics this weekend.
 
Last edited:
To avoid these ads, REGISTER NOW!
Top Bottom