To avoid these ads, REGISTER NOW!

Lets build an industrial grade deruster

trbomax

Well-known member
Joined
Mar 21, 2010
Messages
2,556
Location
starvation lake,mi.
There seems to be so much talk on here about de-rusting and the various means of doing it,I have decided to take all the "mystery" out of electrolytic derusting by running a thread on the build of my new,industrial grade unit. I have built components (tanks and washers) before with a friend who had at the time,a Redi-Strip franchise.This was in the 70's and he now does metal cleaning on a much larger scale than we did then.We could just barely get a car body in the original tanks,he now can run 2 at a time.Anyway,enough talk,lets get to work.

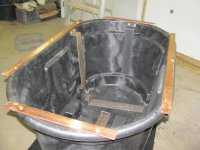
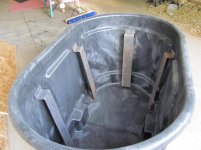
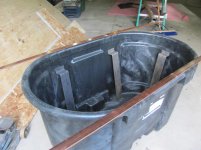
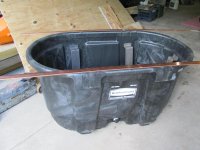
Obviously,you must decide what the largest part is that you will want to clean. Once you decide,you must go about sizeing the tank and the power supply. In my case,Ive never needed a deruster untill we relocated up here in the hills,because when we lived in toledo I could just take my stuff over to my friends place and run it.Now its a 300 mile drive one way. Engine parts (blocks and heads) would be about the largest parts I would clean.For something like an axle houseing,I could do what is called "double ending", placeing the part on the edge of the tank,cleaning it,then reverseing it. I selected a 100gal capacity Rubber Maid nylon stock watering tank.These are cheap,strong, and redily available. A large V-8 block and both heads will fit just fine.We will need a cart of sorts to move it around,and a cover,since the solution is caustic and there is high current involved in this large of a tank.I used 2 funiture dollys from TSC and one sheet of t&g subflooring. One 8' 2 x 4 was used to make the retaining lip around the cart. After assembly I gave all the exposed wood a heavy coat of alcohol based sealer,and then a good coat of black gloss rustoleum. This will make it somewhat waterproof,good enough for what I am doing.

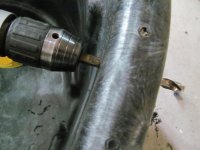
If the paint is dry enough tomorrow,I will assemble the tank to the cart,put the handles on the lid and start building the anodes.
 

Attachments

  • IMG_0726.jpg
    IMG_0726.jpg
    149.2 KB · Views: 1,789
To avoid these ads, REGISTER NOW!

Omphaloskeptic

Well-known member
Joined
Oct 11, 2008
Messages
2,346
Location
Ultima Ratio, Wa.
Yep, I'm watching this one; closely!

Sounds like you've been down this road before. Please feel free to educate us on the Do's-and-Don'ts of derusting.

-Where did you get the 100 gal. tank?

-How much did it cost?

-Is this tank going to need a big (plastic ?) drain valve?

-Do you know if the used solution can be drained into the city sewage system safely without causing harm to the piping and bringing the EPA down on me?

The reason I ask is that I have a motorhome parking slab (unused) on the property with power, water and sewage connections handy; I've been thinking that it would be a good spot to locate a big outdoor derusting tank. Sorry for all the questions, but you've got me thinking about this (future) project of mine...:dunno:

Looking forward to how you put this thing together. :thumbup:
 
OP
T

trbomax

Well-known member
Joined
Mar 21, 2010
Messages
2,556
Location
starvation lake,mi.
Ready-Strip is a company that (if my memory is correct) originated in so cal.I dont know if they invented electrolytic derusting, but they were the first to come up with a standard proceedure and then franchise it.As far as I know they are still in business,but after 40+ years,thier formulas and methods are common knowledge.

The 100 gal tank is a Rubber Maid stock watering tank. I got this one at TSC for around 100$. Its nylon reinforced plastic of some sort,very strong and non-conductive,both of which we need for this project.They make both smaller and larger ones,and you could probably cut a plastic drum in half too,but remember this is going to be an INDUSTRIAL GRADE unit,capable of comercial use on a daily basis.It does have a 1 1/2" drain plug that I suppose you could fit a ball valve to,but we always pumped the tanks because the very caustic solution could not be put in the city sewer system w/o prior treatment.You must keep in mind we were dealing with around 2000 gal,not 50 - 75,and it was a business that by its very nature,was watched closely by the eq and epa people.If I would ever have to drain this system,I would pump it into 55 gal plastic drums,but there should never be a need to do this on the scale we are useing it.Careful testing and monitoring the electrolyte will give it a very long life.

Now I am off to a friends fab shop to figure out the anode shape,and (unrelated to derusting) pickup some fretilizer for the garden and some parts for the air compresser that I havent finished yet!
 
Last edited:
OP
T

trbomax

Well-known member
Joined
Mar 21, 2010
Messages
2,556
Location
starvation lake,mi.
We sheared some 3/16" hot rolled sheet into 3" strips and broke them to the profile you see here.They will be higher on the tank wall with 2 - 5/16" brass bolts and nuts at the top to attach them to the tank and provide an anchor point for the #4 cable that will carry the positive current.By standing them off the tank wall we efectivly double the area of the anode.Lots of area is good when makeing an electrical connection thru a solution,think about a battery with more and bigger plates in the cells.

The 1/4" x 1 1/2" copper bar stock for the negative buss arrived today. This will be cut and fit to form a rail around the top edge of the tank. Parts in the tank will be suspended from rods and wires.They will recieve the negative current thru the suspension wires or in the case of many small pieces a basket hung from pipes laying across the busses.We dont want either the anodes or the parts to be on the bottom of the tank because over time a layer of sludge will settle out and it is not a good conductor.

We will need 30 - 5/16"-18 x 1/12" long hex head brass capscrews w/ brass nuts and flat washers to attach all of these parts.All of the electrical connections and all the parts that form the conductive path of the negative side will be fabbed from non-ferrous material.This will help reduce the possibility of corrosion on these important parts.
 

Attachments

  • IMG_0729.jpg
    IMG_0729.jpg
    138 KB · Views: 500
  • IMG_0730.jpg
    IMG_0730.jpg
    136.7 KB · Views: 471
  • IMG_0731.jpg
    IMG_0731.jpg
    133.2 KB · Views: 452
  • IMG_0732.jpg
    IMG_0732.jpg
    138.3 KB · Views: 463
Last edited:
OP
T

trbomax

Well-known member
Joined
Mar 21, 2010
Messages
2,556
Location
starvation lake,mi.
I got it from Enco.They were haveing a 30% off sale and the timeing was perfect! I will have to check the invoice but I think the before discount price was around $80/6' length. I was buying some tooling for the mill and just found it in thier on-line catalog.I was going to buy it local but they had to order it and all that bs,plus I would have had to drive 60 miles one way to pick it up.
 

rustybutt

Well-known member
Joined
May 6, 2013
Messages
160
Location
Waco, TX
IIRC electrolysis is a line-of-sight operation so having the anodes stand away from the side of the tank will not help that much. Maximizing anode area will give better results. I like the idea of the stock tank!
 

cnc-me

Well-known member
Joined
Jan 6, 2010
Messages
1,183
Location
MI
Like your handle name "Rustybutt" :lol_hitti
Oh, and welcome to GJ.
 
Last edited:

socapots

Well-known member
Joined
Jan 3, 2011
Messages
544
Location
Canada
IIRC electrolysis is a line-of-sight operation so having the anodes stand away from the side of the tank will not help that much. Maximizing anode area will give better results. I like the idea of the stock tank!


Did I miss something. I thought he said that in his post..
 

Fyrme

Well-known member
Joined
Nov 28, 2012
Messages
2,231
Location
Green country, Oklahoma
IIRC electrolysis is a line-of-sight operation so having the anodes stand away from the side of the tank will not help that much. Maximizing anode area will give better results. I like the idea of the stock tank!

I've heard this but some what disagree to a point. I think the line of sight theory is more correct by saying, parts that are not exposed to the solution ie. bolt threads inside on a nut, are not affected by the process. I only use 4 electrodes in my tank and don't seem to have any problem with rust removal even down inside hidden holes and such. Also to add to that threory that you mentioned above, these are my electrodes. Notice the back side has just as much corrosion as the exposed side, if not more.
Exposed side
5651A788-8674-431A-B68D-2FAA462CD5D0-3589-000002C988BB8F3A_zpsfd82a639.jpg

Non exposed side (this side sits almost flat against my tank with only an1/8" of space for water solution to make contact.) it shows more build up that the front side.
AEAB3EC8-49D4-4266-BF0E-BDC9AA5B9019-3589-000002C981ADB475_zpsbd035b27.jpg


The flat stock method, in my opinion has much more surface area to use that a 1/2" piece of rebar, and is easy to scrape off with a putty knife.
 
OP
T

trbomax

Well-known member
Joined
Mar 21, 2010
Messages
2,556
Location
starvation lake,mi.
IIRC electrolysis is a line-of-sight operation so having the anodes stand away from the side of the tank will not help that much. Maximizing anode area will give better results. I like the idea of the stock tank!

I have to respectfully disagree with the "line of sight" statement.IF this were true,then how do you explain the fact that an engine block that has extreemly rusty and scaled internal cooling passages will come out looking like a new casting? A car body will be clean and shiney on the bottom and in all of the inside places that are not "line of sight" in any way.This is a reverse electrolysis process that relys on the solution to transfer the current,anything in contact with the solution will be affected.
 

BRENT in 10-uh-C

Well-known member
Joined
Jan 28, 2006
Messages
212
Location
Tennessee
The 100 gal tank is a Rubber Maid stock watering tank. I got this one at TSC for around 100$. Its nylon reinforced plastic of some sort,very strong and non-conductive,both of which we need for this project.They make both smaller and larger ones,and you could probably cut a plastic drum in half too,but remember this is going to be an INDUSTRIAL GRADE unit,capable of comercial use on a daily basis.It does have a 1 1/2" drain plug that I suppose you could fit a ball valve to,but we always pumped the tanks because the very caustic solution could not be put in the city sewer system w/o prior treatment.You must keep in mind we were dealing with around 2000 gal,not 50 - 75,and it was a business that by its very nature,was watched closely by the eq and epa people.If I would ever have to drain this system,I would pump it into 55 gal plastic drums,but there should never be a need to do this on the scale we are useing it.Careful testing and monitoring the electrolyte will give it a very long life.

Now I am off to a friends fab shop to figure out the anode shape,and (unrelated to derusting) pickup some fretilizer for the garden and some parts for the air compresser that I havent finished yet!

I guess I am confused a bit so please bear with me. I have a hot caustic (Sodium Hydroxide) tank that I use to degrease auto parts. This tank works wonders on dissolving grease, rubber, paint, ....and plastic, -however it won't dissolve rust.

On the other hand, I purchase diluted Phosphoric Acid (-not Muriatic) from Lowes in a white & blue quart bottle called Jabco. I can submerse small rusted metal items for several days and it dissolve the rust leaving a dull gray finish.

So where my confusion comes is if your liquid is indeed a Caustic and not an Acid, aren't you worried it will eat through your plastic Rubber Maid tank?
 
OP
T

trbomax

Well-known member
Joined
Mar 21, 2010
Messages
2,556
Location
starvation lake,mi.
I guess I am confused a bit so please bear with me. I have a hot caustic (Sodium Hydroxide) tank that I use to degrease auto parts. This tank works wonders on dissolving grease, rubber, paint, ....and plastic, -however it won't dissolve rust.

On the other hand, I purchase diluted Phosphoric Acid (-not Muriatic) from Lowes in a white & blue quart bottle called Jabco. I can submerse small rusted metal items for several days and it dissolve the rust leaving a dull gray finish.

So where my confusion comes is if your liquid is indeed a Caustic and not an Acid, aren't you worried it will eat through your plastic Rubber Maid tank?

First of all the solution we use is nowhere near as caustic as what you use. Second,it is cold. lastly, the solution is MOSTLY used as a conductor,not a solvent. The caustic does go after light coatings of oil and then the gluconate is the surficant that disperses the oil.The actual rust removal is achieved by the use of the electric current. Also, because the solution runs at 14-15 ph,there is NO flash rusting like there is with acids.Useing acid actually removes base metal as well as the oxides,and parts treated with muratic or other acid will continue rusting even after they are rinsed and oiled.Acids leave a dark surface that must be mechanically cleaned torestore the base metal color. The caustic/glutconate/cyanide solution will leave the surface just like it was cast or machined.In addition,after rinseing,a quick re-dip will prevent any flash or surface rust from forming for up to a year (if kept indoors). They must be re rinsed before painting.
 
To avoid these ads, REGISTER NOW!

BRENT in 10-uh-C

Well-known member
Joined
Jan 28, 2006
Messages
212
Location
Tennessee
First of all the solution we use is nowhere near as caustic as what you use. Second,it is cold. lastly, the solution is MOSTLY used as a conductor,not a solvent. The caustic does go after light coatings of oil and then the gluconate is the surficant that disperses the oil.The actual rust removal is achieved by the use of the electric current. Also, because the solution runs at 14-15 ph,there is NO flash rusting like there is with acids.Useing acid actually removes base metal as well as the oxides,and parts treated with muratic or other acid will continue rusting even after they are rinsed and oiled.Acids leave a dark surface that must be mechanically cleaned torestore the base metal color. The caustic/glutconate/cyanide solution will leave the surface just like it was cast or machined.In addition,after rinseing,a quick re-dip will prevent any flash or surface rust from forming for up to a year (if kept indoors). They must be re rinsed before painting.


Ok, I guess I understand. My caustic solution is only about 10% so you really must just have a trace amount if yours is less than mine.

Also curious, why have you chosen to use sodium hy. instead of baking soda? One thought I have had is since the baking soda is a mild acid and tends to work well with the electrolysis process, would Phosphoric Acid in a mild solution even be better since it too is acidic in nature?

Your timing on this is ironic for me as I have been trying to determine if I want to get into the blasting business or the pickling business. (Actually I do not want to do either!! :lol: ) I have been leaning towards going the direction of media due to the amount of space it takes to operate a successful derusting process. Maybe smaller tank for me could be a 'sibling' to a blasting operation. Thanks for sharing your info!
 
OP
T

trbomax

Well-known member
Joined
Mar 21, 2010
Messages
2,556
Location
starvation lake,mi.
Ok, I guess I understand. My caustic solution is only about 10% so you really must just have a trace amount if yours is less than mine.

Also curious, why have you chosen to use sodium hy. instead of baking soda? One thought I have had is since the baking soda is a mild acid and tends to work well with the electrolysis process, would Phosphoric Acid in a mild solution even be better since it too is acidic in nature?

Your timing on this is ironic for me as I have been trying to determine if I want to get into the blasting business or the pickling business. (Actually I do not want to do either!! :lol: ) I have been leaning towards going the direction of media due to the amount of space it takes to operate a successful derusting process. Maybe smaller tank for me could be a 'sibling' to a blasting operation. Thanks for sharing your info!

The honest truth is that I use sodium hydroxide because thats part of the solution formula that both Redi-Strip and my friend use and they have both been doing this since the early 70's.I can see no reason to re-invent the wheel!.Also by useing a base solution we have no flash rusting and no hydrogen embrittlement to deal with.Bottom line is that the system works and is a proven performer.

I'd really like to have a hot strip tank,but I dont think I'd use it enough to justify the cost of keeping it at temp.I'd have to use a propane burner and in my small (3024 ft) shop the stink and moisture from an unvented burner would not be aceptable.
 
Last edited:

Fyrme

Well-known member
Joined
Nov 28, 2012
Messages
2,231
Location
Green country, Oklahoma
I have to respectfully disagree with the "line of sight" statement.IF this were true,then how do you explain the fact that an engine block that has extreemly rusty and scaled internal cooling passages will come out looking like a new casting? A car body will be clean and shiney on the bottom and in all of the inside places that are not "line of sight" in any way.This is a reverse electrolysis process that relys on the solution to transfer the current,anything in contact with the solution will be affected.

Exactly!
Not sure why people believe this line of sight rumor.
 

ed_h

Well-known member
Joined
Oct 21, 2007
Messages
51
Exactly!
Not sure why people believe this line of sight rumor.

Well, it's a little more than a rumor.

This is an electrolytic process, meaning that some of the chemistry is done by charged ions migrating between charged electrodes. Positive ions coming off the anodes are attracted to the negatively charged surface of the workpiece. If a part of the workpiece shadows another part, the ions will be captured by the shadowing part. In a deep recess, most ions will be attracted to and be captured by the walls before they can reach the bottom.

The extent to which ions will go around corners and extend into holes is called the "throwing power" of the process. Throwing power varies with the chemistry of the bath, but is ususally not very good. Limited throwing power is a big deal for all kinds of electroplating and anodizing.

The nooks and crannies where electrolytic processes work the least well are often exactly those areas that are hardest to see, so there is sometimes a false sense of success.

trbomax, this is a really interesting project, and it's great that you are documenting it for us. It would be great if you could do some testing to see what the throwing power of your process is.

Ed
 
OP
T

trbomax

Well-known member
Joined
Mar 21, 2010
Messages
2,556
Location
starvation lake,mi.
Well, it's a little more than a rumor.

This is an electrolytic process, meaning that some of the chemistry is done by charged ions migrating between charged electrodes. Positive ions coming off the anodes are attracted to the negatively charged surface of the workpiece. If a part of the workpiece shadows another part, the ions will be captured by the shadowing part. In a deep recess, most ions will be attracted to and be captured by the walls before they can reach the bottom.

The extent to which ions will go around corners and extend into holes is called the "throwing power" of the process. Throwing power varies with the chemistry of the bath, but is ususally not very good. Limited throwing power is a big deal for all kinds of electroplating and anodizing.

The nooks and crannies where electrolytic processes work the least well are often exactly those areas that are hardest to see, so there is sometimes a false sense of success.

trbomax, this is a really interesting project, and it's great that you are documenting it for us. It would be great if you could do some testing to see what the throwing power of your process is.

Ed

I agree that getting into small recesses and corners is sometimes an issue,but the solution has a lot to do with it too. Some solutions are better conducters and throw better than others. In derusting we have the luxury of tuneing the mix for best results.Electroplaters dont have that option and must sometimes build special fixtures or even resort to the use of a "majic wand" for some parts such as wheels.

Right now I'm waiting for parts and have quite a bit of work on the garden to do. It will be a couple days before I can get back on this project.
 

914wilhelm

Well-known member
Joined
Oct 6, 2010
Messages
190
Location
Columbia Gorge, Oregun
I just used this process to strip the rust and old powdercoat off a frame mounted trailer hitch for the father-in-law. Used a plastic waste basket for the tank and for the solution used Arm & Hammer Super Washing Soda. Used 1 tbs per gallon. Think I picked the washing soda up at wallyworld. Used a 12 volt battery charger and used the double end technique. Scrap metal for the anodes. Worked well and even lifted the powdercoat. I previously try to sandblast this but due to its size it was difficult to do in the blast cabinet and the powdercoat was a bear to blast. It was nice to plug this in and just come and check it every day.
 

BADSIX

Well-known member
Joined
Nov 30, 2010
Messages
895
Location
oregon coast
so trbomax where would a person get the formula that ready strip uses ? I did a search and found nothing. I've had some things done by them years ago, a small gas tank for one and its set around my shop for several years with no rust forming on it. their 200 mi. away now so I would like to get my own small tank going.
 
OP
T

trbomax

Well-known member
Joined
Mar 21, 2010
Messages
2,556
Location
starvation lake,mi.
so trbomax where would a person get the formula that ready strip uses ? I did a search and found nothing. I've had some things done by them years ago, a small gas tank for one and its set around my shop for several years with no rust forming on it. their 200 mi. away now so I would like to get my own small tank going.

I have the formula,and will be useing it in this unit. When finished this deruster will give the exact same results as Redi-Strip.I havent worked on it for a few days,was waiting for Mcmaster-Carr to get some of the hardware here.Ive got too many projects going at once!While I was waitingI restarted the T-30 restore project and now I'm somewhat gridlocked I need to do some major rearrangement so I can work on both at once.
 

rustybutt

Well-known member
Joined
May 6, 2013
Messages
160
Location
Waco, TX
Thank you, ed_h, for the info you provided. As stated, different solutions will give different results. I use washing soda and water because it can go right down the drain when I'm done. Using anything with ***/***/cyanide would give me a lot to think about. I'm sure there are other solution that will work into the crevices better, but at what cost. Wash soda and water will de-rust screwed together assemblies to the point they can easily be taken apart. The inside of a cast iron gas tank, however, will not be de-rusted at all. My anodes also are coated on the back side which is up against the side of the tank, but I am more concerned with how well the target piece is cleaned. I will continue to follow this thread, because the only thing I truly know is how much I don't know!
 
OP
T

trbomax

Well-known member
Joined
Mar 21, 2010
Messages
2,556
Location
starvation lake,mi.
I just opened up the box from M-C and of course its not right. The bill and packing list is right but the picker substituted a third box of brass capscrews for the silicon bronze locks.It was even in a separate envelope from the 2 boxes of brass caps that I DID order.So,no assembly of the anode racks for a few more days. This was my first time ordering from them,everyone here says the service is so good,I guess I will find out how good on monday when I call them!
 

socapots

Well-known member
Joined
Jan 3, 2011
Messages
544
Location
Canada
Some good posts and discussion in here. I'd be on the smaller bucket scale just to do suspension parts mostly. But still cool to see hoe a big unit will go down.
 
OP
T

trbomax

Well-known member
Joined
Mar 21, 2010
Messages
2,556
Location
starvation lake,mi.
I got some time to work on this today.next I will install the anodes in the tank. I drilled 2 - 21/64" holes in each anode at the top. Spot the location of these holes by drilling thru the anode on the inside of the tank wall. Dont drill thru yet with the 21/64. Instead drill thru the tank wall and the flange with a 1/4" drill (pic 2). This will be the pilot for a 1" hole saw (pic3). We need the 1" hole in the flange only in order to get a socket in there to tighten the anodes.Now drill the tank wall out to 21/64" and bolt the anodes on with 2-5/16-18 x 1 1/2" long brass bolts,with a flat washer under the head (on the inside) and a flat and lock washer under the nut on the outside. Tighten them up like I did with your raised panel craftsman usa socket and combo wrenches.

Next,we cut the 1/4" x 1 1/2 " copper bar stock and drill with 21/64" drill to fit around the top of the tank. This forms the cathode buss that the parts will hang from. When the #4 ga. wire arrives, I can make the cables that complete the electrical connections between the 6 anodes and the 4 cathode buss pieces.One red (+) cable will then go to the power supply from the cathode buss,and one black (-) cable from the anodes to the power supply.
 

Attachments

  • IMG_0743.jpg
    IMG_0743.jpg
    140.4 KB · Views: 233
  • IMG_0744.jpg
    IMG_0744.jpg
    138 KB · Views: 217
  • IMG_0742.jpg
    IMG_0742.jpg
    141.3 KB · Views: 193
  • IMG_0741.jpg
    IMG_0741.jpg
    138.3 KB · Views: 201
  • IMG_0740.jpg
    IMG_0740.jpg
    128.1 KB · Views: 204
  • IMG_0745.jpg
    IMG_0745.jpg
    135.3 KB · Views: 287

BADSIX

Well-known member
Joined
Nov 30, 2010
Messages
895
Location
oregon coast
is their a ratio when we are talking anodes and cathodes is more cathode area better. I have a 55 gal plastic drum and use (1) 1/8 x 2 flat bar piece for the anode. The part I was derusting was rather large, 1/2 of a 31 chevy rear fender. The fender did not have heavy rust mostly surface rust , it just didn't clean very good. it looks like my anode bar would just cake up with rust then stop working also the rust that's on the anode bar won't come off, I mean it won't just scrape off its got a real tight bond.
 
OP
T

trbomax

Well-known member
Joined
Mar 21, 2010
Messages
2,556
Location
starvation lake,mi.
If you have a circular tank,you should have at least 3 anode bars equally spaced around the tank. This provides the shortest path for the current regardless of the shape of the part being cleaned,and helps to allow a good "hit" in hard to see or reach places. The solution composition is the reason your anodes are fouling. The ph and gluconate ratio need to be right on. It will work with an unbalanced solution, but it will be a major pita at some point.The sodium gluconate acts as a surfacant,and "scrubs" the anodes. It also allows cleaner transfer of the iron oxide off the cathode part thus helping to eliminate the blackening that must be physically removed when the part is pulled.The black is free carbon left over from the reverse plateing proceedure.We also add cyanide as a brightening agent.When its running right, the part should come out just as clean and shiney as it was when new.

On another note,I now have all the parts needed for completion of the project. Time is the issue right now! I did get the panel for the power supplys and electrical switching/monitering controls built and coated with a nice high gloss white rustoleum this week.
 
Last edited:

Mike.ASC

Well-known member
Joined
Apr 21, 2010
Messages
880
Location
East coast
Greetings trbomax . Are you planning on disclosing the specifics & ratios of the chemicals of your solution ?
 
To avoid these ads, REGISTER NOW!
Top Bottom