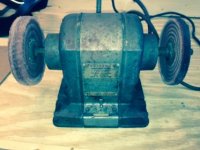
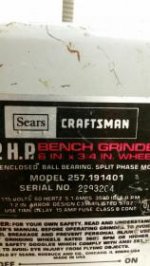
CM BLOCK GRINDER BADGES
Anyone who has been following my
Machine Name Plate Tag Reproduction: thread(
http://www.garagejournal.com/forum/showthread.php?t=323165), well all five 397.19580 INDUSTRIAL RATED badges have sold and mostly shipped. S4cruiser just took delivery of the first so bug him to post the results. With that said this week I'll be ordering two additional badge models requested here by others.
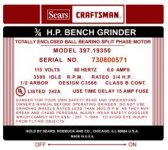
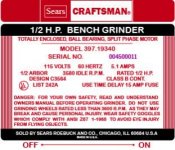
First is model 397.19580
non INDUSTRIAL RATED. I will have six made, however three are already sold. The finish on these will be as the INDUSTRIAL RATED ones, "shear matte/satin" with the brush aluminum showing through.
Second is the gold background version, model 397.19670. These will be in a gloss finish to shine up the gold background. No exposed aluminum on this one. Two out of the six are already sold.
In the near future I'll be reproducing model 397.19410 with the ON/OFF/BRAKE at bottom. Anyhow thanks for viewing and interest-David
Asking $12 each (includes 4 aluminum solid rivets) plus flat rate for any amount USPS First Class $2.60 with Tracking Number.
SPECS:
- .045 thick aluminum with brush finish. Same finish as original badges however thicker, clear background will show through as original
- 2-5/8" x 3-5/32" x .045"
- 1/8" mounting holes. Will need to be slightly enlarge to line up with CM grinder center steel band
- Image is infused into the aluminum and can be cleaned with household glass cleaner
- Four (4) aluminum solid rivets included
You can PM contact info (name & address). Personal check or Paypal.
Depending on interest here, I may/can make more lots available. Also looking for any request in lots to make available.

")


 , yes ....


 look for a date on the bottom.