To avoid these ads, REGISTER NOW!

Lets see your workbench

To avoid these ads, REGISTER NOW!

Carves

Well-known member
Joined
Oct 9, 2013
Messages
459
Location
Central West NSW .. Australia
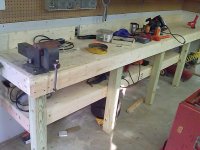
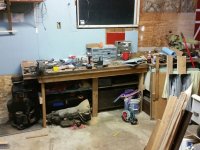
Hi Guys - I'm finally getting around to building my workbench and welding/fab table. I was lucky enough to score the bench below which came out of a sheetmetal factory. It's level, BIG and well built with a few bits that need cleaning up.

As it is it's too large to be practical so I'm trying to work out how to use it. My first thoughts are to cut off one end and have essentially a square welding/fab table, roughly 1200m x 1200mm (4' x 4').

With the remaining piece I was planning on cutting it right down the guts to give me two benches that are 2700mm x 615mm (roughly 9' x 2'). These would then go against the wall in my shed and give me 5700mm (18') of bench space.

I'm just worried that 2ft may not be deep enough? That measurment is from the face of the front steel to the back, not including any overlap that I would get when I put a top on.

It's mainly a general workbench and will be used to build engines on and I'd like to build in some cupboards and/or drawers into it, under the top.

Love to hear some other ideas.
ScottsRX: I may be in the minority but I find the 615mm (2') deep bench more useful. The deeper the bench, the more stuff piles up at the back (not my doing -- it just migrates there by itself). I end up with a 615mm (2') work space regardless of how deep the bench is. With your plan, just move your square fab table over to the bench as an extension if you need a really deep bench for a particular project. If you shorten the legs on the fab table and mount some wheels, you'd have a real nice bench setup. But that's just me....


:thumbup:


1200 square welding table on castors would be a nice thing IMHO.

600ish deep workbenches are fine for most things imho ... untill you start heaving on something in a vice,

... which then gets you thinking about bolting it all to the floor ... or having a deeper more stable bench .. ;);)
 

ScottsRX

Well-known member
Joined
May 2, 2009
Messages
119
Location
Nangkita, South Australia
Thanks Carves, thats the path I'm going with the welding table.

As for the vice, or vices. I'll have one on the bench and another I'll mount on a bit of steel that'll either be concreted in the ground or bolted to a plate thats concreted in. That'll be used for the bashing and bending.
 

BAGN1T

Well-known member
Joined
May 10, 2011
Messages
150
Good read yall! Hoping to be working on my own work bench sometime in the next couple of weeks!
 

Farmall Cub

Well-known member
Joined
Oct 17, 2015
Messages
89
Location
Greensburg, PA
Back when my bench was new and clean. I wanted to be able to use a 3lb hammer on the vice without things jumping around, I can.
 

Attachments

  • IMAG0395.jpg
    IMAG0395.jpg
    137.6 KB · Views: 747

HELLSUNICORN

Well-known member
Joined
Jul 20, 2008
Messages
66
Here is mine. Made from 2 44 inch Harbor Freight tool boxes. I painted the box frames black and I plan to paint the drawers green when I get time. The top is 3/16 steel plate.
 

Attachments

  • photo-51.JPG
    photo-51.JPG
    119.7 KB · Views: 863
  • image-47.jpg
    image-47.jpg
    13 KB · Views: 561

mike528

Well-known member
Joined
Dec 20, 2014
Messages
503
Location
Shelby county Ohio
A2C2F318-B9A2-4153-94E0-2B9ADEFA1085_zpskvvhsl0d.jpg

685F4743-CE62-413C-8AC1-A7382022BBF1_zps9egc6eyl.jpg
 

mustange70

Well-known member
Joined
Jul 6, 2015
Messages
121
Here's my overbuilt monster:

https://scontent-ord1-1.**.fbcdn.net/hphotos-xft1/v/t1.0-9/12036487_10156045618975282_7740822144572533700_n.jpg?oh=b1951e09edf3dde2cffe75c2b8b917f8&oe=5669A856

There's a thread in the fabrication section on it. Built it for heavy fabrication/jig work, didn't want a table that would bend/warp when I have a thousand pounds of weight on it .
 

turbowoodworker

Well-known member
Joined
Mar 18, 2012
Messages
3,519
Location
Apex NC
Nice Roubo. Did you model after the Schwartz plans or just wing it? It looks very nice and should serve your great grandkids well.
 
To avoid these ads, REGISTER NOW!

akdiesel

Well-known member
Joined
Aug 8, 2008
Messages
2,617
Location
Wasilla, AK
Here's my overbuilt monster:

https://scontent-ord1-1.**.fbcdn.net/hphotos-xft1/v/t1.0-9/12036487_10156045618975282_7740822144572533700_n.jpg?oh=b1951e09edf3dde2cffe75c2b8b917f8&oe=5669A856

There's a thread in the fabrication section on it. Built it for heavy fabrication/jig work, didn't want a table that would bend/warp when I have a thousand pounds of weight on it .

Overkill. I like it. Nice design as well with the use of the crane too.
 

crobar6789

Member
Joined
Jun 17, 2015
Messages
13
Location
Eastern Washington
Here's the workbench I use at work,
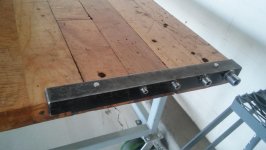
 :rocker:
 

Attachments

  • 20151005_162033_HDR.jpg
    20151005_162033_HDR.jpg
    136.8 KB · Views: 645
  • 20151005_162133_HDR.jpg
    20151005_162133_HDR.jpg
    135.7 KB · Views: 652
  • 20151005_162119_HDR.jpg
    20151005_162119_HDR.jpg
    132.8 KB · Views: 551

Cypherian

ALLIANCE MEMBER
Joined
Oct 11, 2014
Messages
1,197
Location
Delaware
Not complete yet but getting there . Sanding grinding drilling cart. Picture a 3/4 hp block next to the 1 hp and a 2 x48 belt sander ... on the drawer side. Top is going to be galvanized 16 or 18 gauge . The bottom will be enclosed, the back then a cabinet on each end and doors in front of the drawers. A light boom and vacuum system and done ...lol I am not positive on the 2 inch belt sander any suggestions for smallish machine to sit there I do mainly metal work some wood and of course rebuild old machines. All the material came from the old bench that was on the wall new one is in work.

Cypher

Material.jpg

Result1.jpg

Result2.jpg

Result3.jpg
 
Last edited:

Olinrj

Well-known member
Joined
Jul 5, 2012
Messages
286
Location
Greenfield, WI
I finally got to use the bowling alley for the full depth bench. Made the base out of materials salvaged from the basement. The top was intended to match the surface of the radial arm saw top but there was an error somewhere. I'll pull the top and glue the individual pieces at a later date as well as correct the elevation miss, but for now it is being used.
 

Attachments

  • IMG_20151008_6142.jpg
    IMG_20151008_6142.jpg
    63.2 KB · Views: 436
  • IMG_20151017_40480.jpg
    IMG_20151017_40480.jpg
    78.6 KB · Views: 469

dittle fart around

Well-known member
Joined
Jan 9, 2011
Messages
2,455
Location
Vancouver, Washington, USA
I finally got to use the bowling alley for the full depth bench. Made the base out of materials salvaged from the basement. The top was intended to match the surface of the radial arm saw top but there was an error somewhere. I'll pull the top and glue the individual pieces at a later date as well as correct the elevation miss, but for now it is being used.

Gotta believe in the bowling alley builds.

:pimpflash :pimpflash
 

Olinrj

Well-known member
Joined
Jul 5, 2012
Messages
286
Location
Greenfield, WI
Diddle fart around:
definitely! :rocker:

I'm revising the side bench to make room for a craftsman 12" lathe, might only have room for about 36" of bench. If that happens I may just replace the top of the medical cart with bowling alley and keep the mobility at the ready.
 

Ruahrc

Well-known member
Joined
May 17, 2015
Messages
69
My dad and I built a workbench for my garage this weekend. It's your pretty basic 2x4 and 3/4" plywood bench. I'm really happy with how it turned out though, especially as it was the first time I have tried to do this kind of thing. I did not follow any particular set of plans but got a lot of inspiration from looking at people's DIY benches online.

I tend to like having A LOT of surface area, and testing some mockups I never could see why the standard work bench is only 24" deep, it just seems way too shallow to me. So I built mine at 32" deep and 8ft long. I put a small 3/4" hemlock trim piece around the edge of the plywood top so you don't see the edge of the plywood and the edge is smoother to the hand.

Originally I was going build it with screws+bolts like you see, then when I was buying the lumber I decided to get a bunch of those simpson strong-tie brackets that are used to join together construction lumber, thinking it would be easier to put together but in the end I decided to stick with my guns and build it without the brackets and use screws+bolts instead, which I am really really glad I did. I think the bench looks a lot better this way.

Right now the top is unfinished I intend to put polyurethane on it to help protect the surface, but the design of the bench is such that the top can be easily unscrewed from the frame and replaced when it is too beat up or worn out, or if I ever wanted to upgrade to a butcher block top, etc.

It's rock solid and should be able to host many projects in the future :)

attachment.php


attachment.php
 

Attachments

  • 201511080021.jpg
    201511080021.jpg
    61.2 KB · Views: 3,947
  • 201511080020.jpg
    201511080020.jpg
    70.5 KB · Views: 3,960

5piecepuzzle

Member
Joined
Jan 17, 2016
Messages
10
Location
Southern Ontario


I dont have a garage, but a little corner of my basement has my workbench in it.

And another corner has this one for my 3 and 5 year old boys. Both were made from leftover or reclaimed lumber.

 
To avoid these ads, REGISTER NOW!
Top Bottom