

You are using an out of date browser. It may not display this or other websites correctly.
You should upgrade or use an alternative browser.
You should upgrade or use an alternative browser.
Lets see your workbench
- Thread starter speedingpenguin
- Start date


kgorman
Well-known member

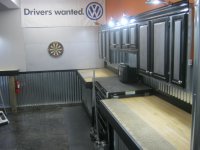
I didn't want to pay crazy prices yet wanted metal face and drawers. I didn't want something too deep because of the space. I ended up getting these Craftsman cabinets for $80/ea so I went for it. The top is birch butcher block from Woodcraft and was $99 on sale ( had to Kreg two together). I hung them with French cleat and into the studs, I could add a leg or two if I really need to. The toolboxes are flimsy alone but when used together pretty damn stout. Total cost ~$500

GroverDill
Active member
The bench was built by the previous owner and I must say its sturdy and i like it.


wedge40
Well-known member
I've looked at most if not all of these. I'm curious if someone can tell me how tall the Harbor Freight 44" chests are WITHOUT the casters.
Wedge
Wedge
jesse72
Well-known member
I measured it at the store and got 33 5/8" tall
67carl
Well-known member
I've looked at most if not all of these. I'm curious if someone can tell me how tall the Harbor Freight 44" chests are WITHOUT the casters.
Wedge
I also measured at the store. For future reference:
Tool box
42" wide
18" deep
33 1/2" tall w/out casters
39 1/2" tall with casters
A little different in height than the previous poster, so I ran out to the garage and remeasured. There are some differences depending on how you measure. The box has some places where the metal is rolled and other variation. I also got 33 9/16 at one point...
Last edited:
akdiesel
Well-known member
I've looked at most if not all of these. I'm curious if someone can tell me how tall the Harbor Freight 44" chests are WITHOUT the casters.
Wedge
I would purchase your cabinets first and then build around them. If you build first you may find a different cabinet later on or measurements may be off just enough to screw things up.
maxspeed96ct
Well-known member
- Joined
- Apr 6, 2012
- Messages
- 379
I like everything that I see here. Any more pics of the whole garage?
yup theres more pictures and details here http://garagejournal.com/forum/showthread.php?t=184126&highlight=maxspeed96ct
wedge40
Well-known member
Thanks for the info. Greatly appreciated.
Wedge
Wedge
What is the best surface for a work bench. I can get a very nice stainless steel table for cheap and I know it would look good, but I'm not sure if it would be the best working surface. Kind of loud and slippery if that makes any difference? I'm wondering if I would be happier with a wood surface.
JimVonBaden
Well-known member
What is the best surface for a work bench. I can get a very nice stainless steel table for cheap and I know it would look good, but I'm not sure if it would be the best working surface. Kind of loud and slippery if that makes any difference? I'm wondering if I would be happier with a wood surface.
It depends on what you plan to use it for.
Wood is great for a lot of projects involving delicate items you do not want to damage or scratch, plus it is cheap and easy to refinish.
Steel is good for welding and heaving work on heavy items, hammering and similar. It rusts, but can be refinished and protected.
Formica is a great all purpose surface that is easy to clean, durable, resistant to chemicals and cheap.
Stainless Steel is like Formica, but even more durable and resists nearly all chemicals, doesn't rust, and is good looking, but can be expensive.
Like I said, it depends on what you plan to use it for.
Jim

Chris98006
Well-known member


TheClaw
Well-known member
Nice setup rday.
mcmlvif100
Well-known member
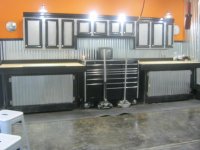
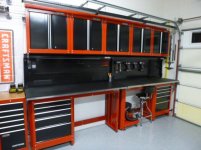
Combined four Craftsman cabinets that I got on sale in the fall with some bowling alley that I have been hoarding for a couple of years. Relatively light duty as the bench top "floats" on the the cabinets. Cut 3/4 inch plywood to fit the tops of the cabinets and then screwed it to the bottom of the bowling alley. Close fit of the plywood keeps the cabinets in the desired locations.
Retained the metal braces that were originally under the lanes to stiffen them but had to relocate a couple of them. Added 1" x 3" to the edges and gave everything five coats of polyurethane. Top weighs approximately 175 lbs. and the cabinets are about 100 lbs. each. Drawers are rated at 50 lbs each so once I get them filled, the bench total could approach 1400 lbs. That said, I'm still going to add a turnbuckle on an angle between the top and the back wall to keep everything from moving around.
Retained the metal braces that were originally under the lanes to stiffen them but had to relocate a couple of them. Added 1" x 3" to the edges and gave everything five coats of polyurethane. Top weighs approximately 175 lbs. and the cabinets are about 100 lbs. each. Drawers are rated at 50 lbs each so once I get them filled, the bench total could approach 1400 lbs. That said, I'm still going to add a turnbuckle on an angle between the top and the back wall to keep everything from moving around.
Attachments

Natsfan
Well-known member
Here's my new one, just a section of bowling lane banded with 2X6's and bottom shelf two 2X10's. Everything coated with polyurethane. The legs were salvaged from an old machine shop bench, and I really liked the style as they fit in with the old 'arn and machine stands in the shop. I was surprised to find a brass tag on the legs as I was cleaning them up for painting. It read "Holley Carburator Co." and was painted over with about 5 coats. So, neat provenance there.
I need to bolt my Wilton vise and Pony wood vise on and I'm good to go.
Bowling alley lane! Thats freekin awesome, even got the dots on there! Oh nice legs too!!
Sims5
Well-known member
mcmlvif.
Does the bench with the four tool boxes under it still roll around the shop easily? I'm needing a new toolbox and your post got me thinking of fastening two boxes together with a single top over both.
Does the bench with the four tool boxes under it still roll around the shop easily? I'm needing a new toolbox and your post got me thinking of fastening two boxes together with a single top over both.
mcmlvif100
Well-known member
mcmlvif.
Does the bench with the four tool boxes under it still roll around the shop easily? I'm needing a new toolbox and your post got me thinking of fastening two boxes together with a single top over both.
Not really easily although I can move it myself. As built, the cabinets still have two fixed wheels and two that swivel. I don't expect to move it very often so used the cabinets as is. If I replaced all eight of the fixed wheels with swivel versions then it would be VERY easy to move around. Currently, I have to lift the top and put a block of wood between it and the end cabinets, then i can carefully move it with the plywood pieces disengaged from the cabinets. Hope this makes sense.
Barnuba
Well-known member
Sims5
Well-known member
Thanks. That's exactly what I was wondering. Thinking of getting two of these boxes and hooking them together and changing to 1 set of fixed and 3 sets of swivel casters. Might put a butcher block counter top on top of both. In the thinking stage right now.


mcmlvif100
Well-known member
Thanks. That's exactly what I was wondering. Thinking of getting two of these boxes and hooking them together and changing to 1 set of fixed and 3 sets of swivel casters. Might put a butcher block counter top on top of both. In the thinking stage right now.
I've thought about doing the same with this bench if I find that I don't like it in its current 11 foot long configuration. I could cut the bowling alley in two, add extra swivel casters and bolt the boxes together using the existing mounting holes for the handles. Not probably great for someone using it in a production environment but would be fine for the use it sees in my workshop.
I have another 11 foot version with the same bowling alley top that I build from scratch. See post 309 of this thread. On it, all of the casters swivel which makes it very convenient to move around. Not having any fixed casters lets me pull it out from the wall without any extra maneuvering. With its length, it's really nice to be able to move it sideways although it doesn't track as well in a straight line.
http://www.garagejournal.com/forum/showthread.php?p=1800583#post1800583 post 309
Sims5
Well-known member
mcmlvif
I took a look at the other bench you built and having all swivel casters seems like a good idea. I'll be sure to post some pics when ideas take shape.
I took a look at the other bench you built and having all swivel casters seems like a good idea. I'll be sure to post some pics when ideas take shape.
radrush
Well-known member
kgorman
Well-known member
^--- I like that setup.
djjsr
Well-known member
Nice work Javajaws! 
mike5511
Member
Re: Simple workbench for assemby and light repair
Apparently you are not the only one.
LOVE THIS - but would be afraid to use it.
Apparently you are not the only one.
Attachments

I have started building my bench, got a bunch of ideas from this forum, really appreciate everyone posting and sharing. I figured I should add what I have done as well.
I decided to build mine with all the legs measured exactly the right length in position, to compensate for the uneveness in the floor. So I set my back part of the fram up using clamps, and leveled everything. Then trimed the legs to get the exact length I needed.
I don't know how others did theirs, some have adjustable feet to level the table, so that's easy. If not, do you just shim the legs?
2 questions: I don't know if I want to secure the bench to the wall yet, not sure if I will need to move it to clean the area of whatever. Would the bench move around too much if I don't secure it down? Any thoughts on this?
Also, I tried to up load pictures, but without success. Can someone show me the thread of "picture posting using photobucket". I'm sure there is 1 of these thread somewhere.
Kevin54
MEMBER EMERITUS
First post on this forum...I figured I better pony up something good! Sadly, it doesn't look all nice and shiny like this now - it could probably use a good scraping/cleaning and refinish on the top.

JAVA....Welcome to Garage Journal
 Nice looking bench What is the top made out of? Is it like a bowling alley top, or completely fabbed up by yourself? It looks super though.
Let's see if I can follow the instruction from the FAQ about posting pictures.
Here is how I started, this allows me to make sure the frame is level even with the floor not exactly level.
<a href="http://s790.photobucket.com/user/nelson-ohio/media/IMG_0907_zps65d54598.jpg.html" target="_blank"><img src="http://i790.photobucket.com/albums/yy181/nelson-ohio/IMG_0907_zps65d54598.jpg" border="0" alt=" photo IMG_0907_zps65d54598.jpg"/></a>
Sims5
Well-known member
Mike5511
The guy would have to super tall to use the drill press in the picture.
The guy would have to super tall to use the drill press in the picture.
wow, the uploading is working.
this part of the bench will be 24' x 8' and 36' tall.
Building the back frame, using 2x4 and sister 2 of them to support the 2x4.
<a href="http://s790.photobucket.com/user/nelson-ohio/media/IMG_0908_zps17549608.jpg.html" target="_blank"><img src="http://i790.photobucket.com/albums/yy181/nelson-ohio/IMG_0908_zps17549608.jpg" border="0" alt=" photo IMG_0908_zps17549608.jpg"/></a>
After the 2 end legs are done, measure the install the middle leg. Here is what the back part of the frame looked like when almost done.
<a href="http://s790.photobucket.com/user/nelson-ohio/media/IMG_0910_zpse7d27f3b.jpg.html" target="_blank"><img src="http://i790.photobucket.com/albums/yy181/nelson-ohio/IMG_0910_zpse7d27f3b.jpg" border="0" alt=" photo IMG_0910_zpse7d27f3b.jpg"/></a>
Then I attached the front part of the frame, leveling to the back so I can cut the outter legs exactly to length.
<a href="http://s790.photobucket.com/user/nelson-ohio/media/IMG_0911_zps37b15e82.jpg.html" target="_blank"><img src="http://i790.photobucket.com/albums/yy181/nelson-ohio/IMG_0911_zps37b15e82.jpg" border="0" alt=" photo IMG_0911_zps37b15e82.jpg"/></a>
Now attaching the front to the back.
<a href="http://s790.photobucket.com/user/nelson-ohio/media/IMG_0919_zpse9a28ad3.jpg.html" target="_blank"><img src="http://i790.photobucket.com/albums/yy181/nelson-ohio/IMG_0919_zpse9a28ad3.jpg" border="0" alt=" photo IMG_0919_zpse9a28ad3.jpg"/></a>
<a href="http://s790.photobucket.com/user/nelson-ohio/media/IMG_0923_zps269274c5.jpg.html" target="_blank"><img src="http://i790.photobucket.com/albums/yy181/nelson-ohio/IMG_0923_zps269274c5.jpg" border="0" alt=" photo IMG_0923_zps269274c5.jpg"/></a>
Inspection
<a href="http://s790.photobucket.com/user/nelson-ohio/media/IMG_0921_zps6549e5cf.jpg.html" target="_blank"><img src="http://i790.photobucket.com/albums/yy181/nelson-ohio/IMG_0921_zps6549e5cf.jpg" border="0" alt=" photo IMG_0921_zps6549e5cf.jpg"/></a>
I plan on using 2 layer of 3/4", the bottom will be OSB and the top will be a better grade with a smoother surface. On the end, I plan on having a 16" wide LVL as top, it will be 30" deep, so it will be 6" deeper than the table. I plan on mounting a vise on that section. LVL boards are real stong, and1-3/4" thick, I have trimmed the 2x4 to account for the different height. You can see it below. Not sure how it will work, we will find out.
<a href="http://s790.photobucket.com/user/nelson-ohio/media/IMG_0924_zps1ddc2098.jpg.html" target="_blank"><img src="http://i790.photobucket.com/albums/yy181/nelson-ohio/IMG_0924_zps1ddc2098.jpg" border="0" alt=" photo IMG_0924_zps1ddc2098.jpg"/></a>
<a href="http://s790.photobucket.com/user/nelson-ohio/media/IMG_0926_zpsc8abc1e1.jpg.html" target="_blank"><img src="http://i790.photobucket.com/albums/yy181/nelson-ohio/IMG_0926_zpsc8abc1e1.jpg" border="0" alt=" photo IMG_0926_zpsc8abc1e1.jpg"/></a>
The end legs are not done yet, I need to make it real stong for the vise. I ran out of screws. It took me about 6 hours to get this far. I work slow.
Tundra
Well-known member
Nice and solid. Beautiful dog, used to have a couple in the past.
wedge40
Well-known member
I heard them Germans can be sticklers on quality. Did it pass??
Wedge
Wedge
alden
Well-known member
it's a bit cramped so it's hard to get a picture of everything.


Stroked383
Well-known member
Man some of your guys workbenches look to nice to work on. Mines trashed right now but with all these calls and trucks getting dropped off, I don't see anytime to scrub this thing in the future. Oh well it does it's job.

