Great tip, I'll look into it. Thanks.A little tank top heater and a clamp on fan would hook you up nicely. IIRC on high you get about 20 hours out of a tank fill.


You are using an out of date browser. It may not display this or other websites correctly.
You should upgrade or use an alternative browser.
You should upgrade or use an alternative browser.
Lets see your workbench
- Thread starter speedingpenguin
- Start date
Here's my bench. I had never had a workbench, just used workmates and sawhorses. Always wanted a proper one, but never could make up my mind exactly what I wanted. This bench is over engineered and constructed, but I wanted something that would last and not deform under load. I also needed a place to mount my father's vise after I had renewed it.
I started planning in early 2020 and purchased most of the lumber and hardware before their prices went into outer space. I 'finished' it earlier this year and installed the vise.
I was worried about the weight (82lbs) of the vise deforming the edge of the fiberglass top and called the fiberglass manufacturer. At their suggestion, I made a 2x4 brace to fit around the corner and under the vise. I used L brackets to support the brace and also screwed it to the post/rails.
The light above the bench is a BRAUN 5500 Lumen 4 Ft. Linkable LED Hanging Shop Light. The power strip at the back of the bench is a HFT 12 Outlet 4 ft. Metal Power Strip.
The screws I used were Simpson Strong-Tie #10 x 2-1/2 in. 1/4-Hex Drive, Strong-Drive SD Connector Screw (100-Pack) for single 2x4s and the corner ties into the posts and Simpson Strong-Tie #10 x 1-1/2-in Mechanically Galvanized Strong-Drive SD Exterior Wood Screws (100) when the 2x4s were doubled up.
When I finally got tired drawing the plans, I switched over to LibreCAD, a 2D F.L.O.S.S. (free/libre open source software) package that will run on Windows, macOS, and Linux. This is the first CAD program I've used so I cannot compare it to other CAD systems. It did the job for me after I climbed the learning curve. I tried to attach the file for my bench but that format is not recognized by the attach file option. If you are interested, PM me and I'll email it to you.
One thing I am currently thinking about is some type of edging around the shelf to protect the edge of hardboard and keep things from rolling off. I've thought about three pieces of quarter round glued together to form a 3/4 round so it would sit on top of the hardboard edge and the edge of the plywood. Haven't really visualized how to cut it to fit around the corners of the shelf yet. Suggestions would be appreciated.

I started out thinking I would use the 2x4basics legs and build a rectangular bench and shelf, but after looking at benches on the web and GJ I decided that I wanted more than that.
I started out with some rough sketches which evolved into 'drafted, scale' drawings on 8.5"x11" sheets. Lots of trial and error; went through many desktop calendar sheets just 'thinking' with a pencil.
I wanted the option of making it mobile and looked at many YouTube videos on how others had done it. None of them seemed to be workable for what I had in mind, so rolled my own solution.
The top is a 4'x8'x1/2" sheet of fiberglass that a friend was able to get me. It weights ~ 150lbs.
The shelf is 4'x8'x3/4" RTD plywood with hardboard on top for a smooth and replaceable surface.
The frame is 40"x80" so that both the top and shelf have a 4" overhang all around. I wanted to be able to clamp things to the top or shelf.
I put a LED rope light under the top to keep the shelf from being a 'black hole'.

I covered the top supports with aluminum foil before the top was installed to reflect more light to the shelf.

To show some of the over engineering/construction, here are the top supports

And the shelf supports. I used Samson Strong_Tie LUS ZMAX Galvanized Face-Mount Joist Hanger for 2x4 Nominal Lumber for the braces that ran the width and toe-nailed the braces between them. In the picture below, the 4x4 post between the 2x4s is one of the jack points to raise the table enough to get the casters lowered.

The 4x4 corner posts and 2x4 rails were attached using Simpson Strong-Tie RTC 18-Gauge Galvanized Rigid Tie Corner for 2x Nominal Joist, 4x4 Nominal Post. The long side rails are doubled up 2x4s which were screwed together and into the corner tie. Again, I did not want this bench to deform under load.
The casters are from Northern Tool: Ironton Standard-Duty 4in. Swivel Polyurethane Caster — 550-Lb. Capacity, Red (no longer stocked) and Ironton Standard-Duty 4in. Swivel Polyurethane Caster with Brake — 550-Lb. Capacity, Red. If I had it to do over, I would put locking casters on all 4 corners. As it stands the end with the locking casters should be lifted first and the brakes locked before lifting the other end (so the bench will not roll off the jack).
I put the knee-hole in because I wanted to be able to sit up to the edge of the bench and my long legs would not fit otherwise. When I cut the shelf plywood and hardboard, I learned that it is wise to clamp those two and cut both at once. I later had to trim the hardboard for a good match to the plywood because I did not clamp them.
Here's the bench on wheels.

And here is the jack and jack point. I wanted to use a hydraulic jack, but my little bottle jack did not have enough lift to get the wheels in position.

I started planning in early 2020 and purchased most of the lumber and hardware before their prices went into outer space. I 'finished' it earlier this year and installed the vise.
I was worried about the weight (82lbs) of the vise deforming the edge of the fiberglass top and called the fiberglass manufacturer. At their suggestion, I made a 2x4 brace to fit around the corner and under the vise. I used L brackets to support the brace and also screwed it to the post/rails.
The light above the bench is a BRAUN 5500 Lumen 4 Ft. Linkable LED Hanging Shop Light. The power strip at the back of the bench is a HFT 12 Outlet 4 ft. Metal Power Strip.
The screws I used were Simpson Strong-Tie #10 x 2-1/2 in. 1/4-Hex Drive, Strong-Drive SD Connector Screw (100-Pack) for single 2x4s and the corner ties into the posts and Simpson Strong-Tie #10 x 1-1/2-in Mechanically Galvanized Strong-Drive SD Exterior Wood Screws (100) when the 2x4s were doubled up.
When I finally got tired drawing the plans, I switched over to LibreCAD, a 2D F.L.O.S.S. (free/libre open source software) package that will run on Windows, macOS, and Linux. This is the first CAD program I've used so I cannot compare it to other CAD systems. It did the job for me after I climbed the learning curve. I tried to attach the file for my bench but that format is not recognized by the attach file option. If you are interested, PM me and I'll email it to you.
One thing I am currently thinking about is some type of edging around the shelf to protect the edge of hardboard and keep things from rolling off. I've thought about three pieces of quarter round glued together to form a 3/4 round so it would sit on top of the hardboard edge and the edge of the plywood. Haven't really visualized how to cut it to fit around the corners of the shelf yet. Suggestions would be appreciated.
I started out thinking I would use the 2x4basics legs and build a rectangular bench and shelf, but after looking at benches on the web and GJ I decided that I wanted more than that.
I started out with some rough sketches which evolved into 'drafted, scale' drawings on 8.5"x11" sheets. Lots of trial and error; went through many desktop calendar sheets just 'thinking' with a pencil.
I wanted the option of making it mobile and looked at many YouTube videos on how others had done it. None of them seemed to be workable for what I had in mind, so rolled my own solution.
The top is a 4'x8'x1/2" sheet of fiberglass that a friend was able to get me. It weights ~ 150lbs.
The shelf is 4'x8'x3/4" RTD plywood with hardboard on top for a smooth and replaceable surface.
The frame is 40"x80" so that both the top and shelf have a 4" overhang all around. I wanted to be able to clamp things to the top or shelf.
I put a LED rope light under the top to keep the shelf from being a 'black hole'.
I covered the top supports with aluminum foil before the top was installed to reflect more light to the shelf.
To show some of the over engineering/construction, here are the top supports
And the shelf supports. I used Samson Strong_Tie LUS ZMAX Galvanized Face-Mount Joist Hanger for 2x4 Nominal Lumber for the braces that ran the width and toe-nailed the braces between them. In the picture below, the 4x4 post between the 2x4s is one of the jack points to raise the table enough to get the casters lowered.
The 4x4 corner posts and 2x4 rails were attached using Simpson Strong-Tie RTC 18-Gauge Galvanized Rigid Tie Corner for 2x Nominal Joist, 4x4 Nominal Post. The long side rails are doubled up 2x4s which were screwed together and into the corner tie. Again, I did not want this bench to deform under load.
The casters are from Northern Tool: Ironton Standard-Duty 4in. Swivel Polyurethane Caster — 550-Lb. Capacity, Red (no longer stocked) and Ironton Standard-Duty 4in. Swivel Polyurethane Caster with Brake — 550-Lb. Capacity, Red. If I had it to do over, I would put locking casters on all 4 corners. As it stands the end with the locking casters should be lifted first and the brakes locked before lifting the other end (so the bench will not roll off the jack).
I put the knee-hole in because I wanted to be able to sit up to the edge of the bench and my long legs would not fit otherwise. When I cut the shelf plywood and hardboard, I learned that it is wise to clamp those two and cut both at once. I later had to trim the hardboard for a good match to the plywood because I did not clamp them.
Here's the bench on wheels.
And here is the jack and jack point. I wanted to use a hydraulic jack, but my little bottle jack did not have enough lift to get the wheels in position.
kaymccampbell
Well-known member
Nice work. I'd round the corners on the top. Also, I'd move the plug strip to under the front of the top.Here's my bench. I had never had a workbench, just used workmates and sawhorses. Always wanted a proper one, but never could make up my mind exactly what I wanted. This bench is over engineered and constructed, but I wanted something that would last and not deform under load. I also needed a place to mount my father's vise after I had renewed it.
I started planning in early 2020 and purchased most of the lumber and hardware before their prices went into outer space. I 'finished' it earlier this year and installed the vise.
I was worried about the weight (82lbs) of the vise deforming the edge of the fiberglass top and called the fiberglass manufacturer. At their suggestion, I made a 2x4 brace to fit around the corner and under the vise. I used L brackets to support the brace and also screwed it to the post/rails.
The light above the bench is a BRAUN 5500 Lumen 4 Ft. Linkable LED Hanging Shop Light. The power strip at the back of the bench is a HFT 12 Outlet 4 ft. Metal Power Strip.
The screws I used were Simpson Strong-Tie #10 x 2-1/2 in. 1/4-Hex Drive, Strong-Drive SD Connector Screw (100-Pack) for single 2x4s and the corner ties into the posts and Simpson Strong-Tie #10 x 1-1/2-in Mechanically Galvanized Strong-Drive SD Exterior Wood Screws (100) when the 2x4s were doubled up.
When I finally got tired drawing the plans, I switched over to LibreCAD, a 2D F.L.O.S.S. (free/libre open source software) package that will run on Windows, macOS, and Linux. This is the first CAD program I've used so I cannot compare it to other CAD systems. It did the job for me after I climbed the learning curve. I tried to attach the file for my bench but that format is not recognized by the attach file option. If you are interested, PM me and I'll email it to you.
One thing I am currently thinking about is some type of edging around the shelf to protect the edge of hardboard and keep things from rolling off. I've thought about three pieces of quarter round glued together to form a 3/4 round so it would sit on top of the hardboard edge and the edge of the plywood. Haven't really visualized how to cut it to fit around the corners of the shelf yet. Suggestions would be appreciated.
I started out thinking I would use the 2x4basics legs and build a rectangular bench and shelf, but after looking at benches on the web and GJ I decided that I wanted more than that.
I started out with some rough sketches which evolved into 'drafted, scale' drawings on 8.5"x11" sheets. Lots of trial and error; went through many desktop calendar sheets just 'thinking' with a pencil.
I wanted the option of making it mobile and looked at many YouTube videos on how others had done it. None of them seemed to be workable for what I had in mind, so rolled my own solution.
The top is a 4'x8'x1/2" sheet of fiberglass that a friend was able to get me. It weights ~ 150lbs.
The shelf is 4'x8'x3/4" RTD plywood with hardboard on top for a smooth and replaceable surface.
The frame is 40"x80" so that both the top and shelf have a 4" overhang all around. I wanted to be able to clamp things to the top or shelf.
I put a LED rope light under the top to keep the shelf from being a 'black hole'.
I covered the top supports with aluminum foil before the top was installed to reflect more light to the shelf.
To show some of the over engineering/construction, here are the top supports
And the shelf supports. I used Samson Strong_Tie LUS ZMAX Galvanized Face-Mount Joist Hanger for 2x4 Nominal Lumber for the braces that ran the width and toe-nailed the braces between them. In the picture below, the 4x4 post between the 2x4s is one of the jack points to raise the table enough to get the casters lowered.
The 4x4 corner posts and 2x4 rails were attached using Simpson Strong-Tie RTC 18-Gauge Galvanized Rigid Tie Corner for 2x Nominal Joist, 4x4 Nominal Post. The long side rails are doubled up 2x4s which were screwed together and into the corner tie. Again, I did not want this bench to deform under load.
The casters are from Northern Tool: Ironton Standard-Duty 4in. Swivel Polyurethane Caster — 550-Lb. Capacity, Red (no longer stocked) and Ironton Standard-Duty 4in. Swivel Polyurethane Caster with Brake — 550-Lb. Capacity, Red. If I had it to do over, I would put locking casters on all 4 corners. As it stands the end with the locking casters should be lifted first and the brakes locked before lifting the other end (so the bench will not roll off the jack).
I put the knee-hole in because I wanted to be able to sit up to the edge of the bench and my long legs would not fit otherwise. When I cut the shelf plywood and hardboard, I learned that it is wise to clamp those two and cut both at once. I later had to trim the hardboard for a good match to the plywood because I did not clamp them.
Here's the bench on wheels.
And here is the jack and jack point. I wanted to use a hydraulic jack, but my little bottle jack did not have enough lift to get the wheels in position.
Can't quite tell how much front overhang there is but I agree with the plug strip move if you still have overhang for clamping.Nice work. I'd round the corners on the top. Also, I'd move the plug strip to under the front of the top.
And put the rope light in some kind of channel so you don't snag it.
Fiberglass top is interesting. First time I've seen that.
Nice work. I'd round the corners on the top. Also, I'd move the plug strip to under the front of the top.
Can't quite tell how much front overhang there is but I agree with the plug strip move if you still have overhang for clamping.
And put the rope light in some kind of channel so you don't snag it.
Fiberglass top is interesting. First time I've seen that.
Thanks for the compliments and comments.
I haven't finalized where I want the plug strip so it's just sitting on the top for now. I have long arms and what my parents called 'a boarding house reach' so getting to the strip isn't a problem for me. Edit: I have another of these strips and I may install it below the top on the front rail if reaching the one on the back become a bother.
There is a four inch overhang on all sides for the top and shelf.
I've thought about rounding the corners on the top, but I worry that cutting the fiberglass might leave a ragged edge. Maybe putting corner bumpers on it and the shelf would do (like parents do on tables for small children).
I thought about drilling through the bracing to run the rope light but decided not to do it. There is at least 11.5 inches between the shelf and the rope light so snagging it is possible but not too likely. If I start having problems with snagging, I'll rethink how the rope light is mounted. If I do make changes I may go for the LED strip lights that look like ribbons with the LEDs mounted on one side; I can mount it so the LEDs are facing the shelf.
I used the fiberglass because I figured it would handle rough duty and be reasonably stain resistant.
Last edited:
drivesitfar
Well-known member
CHR: great looking bench snd you’ll have to inform us on how that fiberglass top holds up to hammering on and if it stays nice and smooth cause looks great.
Speaking of looking great you’ve got one of the nicest bench vises made. curious which Reed C it is?
Speaking of looking great you’ve got one of the nicest bench vises made. curious which Reed C it is?
kaymccampbell
Well-known member
I've got a decent reach myself. It's what happens to the cords that determines plug placement. Plugs at the back are for dedicated things like chargers n bench grinders. Plugs at the front are for drilly, grindy, cutty things that can cut their tails off if you run the cords over the bench.Thanks for the compliments and comments.
I haven't finalized where I want the plug strip so it's just sitting on the top for now. I have long arms and what my parents called 'a boarding house reach' so getting to the strip isn't a problem for me. Edit: I have another of these strips and I may install it below the top on the front rail if reaching the one on the back become a bother.
There is a four inch overhang on all sides for the top and shelf.
I've thought about rounding the corners on the top, but I worry that cutting the fiberglass might leave a ragged edge. Maybe putting corner bumpers on it and the shelf would do (like parents do on tables for small children).
I thought about drilling through the bracing to run the rope light but decided not to do it. There is at least 11.5 inches between the shelf and the rope light so snagging it is possible but not too likely. If I start having problems with snagging, I'll rethink how the rope light is mounted. If I do make changes I may go for the LED strip lights that look like ribbons with the LEDs mounted on one side; I can mount it so the LEDs are facing the shelf.
I used the fiberglass because I figured it would handle rough duty and be reasonably stain resistant.
rshadd
Well-known member

drivesitfar
Well-known member
That picture deserves more than just a like. We’ll done.
is it always that clean cause I’ve got FSD (flat surface disease) and even when I get my benches clean it’s only a day or two before things pile up on them.
is it always that clean cause I’ve got FSD (flat surface disease) and even when I get my benches clean it’s only a day or two before things pile up on them.
I like the plumbed air line with the hose like you've got it! I've got a reel overhead near my bench, and while it's nice, it's usually in the way.
Thanks for the compliments. I'll try to remember to report on how the fiberglass top survives my 'attentions'.CHR: great looking bench snd you’ll have to inform us on how that fiberglass top holds up to hammering on and if it stays nice and smooth cause looks great.
Speaking of looking great you’ve got one of the nicest bench vises made. curious which Reed C it is?
The Reed is a 2C that was my dad's. My post above has a link to my restoration of the vise.
Thanks for the comments. I can see what you mean by having those 'things' cut/damage their tails. That's why I'm thinking about installing a strip at the front.I've got a decent reach myself. It's what happens to the cords that determines plug placement. Plugs at the back are for dedicated things like chargers n bench grinders. Plugs at the front are for drilly, grindy, cutty things that can cut their tails off if you run the cords over the bench.
JRC3
Well-known member
Is that PVC on the air plumbing?
rshadd
Well-known member
No it's 3/4" PEX
JRC3
Well-known member
Good, I didn't want you to die. LOLNo it's 3/4" PEX
I have the same bench, it came from a paper mill in Middletown Ct that was closing its doors. My friend worked there and I got that and two 4 drawer brand new industrial filing cabinets.
The company I worked for had a ton of research labs and when they were remodeled the high quality cabinets and metal 2 door 4 shelf industrial cabinets were up for grabs. My cellar was full of them.
JRC3
Well-known member
Yeah, I love snooping through people's stuff in their pics.I'm surprised to see this thread has been dormant since March. One of my favorite threads on GJ so I'll try to resurrect it. Maybe there are some new benches out there.
skulldrinker
Well-known member

Just enough room to get my work done.
rsparks64
Well-known member
Wow, that is a tight space.
Gitzy
Well-known member
I've got a few benches in my garage, all made by me over the years. They all have their uses.


Last edited:
joshotto94
Well-known member
- Joined
- Nov 30, 2014
- Messages
- 118
Just wrapped up the resto on this one with custom display cases in the side cabinets

harris.jasonm
Active member
- Joined
- Feb 26, 2023
- Messages
- 31
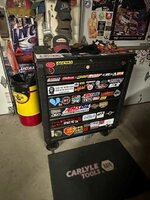
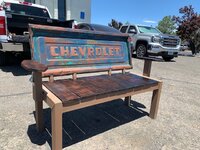
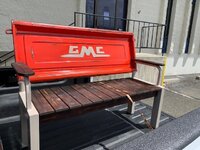
Hello everyone, I have been lurking and using this site for a long time and thought I would finally join. I live in the suburbs and do a lot of automotive work but a fair amount of woodwork also. Through the years I have had several work benches, ones I have made out of wood and even a Kobalt one that I purchased at Lowes that served me well. I like to collect Snap On boxes and love vintage stuff along with repurposing old car parts. Mostly making benches out of tailgates but really like the old patina you can find out west without issues of complete rot and rust. A couple of years ago I decided to make my own bench. One that I hope is passed down to my children who will remember it as "dads bench". In doing this I found an old Snap On box that would make a suitable base at a fairly decent price so I drove a few hours to go and ****** that up. Then I purchased a piece of butcher block from Home Depot and made the top, securing it to the box with a couple of pieces of angle. Then I made a shelf with a piece of pegboard to mount to the top and it was okay but still not what I envisioned in my head. Then I ran across a hood on craigslist from a 1968 Chevrolet C10. It had great patina and the asking price was fair. I thought to myself, well. I can work with this. I drove the 45 min to pick the hood up and the guy I got it from assumed it was going towards a restoration. After I had paid and the hood was on the truck he said "well, send me a pic of your project when you are done." I laughed a little and said "well, you might not want to hear this but I am going to chop it up." He looked horrified and let me know that this hood style was only used for two years and is in high demand for restoration. I told him I was aware but my project would be cool and let him know I would send him a picture when I was done. I run a fab shop so I have a lot of resources and had never sectioned anything before but quickly realized that I would need to take a full 15" out of the width of this hood. I got the concept and found a way I could take two 7.5" strips out from either side and started cutting. I made a frame out of basic 1" tubing and used some drop material to line my shelf. I ordered metal pegboard from Amazon and just decided to build it has I went using the material I had much like I envisioned someone might have done in the 1950's. Overall trying to match the patina of the box and do justice to the rare hood I was sacrificing to my my vision come to life. I cut the nose of the hood off and sectioned it. Leaving myself a little margin for error. Then cut the inner structure of the hood away where I was left with the patina sheetmetal, I then used that to skin the remainder of my project and what I was left with was something unique that hopefully I can pass down to my children. Also makes for a great conversation piece in my garage. It came out a little rat rod but overall I am happy with my bench. I included some random pics of my other boxes and some benches also.
Attachments


Last edited:
harris.jasonm
Active member
- Joined
- Feb 26, 2023
- Messages
- 31
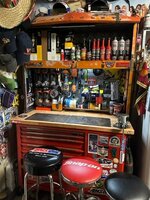
Here are some benches as I exceeded the 10 pics.
Attachments


zmotorsports
ALLIANCE MEMBER
Welcome to the forum. I too live in the suburbs and do automotive work out of my shop. Looks like you have some nice workbenches that you've built over the years.
Happy to have you join us, great group of people here.
Happy to have you join us, great group of people here.
Jayman17
Well-known member
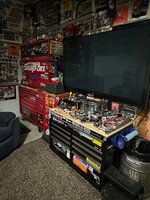
Great job on your workbenches and other projects. One question I have is how do you get by with that tiny TV in your shop? 
Jay
Jay
harris.jasonm
Active member
- Joined
- Feb 26, 2023
- Messages
- 31
LOL. its tough but if I don't watch football and Nascar inside my wife allows it.Great job on your workbenches and other projects. One question I have is how do you get by with that tiny TV in your shop?
Jay
Loose Ctrl
Well-known member
Now I know where all of my stolen tailgates have gone.Here are some benches as I exceeded the 10 pics.

harris.jasonm
Active member
- Joined
- Feb 26, 2023
- Messages
- 31
LOL, right. It's funny. 5-6 years ago I could get a tailgate for $50 anytime. Now I am lucky to find one for $400 or less. I do not sell the benches. I just make them for friends and family and I try to get people to understand that I just can't pay that. It is not worth using them for a restoration because you can get a good repop for around $200 shipped to your door. I like the patina and scars on the old ones but now everyone thinks they have treasure.Now I know where all of my stolen tailgates have gone.
jbrentd
Well-known member
Still a work in progress, but what I am working with currently.


harris.jasonm
Active member
- Joined
- Feb 26, 2023
- Messages
- 31
Nice setup. I like the neon check engine light. Nice touch!Still a work in progress, but what I am working with currently.
jbrentd
Well-known member
Thanks. It serves as a reminder that I drive crappy old cars.Nice setup. I like the neon check engine light. Nice touch!
Colin Len
Well-known member
Those LevRacks look RAD! I wish my garage size/orientation was more suited for that storage system.
jbrentd
Well-known member
I really like mine. Although pricey, it took care of several needs (workbench, several tall cabinets, overhead storage) all in one unit that takes up much less space. They actually made that unit about 3 inches shorter, for me, to fit the wall.Those LevRacks look RAD! I wish my garage size/orientation was more suited for that storage system.
Colin Len
Well-known member
Unfortunately my problem is depth. With how tiny my garage is there's not a single wall that can have that deep of a storage solution without eating into vital workspace. In order to retain as much floor space as I can I'm limiting myself to 18-24" of storage depth on the storage wall and 24-27" of depth on my workbench wall.I really like mine. Although pricey, it took care of several needs (workbench, several tall cabinets, overhead storage) all in one unit that takes up much less space. They actually made that unit about 3 inches shorter, for me, to fit the wall.
joshotto94
Well-known member
- Joined
- Nov 30, 2014
- Messages
- 118
Just wrapped up the restoration on the Graco work bench and grease dispenser. Check out the before and after. I am still searching for the Graco oil drain with the matching Trim Thank you Josh


Old Radar
Well-known member
They're ready for the next 75 years! Great job!
rzims
Well-known member
Some very cool workbenches here. Mine is bought, not built and this is the 3rd garage its lived in...although in every one its had different surrounding cabinet configurations.
Last edited:
fishwatcher
Well-known member
- Joined
- Jan 26, 2023
- Messages
- 759
Nice bench. I am particularly keen on seeing Park Tools and other bike themed paraphernalia. Ride onSome very cool workbenches here. Mine is bought, not built and this is the 3rd garage its lived in...although in every one its had different surrounding cabinet configurations.
 !
!