To avoid these ads, REGISTER NOW!

Above 1200 Sq/FT LilScorpion’s Fab Space

Wokspaces above 1200 squarefeet.

legenddc

Well-known member
Joined
Aug 19, 2012
Messages
1,069
I've resisted so far on the 3D printer. I could see myself printing a lot at first and then it just sitting there. It's a shame you can only print so many of those bins at a time. 57 minutes doesn't seem that bad but it leaves 7 hours of the printer dormant while you're sleeping.

How are you creating the pullout shelves for your systainers? Are you still cutting slots in the shelf like you did here? Curious why you didn't make the pullouts like a shallow drawer instead? The cabinets look like they're 3/4" ply and roughly 12" deep with 12" full extension slides and screwed into the shelf pin holes with the 5mm Euro screws?

Happy Holidays to you and your family!
 
To avoid these ads, REGISTER NOW!

Firstram

Well-known member
Joined
May 16, 2017
Messages
1,391
I've resisted so far on the 3D printer. I could see myself printing a lot at first and then it just sitting there. It's a shame you can only print so many of those bins at a time. 57 minutes doesn't seem that bad but it leaves 7 hours of the printer dormant while you're sleeping.

How are you creating the pullout shelves for your systainers? Are you still cutting slots in the shelf like you did here? Curious why you didn't make the pullouts like a shallow drawer instead? The cabinets look like they're 3/4" ply and roughly 12" deep with 12" full extension slides and screwed into the shelf pin holes with the 5mm Euro screws?

Happy Holidays to you and your family!
I think the trick is to save the big complicated prints for the overnight shift. The quick turnaround stuff is for the day shift.
 
OP
L

lilscorpion

Well-known member
Joined
Mar 15, 2010
Messages
3,599
Location
Colorado
You are on point! I don't want to derail this fantastic thread beyond this post.
I ran a volumetric test print to find my hot end's limit, it's about 18mm3 for a stock Bambu nozzle. The stock setting is 12!

Swapped in a .6mm nozzle and printing a part to compare. The slicer tells me it's going to save 2 hours on a 9 hour print! Im sure I could knock more time off but. I'd rather have a successful print!
So…with a larger nozzle doesn’t print quality get reduced? I haven’t played yet, suppose I need to. I kinda just wanted to rock some shop organization out of the box.
 
OP
L

lilscorpion

Well-known member
Joined
Mar 15, 2010
Messages
3,599
Location
Colorado
Past couple of days I’ve been working on getting the press brake off pallet so I can start chopping away at getting it setup. Needed to build a stand and decided to use 2 1/2 x 2 1/2 square 3/16 wall tubing. This will be the first project on the new welding table, the first time machining and welding in this new shop so I’m a different kind of excited.

Had to get the vises set on the mill. I’ll oerfect them later but using a piece of tubing I got the two within a few tho of each other and maybe just a little more over the 18”. Good enough for a machine cart.

IMG_4999.jpeg

Then I got started drilling all the holes in the upper and lowers.

IMG_5002.jpeg

Glorious is the mill in the new space. 😄

IMG_5004.jpeg

Setting stops on both ends I can swap the pieces in and out really quickly once setup.

IMG_5016.jpeg

And uppers can be machined in one spot because they’re shorter than the max travel on the mill.

IMG_5019.jpeg

The front needs to be flat and in the same plane as the face if the press brake so parts have the most clearance when bending but the back ill slope like a fastback. I could do the math but instead I just use my fancy ruler and measure with the chosen anhke (12*).

IMG_5020.jpeg

Quick cut and then I’m ready to work out all the fixturing and throw down some welds. Damn I miss welding.

IMG_5024.jpeg

Those red ratchet clamps are fast but they ****. They ratchet action is angular so if you put the clamp on the outside of the blocks.

IMG_5027.jpeg

If you’ve seen any of FireBallTools videos you’ve probably seen him test for flatness after welding in one of his fixture tables. The test shows how much warpage happened after the welding. I tried, they flat. Damn flat. Game changer.

With the sides complete, I now reset the table to weld up the cross braces. I decided to offset them so I used 1” spacers under them on the table but left the end plates resting on the table surface.

IMG_5029.jpeg

Weld it up, let it cool, flip it, and hit the bottom.

IMG_5046.jpeg
 
OP
L

lilscorpion

Well-known member
Joined
Mar 15, 2010
Messages
3,599
Location
Colorado
Too bad these won’t be visible. They’ll look fantastic powder coated.

IMG_5048.jpeg

Made a set of nut plates to make mounting the wheels easier. These will slide inside the tubing so I don’t have to mess with getting a wrench in there to hold them.

IMG_5047.jpeg

Weld in a couple grade 8 crush lock nuts into each.

IMG_5049.jpeg

Test fit everything for the first time. Cart measure exactly to what is planned and perfectly square.

IMG_5051.jpeg

I built this stand not totally sure I have the means to get the brake up on to it. My plan was purely conceptual. Turns out, that if I lift with a strap as short as I can get it and as close to the pins as possible on my forks, the tractor can get it brake about 3/4” higher than is needed to slide the cart under it. Heh…

IMG_5052.jpeg

In my excitement, I slid the cart under, got the holes perfectly lined up, got the bolts in and immediately realized the damn cart was backwards. I got to do it all over again. Fortunately I nailed it on the first go second time around.

IMG_5053.jpeg

Thinking about Christmas Eve dinner, I’m kinda hungry. Enough progress for today, time to hang with the family a bit. Hope you all have a wonderful evening.

IMG_5054.jpeg
 
Last edited:

Firstram

Well-known member
Joined
May 16, 2017
Messages
1,391
So…with a larger nozzle doesn’t print quality get reduced? I haven’t played yet, suppose I need to. I kinda just wanted to rock some shop organization out of the box.
Still figuring it out but not really. The .4 is better at fine detail but the .6 is perfect for bins!
 
OP
L

lilscorpion

Well-known member
Joined
Mar 15, 2010
Messages
3,599
Location
Colorado
@lilscorpion

Nice work as usual!

What are the orange plates under the fixture table legs? Skates?
1735127437460.jpeg
Haha…yep. I haven’t yet figured out how to get the table off of the skates. Haven’t put much time into trying tho. Originally I thought the lower shelf in the table was going to have a more stout cross bar to jack up but it turned out to have thin-wall short tubing that doesn’t go all the way across.

Also…I like the working height better. When I get the table off the skates its Mac height will be lower than I prefer. *****…
 
OP
L

lilscorpion

Well-known member
Joined
Mar 15, 2010
Messages
3,599
Location
Colorado
@lilscorpion , I was thinking that it would be nice to put a little shed roof under your welding table top, to slow down **** migration to the shelf contents below?
Agreed. After using it for a week I’m already thinking the shelf is a bad idea unless I can get into the habit of cleaning it out after every job. Ha, I already know I won’t even if I say I will.

I think there’s a better way to utilize the space below. May be a good project for later…
@kaymccampbell Jason at Fireball already thought of that one too.


Ron

Yeah, I have that tray but Fireball must be out of stock on a bunch of stuff because they own me some spacers that enable the tray and the vise to work together. Until I get them, it’s one or the other but not both. I need the tray tho, **** does end up going thru the holes (dust, dirt, sparks, etc) and makes a mess below.
 
Last edited:
OP
L

lilscorpion

Well-known member
Joined
Mar 15, 2010
Messages
3,599
Location
Colorado
Playing with the setup for the next project - a material cart for the plywood I’m building the cabinets out of. Spoiler - the fireball Dragon Wagon isn’t as amazing and perfect as the videos let on and you can get the accuracy they say, but it’s extra effort. I’ll do a review here in a bit and share the limitations (my POV with limited experience).

IMG_5068.jpeg

The could exist a chart of which pin locations you need to use to get the desired angle. In this case, all three are touching with the tune in the correct location and the needed angle was 12*.

Now I’ll do a little machining here at some point and then I’ll be ready to weld.
 
OP
L

lilscorpion

Well-known member
Joined
Mar 15, 2010
Messages
3,599
Location
Colorado
I’ve had it in my plans for more than a dozen years to finally organize my drill bits so I can more easily find them and have no more “miscellaneous bin” in random drawers. I think I had 3 through out my various stashes. Many of them were small bits that just needed to be sorted thru.

IMG_5108.jpeg

I’ve been printing bins on my Bambu X1C for a few days now in a few sizes.

IMG_5038.jpeg

I went thru my organized bits and figured out what the size ranges are (bin-wise) so I could get a rough count of what I’ll need as a best initial guess. I used only brand new bits too, not re-grinds.

IMG_5035.jpeg

Initially I didn’t have a link of confidence in printing so I made smaller batches but the bins still piled up.

IMG_5058.jpeg

With a good enough start, I started going thru the bits in the misc containers. Some bits have markings that are clearly legible, others I had to measure and then reference back to a drill size chart.

IMG_5096.jpeg

As the bits are identified, i printed labels and started a list.

IMG_5098.jpeg

Started with the smaller drill bits and worked to the larger ones. As a new one was found, a bin labeled and then moved into its place numerically. Bins will have both the fractional size and the decimal size on the labels.

IMG_5091.jpeg

In one bin I had a bunch of new in envelope bits as well so I temporarily placed them in order within the packets while I made the labels.

IMG_5094.jpeg

It went fairly quick even tho it would seem like it should take forever.

IMG_5099.jpeg
 

Attachments

  • IMG_5099.jpeg
    IMG_5099.jpeg
    792.3 KB · Views: 27
To avoid these ads, REGISTER NOW!

Cruzan80

Well-known member
Joined
Jul 22, 2015
Messages
4,199
Location
Denver, CO
Any reason you are going with the bins as opposed to the Hanson cabinets? Guessing either because they fit in drawers/lack of cabinet space, or because you can make everything you need vs having to buy something?
 

MadeByMiller

Well-known member
Joined
Dec 29, 2018
Messages
1,230
Location
Rapid City, SD
Agreed. After using it for a week I’m already thinking the shelf is a bad idea unless I can get into the habit of cleaning it out after every job. Ha, I already know I won’t even if I say I will.

I think there’s a better way to utilize the space below. May be a good project for later…


Yeah, I have that tray but Fireball must be out of stock on a bunch of stuff because they own me some spacers that enable the tray and the vise to work together. Until I get them, it’s one or the other but not both. I need the tray tho, **** does end up going thru the holes (dust, dirt, sparks, etc) and makes a mess below.
Allow me to introduce you to a solution: my new Fixture Table Plugs!

A large reason I created them was to stop dust and debris from falling onto everything beneath the table. I currently only have plugs for 5/8" Strong Hand and 16mm Siegmund tables, but if you are willing I would love to work with you to provide plugs for 3/4" Fireball tables as well.

20241231_164119.jpg
 
OP
L

lilscorpion

Well-known member
Joined
Mar 15, 2010
Messages
3,599
Location
Colorado
I’ve been primarily focused on organizing drawers for the last few weeks which really means keeping the 3D printer running night and day making bins. Last weekend I realized that not having at least some organization in my office was making things less efficient so I added a counter that will ultimately turn into a mini-print farm but for now I need it to double as my standup desk for when I work from home.

IMG_5239.jpeg

The drawers will be used to organize all my inside hardware - network tools and hardware, computer/AV cables and cords, and anything related to hobbies of the past that I wish to revive at some point (e.g. RC cars, Arduino/electrics, etc.). The organization part will come in time as it’s not presently a priority except the drawer that supports the 3D printing. I’ll add some bins here and there to make my life easier.

IMG_5240.jpeg

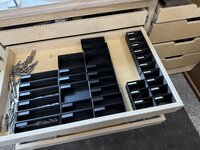
Tooling drawers are coming a long slowly. Printing all the bins takes quite a bit of time. 8-10 of them, depending on size, can take 6-8 hours so I get about 3 runs a day. The method is to throw everything up on the counter and then determine bin size by sizing the objects to the grid and then determining how many ultimately I want or will have.

IMG_5245.jpeg

To some extent it’s guessing but it seems to be working nicely and will be much easier to re-arrange in the future if my needs change.

IMG_5241.jpeg

I’ve completed the move out of the drill bits smaller than 1/2” from the lista. It served me well but I look forward to using it for organizing other stuff which I’ll get to later.

IMG_5246.jpeg

The new solution is way better especially for the small stuff primarily because I can take out a bin and look for the bit I want instead of fishing with my fingers while trying to contort my head to see inside. Why not a drill index cabinet? I had one, hated it. It’s so constraining to quantity and I have a lot of some sizes and not as many as others. I suppose I could have used an index cabinet for the small stuff but again, can remove the tray.

IMG_5242.jpeg

Nothings finalized tho. I’m still adding and re-arranging so the spaces you see already are spoken for in some way or another.

IMG_5243.jpeg
On thing I’m intentionally doing differently is to separate the stub bits from the jobber bits. Most of the time I use the stubbies on the CNC mill because they’re the correct length to work offset-wise with end mills. So when I’m matching, it’s helpful to be able to go directly to the stubbies when I need one and though I’m giving up space, the time savings not having to dig I think will be worth it.

image.jpg

I have some other ideas for making bits easier to find but I’m still noodling so I’m keeping them to myself until I pick a path.

IMG_5244.jpeg

I haven’t messed with metrics much but create bins as I come across them in then drawers. Metric drill bits are interesting when you look at their decimal equivalents and compare back to the closest SAE bits. Here’s a good example: 6.4mm is .002 over 1/4” and F is .007 over…having options for tolerances is nice and metric allows that even if you’re not a metric fastener guy.

image.jpg
 
Last edited:

slodat

ALLIANCE MEMBER
Joined
Feb 6, 2010
Messages
3,681
Location
Central-ish, WA
Metric drills come in handy when you need an in between size. I use them for form tap holes mostly.

My drill chart at my desk is similar to what you made, but I have the metric diameter as well.

Storage and organization looks great!
 

XJSuperman

Well-known member
Joined
Jan 26, 2018
Messages
3,087
Location
Central Iowa
I'm blown away by the sheer volume of small bits and pieces you have stocked, but I'm definitely seeing the "I told ya so" moments as you and the printer get it all organized. Its really coming together well. Its certainly another hobby and a timesuck, but I don't know of a better way to accomplish this level of organization.
 
OP
L

lilscorpion

Well-known member
Joined
Mar 15, 2010
Messages
3,599
Location
Colorado
I'm blown away by the sheer volume of small bits and pieces you have stocked, but I'm definitely seeing the "I told ya so" moments as you and the printer get it all organized. Its really coming together well. Its certainly another hobby and a timesuck, but I don't know of a better way to accomplish this level of organization.
Most of what I do could be accomplished with a couple drill sets and a drill doctor. Rarely would there be a situation where so many would be necessary. My situation is only different in that at one point, about 15 years ago (ish) I used to go to local auctions just before they started putting them on the internet. You had to be there to bid. They were awesome back then and much of the tooling I have I either won at an auction or purchased off of eBay. For some tooling I’m a huge fan of “lots” for that reason.

It’s hard to imagine but 75% of my drill bits that fill my drawers came in just 2 lots from a single auction and I didn’t pay more than $200 for both out the door.

After I converted my knee mill to CNC I did start buying more tooling and “stocking” more as well. Yes, if I treat tooling well and don’t crash, it does last a long time. But CNC can be hard on tooling so I’ve learned that if I really want to get something done I have to have 2-3 extras in the drawer just in case. Otherwise, being a home guy, if I break my last tool I’m probably done until the following weekend.

…all that and I’m kinda an OCD tool hoarder/collector too. 😜
 

Firstram

Well-known member
Joined
May 16, 2017
Messages
1,391
Yeah, it was a total mistake. Was planning to run all grey but ran out mid print so I went with it. Not in going to do more contrasting like them
You can go with any color scheme you want. I just ordered 10 rolls of black because I'm going all in and stealing that look!
 
To avoid these ads, REGISTER NOW!
Top Bottom