Pbindesign
Well-known member
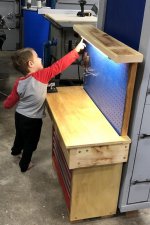
This is looking great! I especially love the accident sign. Well done.
Sent from my iPhone using Garage Journal
Sent from my iPhone using Garage Journal

This is looking great! I especially love the accident sign. Well done.
Very Nice. I have yet to make one of those.
Bret
Well made! Will need to try that myself before christmas
Are those bench cookies underneath? Do you find them practical/something to be had?
Lol! We recently had a few friends over and sat around the fire pit. The guys ended up in the garage later in the evening and it was a big hit with them as well!.
Very nice!. I’m definitely going to be stealing some kind of version of that just for when I’m out there and need a good laugh.
Unruh: I know you are a very busy guy with all the projects you are doing and with work and the family, but if you have time to document the challenges you had spiffing up the huge old Reed 406 bench vise i bet others would love to see it. how's the E tank coming along and I was worried that your tank wouldn't be big enough since even half that vise is pretty big and heavy, but a 32 or 40 gallon plastic garbage can looks like it's plenty big.
good luck!!!
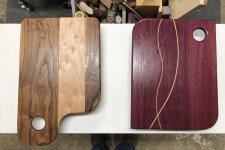
nice work on the cutting board and looks like you might have to get a nice burning tool to put in your autograph or a nice quote if you plan on making a few for presents. (or not).
cheers

Man that looks great! I have a big Reed that I need to restore. Mine is going to be ToolBox Red.
Bret

unruh, that Reed came out great! I am glad that you stuck with it. With a bigger vise like that you could always put it on a stand so you don't have to move your R.I.

Unruh: with all the skills you used to clean up the planer, vise and other items in your garage you can rescue or restore almost anything now.
nice looking big REED 406 and the only thing that might save you from getting the VISE BUYING BUG is having 3 hungry kids keeping your wallet from filling up with cash to buy them. that said if you keep finding deals like that Reed 406 you can't go too far wrong.
keep up the great work!!
Unruh: your call on which vise you want to put on your bench or put one on each end?
in case you haven't seen this thread I started a few years ago here's more ideas about grinder and vise stands and making them easy to move might be a good option for you if floor space isn't readily available. here's the link:
https://www.garagejournal.com/forum/showthread.php?t=252799&highlight=grinder+vise
MrW: did you drill a hole in the back of your Holland's slide to put the chain holder on. I like the idea of having a chain on the pin cause more than not the pins on these old swivel jaw vises are MIA unless they are pounded or rusted in place.
most guys drill into the static, but maybe you had a hole already in your slide? nice looking stand!!

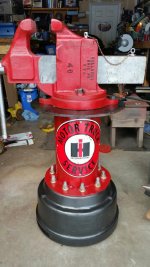
I made this one for my swivel jaw Hollands out of a big rig brake drum and a compressed gas cylinder. There is two bags of concrete in the brake drum. I think the whole thing weighs about 500lbs. It has really changed things for me as far as ease of work. I put it just below elbow height for the top of the jaws and it is SO much nicer than bench height. Plus it is absolutely rock solid for heavier work. I hope this helps.