To avoid these ads, REGISTER NOW!

Long needed change...

OP
C

Conn'swhiterose

Well-known member
Joined
Jun 11, 2011
Messages
75
Location
Calgary AB Canada, 3rd rock from the sun
Here she is after 4 coats of finishing mud and sanded out....
 

Attachments

  • Final mud- sand 1.jpg
    Final mud- sand 1.jpg
    62.6 KB · Views: 9
  • Final mud-sand 2.jpg
    Final mud-sand 2.jpg
    78 KB · Views: 8
  • Final mud-sand 3.jpg
    Final mud-sand 3.jpg
    83 KB · Views: 9
  • Final mud-sand 4.jpg
    Final mud-sand 4.jpg
    82.5 KB · Views: 9
  • Final mud-sand 5.jpg
    Final mud-sand 5.jpg
    66.4 KB · Views: 8
  • Final mud-sand 6.jpg
    Final mud-sand 6.jpg
    73 KB · Views: 7
To avoid these ads, REGISTER NOW!
OP
C

Conn'swhiterose

Well-known member
Joined
Jun 11, 2011
Messages
75
Location
Calgary AB Canada, 3rd rock from the sun
Then the wife and I sheathed the reatining wall insulation/framing....we used 1/2 inch fir plywood and used wood filler on the **** joints to make it look like a continuous sheet....for some reason I don't have many good pics of the filler in place and sanded....got busy and forgot I guess....
 

Attachments

  • Sheath rw 4.jpg
    Sheath rw 4.jpg
    100.5 KB · Views: 17
  • Sheath rw 3.jpg
    Sheath rw 3.jpg
    115.8 KB · Views: 16
  • Sheath rw 2.jpg
    Sheath rw 2.jpg
    127.7 KB · Views: 19
  • Sheath rw 1.jpg
    Sheath rw 1.jpg
    94.2 KB · Views: 15
  • Sheath rw 5.jpg
    Sheath rw 5.jpg
    117.4 KB · Views: 15
OP
C

Conn'swhiterose

Well-known member
Joined
Jun 11, 2011
Messages
75
Location
Calgary AB Canada, 3rd rock from the sun
Well, back again with some pics of the walls/ceiling painted out in semi gloss white.

We started with a healthy coat of "high hide" latex primer and followed with the semi gloss white
 

Attachments

  • Paint 1.jpg
    Paint 1.jpg
    67.1 KB · Views: 12
  • Paint 2.jpg
    Paint 2.jpg
    68 KB · Views: 9
  • Paint 3.jpg
    Paint 3.jpg
    74.1 KB · Views: 9
  • Paint 6.jpg
    Paint 6.jpg
    121.7 KB · Views: 11
  • Paint 5.jpg
    Paint 5.jpg
    66 KB · Views: 10
  • Paint 4.jpg
    Paint 4.jpg
    93.3 KB · Views: 10
To avoid these ads, REGISTER NOW!
OP
C

Conn'swhiterose

Well-known member
Joined
Jun 11, 2011
Messages
75
Location
Calgary AB Canada, 3rd rock from the sun
Next task was to trim out the retaining wall, windows, door etc....AND decide the color. We kicked this around for a long time, Mopar colors...all time classic colors, and it was a tough decision.....BUT

Since my Dad had a 53 Olds that was turquoise and white, when I was a kid, that's what we went with. We have family pictures with the car in it and I always liked the way the car looked in those colors....brings back some of the past for me....

Once again the retaining wall required extra work as the top ledge is 4.25" so we ripped 2X6's to cap it off...we wanted something good and strong as ledges tend to turn into shelves if you know what I mean...
 

Attachments

  • Trim 1.jpg
    Trim 1.jpg
    81.8 KB · Views: 11
  • Trim 2.jpg
    Trim 2.jpg
    75.2 KB · Views: 12
  • Trim 3.jpg
    Trim 3.jpg
    81.6 KB · Views: 15
  • Trim 4.jpg
    Trim 4.jpg
    72.5 KB · Views: 11
  • Trim 5.jpg
    Trim 5.jpg
    103.7 KB · Views: 15
  • Trim 6.jpg
    Trim 6.jpg
    104.9 KB · Views: 14
OP
C

Conn'swhiterose

Well-known member
Joined
Jun 11, 2011
Messages
75
Location
Calgary AB Canada, 3rd rock from the sun
Flooring was the last big job standing in front of completion. We chose a polyaspartic coating system with a full broadcast of chips for color. The floor was diamond ground, hairline cracks ground out and filled, then the 5 coat system was applied.

We had a crew come in to lay this down as they were willing to stand behind the work with a 20 year warranty.

Take a look.....
 

Attachments

  • Floor 3.jpg
    Floor 3.jpg
    147.7 KB · Views: 13
  • Floor 2.jpg
    Floor 2.jpg
    127.5 KB · Views: 4
  • Floor 1.jpg
    Floor 1.jpg
    110.1 KB · Views: 4
  • Floor 4.jpg
    Floor 4.jpg
    144.6 KB · Views: 6
  • Floor 5.jpg
    Floor 5.jpg
    146.9 KB · Views: 8
  • Floor 6.jpg
    Floor 6.jpg
    146.1 KB · Views: 7
OP
C

Conn'swhiterose

Well-known member
Joined
Jun 11, 2011
Messages
75
Location
Calgary AB Canada, 3rd rock from the sun
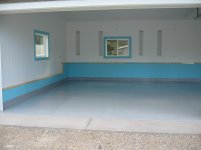
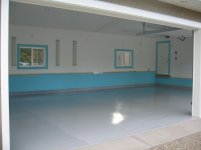
FINALLY, we were close....

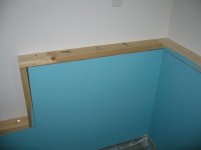
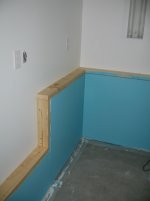
We called up a sheet metal shop and had some lengths of .065 aluminum cut and bent to top off the retaining wall cap. We brought it home and cut/trimmed it to fit and installed with silicone adhesive and 3/16 pop rivets.

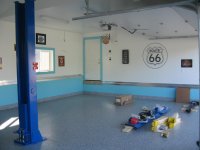
Then mounted up some signs we had in the old garage as well as some new....including a white rose gas pump replica in my Grandfather's memory. He owned and operated a corner station that sold white rose gas/ products in the 50's.

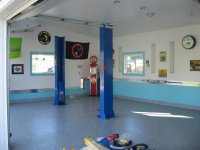
Then myself and neighbourhood guys started hauling in the lift for install...got the columns standing....

And that's about it.....that brings you up to date; where we stand today...hope to finish the lift in the next few days...as time permits.


Thanks for following us on our journey to get this sucker standing!!

Next is trenching in the gas line and installing the radiant tube overhead heater...moving in/building benches/cabinets etc etc.....but we have a building to work in now!!!!!!:bounce:
 

Attachments

  • Finished 1.jpg
    Finished 1.jpg
    136.4 KB · Views: 25
  • Finished 2.jpg
    Finished 2.jpg
    139.7 KB · Views: 21
  • Finished 3.jpg
    Finished 3.jpg
    138.8 KB · Views: 18
  • Finished 4.jpg
    Finished 4.jpg
    140.5 KB · Views: 21
To avoid these ads, REGISTER NOW!
Top Bottom