To avoid these ads, REGISTER NOW!

Between 265 & 485 SQ/FT Made By Miller Studios

Workspaces sized between 265 and 485 squarefeet.
OP
M

MadeByMiller

Well-known member
Joined
Dec 29, 2018
Messages
1,230
Location
Rapid City, SD
The photos are looking really good. Not sure on your lens setup, but I'm assuming the larger has a shoe mount, no? As you get to the bigger glass, the lens goes to the tripod, not the DSLR body. You should find yourself a remote bulb/timer for the camera. I'm out of the loop, but for our 5D MKII's, we used the Canon remote which worked great. I sold all of the kit (there was a lot!) with the business 4 years ago. Looking over the pics of our kids, the ones that clearly stand out were the ones taken with the 5Ds. We used an f2.8 28-70 and 70-200 L series glass for about everything. Nikon lent us a D3s /glass for a year or so and I loved that setup as well.

You are generally going to find less chromatic aberration and sharpness in that f4 to f8 range. ISO as low as possible as you've figured out :)
Many thanks! I'm getting a little more comfortable. As I further understand how changing the camera settings affect the photo I am trying to also develop the scene lighting and composition. Not saying I'm good at any of it, but I am trying to get better! Every time I pull the camera out I'm learning something to apply towards the next outing.

My camera has a quick attach adapter installed on it for the tripod, I don't have a big boy lens that mounts directly to the tripod yet. Agreed on the remote shutter, I've been getting by with a two-second shutter delay but I know a remote would be better. Your 5D setup with the L-series lens was ultra fancy! My Rebel and the accompanying standard lenses are good for the hobby level wannabe stuff I think, but I definitely want to get a more lenses to play with.

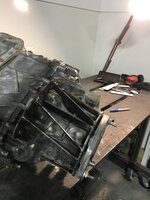
I've found that shooting handheld indoors my hands are so shaky that I have to bump the ISO up higher to get a crisp image, 200-800 or even up to 1600 light dependent. I need to practice more so I can get more comfortable holding the camera steady. F-stop is one of the toughest things for me to nail. I get the principles and how adjusting it affects the image, but I don't have the experience yet to deploy the changes properly 100% of the time. On the camera's LCD screen I think it looks good, but when I view the shots on my big monitor I see how it could have been better. For example, this shot below was taken at f5 which I set intentionally to increase the bokeh outside of the red stamping, but once I viewed it on my monitor I noticed that I should have increased the f-stop because the bokeh is encroaching on the stamp that I wanted to be in focus.
IMG_4755.JPG

I always appreciate your comments, thanks for stopping by and for your encouragement!
 
To avoid these ads, REGISTER NOW!

Denwood

Well-known member
Joined
Sep 22, 2014
Messages
4,180
Location
Thunder Bay, Ontario, Canada
You might want to take a look at a monopod…very quick support for those indoor shots.

Depth of field and f stop go hand in so understanding the relationship is very important. Lens choice too. I am just a toddler the world of art and composition but I had to be pretty strong on the technical side in my previous life running a company that catered to cinematographers :)
 

Trapps

ALLIANCE MEMBER
Joined
Feb 10, 2017
Messages
1,992
Location
The Detroit Zoo
If Dennis is a toddler, I am an infant.

Glass is your friend! I'm not up on the Canon world, but primes are also a great choice; you can get into some fast glass (like a 50mm 1.8) for not a ton of cash; under $200. Even going to a 50mm 1.4 won't break the bank. (Since my kids have grown and flown (well, one has flown) I find myself using the 'big' camera less and less. There is probably some 'cell phone cameras have gotten so good and they are convenient too' syndrome in there as well.

Still, capturing images you've worked a bit for really sets them apart. Just scroll up to see a few examples!

An external flash can also have a big impact. Less so for staged things where you have lighting flexibility. But, for hand held, candid shots, indoors or outside, a decent flash can bring lots of options and sharper images.

I was obsessed for a while and have now moved on and pared down the kit; a couple of primes, a 18-200 (my everyday lens) and a 70-200 (it's a 2.8 and makes some incredible images, despite the turd behind the viewfinder). I never did do a macro, it is the one lens I'd add if I ever buy another.

Keep shooting!
 
OP
M

MadeByMiller

Well-known member
Joined
Dec 29, 2018
Messages
1,230
Location
Rapid City, SD
If Dennis is a toddler, I am an infant.

Glass is your friend! I'm not up on the Canon world, but primes are also a great choice; you can get into some fast glass (like a 50mm 1.8) for not a ton of cash; under $200. Even going to a 50mm 1.4 won't break the bank. (Since my kids have grown and flown (well, one has flown) I find myself using the 'big' camera less and less. There is probably some 'cell phone cameras have gotten so good and they are convenient too' syndrome in there as well.

Still, capturing images you've worked a bit for really sets them apart. Just scroll up to see a few examples!

An external flash can also have a big impact. Less so for staged things where you have lighting flexibility. But, for hand held, candid shots, indoors or outside, a decent flash can bring lots of options and sharper images.

I was obsessed for a while and have now moved on and pared down the kit; a couple of primes, a 18-200 (my everyday lens) and a 70-200 (it's a 2.8 and makes some incredible images, despite the turd behind the viewfinder). I never did do a macro, it is the one lens I'd add if I ever buy another.

Keep shooting!
If you're an infant, I am an embryo.

Yes, the Canon "nifty-fifty" 50mm 1.8 lens is so ubiquitous it seems I must have it! I haven't taken a single photo using flash yet, both because I haven't seen a necessity for it and also because it seems intimidating to get a nice photo that isn't blown out. I'll have to add that to the list of things to become familiar with.

I am so cheap that I have not felt it necessary to purchase a $1,000+ phone yet. My $300 Moto G Stylus that I've had for a few years now still gets the job done. Funny enough, before I got this DSLR I had been considering taking the plunge into the high end cellphone world for the improved camera. I'm glad I did not though, because any photos I take with my phone I'm likely not interested in them being "nice" anyway, and when I want to take "nice" photos I can take the time to set up the fancy camera. I do quite enjoy it, and most of my life I have had a backseat interest in photography, or at least taking nicer quality pictures. The detail oriented, artistic portion of my brain is finding a great amount of satisfaction in the shutter click, and the challenge of learning a new skill always hooks me.

Thank you for leaving a comment, your advice and encouragement are both much appreciated!
 

Denwood

Well-known member
Joined
Sep 22, 2014
Messages
4,180
Location
Thunder Bay, Ontario, Canada
Going to back to my first film camera as a teen, a Minolta x7A (which I still own), my favorite shots were all portrait type shots, taken of my closest friends…who were not posing :). Patience, good light and a fast 80mm. It seems that sometimes you can capture the “essence” of someone’s inner beauty with just a single still photo:)

When digital full frame cameras came out with low light ability (like the Nikon D3s) I was dumbfounded by what you could do without a flash…and I have not owned once since. That said, the night bulb (long) exposure terminated by a fill flash for foreground is something I’ve always loved.

All this camera talk may be dangerous to my finances…
 

RickP

Well-known member
Joined
Jan 15, 2013
Messages
1,547
Location
Annapolis, MD
If you'd like to try using a flash inside, check out the ones that have a hinged light. You can sometimes avoid the harsh light washout effect by bouncing the light off the ceiling or wall.

For a longer lens, have you considered getting a used one? I've bought a few older lenses from keh.com and never been disappointed, especially because they grade the quality of the glass in each one. As you know, you'll pay a lot more for a "faster" long lens (with a lower f-stop), but the night shots you're taking will probably benefit from that speed. The real speed benefit would be shooting sports, or kids playing outside!
 
OP
M

MadeByMiller

Well-known member
Joined
Dec 29, 2018
Messages
1,230
Location
Rapid City, SD
If you'd like to try using a flash inside, check out the ones that have a hinged light. You can sometimes avoid the harsh light washout effect by bouncing the light off the ceiling or wall.

For a longer lens, have you considered getting a used one? I've bought a few older lenses from keh.com and never been disappointed, especially because they grade the quality of the glass in each one. As you know, you'll pay a lot more for a "faster" long lens (with a lower f-stop), but the night shots you're taking will probably benefit from that speed. The real speed benefit would be shooting sports, or kids playing outside!
Thank you for the tips on using flash indoors!

I did not know that website existed, thank you for sharing! I have been eyeing the SIgma 150-600mm lens which they don't have available used at the moment, but that does look like a great source. I'm not into "action" shots yet, so a slower lens is just fine for me.
 
OP
M

MadeByMiller

Well-known member
Joined
Dec 29, 2018
Messages
1,230
Location
Rapid City, SD
SNOW! Continued:
IMG_4795copy.jpg
IMG_4799.JPG
IMG_4801copy.jpg
IMG_4804.JPG
IMG_4805.JPG

I was really excited to get out and try to capture some of the gorgeous snow-laden pine trees with the fancy DSLR. I'm pretty happy with these, my fingers were frozen by the time I was done!

We got 6"+ of beautiful, fluffy powder which is totally awesome! That meant I got to push off the driveway again:
IMG_20230128_115724116_HDR.jpg
IMG_20230128_115640344_HDR.jpg
IMG_20230128_123446105_HDR.jpg
IMG_20230128_115706925_HDR.jpg
IMG_20230128_123417527_HDR.jpg
 
OP
M

MadeByMiller

Well-known member
Joined
Dec 29, 2018
Messages
1,230
Location
Rapid City, SD
I just wrapped up this "reverse engineering" job for a customer. He makes these neat looking paperweights all by hand, but is looking to increase production by having them CNC machined. He was referred to me by a prior customer of mine and has been great to work with. He shipped me a set and I got them modeled up then 3D printed to mail to him to verify the design prior to machining. There was a lot of fun Surface work in the finger stalls. If you're interested in seeing more of his work, his website is HERE.
Tree of Life Knuckles 008.PNG

IMG_4868.JPG
 

phred

Well-known member
Joined
Apr 23, 2009
Messages
525
Location
NC
Neat “paper weights”.
I wish had known you 5 years ago. I fabbed this brace for a zf5 transmission and several people wanted me to make production versions but every rib is different to fit the contours of the trans tail housing. A 3d scan and model with dxf files would have made repeatability a reality.
 

Attachments

  • F540B4D6-E105-4232-AD16-441E67E8D7F8.jpeg
    F540B4D6-E105-4232-AD16-441E67E8D7F8.jpeg
    621.4 KB · Views: 69
  • 23E15355-EBDA-40BD-96BB-5CE4438C7744.jpeg
    23E15355-EBDA-40BD-96BB-5CE4438C7744.jpeg
    664.7 KB · Views: 72
  • D7527FD3-DB57-4D21-B3B9-001B8CE2B639.jpeg
    D7527FD3-DB57-4D21-B3B9-001B8CE2B639.jpeg
    434.6 KB · Views: 72
OP
M

MadeByMiller

Well-known member
Joined
Dec 29, 2018
Messages
1,230
Location
Rapid City, SD
Neat “paper weights”.
I wish had known you 5 years ago. I fabbed this brace for a zf5 transmission and several people wanted me to make production versions but every rib is different to fit the contours of the trans tail housing. A 3d scan and model with dxf files would have made repeatability a reality.
Well here I am 5 years late and dollar short! That wouldn't be too difficult at all to model up, no scan necessary either.

I really enjoy solving CAD design problems with more organic shapes. It brings out the artistic side of modeling that I so love.
 

wreckdiver1321

Well-known member
Joined
Aug 12, 2021
Messages
1,039
Location
Billings, MT
Great efforts on the photography front Austin!

A couple of thoughts as I look through your pictures and think of the way I do things.
  • Your composition and use of light is pretty solid already, you're getting a great "feel" for how to set up your images, even the humdrum stuff like the manuals and 3D printer shots. You'll develop that as you keep shooting. Do some experimenting to find out what works and what doesn't. Same with editing. Just play around, focus less on the perfect result and more on effects. Once you have a good understanding of the effects, those are the building blocks for great photos.
  • Do not be afraid of ISO. There's some thought that only low-noise, "clean" photos are good, but I'd rather have some noise and guarantee a crisp shot than a noiseless blurry image. This is especially true of anything that's not a landscape. Even portraits (if they're not a "studio" setting and more candid style) can be stunning with a little grain to them. For me it's about getting the shot rather than having it be clean. I'm often shooting up to 2500 or 3200 ISO in my shop photography, and when it gets dark sometimes I push as high as 6400. That being said, I'm on a full frame so it handles it really well. Still though, don't be afraid to push it.
  • Despite all my understanding of the exposure triangle, I stopped shooting in manual mode a long time ago. I am almost always using aperture priority with manual ISO setting. I decide what depth of field I want, select an f stop, then adjust the ISO to get an acceptable shutter speed. It's faster and more enjoyable for me that way because I don't have to make any changes to the shutter, just move the ISO until the shutter speed number gets high enough. I have my camera set to underexpose by a bit because it's much easier to get dark details out of editing than it is to pull highlights back. The only time I go full manual is when I'm doing stuff at night like long-exposure work.
  • As mentioned, good glass should be the next investment as you develop. The kit lenses are generally better than a phone but once you use high quality glass you'll be kind of amazed at the difference. I have a simple three-lens setup that I'm thinking about changing up. I mostly do landscapes and travel photography, so I want wide angles and a 50mm. I have Nikon's standard 50mm 1.8 that gets used for all of the street and candid stuff, then a 17-35mm f4 as well as a 24-120mm f4 that work wonders and allow me to get the shot in most situations. I don't do any wildlife work really so I don't have big glass, but you'll want 300mm+ for wildlife telephoto stuff. That gets into money but Sigma has a few good options that are high quality for not crazy prices.
  • I do have a flash, but almost never use it. Using the flash helped me understand the effects of light a lot more, which I then carried into my regular natural light photography. For the more detail work you're doing, a remote flash setup may be helpful if you're okay with messing with it to set it up. I personally feel like a large amount of gear interferes with the shooting experience for me, so I go without most of the time.

Keep at it! It's fun to learn and get mastery over the gear. Seeing the results is always rewarding.
 
OP
M

MadeByMiller

Well-known member
Joined
Dec 29, 2018
Messages
1,230
Location
Rapid City, SD
Great efforts on the photography front Austin!

A couple of thoughts as I look through your pictures and think of the way I do things.
  • Your composition and use of light is pretty solid already, you're getting a great "feel" for how to set up your images, even the humdrum stuff like the manuals and 3D printer shots. You'll develop that as you keep shooting. Do some experimenting to find out what works and what doesn't. Same with editing. Just play around, focus less on the perfect result and more on effects. Once you have a good understanding of the effects, those are the building blocks for great photos.
  • Do not be afraid of ISO. There's some thought that only low-noise, "clean" photos are good, but I'd rather have some noise and guarantee a crisp shot than a noiseless blurry image. This is especially true of anything that's not a landscape. Even portraits (if they're not a "studio" setting and more candid style) can be stunning with a little grain to them. For me it's about getting the shot rather than having it be clean. I'm often shooting up to 2500 or 3200 ISO in my shop photography, and when it gets dark sometimes I push as high as 6400. That being said, I'm on a full frame so it handles it really well. Still though, don't be afraid to push it.
  • Despite all my understanding of the exposure triangle, I stopped shooting in manual mode a long time ago. I am almost always using aperture priority with manual ISO setting. I decide what depth of field I want, select an f stop, then adjust the ISO to get an acceptable shutter speed. It's faster and more enjoyable for me that way because I don't have to make any changes to the shutter, just move the ISO until the shutter speed number gets high enough. I have my camera set to underexpose by a bit because it's much easier to get dark details out of editing than it is to pull highlights back. The only time I go full manual is when I'm doing stuff at night like long-exposure work.
  • As mentioned, good glass should be the next investment as you develop. The kit lenses are generally better than a phone but once you use high quality glass you'll be kind of amazed at the difference. I have a simple three-lens setup that I'm thinking about changing up. I mostly do landscapes and travel photography, so I want wide angles and a 50mm. I have Nikon's standard 50mm 1.8 that gets used for all of the street and candid stuff, then a 17-35mm f4 as well as a 24-120mm f4 that work wonders and allow me to get the shot in most situations. I don't do any wildlife work really so I don't have big glass, but you'll want 300mm+ for wildlife telephoto stuff. That gets into money but Sigma has a few good options that are high quality for not crazy prices.
  • I do have a flash, but almost never use it. Using the flash helped me understand the effects of light a lot more, which I then carried into my regular natural light photography. For the more detail work you're doing, a remote flash setup may be helpful if you're okay with messing with it to set it up. I personally feel like a large amount of gear interferes with the shooting experience for me, so I go without most of the time.

Keep at it! It's fun to learn and get mastery over the gear. Seeing the results is always rewarding.
Thank you Tom for taking the time to make such a nice post!

I try to do a lot of experimenting with light and composition. Of course, 75% or more of the photos I take just get deleted as soon as I open the memory card up, so it's a numbers game really. Out of 30 shots I ought to have a few acceptable ones.

That's a great point on ISO and I do try to keep that in mind, but I definitely am too concerned about noise at the expense of a crisp shot often.

Perhaps I will get off manual mode at some point, but for the time being I'm really enjoying learning the principles and it adds another layer of fun to the experience for me. I've noticed that my camera's light meter does tend to underexpose as well and I assumed it was due to what you mention about being easier to bring up the brightness in post.

Like @Denwood and I were discussing earlier, I think the first lens I get should be a Canon 50mm 1.8 (edit: My local Best Buy even has one in stock and on sale for $99 right now...). You have me really curious about the glass quality difference now! This Sigma 150-600mm lens is actually what I've been eyeballing for my longer range lens. That's a lot of money for what I use my camera for though...

I very briefly experimented with flash in some indoor low light stuff recently and my results were predictably poor ha. It is something I will have to put a lot more time into to learn how to properly employ it.

I really appreciate the wisdom and encouragement you shared with me here!
 
Last edited:

wreckdiver1321

Well-known member
Joined
Aug 12, 2021
Messages
1,039
Location
Billings, MT
Thank you Tom for taking the time to make such a nice post!

I try to do a lot of experimenting with light and composition. Of course, 75% or more of the photos I take just get deleted as soon as I open the memory card up, so it's a numbers game really. Out of 30 shots I ought to have a few acceptable ones.

That's a great point on ISO and I do try to keep that in mind, but I definitely am too concerned about noise at the expense of a crisp shot often.

Perhaps I will get off manual mode at some point, but for the time being I'm really enjoying learning the principles and it adds another layer of fun to the experience for me. I've noticed that my camera's light meter does tend to underexpose as well and I assumed it was due to what you mention about being easier to bring up the brightness in post.

Like @Denwood and I were discussing earlier, I think the first lens I get should be a Canon 50mm 1.8 (edit: My local Best Buy even has one in stock and on sale for $99 right now...). You have me really curious about the glass quality difference now! This Sigma 150-600mm lens is actually what I've been eyeballing for my longer range lens. That's a lot of money for what I use my camera for though...

I very briefly experimented with flash in some indoor low light stuff recently and my results were predictably poor ha. It is something I will have to put a lot more time into to learn how to properly employ it.

I really appreciate the wisdom and encouragement you shared with me here!
Happy to share, I think we all need to knock our ideas off one another every so often.

With regards to ISO, just think of some of the great film photographs you've seen. Ansel Adams, Henri Cartier-Bresson, Steve McCurry, those types. Look at their photos and you'll see grain. Doesn't diminish the quality or feel of the photo. The subject and the moment is what matters.

I absolutely get staying in manual, I did that for a long time. It helps you understand everything a little better and will make you better at handling your gear. You understand how everything works a lot better that way. And remember, everyone does things a little different. Photography is an art, not a science, so do what works for you and use the method that produces the results you want.

50mm 1.8 is a great lens to keep in the bag. I forget, what body do you have? If it's a crop sensor camera I'd buck the trend and say get a 35mm 1.8 if Canon has one. That's much more useful on a crop sensor body than the 50 would be. Slight distortion due to it being slightly wide but the field of view is the same as the 50 on a full frame. The glass itself will be pretty darn sharp and having access to larger aperture settings is a great thing. I almost never shoot wider than 2.8 for sharpness but having that as an option is really useful. Lots of depth of field from that.

That Sigma lens is a monster as far as bang for your buck. Quality and focal length in a reasonably priced package. I thought about getting one for my Nikon but my photography tended more towards travel and landscapes, so such a lens would be a waste for me frankly. Not really into wildlife or sports so it wasn't worth it to me.

Keep shooting!
 
OP
M

MadeByMiller

Well-known member
Joined
Dec 29, 2018
Messages
1,230
Location
Rapid City, SD
Happy to share, I think we all need to knock our ideas off one another every so often.

With regards to ISO, just think of some of the great film photographs you've seen. Ansel Adams, Henri Cartier-Bresson, Steve McCurry, those types. Look at their photos and you'll see grain. Doesn't diminish the quality or feel of the photo. The subject and the moment is what matters.

I absolutely get staying in manual, I did that for a long time. It helps you understand everything a little better and will make you better at handling your gear. You understand how everything works a lot better that way. And remember, everyone does things a little different. Photography is an art, not a science, so do what works for you and use the method that produces the results you want.

50mm 1.8 is a great lens to keep in the bag. I forget, what body do you have? If it's a crop sensor camera I'd buck the trend and say get a 35mm 1.8 if Canon has one. That's much more useful on a crop sensor body than the 50 would be. Slight distortion due to it being slightly wide but the field of view is the same as the 50 on a full frame. The glass itself will be pretty darn sharp and having access to larger aperture settings is a great thing. I almost never shoot wider than 2.8 for sharpness but having that as an option is really useful. Lots of depth of field from that.

That Sigma lens is a monster as far as bang for your buck. Quality and focal length in a reasonably priced package. I thought about getting one for my Nikon but my photography tended more towards travel and landscapes, so such a lens would be a waste for me frankly. Not really into wildlife or sports so it wasn't worth it to me.

Keep shooting!
Again, thank you for the wisdom.

Being such a newbie I feel like I'm just trying to keep my head above water. I do my best with the little knowledge I have and try to learn more each time. I've embarked on the learning curve journey many times now and I have patience and foresight to know that some things I can only learn with enough experience.

It's a Canon Rebel T3i. I'm going to keep my eye on the used market for that Sigma lens, it would be so cool to have.
 
OP
M

MadeByMiller

Well-known member
Joined
Dec 29, 2018
Messages
1,230
Location
Rapid City, SD
I made a trip into town the other day and picked up a new lens! The 50mm f1.8 Canon lens that has been mentioned a few times here recently in my thread. Best Buy had it on sale, so I took that as a sign that I needed it! I've been having fun with it, but before I post any pictures I've taken with it, here are some wannabe shots I took of it.
IMG_5016.JPG
IMG_5020.JPG
IMG_5021.JPG

Following @wreckdiver1321 's advice, I opted to crank up the ISO while shooting handheld to try to increase the sharpness of the image. Of course, that led to some noisy images that I liked otherwise, so I brought them in to Darktable for some editing.

PRE:
IMG_5018.JPG

POST:
IMG_5018copy.jpg

PRE:
IMG_5019.JPG

POST:
IMG_5019copy.jpg

Is there anything more cliche than a wannabe photographer taking pictures of a lens?? Oh well, next I'll post some with the new lens shots.
 
OP
M

MadeByMiller

Well-known member
Joined
Dec 29, 2018
Messages
1,230
Location
Rapid City, SD
Here are some with the new lens shots, as promised. They come in the form of a new 3D printing update - TPU filament! I'm working on a project that utilizes the stuff and having never printed with it, I needed to do some testing and tweaking. The before block is using significantly different settings, but is also prior to me drying the filament for about 10 hours in my PrintDry PRO filament dryer (I'm also printing out of the dryer). TPU is extremely hygroscopic and as you can tell, drying made a big impact!

The new 50mm lens is fun! Most of these shots were taken with the f-stop cranked way down to 1.8, which sure makes for some neat effects but is trickier than usual to manually dial in the focus. I'm excited to improve with the lens.
IMG_5039.JPGIMG_5031.JPG
IMG_5033.JPG
IMG_5036.JPG
IMG_5034.JPG
IMG_5035.JPG
IMG_5027.JPG
 
OP
M

MadeByMiller

Well-known member
Joined
Dec 29, 2018
Messages
1,230
Location
Rapid City, SD
And continuing the moon series, I caught the moon out nice and clear before the sunset, so out came the camera and tripod to try to capture it in a new light. It's not super crisp, but I need that 600mm Sigma lens for that...
IMG_5045cropped.jpg

Darktable to the rescue for some additional contrast/pop:
IMG_5045copy.jpg

On my Canon Rebel T3i with 250mm focal length, f/5.6, ISO 100, 1/640s shutter speed.
 
To avoid these ads, REGISTER NOW!
OP
M

MadeByMiller

Well-known member
Joined
Dec 29, 2018
Messages
1,230
Location
Rapid City, SD
I recently learned that extension tubes are a thing! After researching the best to get I hit up Ebay and found a lightly used set of Promasters (rebranded Japanese Kenkos) for a fraction of new price. I got a few cruddy snaps off before the battery died on the camera. These are going to be so much fun.

IMG_5170.JPG
IMG_5171.JPG
IMG_5175.JPG
 

jcarapet

Well-known member
Joined
May 22, 2017
Messages
276
Location
Texas
Nifty fifty for the win! When I go sub 2.0 on aperture I have to use the digital viewfinder and zoom in to dial in focus. My eyes just aren't good enough. Don't remind me that the sigma 600 is out there...

What's the line? To keep your kids off drugs get them into photography. Then they won't have any money for drugs.
 

nicholam77

Well-known member
Joined
Dec 18, 2016
Messages
2,655
Location
Minneapolis, MN
Just finished catching up on your thread and the photography efforts. Exciting stuff!

Nice pick up with the 50mm 1.8... that's a classic. Like Tom (@wreckdiver1321 ) mentioned, since you're on a crop sensor, a 35mm prime would be a great addition as well, and more closely approximate what a 50mm would give you on a full frame in terms of field of view. Also, as you probably realize from your 50mm test images, shooting wide open (f/1.8) really throws out the background. With a 35mm, it will do that slightly less at the same apertures, which lets you take advantage of the fast lens speed without quite that dramatic of background separation. No rush but if you like the 50mm maybe you'll want to add one down the line :)

I also agree with everything else Tom said about noise, aperture-priority, and flashes.

Focal length, aperture, shutter speed, etc all have their effects on the image, but I'll throw in one more huge consideration when it comes to the creative aspect of photography, which has little to do with the camera itself: Lighting.

Of course there are whole books dedicated to lighting and composition and color, but some key points you might want to familiarize yourself with if you aren't already:
  • your eye is attracted to the brightest parts of the image first
  • high-key vs. low-key lighting
  • 3 point lighting system (key light, fill light, back light)
  • color temperature of your lights
Two quick examples from the 50mm images you shared:

In this first one, the predominant light source is from the window, so the subject (the lens) is back lit. There's enough ambient light in the room that you can make out the details of the subject, but overall it's in shadow and fairly flat looking, except the hot spot on the upper right corner. In fact, I would say that hot spot is the focal point of the image that your eye is drawn to first. Because the camera is at eye level with the lens and straight on, it looks flat and doesn't have a lot of dimension to it. I'm not saying this a bad photo by any means, and sometimes this stuff can be desirable. I'm just saying what I notice when I look at it.
img_5016-jpg.1822190


The one below, to me, is much more interesting and dynamic. The light source is the same, but since you tilted the lens so it's slightly facing the window it's catching the light on the front. That becomes the bright point since the window is cropped out of this one. I feel like the most interesting part of the lens (the front and glass element) is being visually highlighted, and there is nice contrast (also look up the term Chiaroscuro!). The reflection in the glass and the purple tinge also draws your eye. Being tilted for more of a 3/4 view, the lens itself has a lot more visual depth and nooks and crannies for the light to catch, which gives it definition and makes it feel three dimensional.
img_5021-jpg.1822197


Same with this one, which is my personal favorite of what you posted:
img_5018copy-jpg.1822192


Similar thoughts for your images of the Prusa. A few of them have a key light (main light for the front of the subject) and some do not. Some are backlit only and are practically in silhouette. Again, this is all somewhat subjective, but the more you think about where the light is coming from, what it's doing to the subject and background, and what you want it to do, the more control over the resulting image you'll have.

Comparing the cubes, I like the bottom one better that has the key light because it highlights the subject and gives you more detail. The warmness of that key light compared to the background throws me off a bit, but I'm a color temperature freak. I'm guessing the background was daylight from a window and the light you had on the cube was a warmer color temperature.
img_5034-jpg.1822322

img_5035-jpg.1822323


Sometimes you can't control the light very much at all, or don't need to. Sometimes nature gives you the perfect lighting and subject and all you have to do is be there at the right time. But it's just another facet to control the "perspective" of your photos, i.e. what you want people to see and take away from them. Just like the focal plane, focal length, depth of field, and many other things. Anything you take a picture of could be done a million different ways. Another way to say that is images have "bias". As the photographer it's up to you to express the subject the way you want, and that's what makes it interesting and personal and artistic.

Hopefully that wasn't too intrusive and gives you another avenue to research and experiment with!
 
OP
M

MadeByMiller

Well-known member
Joined
Dec 29, 2018
Messages
1,230
Location
Rapid City, SD
This is new favorite thread.

- Manageble Space
- Primative Shop
- Garage Sale/ Auction Finds

Just awesome.
Thank you very much! I realize that there isn't much shop content in here anymore, that will hopefully change this spring though - so stick around!

Nifty fifty for the win! When I go sub 2.0 on aperture I have to use the digital viewfinder and zoom in to dial in focus. My eyes just aren't good enough. Don't remind me that the sigma 600 is out there...

What's the line? To keep your kids off drugs get them into photography. Then they won't have any money for drugs.
I use the LCD screen 100% of the time. I wear glasses so can't really put my eye on the eyepiece. That's not so good when taking pictures outside during the day though. I might design and 3D print a shade to put on top of the screen so I can see better.

I don't need the Sigma... There was an older 50-500 Sigma for sale locally that was slightly tempting, but it wasn't pennies on the dollar price wise and go big or go home with the 600mm range, right?

Just what I needed was an expensive hobby to fall into place with my other expensive interests.

I need to pick up an extension tube set, still haven't done that. Cool effects!
You definitely do! In my research, the only thing to look for is how well they actually fit the camera. A lot of reviews for the super cheap Chinese tubes say they either fit super loose and fall off (taking your lens with them) or they are too tight and get stuck. These Promaster/Kenko/Tamron are actually quite nice in quality. They also have electrical connections if you're using a lens with electronics.
 

slodat

ALLIANCE MEMBER
Joined
Feb 6, 2010
Messages
3,679
Location
Central-ish, WA
Just finished catching up on your thread and the photography efforts. Exciting stuff!

Nice pick up with the 50mm 1.8... that's a classic. Like Tom (@wreckdiver1321 ) mentioned, since you're on a crop sensor, a 35mm prime would be a great addition as well, and more closely approximate what a 50mm would give you on a full frame in terms of field of view. Also, as you probably realize from your 50mm test images, shooting wide open (f/1.8) really throws out the background. With a 35mm, it will do that slightly less at the same apertures, which lets you take advantage of the fast lens speed without quite that dramatic of background separation. No rush but if you like the 50mm maybe you'll want to add one down the line :)

I also agree with everything else Tom said about noise, aperture-priority, and flashes.

Focal length, aperture, shutter speed, etc all have their effects on the image, but I'll throw in one more huge consideration when it comes to the creative aspect of photography, which has little to do with the camera itself: Lighting.

Of course there are whole books dedicated to lighting and composition and color, but some key points you might want to familiarize yourself with if you aren't already:
  • your eye is attracted to the brightest parts of the image first
  • high-key vs. low-key lighting
  • 3 point lighting system (key light, fill light, back light)
  • color temperature of your lights
Two quick examples from the 50mm images you shared:

In this first one, the predominant light source is from the window, so the subject (the lens) is back lit. There's enough ambient light in the room that you can make out the details of the subject, but overall it's in shadow and fairly flat looking, except the hot spot on the upper right corner. In fact, I would say that hot spot is the focal point of the image that your eye is drawn to first. Because the camera is at eye level with the lens and straight on, it looks flat and doesn't have a lot of dimension to it. I'm not saying this a bad photo by any means, and sometimes this stuff can be desirable. I'm just saying what I notice when I look at it.
img_5016-jpg.1822190


The one below, to me, is much more interesting and dynamic. The light source is the same, but since you tilted the lens so it's slightly facing the window it's catching the light on the front. That becomes the bright point since the window is cropped out of this one. I feel like the most interesting part of the lens (the front and glass element) is being visually highlighted, and there is nice contrast (also look up the term Chiaroscuro!). The reflection in the glass and the purple tinge also draws your eye. Being tilted for more of a 3/4 view, the lens itself has a lot more visual depth and nooks and crannies for the light to catch, which gives it definition and makes it feel three dimensional.
img_5021-jpg.1822197


Same with this one, which is my personal favorite of what you posted:
img_5018copy-jpg.1822192


Similar thoughts for your images of the Prusa. A few of them have a key light (main light for the front of the subject) and some do not. Some are backlit only and are practically in silhouette. Again, this is all somewhat subjective, but the more you think about where the light is coming from, what it's doing to the subject and background, and what you want it to do, the more control over the resulting image you'll have.

Comparing the cubes, I like the bottom one better that has the key light because it highlights the subject and gives you more detail. The warmness of that key light compared to the background throws me off a bit, but I'm a color temperature freak. I'm guessing the background was daylight from a window and the light you had on the cube was a warmer color temperature.
img_5034-jpg.1822322

img_5035-jpg.1822323


Sometimes you can't control the light very much at all, or don't need to. Sometimes nature gives you the perfect lighting and subject and all you have to do is be there at the right time. But it's just another facet to control the "perspective" of your photos, i.e. what you want people to see and take away from them. Just like the focal plane, focal length, depth of field, and many other things. Anything you take a picture of could be done a million different ways. Another way to say that is images have "bias". As the photographer it's up to you to express the subject the way you want, and that's what makes it interesting and personal and artistic.

Hopefully that wasn't too intrusive and gives you another avenue to research and experiment with!
This is an excellent analysis. Thank you for sharing it!!
 
OP
M

MadeByMiller

Well-known member
Joined
Dec 29, 2018
Messages
1,230
Location
Rapid City, SD
Just finished catching up on your thread and the photography efforts. Exciting stuff!

Nice pick up with the 50mm 1.8... that's a classic. Like Tom (@wreckdiver1321 ) mentioned, since you're on a crop sensor, a 35mm prime would be a great addition as well, and more closely approximate what a 50mm would give you on a full frame in terms of field of view. Also, as you probably realize from your 50mm test images, shooting wide open (f/1.8) really throws out the background. With a 35mm, it will do that slightly less at the same apertures, which lets you take advantage of the fast lens speed without quite that dramatic of background separation. No rush but if you like the 50mm maybe you'll want to add one down the line :)

I also agree with everything else Tom said about noise, aperture-priority, and flashes.

Focal length, aperture, shutter speed, etc all have their effects on the image, but I'll throw in one more huge consideration when it comes to the creative aspect of photography, which has little to do with the camera itself: Lighting.

Of course there are whole books dedicated to lighting and composition and color, but some key points you might want to familiarize yourself with if you aren't already:
  • your eye is attracted to the brightest parts of the image first
  • high-key vs. low-key lighting
  • 3 point lighting system (key light, fill light, back light)
  • color temperature of your lights
Two quick examples from the 50mm images you shared:

In this first one, the predominant light source is from the window, so the subject (the lens) is back lit. There's enough ambient light in the room that you can make out the details of the subject, but overall it's in shadow and fairly flat looking, except the hot spot on the upper right corner. In fact, I would say that hot spot is the focal point of the image that your eye is drawn to first. Because the camera is at eye level with the lens and straight on, it looks flat and doesn't have a lot of dimension to it. I'm not saying this a bad photo by any means, and sometimes this stuff can be desirable. I'm just saying what I notice when I look at it.
img_5016-jpg.1822190


The one below, to me, is much more interesting and dynamic. The light source is the same, but since you tilted the lens so it's slightly facing the window it's catching the light on the front. That becomes the bright point since the window is cropped out of this one. I feel like the most interesting part of the lens (the front and glass element) is being visually highlighted, and there is nice contrast (also look up the term Chiaroscuro!). The reflection in the glass and the purple tinge also draws your eye. Being tilted for more of a 3/4 view, the lens itself has a lot more visual depth and nooks and crannies for the light to catch, which gives it definition and makes it feel three dimensional.
img_5021-jpg.1822197


Same with this one, which is my personal favorite of what you posted:
img_5018copy-jpg.1822192


Similar thoughts for your images of the Prusa. A few of them have a key light (main light for the front of the subject) and some do not. Some are backlit only and are practically in silhouette. Again, this is all somewhat subjective, but the more you think about where the light is coming from, what it's doing to the subject and background, and what you want it to do, the more control over the resulting image you'll have.

Comparing the cubes, I like the bottom one better that has the key light because it highlights the subject and gives you more detail. The warmness of that key light compared to the background throws me off a bit, but I'm a color temperature freak. I'm guessing the background was daylight from a window and the light you had on the cube was a warmer color temperature.
img_5034-jpg.1822322

img_5035-jpg.1822323


Sometimes you can't control the light very much at all, or don't need to. Sometimes nature gives you the perfect lighting and subject and all you have to do is be there at the right time. But it's just another facet to control the "perspective" of your photos, i.e. what you want people to see and take away from them. Just like the focal plane, focal length, depth of field, and many other things. Anything you take a picture of could be done a million different ways. Another way to say that is images have "bias". As the photographer it's up to you to express the subject the way you want, and that's what makes it interesting and personal and artistic.

Hopefully that wasn't too intrusive and gives you another avenue to research and experiment with!
Thank you very much Nick for taking the time to put together this information rich post!

First of all, I'm going to pretend that you guys are not telling me that I need to spend hundreds of dollars on another lens that isn't the 600mm Sigma. I do have my 18-55mm kit lens, although the aperture doesn't get nearly as large as that prime lens would.

Lighting sure is tough, and I am quite ignorant on lighting theory. I do recognize the 3 point lighting system as you describe, it's the basis for most of the lighting I try to setup in my Blender renderings. Having said that, I've never actually applied that system (on purpose anyway) in my wannabe photography for some reason. My lighting setups are the result of taking dozens of pictures and experimenting with my desk lamp and occasionally the flashlight on my phone in conjunction with the light coming in the window and the overhead light in my office. I certainly do need to start paying closer attention to it though especially since those conditions are under my control while shooting inside, I should maximize that potential.

Your reviews of the images I posted are very helpful, thank you! I'm not under any illusions that any of my photos are good, but I do see some progression since I began in this new hobby and the feedback you're providing here will go a long way towards my improvement.
 

nicholam77

Well-known member
Joined
Dec 18, 2016
Messages
2,655
Location
Minneapolis, MN
Thank you very much Nick for taking the time to put together this information rich post!

No problem!

Lighting sure is tough, and I am quite ignorant on lighting theory. I do recognize the 3 point lighting system as you describe, it's the basis for most of the lighting I try to setup in my Blender renderings. Having said that, I've never actually applied that system (on purpose anyway) in my wannabe photography for some reason.

I think your comparison to Blender renderings is an apt one. When you make a still frame render, I'm sure you have a whole lighting rig and consider the angle of the model etc. So you probably have more knowledge / instincts than you think. Also... considering the lighting doesn't necessarily mean you need to set up a bunch of lights. It could just mean thinking about where the sun is relative to your subject and even the time of day and weather.

My lighting setups are the result of taking dozens of pictures and experimenting with my desk lamp and occasionally the flashlight on my phone in conjunction with the light coming in the window and the overhead light in my office.

If you're using artificial light sources it's best to match color temperatures unless it's for creative effect. This can be tricky when mixing artificial and natural light. Depends on the time of day a bit, but natural sunlight is generally very cool (blue) compared to most artificial light sources. Even just getting a high quality daylight-balanced bulb for your lamp(s) would be a good idea. It can be handy to diffuse the light, too — you could grab a cheap soft box on Amazon etc. My personal preference is always natural light when possible, but if you're shooting indoors in more of a "studio" setup, some decent (does not need to be expensive) lights will help.

I'm not under any illusions that any of my photos are good, but I do see some progression since I began in this new hobby and the feedback you're providing here will go a long way towards my improvement.

Absolutely! I'm just a (former) hobbyist, too, but in my humble opinion you've captured some great images so far. Keep at it!
 
OP
M

MadeByMiller

Well-known member
Joined
Dec 29, 2018
Messages
1,230
Location
Rapid City, SD
Vigilant FB Marketplace watching paid off for us once again. Yesterday my scrolling was interrupted by a gem of a listing in the sea of usual pre-owned consumer garbage by this sharp looking table (the Herman Miller tag in the listing title was hard to ignore as well). I showed it to my wife and we decided it would be a great table to compliment our Chromcraft chairs that I recently cleaned up. A deal was made with the seller for a great price and I set off in the Dakota to retrieve our new dining table.

Upon initial inspection, I was glad to see that it was in quite good condition despite being it being reportedly from the late '70s. The seller informed me that the table was originally purchased by her father-in-law, who was an architect by trade. It was later revealed that he had a role in designing many notable buildings here in the Black Hills and beyond - how neat! Despite being in good overall condition, the polished cast aluminum legs were quite tarnished and appeared to have had some sort of corrosive chemical splashed on them at some point. I was able to bring back a decent luster without rubbing my fingers raw.
IMG_20230216_172651631_HDR.jpg
IMG_20230216_181307869.jpg
IMG_20230216_172711864_HDR.jpg
IMG_20230216_181146238_HDR.jpg

The claim of a late seventies origin was verified by the July 17, 1979 date stamp on the underside:
IMG_5266 crop.jpg

After moving the old table out, the Eames designed Conference table turned dining table made it's way into our home.
IMG_5237.JPG
IMG_5244.JPG
IMG_5249.JPG
IMG_5256.JPG

I think you'll agree that it's quite the match for the old Chromcrafts. It fits our space better than anticipated, with room to add two more chairs comfortably. The build quality of this table is really a marvel and with the construction materials, hardware, and good design it feels much more solid and sturdy than any consumer grade dining table. Though simple, it has a striking mid century appeal that is a match for the aesthetic we're trying to cultivate in our home. Hopefully some day we will have an example of the iconic Eames chair to match our Eames table!
 
OP
M

MadeByMiller

Well-known member
Joined
Dec 29, 2018
Messages
1,230
Location
Rapid City, SD
Yesterday was my youngest's first birthday! My wife made a cake and cupcakes and while I had the camera out, I had some fun. I grabbed a few shots with the nifty fifty of the colorful confections before affixing the extension tubes to get some super close up sprinkle snaps. Nothing amazing here, just getting some reps in on the shutter finger!
IMG_5289.JPG
IMG_5286.JPG
IMG_5277.JPG
IMG_5281.JPG
 
Last edited:
OP
M

MadeByMiller

Well-known member
Joined
Dec 29, 2018
Messages
1,230
Location
Rapid City, SD
Awesome pick up! Looks great as a dining table and appears to be in excellent shape after your tune up!
Yes, and a pennies on the dollar deal too in my opinion at only $200!

Picking MCM was kind of a side hustle for me in the 90’s. As much as I would have liked to, I couldn’t keep everything
I'm no good at selling, wired more as a collector I suppose! I bet you handled some amazing items.
 
OP
M

MadeByMiller

Well-known member
Joined
Dec 29, 2018
Messages
1,230
Location
Rapid City, SD
Here's a personal project that I knocked out over the weekend.

When I was young my grandfather had a hobby carving rolling pins. When we would go to visit I would study his carvings from the spot they were displayed near the fireplace. I remember being impressed and inspired by the detail and beauty in his work, and that I had no idea of my grandpa's artistic skill prior to seeing them. He carved these rolling pins in many different themes, from wildlife to Presidential portraits. The local newspaper even ran a piece showcasing his artwork.

Fast-forwarding many years, my grandfather surprised my wife and I with one of his rolling pins to display in our home. We hung it in our living room from the hook he'd wired onto the handle and there it stayed, until last week when I got the idea that it needed a wall mount for proper display.

Into Fusion 360 I went without much more than a cloudy vision of where I was headed with the design. These are some of my favorite design projects - a simple, 3D printed part with plenty of opportunity for creativity. The design slowly became more in focus as I filled in details and chased ideas. Once I was satisfied, I fired up the printer and set it up for a 15 hour print of the 3 individual printed components that make up the construction.

There aren't many things more satisfying than a project coming together just as envisioned, and fortunately this was one of those projects. Now my grandfather's artwork that I admired as a boy has a prominent display in our home, just above the fireplace of course.

Rolling Pin Hanger 001.png
IMG_5319_01.jpg
2_01.jpg
IMG_5334_01.jpg
4_01.jpg
IMG_5340_01.jpg
IMG_5342.JPG
IMG_5343.JPG
IMG_5346censored.jpg
IMG_5330censored.jpg
 
To avoid these ads, REGISTER NOW!
Top Bottom