To avoid these ads, REGISTER NOW!

MaxJax Install - Concrete too thin!

Denwood

Well-known member
Joined
Sep 22, 2014
Messages
4,180
Location
Thunder Bay, Ontario, Canada
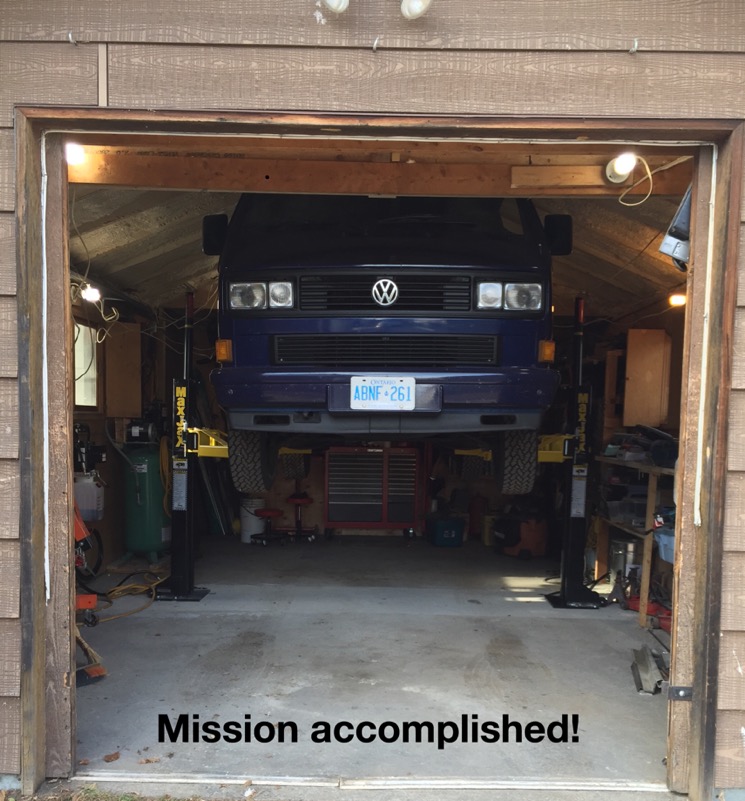
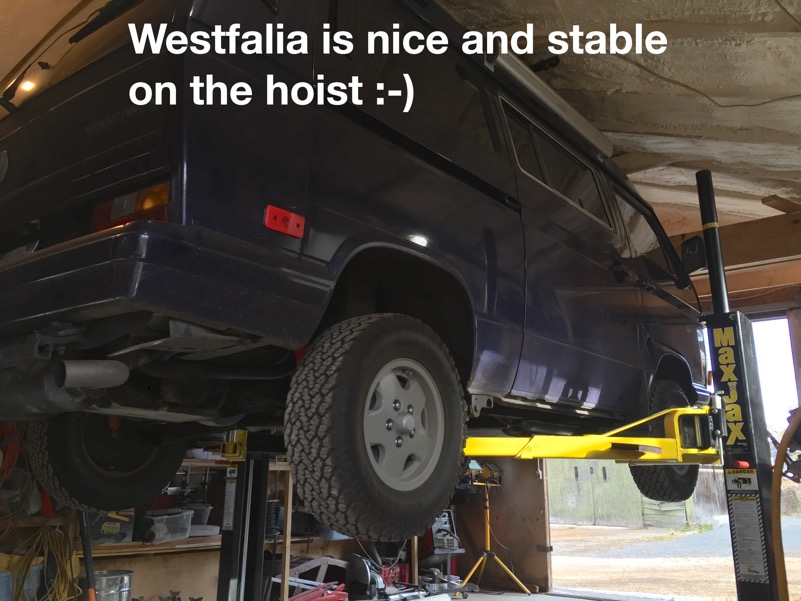
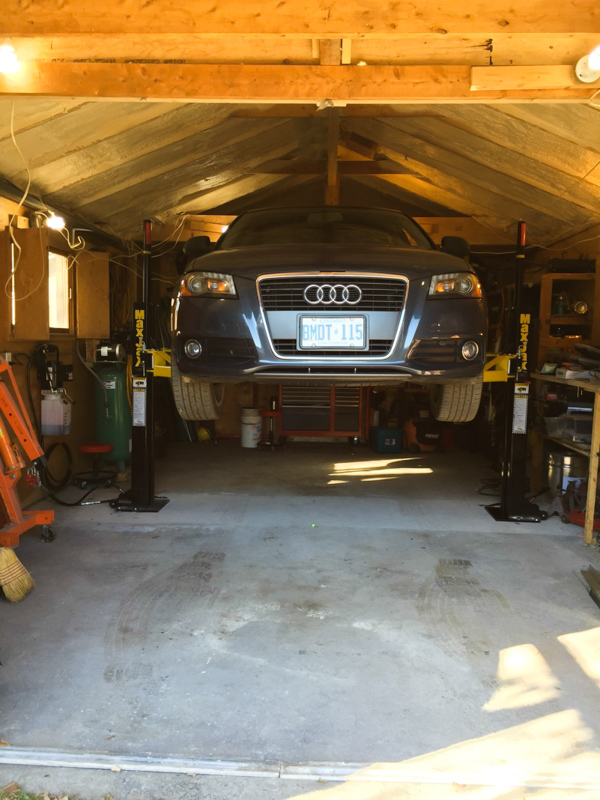
I've been working on a garage reno, which includes a MaxJax lift. This lift will see an Audi A3, 1990 VW Westfalia van, and Honda CRV. When drilling anchor holes for epoxy inserts to bolt the lift down, it was evident the slab was way too thin.

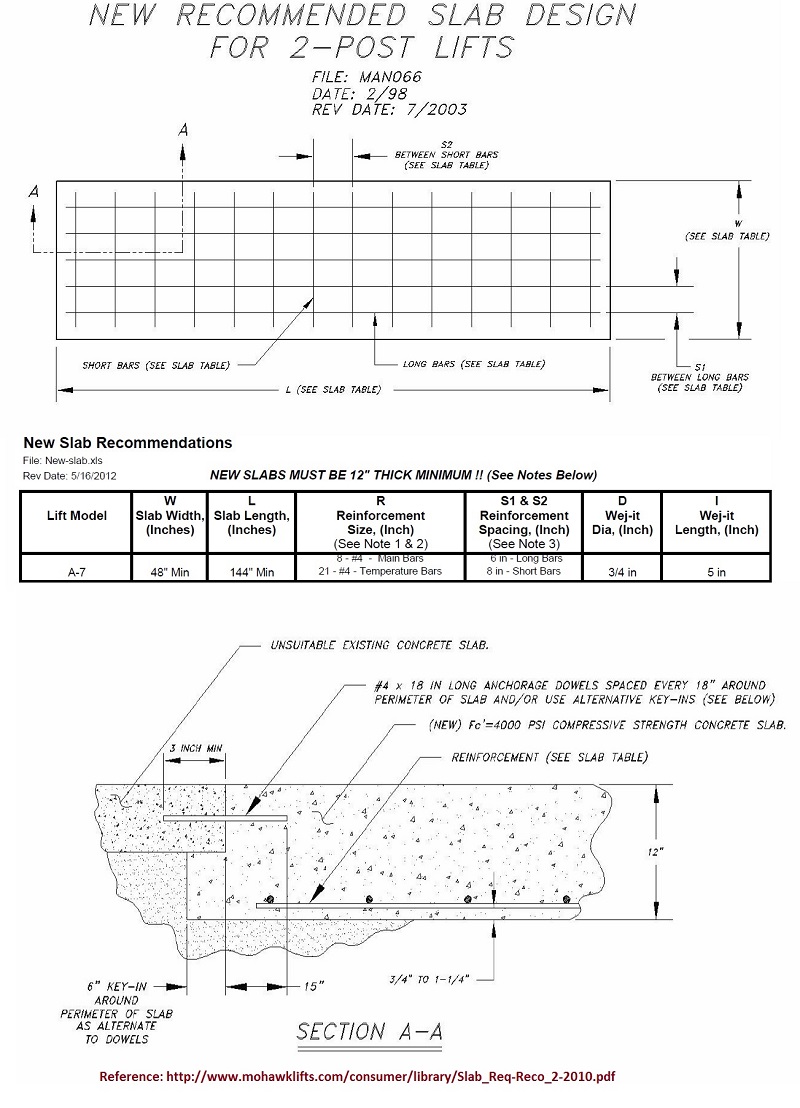
Doing some research, I found a spec for a retrofit slab based on Mohawks A7, 7000lb asymmetric lift.

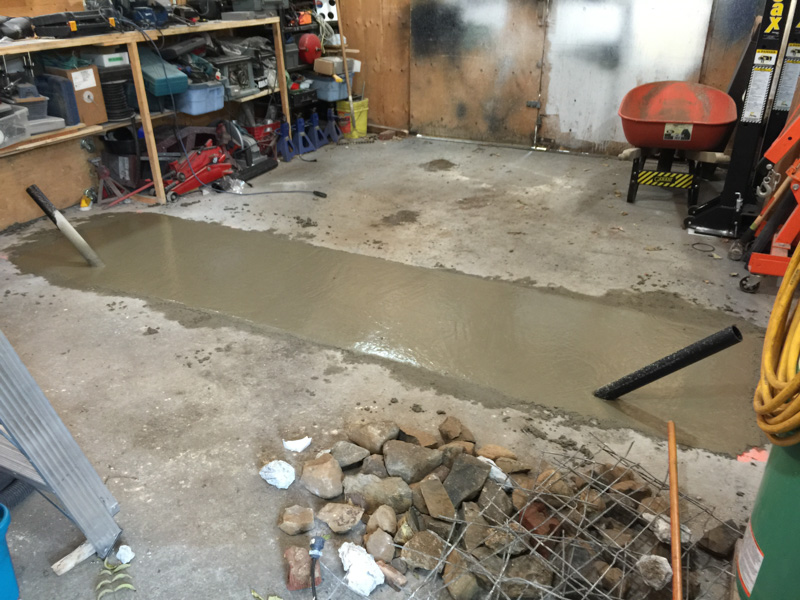
I'll take this down a notch, so will be pouring a reinforced 3' x 14' slab, 14" thick with a 6" key under the existing slab as pictured (so no need for epoxying anchor dowels every 18".)

Reference pdf document from Mohawk:

http://www.mohawklifts.com/library/manuals/Slab_Require_Recommend_11_07.pdf

mohawk_slab.jpg


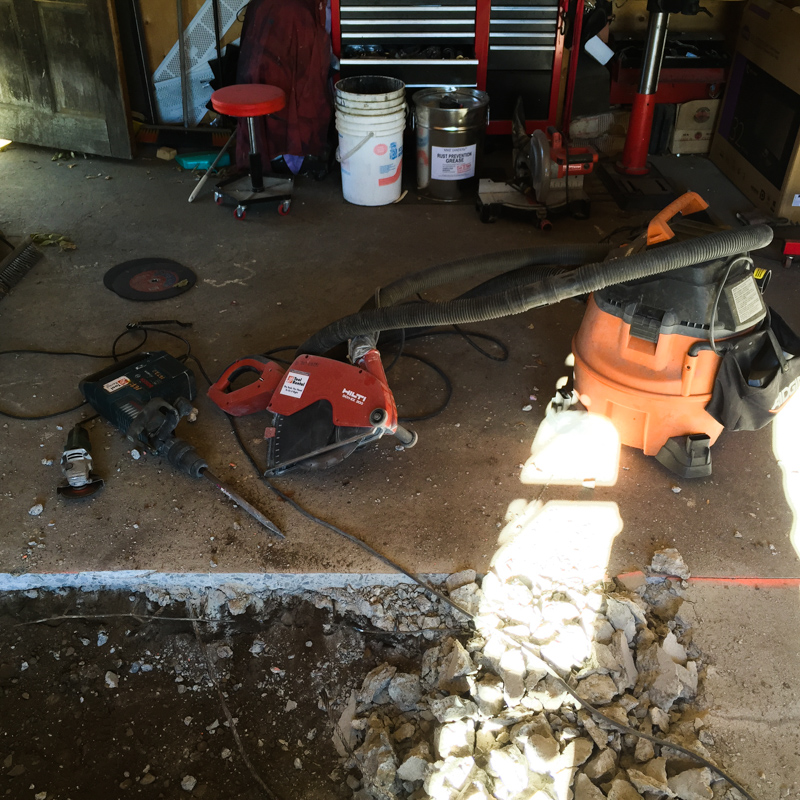
I rented a Hilte diamond saw and Bosch demolition hammer from Home Depot. I'd consider these essential to doing this job...still a three to four hour task with the right tools. Here's a few notes/pics for reference.

A dust mask and ear protection are necessary:
pit2.jpg


My shop vac (make sure you use a filter bag inside the vac!) duct taped to the Hilte dust port made for near zero dust. The concrete dust would likely damage the vac motor, hence the optional bag installed..this is normally used for drywall dust. The diamond saw will not cut rebar very well, so I set the depth to a few inches only for my cuts. I used my 4" angle grinder to cut mesh reinforcing as I progressed along with the hammer.
pit1.jpg


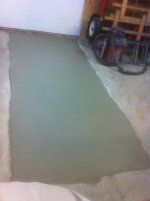
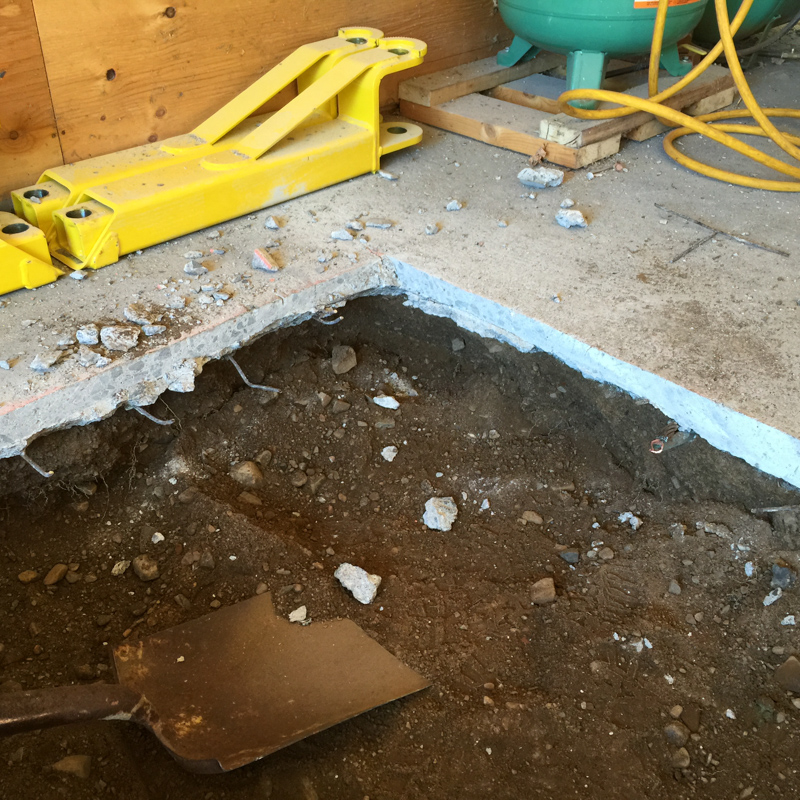
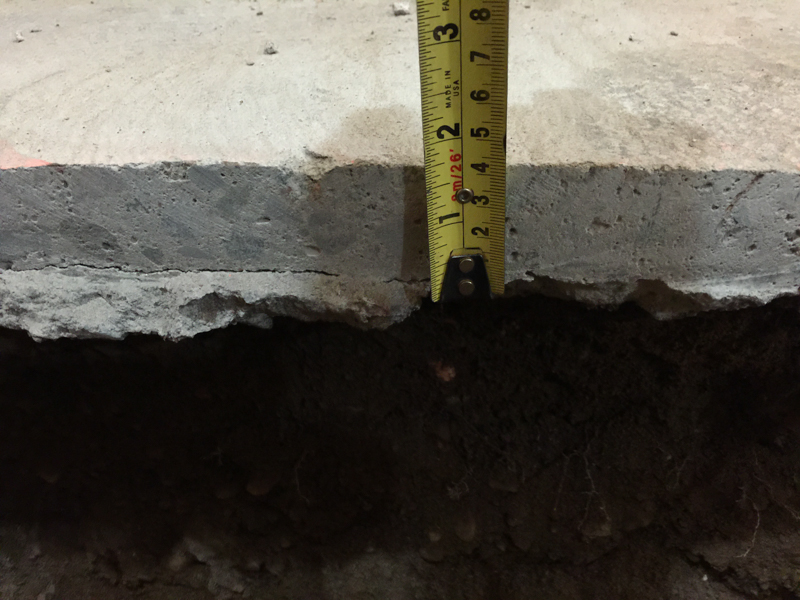
The concrete at one end is very thin!

pit3.jpg


pit4.jpg


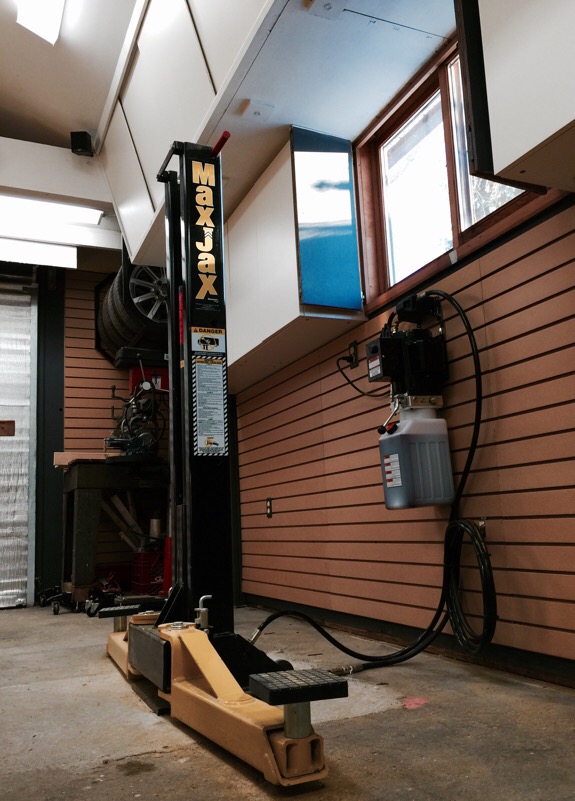
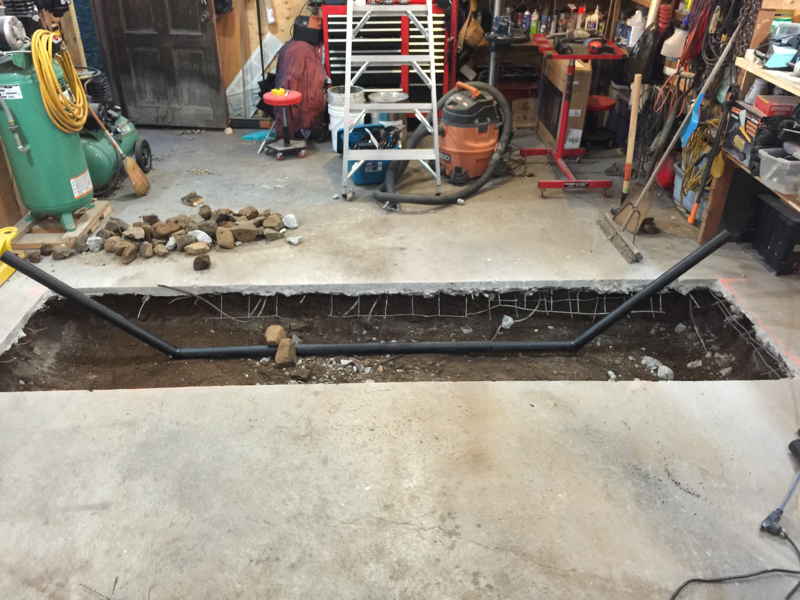
Ready to to go, with ABS pipe in position. I'll use the ABS "conduit" to pass the hydraulic line from the left side under the slab. The hydraulic pump/reservoir unit will be mounted on the right column to keep lines out of the way.

pit5.jpg
 
Last edited:
To avoid these ads, REGISTER NOW!

BobRae

Well-known member
Joined
Oct 2, 2014
Messages
96
I'm far from an expert but it seems to me that tying into a 1-1/2" surrounding slab as you are doing could be dangerous given the size of the section you have cut out. Are you concerned that torsional forces from an improperly balanced vehicle might not cause the whole thing to twist and tear the concrete away from the tie in point? I think I would have cut out a much larger section of concrete so that the new pad, although tied into the surrounding 1-1/2" floor, would be able to counteract and tilting forces on its own by the nature of the size of the section the lift was bolted to.

Just a layman' observation. I'd hate to be under an SUV that was nose heavy on lift only to have the concrete pad the lift is bolted to tear away from the rear floor section it is tied into.

Have you checked with Maxjax given that your existing pad is so thin? Maybe I'm wrong and with a 12" thick pad they figure the weight of the new pad will counteract any vehicle weight forces and the lift doesn't rely on the surrounding structure?
 
Last edited:

gregtwojeeps

Well-known member
Joined
Jul 30, 2013
Messages
5,096
Location
Ky
Your drawing for the correct installation looks spot on and you are doing well in my opinion. Seeing how the original contractor installed the thin slab wreaks of a unqualified concrete contractor to me though..

Knowing this, I would have at least plate compacted the bottom of your new hole to be sure the soil had reached bottom. If your new pier wants to settle down in the uncompacted soil, the existing thin slab will not stop it from doing so I would not think. good luck jmo though
 

zporta

Well-known member
Joined
Feb 9, 2012
Messages
269
wow that is a thin garage slab. Its going to be very tough doweling into that existing slab without it breaking while drilling
 

BobRae

Well-known member
Joined
Oct 2, 2014
Messages
96
wow that is a thin garage slab. Its going to be very tough doweling into that existing slab without it breaking while drilling

I don't think the OP can dowel into that slab. the drawing shows an alternate of "keying" the new poured pad under the existing. As I posted above, my concern would be the "keying" means the new pad is relying on some structure assistance from the existing pad. I wonder if it sufficient given the 1-1/2" pad (existing")
 

CNGsaves

Well-known member
Joined
Sep 26, 2012
Messages
13,233
Location
KS and OK
OP, you sure are transforming that small shop into nice space with taller ceiling and the MaxJax.

Might be worth your time to research risk of leaving that thin concrete next to lift. NOW (while floor is all tore up) would be time to dig out some dirt under thin part (if necessary) and MudJack in more concrete to firm everything up. Worth a few phonecalls if nothing else for your peace of mind.

Curious in rough terms what you'll have invested in garage refurbishing to handle your lift (ie lam beams in your other thread, plus concrete work for MaxJax)??
 
OP
D

Denwood

Well-known member
Joined
Sep 22, 2014
Messages
4,180
Location
Thunder Bay, Ontario, Canada
Greg, that's good advice. See my comments below...soil estimate (undisturbed is 1500lbs/square foot. I also fixed up a mistake in my first post..the slab will be 14", not 12".

Zp, the spec allows a 6" key in, instead of dowelling. So no dowels will be required in this case, just a six inch key in, under the existing slab.

Bob, I used the A7 lift retrofit spec. for a few reasons:

1. It is a 72" lift vs the MaxJax at 48". The lever forces would likely be up to 50% more than the MaxJax.
2. The A7 is asymmetric, with max load 7000lbs, so would need to withstand much more forward loading than the Maxjax.

I spent some time last weekend with a family friend, also a quality assurance (civil) engineer. Bob has over 40 yrs experience, currently doing QA on most of the bridge restructures here in Northern Ontario. I ran a few numbers past him.

The slab I'm about to pour (144"x48"x14") requires 1.9 cubic yards of concrete, with a weight of ~6960 lbs. I've cut a 36" wide slot, but the slab will actually be 48" wide with the key-in. The soil underneath is undisturbed, and consists of fist sized boulders and compact earth...it's a beast to dig up. Bob is telling me 1500lbs/square foot would be a typical number to calculate support for this soil type. With a slab, just sitting there (no key in to existing), it would require upwards of 3480 lbs (half the slab weight) to tilt the slab. With the MaxJax columns in the middle of the slab, (assuming a simple lever) it would require an imbalance of 994lbs, 7ft away, to tilt the slab. In other words, if I balanced a car on the hoist, then hung 1000lbs from on one bumper, I'd just tip my slab...assuming zero key under existing. Given the 6" key in, and 4x4 mesh reinforcing at the edges that I'll be tying into, I'd have to estimate several thousand pounds to break out the reinforced edge, maybe more. I'd be pretty confident saying that it would take over 2000lbs, 7ft away to tilt the slab with key in.

It took me 3-4 hours to break up the slab, so thin as it is, it's very strong. A 4x4 mesh was installed in the existing, and I've left it at the edges to tie into. I measured at the thinnest point, so average is closer to 3".

Feel free to check my math...just did some simple calcs :)

CNG, the beams and supplies were approximately, $800 all in, spray foam $1600, hoist $2000, tool rental for 1.5 days, $220, drywall for ceiling another $700, and insulated roll up door will be approx $2000 with remote opener. I'll be doing something akin to Jack's 12-gauge garage to maximize every square inch. Lots of ideas here!
 
Last edited:

RecceDG

Member
Joined
Aug 8, 2014
Messages
16
This is similar to what I did in the same circumstance, with the following differences:

1. My hole was 4' x 12'

2. I went with 9.5" - 10" thick on the slab

3. I pounded the rebar 6"-8" under the old slab in all directions

4. My key section was an inch or 2

I've had 3800lbs of car up on the lift with zero issues. That slab ain't moving.
 
OP
D

Denwood

Well-known member
Joined
Sep 22, 2014
Messages
4,180
Location
Thunder Bay, Ontario, Canada
Thanks Recce. I just got off the phone with Danmar. They confirmed that my slab (and yours!) is more than enough. They suggested that a 3'x3' footing, 12" deep with reinforcing would do, although a continuous slab between the two posts is preferable.
I also wanted to check that the conduit under the slab was ok..no problems there either.
Now to get some rebar...
 
OP
D

Denwood

Well-known member
Joined
Sep 22, 2014
Messages
4,180
Location
Thunder Bay, Ontario, Canada
Well, another $120 for rebar (cut to spec) and we're ready for 2 yards of 4000 psi concrete tomorrow morning. The rebar guys suggesting doing with a 12"x12" grid using larger rebar than spec'd (5/8"), 2" off the bottom, and doing a second layer of 1/2" rebar a few inches off the surface to stop cracking. The top layer of rebar is set up to avoid any contact when dropping the epoxy anchors in later.

The second layer of 1/2" rebar (closer to the top) is wire tied into the existing slab mesh, essentially hanging from it. For reference, 2 yards of 4000 psi will come to $360 CAD, delivered. There's a minimum charge for smaller quantities and 13% HST tax included in that price.

rebar2.jpg


The cement brick you see under the 5/8" rebar is there to make sure it stands off the ground 2 1/2 inches. The yellow tape around the ABS joints is just there as extra insurance against leaks as I did not wet test after bonding them with ABS cement. The pipe is 3", so plenty large enough to pass the hydraulic hose through.

rebar1.jpg
 
Last edited:

xyster101

Well-known member
Joined
Jul 3, 2013
Messages
640
Location
Upstate NY
That is a lot of work for a lift. Going to be sweet when it is all done. Any shots of the whole garage? From those shots it looks like a 1 car.
 
OP
D

Denwood

Well-known member
Joined
Sep 22, 2014
Messages
4,180
Location
Thunder Bay, Ontario, Canada
X, in my sig is the build thread. The shop is a detached, heated 16x24, with a 10 ft ceiling thanks to a few LVL beams. I'm redoing the shop so that every possible square inch is utilized. The 12 gauge garage thread has been quite an inspiration. So far about 10-12 hours of work has been soley getting my rid of junk, leftover construction materials etc. All of the woodworking equipment is sitting in a separate 24x24 shop at my business..freeing up a lot of space at this shop. We also have 2 x 40ft containers at the business which will be the new home for any construction materials.
 
Last edited:

38Chevy454

Well-known member
Joined
Dec 26, 2006
Messages
4,036
Location
Cincinnati, OH
Nice work, amazing how thin the orig slab was! Your new slab seems to be more than adequate. I like the hydraulic hose pass-through.
 

BobRae

Well-known member
Joined
Oct 2, 2014
Messages
96
Greg, that's good advice. See my comments below...soil estimate (undisturbed is 1500lbs/square foot. I also fixed up a mistake in my first post..the slab will be 14", not 12".

Zp, the spec allows a 6" key in, instead of dowelling. So no dowels will be required in this case, just a six inch key in, under the existing slab.

Bob, I used the A7 lift retrofit spec. for a few reasons:

1. It is a 72" lift vs the MaxJax at 48". The lever forces would likely be up to 50% more than the MaxJax.
2. The A7 is asymmetric, with max load 7000lbs, so would need to withstand much more forward loading than the Maxjax.

I spent some time last weekend with a family friend, also a quality assurance (civil) engineer. Bob has over 40 yrs experience, currently doing QA on most of the bridge restructures here in Northern Ontario. I ran a few numbers past him.

The slab I'm about to pour (144"x48"x14") requires 1.9 cubic yards of concrete, with a weight of ~6960 lbs. I've cut a 36" wide slot, but the slab will actually be 48" wide with the key-in. The soil underneath is undisturbed, and consists of fist sized boulders and compact earth...it's a beast to dig up. Bob is telling me 1500lbs/square foot would be a typical number to calculate support for this soil type. With a slab, just sitting there (no key in to existing), it would require upwards of 3480 lbs (half the slab weight) to tilt the slab. With the MaxJax columns in the middle of the slab, (assuming a simple lever) it would require an imbalance of 994lbs, 7ft away, to tilt the slab. In other words, if I balanced a car on the hoist, then hung 1000lbs from on one bumper, I'd just tip my slab...assuming zero key under existing. Given the 6" key in, and 4x4 mesh reinforcing at the edges that I'll be tying into, I'd have to estimate several thousand pounds to break out the reinforced edge, maybe more. I'd be pretty confident saying that it would take over 2000lbs, 7ft away to tilt the slab with key in.

It took me 3-4 hours to break up the slab, so thin as it is, it's very strong. A 4x4 mesh was installed in the existing, and I've left it at the edges to tie into. I measured at the thinnest point, so average is closer to 3".

Feel free to check my math...just did some simple calcs :)

CNG, the beams and supplies were approximately, $800 all in, spray foam $1600, hoist $2000, tool rental for 1.5 days, $220, drywall for ceiling another $700, and insulated roll up door will be approx $2000 with remote opener. I'll be doing something akin to Jack's 12-gauge garage to maximize every square inch. Lots of ideas here!

I'm glad that you involved an engineer. Too many home projects like this end up in disaster after someone who doesn't have the qualifications makes some mistakes, thinking they know what to do. Kudos for you for recognizing the risk of that and getting the numbers worked out by a pro. :) I hope you'll post more pictures as you progress.
 

PWC Repair

Well-known member
Joined
Dec 27, 2012
Messages
3,165
Location
Arkansas
Looks like you're doing a fine job on this project. I also love how the original reinforcement is laying on the bottom of the old concrete doing basically nothing.
 

BobRae

Well-known member
Joined
Oct 2, 2014
Messages
96
What is a HST tax? Nice job. May as well do it right!

It is the combination of the provincial sales tax (equivalent to a US "State Tax") and a Goods and Services Tax (GST) which is called a VAT ("Value Added Tax")in the EU. The first tax goes to the provincial coffers while the second goes to our federal government. The combined tax in some provinces is call the HST (Harmonized Sales Tax).

We seem to get taxed to death in Canada.
 
OP
D

Denwood

Well-known member
Joined
Sep 22, 2014
Messages
4,180
Location
Thunder Bay, Ontario, Canada
38Chev, just need a longer hydraulic hose and that pass thru should be great :)

PWZ, yes the mesh on the old slab was definitely not supported correctly..but was still a pain to break it up. I feel sorry for anyone who might need to break up the new 14" slab!

Bob, like the roof restructure, I feel a lot better with some numbers behind the work. At the end of the day, my life itself is not so important, but the impact of my injury or death on my family is something I'm not willing to gamble with. One of the reasons for the hoist in the first place is my unease working under jack stands. They tilt over far too easy for my liking. I'm still ordering up some low hoist stands, so between them and the hoist itself, the setup should be very safe.

Concrete went well today. I've never finished concrete before, but basically a 4 ft aluminum 1"x4" channel was used as the "skree" and a 4"x14" steel trowel for the finish. I also rented a concrete agitator from Home Depot for a few hours which was awesome. The concrete flowed like syrup wherever agitated, so I've got 100% confidence that there are no voids under the lower layer of rebar, or the 6" key in. Highly recommended rental!

In the month during cure, I'll be doing a pretty massive clean up, paint, ceiling drywall over the spray foam, 5 channel audio system (gotta have tunes), keyclamp shelving/bench system, roll up door with operator...and more.

newslab2.jpg


newslab1.jpg
 
Last edited:
OP
D

Denwood

Well-known member
Joined
Sep 22, 2014
Messages
4,180
Location
Thunder Bay, Ontario, Canada
24 hours later, attempting to keep the concrete at 50F (10C) or so to achieve max strength after 28 days. Based on a few Google searches it looks like concrete will reach comparatively higher strength after 28 days when it as cured at 50F. Just after watering down the concrete we see the exothermic nature of the cure..

slabtemp1.jpg


slabtemp2.jpg
 
Last edited:
To avoid these ads, REGISTER NOW!
OP
D

Denwood

Well-known member
Joined
Sep 22, 2014
Messages
4,180
Location
Thunder Bay, Ontario, Canada
Agree 100%. I have several on order..found the link in GJ actually as medium lift jack stands are very hard to find. The gregsmith ones are the only stands I've seen so far that would work. Very handy to have as well if you're lifting the vehicle off a part supported by the stands. These go from 30" to 53"

http://www.gregsmithequipment.com/2-Ton-Tripod-Stand-SHORT
 
Last edited:

MoonRise

Well-known member
Joined
Nov 5, 2010
Messages
4,025
Location
NJ
Keep the concrete 'moist' during the cure time, especially against the existing slab (Hah! 1-1/2" is not really a 'slab' IMNSHO).

The concrete needs moisture to cure to its full strength.

Your new concrete is against an existing slab (which will tend to **** out moisture from the new concrete) and it is against bare dirt (which will tend to **** out moisture from your new concrete).

Wet it down. Want to get 'fancy'? Build some sort of reverse pond/dam and make it so a continuous puddle/pond of water is on top of the new concrete (and overlapping onto the existing concrete). Once the concrete has set-up to the touch, keep it wet-wet-wet for best cured strength.

Oh, and if you are running heat in the garage, I hope it is not a fueled heater that is venting the exhaust into the space (like a "torpedo' heater, etc, etc). The exhaust gases contain extra CO2 (and some CO, be careful there!) and that 'extra' CO2 compared to normal air screws up the concrete cure from "carbonation".

http://www.concretenetwork.com/cold-weather-concrete/curing.html
 
Last edited:
OP
D

Denwood

Well-known member
Joined
Sep 22, 2014
Messages
4,180
Location
Thunder Bay, Ontario, Canada
Yep...it drank a gallon this am. I'm just going to leave a few 5 gallon pails on the slab with a small hole put in the base of each. Should be fine that way. The Reznor heater vents externally..so no worries there ;-)
 
OP
D

Denwood

Well-known member
Joined
Sep 22, 2014
Messages
4,180
Location
Thunder Bay, Ontario, Canada
Many hours of clean up later...we're making progress. Drilled the holes today for the MaxJax, but it's too soon to set the epoxy anchors. The nice thing about pouring a slab is if you planned right, no rebar to hit, and full depth holes for each anchor. I just chalked a center line down the slab, marked each MaxJax base for center line, and measured three times. Pilot holes weren't required..I just used the Maxjax base as the drill guide, hammer drilled for 10-20 seconds in each hole, moved the base and finished each hole with the 7/8" bit. Easy peasy.

If you are running conduit under the slab like I did, make sure the exiting conduit/hose clears the lift arms at their full wide position. I have a bit of work to do (minor) to fix an oversight in that department. Fortunately the conduit is 3", and exits the slab at 45 degrees, otherwise it would be a big issue. The slab project is done :)

cleaner.jpg
 
Last edited:

Mike C5

Active member
Joined
Feb 12, 2011
Messages
27
The info in this thread sure came in handy. I poured my 'super' slab on Monday after singing the 'Thin Concrete Blues'.. Here are a few photos... Just 25 days to go.
 

Attachments

  • IMG_2916s.jpg
    IMG_2916s.jpg
    151.9 KB · Views: 308
  • IMG_2922s.jpg
    IMG_2922s.jpg
    101.7 KB · Views: 266
  • IMG_2925s.jpg
    IMG_2925s.jpg
    110.5 KB · Views: 263

Cobra96

Well-known member
Joined
Jul 29, 2014
Messages
88
Hey Everyone

Wondering if anyone has a method to clean up the concrete dust storm I have in my garage from cutting into my slab. Had my footers poured today and was wondering what takes the dust off the walls? thinking of using a sponge mop with water?
Any ideas would be appreciated..., looks like a lot of you have been there and done that!

thanks!
 
OP
D

Denwood

Well-known member
Joined
Sep 22, 2014
Messages
4,180
Location
Thunder Bay, Ontario, Canada
Trey, sorry just the pics. The project took a week in between work/family so it would have been a PITA to do separate time lapses.

Cobra, the Hilte was connected to my shop vac (with drywall bag filter installed)..and doors were open. Very little dust was produced as the Hilte is well designed for use with the vacuum. Otherwise I just open up the doors on a breezy day and blast away with compressed air.
 
Last edited:

Trey T

Well-known member
Joined
Aug 3, 2011
Messages
3,749
Location
Houston, TX
That's a big issue for many ppl that are serious with filming and we just resolve to photos. You and your company should come up with a solution, somehow....
 
OP
D

Denwood

Well-known member
Joined
Sep 22, 2014
Messages
4,180
Location
Thunder Bay, Ontario, Canada
Trey, funny you should mention that. Time lapse motion prototype:

https://vimeo.com/114568435

For a static lapse, it's not an issue to frame multiple takes..just takes time and patience to shoot/manage media/edit. With two kids and a business the shop stuff is pretty low priority :). That said, I do have an overhead door video review to shoot and post. A pretty ghetto vid I shot in the shop (how to sharpen a fiskars reel mower) is sitting at over 30K plays, shot using only our Morpheus stabilizer and an RX100 pocket cam. So our Morpheus product is I think a perfect solution for shop stuff. You will see more of that from me shortly :)

I was wondering when I was going to get called out on this one :)

This is a horrific video, yet pushing 32K views...

 
Last edited:
OP
D

Denwood

Well-known member
Joined
Sep 22, 2014
Messages
4,180
Location
Thunder Bay, Ontario, Canada
Lord, Cobra, Idle, thanks :)

I could fit a full rise lift, if the columns were to poke into the ceiling. That was the gotcha on the units I reviewed specs for. Because the ceiling is 10'2 max though, my Westfalia is at max height already on the Maxjax with 1" to spare! You're correct though in that my A3 could go higher. I purchased a set of 6" riser adapters as this puts vehicles at perfect height for me on the roller stool. Jetting around under the lift using the roller seat is awesome. Having the floor free with vehicle lifted sure makes the shop seem larger too. These are some pics from October.

vanlift1.jpg


vanlift2.jpg


vanlift5.jpg


lifted.jpg


October 2014 to February 2015 progress pics:

southstor.jpg


slatwall6.jpg
 
Last edited:

JohnnieMo

Well-known member
Joined
Nov 25, 2014
Messages
1,175
Location
Calgary, Alberta
How heavy is the VW van?

Just a query.... why did you set the concrete and then drill in the anchors? Wouldn't it be stronger to set the anchors (or something equivalent) directly in to the wet concrete and let it harden in place?

I'm considering a MaxJax, but my Avalanche is all of 6000lbs, so I'm right on the threshold. I would likely require new concrete as you have done.
 
OP
D

Denwood

Well-known member
Joined
Sep 22, 2014
Messages
4,180
Location
Thunder Bay, Ontario, Canada
Cat, thanks :)

Johnnie, the Westfalia is about 4500 lbs. This fellow is lifting an Avalanche with the MaxJax: http://chevroletforum.com/forum/avalanche-18/avalanche-maxjax-67567/

Setting the concrete and drilling holes after was really about convenience. The holes go in quickly (particularly as I had made sure there would be no rebar interference) and I drilled them using the Maxjax column base as the template. No chance of mistakes that way. The epoxy anchors I used are tested by Wej-it to 26000lbs, so a very large safety margin there. Had I "engineered" my own anchors poured in place, I would not have those tests/ratings to go by. At least one poster here on Garage journal poured his anchors in place and had to remove every one of them: http://www.garagejournal.com/forum/showthread.php?t=188429&highlight=anchors+pull+concrete

I tend to error on the side of caution when it comes to working under vehicles so the thicker slab, epoxy anchors and low rise jack stands all contribute to a safer working environment.

If I was doing another install, I'd do the same. Pour, drill, use epoxy anchors.
 
Last edited:

tomsmith

Well-known member
Joined
Jul 12, 2009
Messages
207
That's me with the Avalanche :) It's right at the weight limit though (6000lbs) so once it's up, I put 4 12ton jack stands under it (one at each corner)
 
To avoid these ads, REGISTER NOW!
Top Bottom