

JSK
Well-known member
After the MaxJax was assigned to Dannmar, I have not been as much involved. But I have installed a few of these so I'll be glad to share my own experience. My original cart design was a fully assembled welded unit so not too familiar with the revised unassembled design which was implemented in order to make a more compact shipping bundle for retail stores.
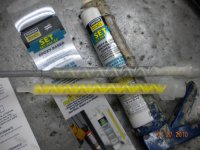
First, I am a firm believer of epoxy. On most of the MaxJax lifts I have installed, I filled the 7/8” hole with two-part anchor epoxy then installed as per the instructions. It can get messy, but in my years of installing lifts, it has always proved beneficial. To me, it just adds an extra level of assurance. However, if installed properly, and when lifting max 6,000 pounds, (which in the two-post world is very minor), and with shorter than usual lifting arms, the floor loading from a MaxJax is a lot less than typical two-posts. So, the PD58 anchors minus the epoxy are more than capable when installed as per instruction. You can find answers to all of your uneasy concerns here.
If you do choose to use epoxy, make sure you clean the dust out of the holes good prior. Fill the hole about two-thirds or too much epoxy will ooze out of the hole once the anchor is tapped in. This creates a mess which needs to be cleaned up quickly before the epoxy hardens. Make sure to put grease inside the anchor in the event epoxy finds its way onto the threads. The grease prevents the epoxy from polluting the threads and it also helps when remove the sacrificial “pounding in and setting bolt” after the anchors are installed.
The most important thing to focus on is locating and drilling the holes exactly where they need to be. If when drilling, the bit initially walks to the left slightly on some of the holes, then walks to the right on others, the accumulated spacing may be just enough to make the bolts not fit clear through the base plate of the lift once installation is complete. Take your time. Drill pilot holes first only after double checking. Do your best to make sure the pilot drill stays exactly on your mark. And when drawing your marks, be very careful to locate the exact pinpoint center of the base plate holes.
NOTE: The instructions say to drill the first hole, position the column in place, install an anchor, secure the column, then mark the second hole using the base plate as a guide. Drill second hole, position the column in place, install an anchor, secure the column, then mark the third hole using the base plate as a guide - repeat steps etc. Although this seems like a redundant process, it is a cautious way to insure the holes are exactly where they need to be. If however you opt to drill first, install later, be sure to get your marks dead nuts.
The second most important thing to remember is drill bit - 7/8” is 7/8”. Don’t use a close enough metric bit or, just as bad, an under size or worn bit. Worn drill bits will make your install a nightmare. If you find yourself using a sledge hammer to pound in the anchors, the bit was worn, too small at the tip, or just plain the wrong size. Underside and top spalling will occur if a sledge hammer is used. Use a rotary hammer drill, not a regular Dewalt with a concrete bit - you’ll be drilling long before the cows come home. When drilling, make sure you hold the drill perfectly vertical. Although it’s impossible to be perfect, pay attention and do your best.
After the holes are drilled, get a vacuum cleaner and clean all the dust out of the holes and around the work area. If using epoxy, I recommend a screwdriver and wet rag to plunge the holes once or twice. Let the holes dry thoroughly before proceeding and it may even help to blow dry after.
Install the 5/8” spacing nut onto the sacrificial bolt. Before proceeding, be sure to install the bolt all the way until it touches the inside bottom of the anchor. This way the threads won’t take all the punishment of the pounding and make removing the sacrificial bolts difficult. Once the bolt is making contact with the inside bottom of the anchor, position the spacing nut 5/8” away from the anchor. Pound in each anchor until the top of the anchor is approximately 5/8” below the surface of the concrete. Repeat steps. If using epoxy, install one at a time. Do not pour epoxy in all of the holes at once.
After the anchors are installed, install a flat washer, then start tightening the 5/8” spacing nut to set the anchors. Depending on the condition or hardness of your concrete, the final size of the finished hole, the aggregate and other conditions, some of your anchors may set higher than others. However, they should pull up at least 3/8” – ½”. It should take a little elbow grease to set them properly. If you find it super easy to pull them up, and/or they start protruding from the top of the hole, you may have suspect concrete or an oversized hole. I would investigate the cause before proceeding. If using epoxy, let the epoxy dry fully before using the lift. After the initial use with car, the anchors may tend to creep up slightly further as the bolts make their final set - this is normal.
NOTE: Some of you will find the top of the concrete spalled or cracked away a little around the hole during installation. Brand new, sharp drill bits will minimize this. If, after the install is complete, you would like to pretty up the floor around the holes, the best thing to use is an epoxy rather the Quikrete. Quikrete or concrete patch is easier to use, but it’s brittle and will eventually crack away due to stress and strain on the concrete during lift use. An epoxy or Bondo type fill is flexible and will make a better patch around the anchor holes. You can even add paint or color to the epoxy to better match your floor.
Jeff
BendPak
Last edited:


")