Finally finished my install yesterday, here's some notes...sorry no pics, if I can figure best way to add I will.
- 1960's New England tract house, 2 car garage - well 2 cars if you don't mind your wife dinging your door every time she gets out. Better as a one car with working space. 16'x 7' door is ideal, as I can place the car in the middle or to the side. Standing in the driveway, there is a man-door to the right of the right of the roll-up, and in the back right hand corner the door into the house, a couple of concrete steps going up to it. Walls and ceiling drywall covered. Floor to ceiling is 112 at the back wall, about 115" at the door.
- Floor is about 22.5 ft x 23 ft. Original floor was cracking in a couple spots where settling under the pad and maybe a little water wash-out was going on. Figured it needed to be repaired, but measured in the cracks and looked like it was 2-3 inches thick anyway, so it all had to go. Kept the existing steps up into the house, paid $ 3300 to have a contractor take out old floor, compact and add some sand, and pour about 8 yards of 3500 psi fiber reinforced concrete. Concrete guy and I discussed re-bar, mesh etc, but for a home garage and the use it'll get , agreed that would be overkill. At 5-6 inches thick everywhere, level from the back wall about 4 feet towards the door, and then about 1/8" per ft pitch to the big door, well withing MaxJax spec.
- Sealed with water based sealer applied with a sprayer, 2 coats. Because it was already late October before it was poured, the cool nights and lack of heat in the garage limited choices a little. This is a workshop not a man-cave, so I just wanted something that will provide some protection from spills and sweep easy, without the extra cost and time to apply epoxy even if it could be done in the cold. Only issue with the sealer is my boots were a little damp when I applied the second coat, so I ended up sealing in some foot prints...like I said, shop not showplace so I can live with it.
- The door is only 12 years old, so no new door, but had garage door guy come and re-do the tracks to bring the door closer to the ceiling. I normally do my own stunts, but the parts for me to buy on line would be $ 350, and to have them do it including parts was only $550 . Had torsion spring replaced as that's a job that's cheap to have the guy that knows what he's doing just do it while he was doing the tracks. No opener, as the door is light enough and I'm not in and out daily
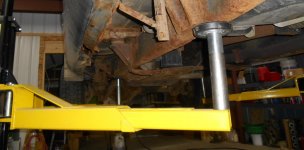
- Decided to place the lift to the right hand side, leaving more working space on the left. While the car is in place or on the lift, there is 4 foot wide walkway between it and the RH wall, even with the lift column in place.
- I have 3 cars currently to be lifted - '65 Mustang, '2000 Miata track car, and Dad's '51 Shoebox. I can do wife's driver as well if needed; my truck doesn't fit in the garage well anyway and I pay people to work on it ( it's an appliance to tow the race car and haul **** ) so not worried about working on it. Placing the posts 121" apart (outside of baseplates) works although I'm at the end of the arms to lift the Mustang on what passes for a frame on it. I wanted to be able to open the doors to the first detent in the hinge without hitting the column. The Ford frame is wider so it will be fine. The Miata is a little narrower but you lift it by the rockers so actually fits well.
- Drilling the holes was pretty simple. I placed the columns and used a 3/4" bit to "mark" the holes, drilling about an inch down. I tried a smaller bit but it walked too much- the 7/8" bit edges caught the edge of the split in the hole of the plates - why do they do that anyway? Probably they have a plasma cutter just follow a pattern and they don't shut it off ...
- Once the holes are marked, move the columns and drill with 7/8" bit. A 24" long bit is good for this, as it lets you stand at a good position over it. Also, I had a buddy help by spotting and adjusting my position if needed while drilling to make sure it went in straight - the longer bit makes it much easier to see if you're leaning over. He's also holding a vacuum at the hole to keep the view clear. Painted a mark at 5" from the end of the bit as a depth gauge - drill until you hit the paint.
- I used the Wej-it anchors that came with the lift, as the epoxy ones were just discontinued by Danner when I ordered the lift. Figured I could always go get them or something like it from Grainger if needed, but might as well give the wej-its a try first. 10 holes, 10 anchors, followed the directions that came with and no problem at all. Replaced the "sacrificial" bolt after the first 5 anchors. Put some oil on the nut and bolt also. Some of the anchors were a little more than 1/8" below the floor even when we cranked the bolt as tight as we could...
- Put the columns in place and torqued to 95 ft-lbs as directed. 3-4 four of the anchors took some additional turns on the torque wrench (probably the ones a little below the 1/8" mark) but the torque wrench is longer than the wrenches we were using so they just needed a bit more leverage I guess.
- Assembled the hydraulics as directed, but first removed the factory applied tape and re-applied couple fresh turns of better tape then paste teflon on that. No leaks. Used the quick connects that came with the lift.
- Directions say 7 quarts, then 1-1/2 quarts additional.. Thanks so 2 gallons is a little short... I used AW32 bought at O'Reilly's. No smell, no squealing noise as some have reported. I only have the 2 gallons in there now, and I think it wants another quart as at the top of the travel not sure if it's stopping because the piston is end of travel or the pump is staring to cavitate. So I'll grab another gallon and add a bit to make sure.
- Bleeding air took a couple up and down cycles, but really no big deal. Both sides go up and down evenly and smoothly.
- To lube inside the channels, directions say spray white lithium. If you have a flux brush and a tub of goo, bend the brush so you can "paint" the inside of the channel with the goo - it's tough to spray in there
So it's installed, and I'm very happy with it. I've got things to do on all 3 cars this winter, so hopefully the weather cooperates so I can move cars in and out as needed. I'll probably leave the RH column in place and remove/replace the LH as needed when I need more floor space. In the Spring I'll mount the pump on the wall or the RH column and run hose overhead.
If you're on the fence, do it!