

You are using an out of date browser. It may not display this or other websites correctly.
You should upgrade or use an alternative browser.
You should upgrade or use an alternative browser.
Maxjax Installs: Post Here
- Thread starter G-force
- Start date

flatsixcrazy
Member
- Joined
- Sep 4, 2011
- Messages
- 10
Right now, I'm waiting to hear from Gabe at Dannmar on what to do about only having 3.5 inches of concrete. I'm pissed at the concrete guy and the builder, but there is nothing that can be done about that now, other than to warn others that if you are having a floor poured, get out there and ensure that you are getting the depth that you want.
I am considering the MAJAX and I am afraid that I might be in your shoes after I purchase the lift. So, I will be test drilling my garage floor (townhome built in 2000) this coming weekend. How do I take depth measurements of the slab after I drill some test holes? Thanks for all your help.
73 Mustang Bill
Well-known member
- Joined
- May 27, 2011
- Messages
- 124
In my case, I had expensive vapor barrier under the concrete that I drilled through. With a 7/8" hole in the concrete, it was easy enough to stick an icepick in there and find out how deep it was to the vapor barrier. Below that, the dirt and gravel weren't hard-packed in there, probably because it was pulled up by the drill.
73 Mustang Bill
Well-known member
- Joined
- May 27, 2011
- Messages
- 124
Good time to talk about drills. I was at HD on Saturday looking at hammer drills. Rental prices (4hr/day):
1/2" hammer drill $20/$28, but they didn't have any of these.
1" hammer drill $35/$50
2" rotary hammer $43/$62
(I thnk that's what they had on the shelf at the time). To buy one, they had a 1/2" Ryobi hammer drill for $69, and a 1/2" Mikita for $79. Homer dude used to install pools, and said that the 1/2 hammer drill would be sufficient to do the job. Decided to go with the Mikita rather then rent. DAMN glad I did. The Mikita went through the concrete easily, and when I found out my floor was shallow, I stopped drilling holes. If I had rented, I would have been hit with 4 hours that day, and another 4 hours when I finish.
When I got home, I checked online reviews of the Ryobi, as well as the Harbor Freight stuff. Usually the reviews are only written by guys that have bad experieinces, so I try to factor that in, but it sounds like the Ryobi and HF tools weren't that great. Might be able to get the job done, but it's too painful to have to take a tool back halfway through a job, and I'd rather have a decent tool for life now. HF drill is only $20ish, but I shyed away form that because I didn't want the thing to wander or make my holes bigger than desired, and didn't want to take a chance on their "lesser" drill.
When you order your MaxJax, if you ordered the drill bits from EBay and hammer drill from HF, you could be all set to go for minimal money.
When I ordered my MaxJax, I also ordered the 7/8" Bosche drill bit off of EBay. At $5, I bought 2, so with postage it was only $15.50. They arrived in a timely manner. Again, nice to have for the future.
The combination of the 1/2 Mikita hammer drill and the Bosche 7/8" drill bits worked better than expected. I also used a laser level that projects a beam in two axis. It appears to have help keep the drill perpendicular to the surface, but I won't know for sure until I instaall the anchors.
EDIT: Okay, I used the hell out fo the Mikita hammer drill today. I drilled a total of 13 holes, some 5-12" deep for the drop-in anchors, and some 6-1/4" deep for the epoxy anchors. The drill was VERY hot for a few of these holes, especially when one drill bit was getting dull (after abou 10 holes). I had three drill bits, two of the 6-3/4" Bosche bits, and one long bit (I think it's 11" long). I drilled the first 5 inches with the shorter bits, and the final 1/2" or 1-1/4" with the longer bit. The drill got VERY hot after a couple holes, so I'd give it a break for a while. I was drilling into new (30 day old) 3500 psi concrete that is 12 inches deep, so this was an acid test for it. The drill chuck couldn't be tightened up very well, so every inch or so I had to stop and retighten. The drill did the job and survived, but I would not recommend it if you are buying it for a heavy-duty job like I used it for.
Last edited:
flatsixcrazy
Member
- Joined
- Sep 4, 2011
- Messages
- 10
When I ordered my MaxJax, I also ordered the 7/8" Bosche drill bit off of EBay. At $5, I bought 2, so with postage it was only $15.50. They arrived in a timely manner. Again, nice to have for the future.
Bill, are you talking about these Bosch drill bits (http://www.ebay.com/itm/BOSCH-22087...868?pt=BI_Hammer_Drills&hash=item5add5af714)?
73 Mustang Bill
Well-known member
- Joined
- May 27, 2011
- Messages
- 124
I bought the Bosche HCBG24 and they worked great. I don't know if the ones that you pointed out work well or not.
skamp
Well-known member
I talked to Dannmar this morning re: the long hose. They said to put the fittings at 45 degrees to create more of an arc for the hose. If it leaks they said to call back. I will try it out tonight.
That is what I did to install mine. I have not run it yet to see if it leaks but appeared to install OK.
Steve
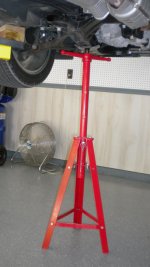
The 10 ton stands go from 19" to 30". would that do it?
http://www.gregsmithequipment.com/10-Ton-Jack-Stands-Set-of-2
http://www.gregsmithequipment.com/10-Ton-Jack-Stands-Set-of-2
I got the GregSmith small tripod stands to put under the car. They will work when the cars are at the high setting. I don't have a good solution for the low setting as most jackstands do not go to 30-33".
Steve
skamp
Well-known member
The 10 ton stands go from 19" to 30". would that do it?
http://www.gregsmithequipment.com/10-Ton-Jack-Stands-Set-of-2
Not really. The problem is you have to use the pin locations which I assume are 1" or so apart. You really need something with fine grained adjustment to snug the stand up to the part you are looking to brace.
Steve
73 Mustang Bill
Well-known member
- Joined
- May 27, 2011
- Messages
- 124
I bought the Bosche HCBG24 and they worked great. I don't know if the ones that you pointed out work well or not.
I need to clarify something here. That drill bit will work only if you are using the normal Wej-it anchors. If you are using the epoxy anchors, you have to go to a longer drill bit, as those holes have to be at least 6-1/2" deep... unless your concrete is less than about 5-1/4" to 5-1/2" inches deep, as that is how deep you can go with that 6" long drill bit. I just had part of my floor repoured to 12 inches deep, so I have to get the longer drill bit. Got it on EBay, supposedly only used for one hole. There were others there that looked pretty tired. If they weren't using a hammer drill, it's probably shot.
73 Mustang Bill
Well-known member
- Joined
- May 27, 2011
- Messages
- 124
Can you share a photo of the epoxy anchors? Curious as to what those look like.
Here is the epoxy anchor (bottom) beside the regualr wedge anchor. I was surprised that they aren't wedge shaped at the bottom, but I understand that the epoxy is incredibly strong. I'll have to look up the specs on them one of these days. With my 12 inch 3500 psi repour, it might be overkill, but there is no such thing as being "too safe".
Bill
Safety Third !
Attachments

Last edited:
skamp
Well-known member
Here is the epoxy anchor (bottom) beside the regualr wedge anchor. I was surprised that they aren't wedge shaped at the bottom, but I understand that the epoxy is incredibly strong. I'll have to look up the specs on them one of these days. With my 12 inch 3500 psi repour, it might be overkill, but there is no such thing as being "too safe".
Bill
Safety Third !
No need for a wedge. The epoxy locks the anchor in the ribs. Your picture is a good example of what would happen if you use these in 4" concrete. Only 1 maybe 2 of the ribs are locked in epoxy. The rest is in the dirt. With that said even with a 40-50% reduction in rib area on 4" concrete there is still a lot of strength there.
Steve
regguy1
Well-known member
Not really. The problem is you have to use the pin locations which I assume are 1" or so apart. You really need something with fine grained adjustment to snug the stand up to the part you are looking to brace.
Steve
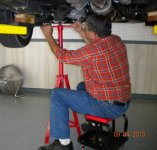
I bought these from GS Equip. They're perfect for the MJ. They have the screw adjustment feature.
http://www.gregsmithequipment.com/2-Ton-Tripod-Stand-SHORT
Attachments

Last edited:
skamp
Well-known member
Here is the epoxy anchor (bottom) beside the regualr wedge anchor. I was surprised that they aren't wedge shaped at the bottom, but I understand that the epoxy is incredibly strong. I'll have to look up the specs on them one of these days. With my 12 inch 3500 psi repour, it might be overkill, but there is no such thing as being "too safe".
Bill
Safety Third !
One thing to make sure of is that you clean the hole 3-4x. It cannot be too clean. You should aggressively brush the hole and vacuum out the dust. The strength is in the epoxy adhering to the walls of the hole. If there is dust the bond is weaker. There is a nice brush and SDS adapter I saw at Lowes to clean the holes. Here are the links.
http://www.lowes.com/pd_315922-2191-08414_0__?productId=3362288
I could not find the link for the brush but they had a 3/4" one at my store. Looked like a nice method to really clean the hole.
Steve
Steve
skamp
Well-known member
I bought these from GS Equip. They're perfect for the MJ. They have the screw adjustment feature.
http://www.gregsmithequipment.com/2-Ton-Tripod-Stand-SHORT
I bought a set of these based on your feedback. They are great stands but only will work on the higher height. I have not found anything that would screw up like this if I have a car at the 26" height.
Steve
We have the same set. 4 really and we cut one set down a bit to fit when the car is lower.I bought a set of these based on your feedback. They are great stands but only will work on the higher height. I have not found anything that would screw up like this if I have a car at the 26" height.
Steve
regguy1
Well-known member
I bought a set of these based on your feedback. They are great stands but only will work on the higher height. I have not found anything that would screw up like this if I have a car at the 26" height.
Steve
You could modify them , cut bottom of the legs to needed height...?
Bosch SDS Bulldog for Installing Anchors
I bought the above drill to put anchors down to install Maxjax. Got the pilot 5/8" hole done, then tried to do 7/8" and got about a quarter inch and then it stopped turning, though I could hear the drill motor working, no action at the drill end. I called Bosch and he advised me not to drill pilot hole, just do 7/8" hole, as the drill bit was catching on the side of the smaller hole, and the clutch was coming on. I haven't tried it his way yet, and wondered if anyone else had this issue, and what you did to solve problem. Thanks,
Don Ivey
skamp
Well-known member
Re: Bosch SDS Bulldog for Installing Anchors
I had this happen in my test hole. What I needed to do was get the drill going first and lower slowly so it chipped the edge it was catching on. I had to do that a few times but got the hole completed. After that I was determined to not use the pilot hole method.
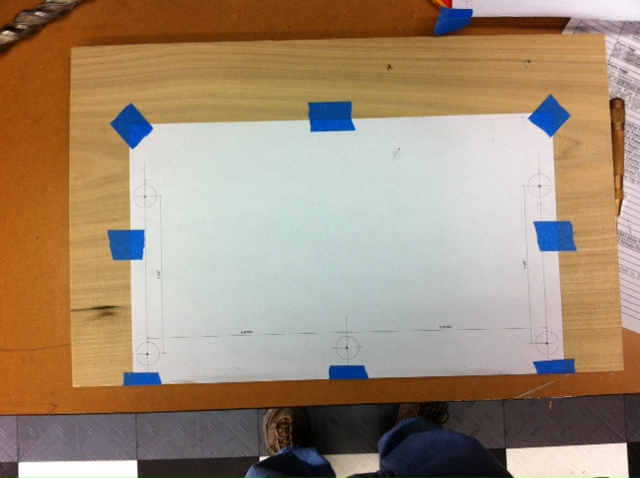
When I drilled my real holes I made a template out of poplar and drilled the 7/8" holes straight away using the laser level technique. Here is a link to my template. It is in Visio and you need to print on a legal size piece of paper and disable fit to page.
http://www.lanability.com/images/maxjaxtemplate.vsd
Here is the template taped to the board. I used a centerpunch to give me markers for the holes I drilled.
I then cleaned the concrete and taped down the template with 3M double sided tape. It pulled up my old **** epoxy when I pryed it off so lots of holding power.
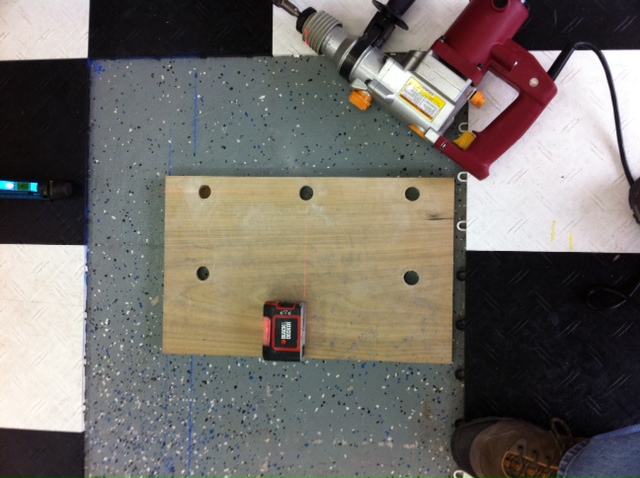
Here is what it looked like after the holes were done. They lined up perfect.
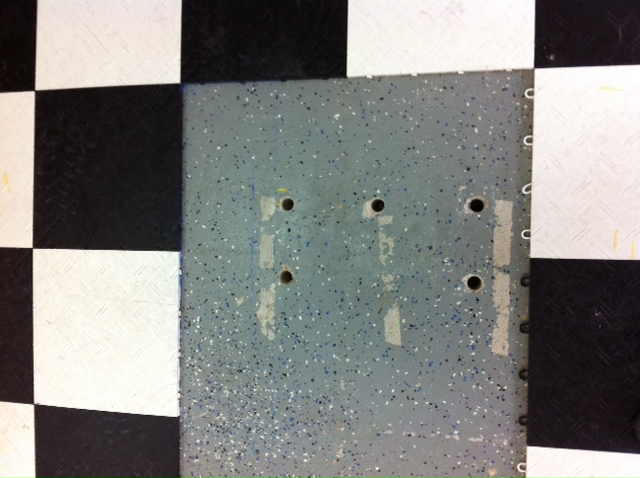
Steve
I bought the above drill to put anchors down to install Maxjax. Got the pilot 5/8" hole done, then tried to do 7/8" and got about a quarter inch and then it stopped turning, though I could hear the drill motor working, no action at the drill end. I called Bosch and he advised me not to drill pilot hole, just do 7/8" hole, as the drill bit was catching on the side of the smaller hole, and the clutch was coming on. I haven't tried it his way yet, and wondered if anyone else had this issue, and what you did to solve problem. Thanks,
Don Ivey
I had this happen in my test hole. What I needed to do was get the drill going first and lower slowly so it chipped the edge it was catching on. I had to do that a few times but got the hole completed. After that I was determined to not use the pilot hole method.
When I drilled my real holes I made a template out of poplar and drilled the 7/8" holes straight away using the laser level technique. Here is a link to my template. It is in Visio and you need to print on a legal size piece of paper and disable fit to page.
http://www.lanability.com/images/maxjaxtemplate.vsd
Here is the template taped to the board. I used a centerpunch to give me markers for the holes I drilled.
I then cleaned the concrete and taped down the template with 3M double sided tape. It pulled up my old **** epoxy when I pryed it off so lots of holding power.
Here is what it looked like after the holes were done. They lined up perfect.
Steve
Thanks for the info about the template. One other question. How do you get a fairly accurate torque measurement if you use the Wej-it method of anchor installation, and keep the bolt head steady while tightening the bolt below. My torque wrench works with a socket, so can't get to bolt. Guess I just need to calibrate my arm ")
Don Ivey
Don Ivey
isaac338
Well-known member
Thanks for the info about the template. One other question. How do you get a fairly accurate torque measurement if you use the Wej-it method of anchor installation, and keep the bolt head steady while tightening the bolt below. My torque wrench works with a socket, so can't get to bolt. Guess I just need to calibrate my arm
Don Ivey
The correct method doesn't involve torque - only a number of turns. You'll feel it bite and you're supposed to give it 3-4 turns after; all mine became impossible to turn after a couple of turns.
les_garten
Banned
Re: Bosch SDS Bulldog for Installing Anchors
What size hole did you drill in the wood?
Thanx a ton for the template!
I had this happen in my test hole. What I needed to do was get the drill going first and lower slowly so it chipped the edge it was catching on. I had to do that a few times but got the hole completed. After that I was determined to not use the pilot hole method.
When I drilled my real holes I made a template out of poplar and drilled the 7/8" holes straight away using the laser level technique. Here is a link to my template. It is in Visio and you need to print on a legal size piece of paper and disable fit to page.
http://www.lanability.com/images/maxjaxtemplate.vsd
Here is the template taped to the board. I used a centerpunch to give me markers for the holes I drilled.
I then cleaned the concrete and taped down the template with 3M double sided tape. It pulled up my old **** epoxy when I pryed it off so lots of holding power.
Here is what it looked like after the holes were done. They lined up perfect.
Steve
What size hole did you drill in the wood?
Thanx a ton for the template!
skamp
Well-known member
Re: Bosch SDS Bulldog for Installing Anchors
No problem. I used a 7/8" spade bit.
Steve
What size hole did you drill in the wood?
Thanx a ton for the template!
No problem. I used a 7/8" spade bit.
Steve
les_garten
Banned
Re: Bosch SDS Bulldog for Installing Anchors
Gracias mi amigo, as we say in S. FL...
No problem. I used a 7/8" spade bit.
Steve
Gracias mi amigo, as we say in S. FL...
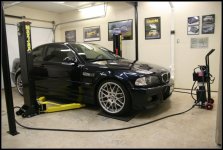
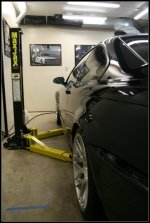
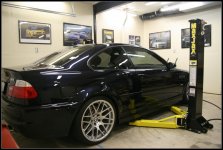
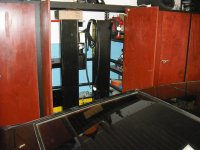
Finished installing the lift. I only had one problem with one bolt which i had to use epoxy on. The concrete was 3.5 deep near the wall and 5.5 in the middle. Love the product so far!
Attachments


regguy1
Well-known member
Finished installing the lift. I only had one problem with one bolt which i had to use epoxy on. The concrete was 3.5 deep near the wall and 5.5 in the middle. Love the product so far!
Nice job, looks good!
mikeyr
Well-known member
Did you epoxy the one that was 3.5 ? or was it another ?Finished installing the lift. I only had one problem with one bolt which i had to use epoxy on. The concrete was 3.5 deep near the wall and 5.5 in the middle. Love the product so far!
one side of my install had about 6" thick concrete and no issues with the anchors, the other side varied between 3.5 and 4.5, I think there must have a been a "bump" in the substrate because one bolt of the 5 was 3.5 concrete the other 4 bolts are solid in the 4.5.
The one in the 3.5 hole came up and did not lock until maybe about 1/16" above my concrete, its a good lock and easily held up to the 90ft.lbs. torque so I ground it down flush. I am thinking of replacing that one with epoxy just for peace of mind, it held up my car fine. I am concerned that the epoxy needs the full 4+" inches to be strong.
The other thought is that when I drilled through I broke out a small chunk of concrete on the bottom of that hole since the other 4 were plenty thick.
Did you epoxy the one that was 3.5 ? or was it another ?
The i had the three back holes at 3.5 inches deep. One of them did not seat until 1/8 above the concrete. The other two (at 3.5) held great. I am thinking of doing the same thing and putting an epoxy anchor in but am unsure. I plan on keeping my posts up 99% of the time.
I am also looking for a product/tape where i can square off where i need to park my car. kind of like you see in boeing plants.
M
73 Mustang Bill
Well-known member
- Joined
- May 27, 2011
- Messages
- 124
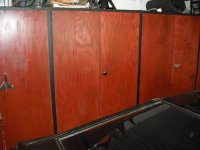
Thought I'd share some picture of my MaxJax when it's being stored...
I'm planning on running the hoses up out of the top of the cabinet, on a folding swing arm to reach out to the far post, and down to 90 deg elbows at the bottom. Eventually I'll put some door across the top of the cabinets to hide all the stuff that is stored up there. I'll have to get one 10' piece to reach the far post, but Northern Tool isn't far from work, so I'll droip in there and get what I need Tractor Supply doesn't have a 10 foot hose.
Hay, I'm waiting for some new concrete to harden. Just one more week to wait. Can I still connect up my hoses and bleed the system, even though it's not bolted down? I'd probably put them back to back and secure the tops of the posts together so that they don't go anywhere.
Attachments
Last edited:
JTSmithson
Well-known member
Finished installing the lift. I only had one problem with one bolt which i had to use epoxy on. The concrete was 3.5 deep near the wall and 5.5 in the middle. Love the product so far!
Great install, Greater Bimmer!
73 Mustang Bill
Well-known member
- Joined
- May 27, 2011
- Messages
- 124
I'm getting ready to buy 2 gallons of fluid for the lift. Any opinions on whether hydraulic fluid or ATF is better? I live in Florida, so ultra-cold temperatures aren't an issue. Price for 2 gal of Hyd Fluid is $20 at Tractor Supply, ATF is $30 for 2 gal.
Last edited:
les_garten
Banned
I'm getting ready to buy 2 gallons of fluid for the lift. Any opinions on whether hydraulic fluid or ATF is better? I live in Florida, so ultra-cold temperatures aren't an issue. Price for 2 gal of Hyd Fluid is $20 at Tractor Supply, ATF is $30 for 2 gal.
I live in FL as well.
I chose the ATF. I think it is closer to the viscosity that they want.
It is warm enough here that you could get by with Hydraulic Fluid, at least where I live in S. FL. I mainly went with the ATF because it is readily available everywhere if I need to add some for some strange reason or change it.
I looked over a lot of hydraulic fluids at TS like you are doing. There is a wide range of viscosities, but they were all "thicker" than ATF, some quite a bit so.
I'm think DanMar is assuming most will use ATF. ATF is a no brainer, Hydraulic fluid kind of starts a discussion.
skamp
Well-known member
Hay, I'm waiting for some new concrete to harden. Just one more week to wait. Can I still connect up my hoses and bleed the system, even though it's not bolted down? I'd probably put them back to back and secure the tops of the posts together so that they don't go anywhere.
I don't think you would have any problem bleeding them without bolting them down. Just leave off the arms.
Steve
les_garten
Banned
Hay, I'm waiting for some new concrete to harden. Just one more week to wait. Can I still connect up my hoses and bleed the system, even though it's not bolted down? I'd probably put them back to back and secure the tops of the posts together so that they don't go anywhere.
I hooked mine up and ran them for a number of days. I left them elevated. Worked on the bleeding, etc.
Put the arms on with the arms fully rotated away from the car. Like if you had a car on it.
If you think about the weighting, you'll figure it out. You can raise the lift all the way up, no problems. It is not going to tip over, if you have the arms right. You want the arms in a position like you were driving a car between the columns
You want the arms on to help bleed.
Last edited:
Great install, Greater Bimmer!
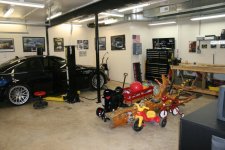
Thanks! As you can see from the pics it is a family man's cave. It started as a "John Deere" room which I converted to a 3rd garage.
M
Attachments


73 Mustang Bill
Well-known member
- Joined
- May 27, 2011
- Messages
- 124
I'm getting ready to buy 2 gallons of fluid for the lift. Any opinions on whether hydraulic fluid or ATF is better? I live in Florida, so ultra-cold temperatures aren't an issue. Price for 2 gal of Hyd Fluid is $20 at Tractor Supply, ATF is $30 for 2 gal.
Okay, I've started quoting myself. I must be going mad. I have three versions of the MaxJax installation manual. They all mention Dextron III, and one mentions 10 weight hydraulic fluid. I guess I also like Les' argument that ATF is easier to locate than 10 weight hydraulic fluid. Will probably put a tag on the pump indicating what I used, so that I don't forget. This weekend is bleed weekend, next weekend is drilling holes and epoxing in the anchors. I also have a couple special mods that i have in mind that I'll share if they work.