To avoid these ads, REGISTER NOW!

Millermatic 200: What to do..

To avoid these ads, REGISTER NOW!
OP
K

Keyblazer

Well-known member
Joined
Jul 30, 2009
Messages
1,471
Location
Irvine, CA
Hi!
Well I’ve been working on it slowly between other projects.
I swapped the wires on the power switch to correspond to how it was wired before and how other pics of mm200s look… white on top connector and black on lower… and the power cord plug is on now.

I got the missing yellow high/low Jack plug installed in the front plate.
Searched everywhere for a stain relief bushing for it, and found something I thought would work. But had to add a washer to get it to clamp on the front face plate better.
Bad pic I took after I degreased and scrubbed the face plate… forgot to take an after pic. What looks like rust is just simple green, first, and grease… Will do today.
834BAAA7-B8C2-4376-B940-B64BE9F7A02F.jpeg

Once I had that in, I had to figure out where it connected to inside.
Wiring diagrams didn’t help me, so after searching the internet for a bit I found some pics that showed a wire attached to this component that my welder was missing.
The bolt on the red part to the right of the wire in my hand… and it was loose…

D1AEBDBD-2F4E-4B91-9ECF-FAEE7FF9E0E3.jpeg

On it went.
2CFD45F0-BD7E-47AC-96C5-BE97CE8C1411.jpeg

I’m getting pretty close now, as everything looks like it’s ready… but I guess I am a little nervous to plug it in!!!

All I’m missing now is a Ground wire.
I think I might rob one off my other welder for now, but
What gauge should I look for?
 

Zeke

Well-known member
Joined
Aug 13, 2009
Messages
17,176
Location
Long Beach CA, the sewer by the sea.
Always good to match the gauge of existing power feed wires. But welders don't usually use neutrals. It is grounded by the power cord which consists of 2 hots and a ground. Not a bad idea to ground your welding table to the shop ground if available. I guess you can run a jumper from the welder chassis to a known ground. I never have.

And maybe you're asking about the power cord itself. Of course that has to be one cord with all current carrying wires in one cord. They will be equal. 10-2 with ground is sufficient for that welder.


Note: I posted this just to see if I'm on point. If I'm wrong about any aspect I'm sure others will let me know.
 
OP
K

Keyblazer

Well-known member
Joined
Jul 30, 2009
Messages
1,471
Location
Irvine, CA
Update time!
Checked all my wiring again…
This is how it looks now.
B02AD763-E5CA-4399-BD7F-2B69986C221C.jpeg

This is how my hi/lo cable looks with the strain relief… not 100% happy with it yet… might 3D print an adaptor for the hole, but it will work for now.
F5030BBF-473B-419E-98CF-FBE8133D44C9.jpeg
EF70C9C2-A48F-40B9-81FE-7B4FA6F3E74F.jpeg

Everything looked good… but I still don’t have a welding ground clamp setup.
It’s $70 at least for the cable…
Prob best I check if it maybe works now as I’m ready…

So I just went for it….
Turned off the breaker…
Made sure the welder main switch was off...
Plugged her into my 220v outlet…
Went and turned breaker on… no noise… or smoke….
Turned the welder main switch on with trepidation…. And a wooden stick….
No smoke, no fire… just a slight hum….
Squeezed the trigger on the gun…
Wire feed motor engaged…. And roller turned as it should!
I think she’s alive!!!!
Only thing I’m concerned about is no rear fan engagement.
It it on a thermostat?
 
OP
K

Keyblazer

Well-known member
Joined
Jul 30, 2009
Messages
1,471
Location
Irvine, CA
Well…
Threw a spool of .035” in… I was feeding GREAT!

DB26236F-CAF0-41EF-A7A6-C2B57F63817F.jpeg
Got a ground cable from my other welder, and got that connected...
Went for it...
And....

ITS ALIVE!!!!
Quick bead on some 18g.
41D6A43C-79A3-4435-AFF8-C357E5476F8A.jpeg

Then cranked it up on some 3/8.

21249422-2503-4EB1-8C87-4366E1C71ABF.jpeg

Yeah, I know the welds aren't the greatest, but I think it’s me, not the welder.
Need some time to dial it in…. But I’m feeling pretty good about it!

Now I’m convinced it’s not a lost cause…
I’m gonna get to the tins… a little hammer and dolly work to dress out the dings will make me, and her feel better…
Tried a couple of colors to see what was close to the original Miller shade…
Rustoleum Sail Blue was closest, but I not convinced yet...

E78B2E9D-8041-4A4E-90F2-98C7A064B022.jpeg

Might go a little custom….


E42B1802-F3DE-45F5-A390-F7EEB7FD67E2.jpeg
 
Last edited:
OP
K

Keyblazer

Well-known member
Joined
Jul 30, 2009
Messages
1,471
Location
Irvine, CA
Feeling good about it myself!

Have confirmation the fan is thermostatic on this unit!

Want to repaint all the tins...
Anyone ever peeled off the main Miller sticker and reattached it?
 
OP
K

Keyblazer

Well-known member
Joined
Jul 30, 2009
Messages
1,471
Location
Irvine, CA
Agreed.
The originals are scuffed anyway.
Ordered the new ones.

Just bought this…
So I can do stencils for face plate too if I want. 5CB08B85-6E11-4DF5-A1ED-D397DD9C7BA0.jpeg
 
OP
K

Keyblazer

Well-known member
Joined
Jul 30, 2009
Messages
1,471
Location
Irvine, CA
Is there a Cricut thread here somewhere?

Well, I found my Rustoleum Safety blue!
And some other paint for the Lenco Spot Welder I’m also restoring.
541A9BE3-7C33-411A-B769-BE190E758017.jpeg


It looks pretty close to the Sail Blue but safety blue is close to Miller blue.
FC630AFD-3A98-4B36-AB63-B235B6123ED8.jpeg


Took a pic of the Lenco timer control and imported it into Cricut software.
D10F47FC-76F8-4C34-81B2-0A7A3E1335D8.jpeg


After some work I got this far.
Learning.
0B006716-26BC-4574-9549-9CC24116CAD9.jpeg
 
To avoid these ads, REGISTER NOW!
OP
K

Keyblazer

Well-known member
Joined
Jul 30, 2009
Messages
1,471
Location
Irvine, CA
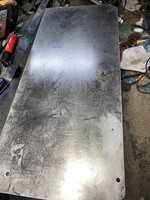
Started with the lower fixed panel today.
Stripped all the old paint and rust with a DA.
Dressed most of the bad dents and dings out with hammer and dolly.
C2D80550-CF10-48B3-9BF7-1C19E9D716B3.jpeg


0030F0AC-B8F6-4ACE-8B7F-2817FE683523.jpeg


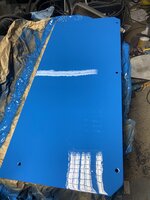
Shot some primer on, let it flash and shot a coat of that Rustoleum Safety Blue...

A00D57D3-AE1A-4AB7-8252-B30B7B0534E0.jpeg
 
OP
K

Keyblazer

Well-known member
Joined
Jul 30, 2009
Messages
1,471
Location
Irvine, CA
Decals are good but some things bug me now I look.
The lettering is displaced to the left, and so doesn’t line up with the white Miller logo above them, like the originals.
Right end is also not a perfect half round…

So I started playing with the decal on the Cricut software.
Not great pics, but this took me about an hour as I’ve never done something like this before…
Two slightly different versions.
I didn’t have measurements to hand, so they are not “Dimensionally correct”, but visually and proportionally better than the decals I bought to my eye.

441CAB71-001B-4660-AFD4-F3B6C7F2AA0A.jpeg
6667CA3A-7738-4BA0-8625-7813BB156AAC.jpeg
The second font I used has a slight italic tilt to the right so looks a little,,,, racier….
Today I will get some accurate dimensions and rejig them a bit… then I might do a test cut!

My intention is to do a stencil and paint the logos on, rather than decals.
I’m thinking lay down the blue first(maybe a metallic automotive paint), then the white, and black with appropriate masking, then some clear on top.
 
OP
K

Keyblazer

Well-known member
Joined
Jul 30, 2009
Messages
1,471
Location
Irvine, CA
I could not for the life of me get the chevrons… that’s the right description… angled enough in the Cricut software to look like that 30+ year old Miller Logo…
Good enough I suppose…
Then I found that I need a 24x12 Matt to cut the logo… it’s 6x 21.5” so can’t ever fit 2 on a sheet vertically, cos I guess I will loose the border I need to keep the stencil strong/stiff enough to stay straight.
Cutting Matt is it’s ordered now,
Will be here in a couple of days… kinda fun but I’m total green at this… doing my best!
 

Zeke

Well-known member
Joined
Aug 13, 2009
Messages
17,176
Location
Long Beach CA, the sewer by the sea.
I could not for the life of me get the chevrons… that’s the right description… angled enough in the Cricut software to look like that 30+ year old Miller Logo…
Good enough I suppose…
Then I found that I need a 24x12 Matt to cut the logo… it’s 6x 21.5” so can’t ever fit 2 on a sheet vertically, cos I guess I will loose the border I need to keep the stencil strong/stiff enough to stay straight.
Cutting Matt is it’s ordered now,
Will be here in a couple of days… kinda fun but I’m total green at this… doing my best!
They are simply too large or too long. I'm thinking too long.
 
OP
K

Keyblazer

Well-known member
Joined
Jul 30, 2009
Messages
1,471
Location
Irvine, CA
I can't get the Cricut software to make a shape like that...
I believe the official word is a parallelogram....
 

oldmachinenut

Well-known member
Joined
Apr 3, 2009
Messages
2,559
Location
Missing, presumed dead in central Pa.
Op, Thanks again for the link to the stickers. I put them on this afternoon, I am very happy with them.
 

Attachments

  • A036F333-A9BD-461A-9614-25096B06C273.jpeg
    A036F333-A9BD-461A-9614-25096B06C273.jpeg
    1.2 MB · Views: 29
  • F3D14DA4-BF2A-406B-8E92-2EB251F19E2C.jpeg
    F3D14DA4-BF2A-406B-8E92-2EB251F19E2C.jpeg
    545.7 KB · Views: 28
  • F529FFC4-B773-403D-9E98-CF6635E845FC.jpeg
    F529FFC4-B773-403D-9E98-CF6635E845FC.jpeg
    1.2 MB · Views: 27
OP
K

Keyblazer

Well-known member
Joined
Jul 30, 2009
Messages
1,471
Location
Irvine, CA
Awesome!
I’m pleased my journey is helping others too!
I’ve been buried on other projects, but I’m still gonna finish it up soon.
 
OP
K

Keyblazer

Well-known member
Joined
Jul 30, 2009
Messages
1,471
Location
Irvine, CA
Tired of seeing it taking up space and being ugly.
Wasn’t happy with my test piece side panel…
The Rustoleum safety blue was wrinkled and the panel was bowed.
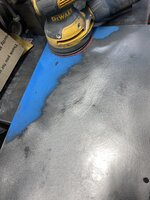
Broke out the DA, stripped the paint…
F70DD095-ACA1-47B2-BF70-119D4DFAB85D.jpeg2148239F-4E4F-40EA-AF3A-91A2ABA2F2B7.jpeg


Then learned how to use a shrinking disc…
F4053F03-01F8-4FC6-BC8B-88E38AC2A39F.jpeg

485F1DA6-111D-40D1-BBA0-29CB11B01932.jpegE75213B4-1DF4-468B-B196-4F3A3CB7E451.jpeg84BD608F-92F9-4AF4-B127-E96F5CDAA3F4.jpeg6CCAD6B9-2DFB-48D0-BF58-63616D143A60.jpeg
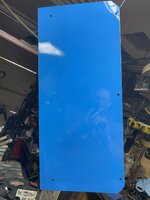
Primed and repainted.
00EA5919-F7A8-4A2F-9E35-ACF2470319B8.jpeg
 

Attachments

  • 3DF336CF-D815-4DE0-B89D-711032AA29B2.jpeg
    3DF336CF-D815-4DE0-B89D-711032AA29B2.jpeg
    1.2 MB · Views: 3
  • 931E7D0E-B4FA-415F-8CDE-9D4360314026.jpeg
    931E7D0E-B4FA-415F-8CDE-9D4360314026.jpeg
    1.1 MB · Views: 5
OP
K

Keyblazer

Well-known member
Joined
Jul 30, 2009
Messages
1,471
Location
Irvine, CA
It’s gonna be, I hope.
Not 100% convinced with the Rustoleum… color is very close, but I’m concerned about durability.
I just ordered some RAL 5017 Powder Coat that looks like it might be close and have the durability.
Will run a test and report back.
 
To avoid these ads, REGISTER NOW!
Top Bottom