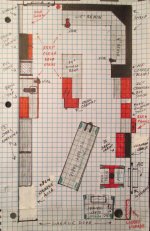
To avoid these ads, REGISTER NOW!

Motorman55's Garage...The Beginning

OP
M

Motorman55

Well-known member
Joined
Apr 10, 2016
Messages
2,630
Location
South Jersey
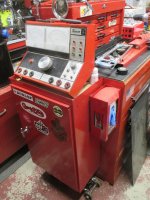
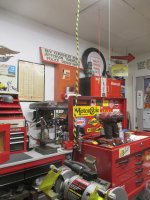
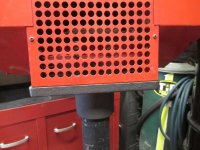
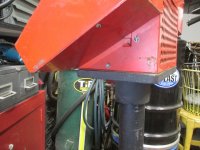
I've been planning on making a few modifications to the shops Hein-Werner 12-Ton hydraulic press for some time now. Today I actually got one of the mods done.

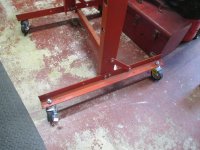
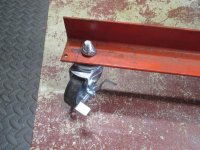
After drilling the 1/2" holes in the press floor supports/feet, I bolted on (4) HF 3" swivel casters. I used (2) swivel casters with brakes on the front and (2) non-brake swivel casters on the rear.

This simple mod allows me to move the press whenever I need to.
 

Attachments

  • IMG_3684.jpg
    IMG_3684.jpg
    152 KB · Views: 61
  • IMG_3685.jpg
    IMG_3685.jpg
    154.1 KB · Views: 55
To avoid these ads, REGISTER NOW!
OP
M

Motorman55

Well-known member
Joined
Apr 10, 2016
Messages
2,630
Location
South Jersey
Part of 'decluttering' the shop includes sorting thru a lot of vintage tools and more modern ones that I have doubles & triples of that have piled up in the cabinets and toolbox drawers.

Many of these tools I got for 'Free' from the local Recycle/dump or friends and relatives. A couple of them I found in the street or a parking lot.

Main thing is to clean them up, check them for seviceability, then separate them into boxes of 'Keep, Sell, Donate or Scrap.'

Its a work in progress...
 

Attachments

  • IMG_3686.jpg
    IMG_3686.jpg
    149 KB · Views: 53
  • IMG_3705.jpg
    IMG_3705.jpg
    147.5 KB · Views: 55
OP
M

Motorman55

Well-known member
Joined
Apr 10, 2016
Messages
2,630
Location
South Jersey
Today I repaired the garage lofts 3 pc pull down folding wood ladder that I broke the other day. Required a little glue and clamping till dried. Repair looks good and solid, but will add a metal plate tomorrow to reinforce it. Also tightened all the bolts of the hinges as they had become loose from extended use making the ladder creak. Big difference now in stiffness of the ladder when down. May not have to replace it anytime soon.

Also cut and fit some HF drawer liner for the red Craftsman 2 drawer work bench.

Then it was back to sorting thru stuff in the garage to 'Keep, Sell, Scrap or Donate.' Tomorrow I'll hook up the trailer and bring the scrap and any other garbage to the recycler/dump.
 
OP
M

Motorman55

Well-known member
Joined
Apr 10, 2016
Messages
2,630
Location
South Jersey
Started cleaning up one of the Estwing hammers. This is what it looked like after a quick hit with the bench grinder wire wheel.

Even the rubber handle grip is beginning to look better after cleaning with Simple Green. Should turn out nice once its all done.
 

Attachments

  • IMG_3802.jpg
    IMG_3802.jpg
    146.1 KB · Views: 54
OP
M

Motorman55

Well-known member
Joined
Apr 10, 2016
Messages
2,630
Location
South Jersey
Today, the weather was pretty warm, so I got a chance to work on my '94 Chevy P.U. truck.

1) Removed the trailer hitch. This was to facilitate the upcoming replacement of the rear spring hangers (the right side one having collapsed so I figured to replace both) and the hitch was blocking the original rivets that need to be cut off.

2) Made a repair to the parking brake cable. I'll replace the whole cable when I redo the rear brakes this spring.

3) Added some missing padding to the ripped drivers seat and installed a new bottom seat cover.

After the above, I took the truck out to get some fresh gas then rode around a little. Next up, cut off the old rear spring hangers and install new hanger kits.
 

Matias

Well-known member
Joined
Feb 28, 2015
Messages
616
Location
Finland
No idea how I've not seen this thread before! First, I like your separation of motorbench and bench for electrics. Need to do that myself. Will put the wires/tapes in a similar fashion to you. Also, I will probably copy your idea of the detailing cart ;)

If you haven't put new anchors for the tire machine, as a quick thought, I put mine on a pallet with bolts. I take the pallet outside when not in use. I stand on the pallet when I changed the tires for my car, it worked fine, as it's heavy enough itself.

You make good use of the space you have. Will be waiting for some garage updates. You are right, the going through stuff is tedious/hard. But makes life in the garage so much better when done!
 
OP
M

Motorman55

Well-known member
Joined
Apr 10, 2016
Messages
2,630
Location
South Jersey
While in the garage doing a little maintenance to my Craftsman grinder and belt sander today, the mailman dropped off a little package.

Its my latest find, a vintage/original NOS bearing in its sealed original black and orange box. A nice addition to my early vintage Harley motormobilia collection. Took this pic and then placed it in the large display case in my shop office.

I like getting cool old stuff in the mail.
 

Attachments

  • IMG_3821 (2).jpg
    IMG_3821 (2).jpg
    92.4 KB · Views: 39
OP
M

Motorman55

Well-known member
Joined
Apr 10, 2016
Messages
2,630
Location
South Jersey
I've Been working on a set of drawings to modify the shop layout. I'm not really happy with the original layout.

I will purchase and place a HF 16" End Locker on the right side of the 4' Electric bench. Color to be 'Black' to match the black 4' and 5' corner work benches.

Next to the right of the new HF End Locker will be the 26" stacked Craftsman tool box.

I'll move the large 54" double bank tool cabinet to its new position shown with the drawers facing the 4' black workbench.

The 7' Motorcycle lift has wheels, so it can be moved into any position as needed.

The other shelves, cabinets, blast cabinet, hydraulic press, etc. are not shown yet. I'll add them to drawing as I figure out the best place to put them.
 

Attachments

  • IMG_3858.jpg
    IMG_3858.jpg
    138.6 KB · Views: 52
  • IMG_3859 (2).jpg
    IMG_3859 (2).jpg
    141.4 KB · Views: 43
  • IMG_3860 (2).jpg
    IMG_3860 (2).jpg
    128.7 KB · Views: 48
OP
M

Motorman55

Well-known member
Joined
Apr 10, 2016
Messages
2,630
Location
South Jersey
The first thing I needed to do was move the M/C lift and hydraulic press out of the way (as well as a bunch of other stuff)

After moving the 52" double bank cabinet to its new position per the drawing, I removed the wheels and place it on 1" wood blocks. I did this for two reasons"

1) So that the 42+" height of the double bank cabinet top would be the same working height as all the other work benches which are approximately 36"to 37"

2) So that the double bank cabinet becomes a non-moving heavy work bench. This puppy's not going any where now. (Note: the 1" wood blocks allow for a small gap between the floor and the bottom of the cabinet which will allow me to adjust/lift the cabinet as needed.)

The following pics show the double bank cabinet in it new position and lowered height.
 

Attachments

  • IMG_3855.jpg
    IMG_3855.jpg
    151.1 KB · Views: 94
  • IMG_3856.jpg
    IMG_3856.jpg
    154.6 KB · Views: 96
Last edited:
OP
M

Motorman55

Well-known member
Joined
Apr 10, 2016
Messages
2,630
Location
South Jersey
Consideration was given when placing the 54" double bank cabinet in its new space to make sure I had enough room to work on all the other benches around it.

I've got approximately 3' all around which is plenty for what I need. It also allows me to fully extend the double bank cabinets drawers.

I can also pull out both drawers of the 5' and 4' black benches while standing in front of them.

Now to order the black HF End Locker. Meanwhile I've got to clean up the mess I made.
 

Attachments

  • IMG_3854.jpg
    IMG_3854.jpg
    154.1 KB · Views: 89
Last edited:
OP
M

Motorman55

Well-known member
Joined
Apr 10, 2016
Messages
2,630
Location
South Jersey
Made some more progress in the new layout of the shop.

Since my last post, I started setting up a new section of shelving and cabinets along the outer right side garage wall to hold all my general autobody supplies and specialty fasteners. Should get it finished this week. (Pic 1)

I took the small Craftsman cabinet I removed from the same wall and bolted it to the end of the 54" double bank cabinet using the double banks original handle mounting holes. This may turn out to be its permanent location. (That's my old Snap-On tester sitting on top of it.) (Pic 2)


Part of this new layout requires I relocate the drain line for the central air unit. It ran straight down the middle of the wall (right where I wanted to put the supply cabinets) to the floor then 45o along the bottom and out to the front of the garage. Today I just cut it off below the ceiling. I'll reroute it along the wall just below the ceiling. I have to pick up a couple fittings to finish.

Of course the mess has grown exponentially. Have to make a run to the recycler/dump this week.
 

Attachments

  • IMG_3865.jpg
    IMG_3865.jpg
    153.1 KB · Views: 79
  • IMG_3863.jpg
    IMG_3863.jpg
    111.4 KB · Views: 79
Last edited:
OP
M

Motorman55

Well-known member
Joined
Apr 10, 2016
Messages
2,630
Location
South Jersey
I went out to HF today and ordered the 16" End Locker in 'black' to match the black shop benches. The guy said it would take a bout a week for it to come in and will call me when it does. I plan to mount the End Locker to the right side of the 4' black electric bench.

Here's an updated work in progress drawing for the shop:

The MC Lift, Blast Cabinet and Hyd. Press are all mobile so their location will vary as needed. Other shop equipment (not shown in drawing) include a welder & cart, bench grinders/polishers, belt sander, air compressors, detailing cart, as well as additional overhead shelving and or cabinets, etc.

Eventually I'll get around to painting the floor light gray. I planned on the walls having a Lt gray lower section, white upper section and a 2 or 3 inch red stripe dividing them. Of course the ceiling will remain white too.
 

Attachments

  • IMG_3870 (2).jpg
    IMG_3870 (2).jpg
    124.8 KB · Views: 55
Last edited:
OP
M

Motorman55

Well-known member
Joined
Apr 10, 2016
Messages
2,630
Location
South Jersey
On Saturday, I purchased this small cart today on-line at Michaels Craft Store on sale with a coupon for $39.99, then picked it up at one of their local stores. I bought it to use in the shop office to hold all my art/sign painting supplies.

Its not very big, but once its bolted together its pretty sturdy. Two of the four wheels are locking type to keep it from moving. I loaded it up with a some of my auto/cycle cleaners/polishes and a HF glove holder to see how it would hold up to some weight and still be able to roll around. It does both no problem.

Maybe I'll get another one to use in the garage too. With a few modifications and possibly a small box or dividers on top it could make for a nice detail cart. Maybe hold the vacuum, hoses and attachments too.
 

Attachments

  • IMG_3877.jpg
    IMG_3877.jpg
    87.1 KB · Views: 72
  • IMG_3878.jpg
    IMG_3878.jpg
    84.8 KB · Views: 69
  • IMG_3879.jpg
    IMG_3879.jpg
    94 KB · Views: 79
Last edited:
OP
M

Motorman55

Well-known member
Joined
Apr 10, 2016
Messages
2,630
Location
South Jersey
Working on the left side wall of the garage, I removed all the drawers from the 36 drawer cabinet and pulled it out from its location in-between the two 42" L x 46" H x 12" D steel shelving units.

Next I leveled and bolted the two previously separated steel shelving units together making for one continuous 7 Ft long unit. Sometime this week I'll top them with a 7' long piece of 3/4 ply or smooth pine board.

Tomorrow, per the drawing, I'll move the 36 drawer cabinet over to the right outer side garage wall.
 

Attachments

  • IMG_3870 (3)_LI.jpg
    IMG_3870 (3)_LI.jpg
    125.2 KB · Views: 35
Last edited:
OP
M

Motorman55

Well-known member
Joined
Apr 10, 2016
Messages
2,630
Location
South Jersey
Right now the garage/shop looks like a hurricane hit it as I continue to rearrange cabinets and equipment.

The right side will not be completely done until the HF 'Black' Side Locker comes in. Once I set that in place next to the 4' 'Black' Electric Bench I can **** up the Craftsman single bank tool box to it and so on along the wall.

I'll post some pics once I get a few more things in place.
 
Last edited:

Matias

Well-known member
Joined
Feb 28, 2015
Messages
616
Location
Finland
Lot of work done there! Rearranging does create quite a mess before everything is finished... Hopefully the black locker arrives soon!

Been thinking about that cart also, especially as a detail cart with vacuum. I suspect the vacuum would be used more if it is readily available.
 
OP
M

Motorman55

Well-known member
Joined
Apr 10, 2016
Messages
2,630
Location
South Jersey
Lot of work done there! Rearranging does create quite a mess before everything is finished... Hopefully the black locker arrives soon!

Been thinking about that cart also, especially as a detail cart with vacuum. I suspect the vacuum would be used more if it is readily available.

There's a possibility it will come in this Wednesday if I'm lucky, but the sales girl said its more likely to come the following Wednesday. We'll see. Definitely holding things up but I've got plenty of other things to do yet to keep me busy in the shop.

This is the detail cart (pic 1) I made from a side cabinet last year. Its worked out good, but now I'm thinking of using it for something else.

This little cart (pic 2) (See post #94) I just bought on-sale last Saturday at a Michaels Craft Store for the shop office might work also work out as a detail cart. If I go this route I'll have to buy another one (not sure I can get it as cheap again) or look around for something else.

Of course I could buy a HF 4 or 5 drawer cart on sale and just call it done, but then I'll have to choose a color...red or black or maybe white? But then the wife will want to buy something of equal or double the price of the cart too....:lol_hitti
 

Attachments

  • IMG_2886.jpg
    IMG_2886.jpg
    110.4 KB · Views: 42
  • IMG_3879.jpg
    IMG_3879.jpg
    94 KB · Views: 37
Last edited:
OP
M

Motorman55

Well-known member
Joined
Apr 10, 2016
Messages
2,630
Location
South Jersey
Well. I managed to pull out a lot of extra tools and various small tool/file boxes that I don't want and have no desire or time to try to sell.

Most of the stuff came to me buy way of 'free' or in 'Lot' purchases. You know you buy the box or 'Lot' of stuff because there's one or two things in the Lot you really need then the rest you try to sell forever and can't so you end up giving it away or it ends up in the trash/recycle dump. Meanwhile it takes up a lot of valuable room or storage space.

Anyway, I took them down to a local Thrift Shop along with some older clothes and various household items the wife didn't want and donated them. This Thrift Shop sells the items to buy food and supplies for their free Food pantry for the needy. This was our second donation to them. We're already putting more things together to donate.

We've actually found and purchased some things there that we collect too. The wife and I now have a new system. We'll continue to buy things we collect or want in a 'Lot' when necessary, but now we'll donate the rest to this Thrift Shop right away.
 
OP
M

Motorman55

Well-known member
Joined
Apr 10, 2016
Messages
2,630
Location
South Jersey
Today I went to Lowes and had some 3/4 smooth one side plywood and pegboard cut to size for use in the shop.

When I got home I installed the single long board on top of the two gray metal shelves to form the one piece 17" x 84" shelf top per the new layout. I drilled a screwed down the board on the far ends. I'll be gluing a 1/2 round trim board to the front edge to finish it off. I plan to paint the board a dark gray.

I modified a bottom metal shelf to form an overhead cabinet which I placed over the right half of the lower shelf unit. I have a smaller piece of ply that's cut to fit the bottom of the overhead cabinet to form its lower shelf. That still needs a little trimming to fit. That'll get painted dark gray also. Should get that done tomorrow.

I dry fitted the two small peg board on the right side. The left side larger board will need its length trimmed a few inches to fit. Then its just a matter of leaving some backspacing and screwing them to the wall.

I'm still deciding what color to paint the pegboards. I'm thinking red or yellow to match the pegboards on my motor and electric benches. :headscrat
 

Attachments

  • IMG_3902.jpg
    IMG_3902.jpg
    153.6 KB · Views: 67
  • IMG_3901.jpg
    IMG_3901.jpg
    151.4 KB · Views: 60
  • IMG_3900.jpg
    IMG_3900.jpg
    114.7 KB · Views: 68
  • IMG_3870 (3)_LI.jpg
    IMG_3870 (3)_LI.jpg
    125.2 KB · Views: 50
To avoid these ads, REGISTER NOW!
OP
M

Motorman55

Well-known member
Joined
Apr 10, 2016
Messages
2,630
Location
South Jersey
Today I installed the small upper pegboard and shelf in the overhead cabinet. I painted the upper pegboard 3 coats of yellow ( matches the motor bench pegboard color) and added a red stripe across the top of it.

Next I painted the small overhead cabinet shelf dark gray, as well as the long board across the lower cabinets. It looks ok, but I'm not sure I really like the contrast between the yellow pegboard and the light gray color of the metal cabinets. I think I'm going to repaint the boards gloss black.)

I didn't paint the small lower pegboard nor the large pegboards yet. I want to go red on those, but I don't have any red paint left. Have to pick that up tomorrow.

I'll snap a pic after I'm done painting.
 
Last edited:
OP
M

Motorman55

Well-known member
Joined
Apr 10, 2016
Messages
2,630
Location
South Jersey
The weather has been pretty mild these past few days which allowed me to keep the overhead garage door open.

Tinkered with the Harley a little, mostly just checking things over in general.

While I didn't' get to do too much else in the workshop/garage today, I did manage to repaint the overhead shelf and long board across the two cabinets Semi-Gloss Black. I think they look a lot better then the dark gray.

In the shop office I added a nice silver/gray colored clamp-on swivel type overhead lamp to the drafting table. I picked it up last week at the local Thrift Shop for $5.00. Condition is like new.

Tomorrow I'll pick up the red paint for the pegboards as well as some small rollers and misc other things.
 
OP
M

Motorman55

Well-known member
Joined
Apr 10, 2016
Messages
2,630
Location
South Jersey
I'm still playing around with the shop layout drawing in my quest to get the most useage out of the limited space available in this 1 car size garage.

There's no doubt I'll have to get rid of some things that are taking up space. Looks like my old 1969/70 Bolens 900 Tube Frame Tractor project will have to go. Its completely apart and I'm tired of tripping over the rear end and front axle and moving all the boxes and parts around. Its got to go.

Also I've got this big *** heavy 16 HP I/C motor sitting on a moving dollie that a friend gave me a couple years ago that I'll probably never get around to working on. Just another anchor in the shop. Another "Its got to go."

Then there's boxes of misc. electrical stuff, car stuff, bike stuff, old tires, batteries and who knows what, that I dragged here from the old house that's just taking up space.

Definitely have to make another donation to the Thrift Shop and Dump/recycler.
 
Last edited:
OP
M

Motorman55

Well-known member
Joined
Apr 10, 2016
Messages
2,630
Location
South Jersey
Today I added a 3/4 plywood base and castor wheels to the Skat Blast cabinet.
Nice thing about the base is it offers a little more storage space. Finally I can move it around and out of the way anytime I need to.

Still waiting for the HF Black 16" End Locker. They're suppose to call me when it comes in. Really need to get it here so I can finish the right side of the garage layout. Tomorrow I'll give them a call and see what's up.

Bought a small can of red paint to paint the pegboards, but after painting a small test piece, I don't like the shade of red. Have to go back and get a deeper red shade. So the brown pegboards will have to wait till this weekend to get painted red.

Meanwhile, I played around a little with hanging up some of my body hammers, dollies and air tools to get an idea of what I can fit. I may just hang all my hammers and dollies and keep the air tools underneath on the shelf.

Also added some more stuff to the donate pile for a run to the Thrift Shop and sorted through a few drawers of nails and screws.

Long way to go yet.
 

Attachments

  • IMG_3909.jpg
    IMG_3909.jpg
    63.5 KB · Views: 48
  • IMG_3912.jpg
    IMG_3912.jpg
    158.6 KB · Views: 79
Last edited:

bj383ss

Well-known member
Joined
Sep 29, 2011
Messages
3,166
Location
TX
Been following along on your thread for awhile just never commented. I really like your space and how you have planned it all out.

When you mentioned Yellow pegboard I didn't think it would look good but it came out great inside that gray cabinet. I love those style Craftsman hammers and you seem to have the whole collection. If only I had known at the time I would have bought them all. I just have the Medium size Ball peen.

Bret
 
OP
M

Motorman55

Well-known member
Joined
Apr 10, 2016
Messages
2,630
Location
South Jersey
Today I had to run down to HF to pick up the US General Side locker I ordered two weeks ago. The wife tagged along.

While waiting for the guy to bring out the Locker we walked around a bit and wandered over near the welding stuff. I mentioned to the wife that the 125 Titanium welder was on sale for $159.99, down form their regular $199.99 price. Told her I hoped it would be on sale again in two months when I planned to buy it.

She said buy it now and save the $40.00 just in case it wasn't on sale for awhile. I like how she thinks.

So today I got the following from HF:

1) A HF Side Locker in Black
2) A HF Titanium 125 Welder
3) Storehouse 12 Drawer Organizer

I just unboxed them today. Tomorrow I'll set the Side Locker in place and set up the Titanium welder.
 

Attachments

  • IMG_3917.jpg
    IMG_3917.jpg
    74.7 KB · Views: 53
  • IMG_3914.jpg
    IMG_3914.jpg
    108.2 KB · Views: 48
  • IMG_3915.jpg
    IMG_3915.jpg
    94.7 KB · Views: 49
Last edited:
OP
M

Motorman55

Well-known member
Joined
Apr 10, 2016
Messages
2,630
Location
South Jersey
Right now the Side locker is sitting on a dollie. I need to build a platform for the black HF Side Locker to sit on. Since the locker is only 55" tall and I want the top of the locker to be at least level with the black electric bench top shelf, I need to raise it about 7-1/2" to 8" off the floor.

I already have some 3/4" plywood, so tomorrow I have to run over to Home Depot to pick up a length 2x8 lumber. After cutting four pieces to size I'll stand the 2X8's on end and top it off with the 3/4 ply to make a 22 x 16-1/2 frame/base. That should get me to where I need to be. Then I'll paint it black to blend with the black Locker.
 

Attachments

  • IMG_3915.jpg
    IMG_3915.jpg
    94.7 KB · Views: 36
  • IMG_3913.jpg
    IMG_3913.jpg
    91.2 KB · Views: 34
OP
M

Motorman55

Well-known member
Joined
Apr 10, 2016
Messages
2,630
Location
South Jersey
Been following along on your thread for awhile just never commented. I really like your space and how you have planned it all out.

When you mentioned Yellow pegboard I didn't think it would look good but it came out great inside that gray cabinet. I love those style Craftsman hammers and you seem to have the whole collection. If only I had known at the time I would have bought them all. I just have the Medium size Ball peen.

Bret

I bought all those Craftsman hammers at once back in the late 1980's/early1990's I think. I like the light gray paint on the heads.

Except for the small mallet, all the others were seldom used and lightly at that. I have other Craftsman hammers that are used most the time, so these have very little wear on their wood handles original finish. Even the 'Craftsman' engraved black lettering are like new.
 
OP
M

Motorman55

Well-known member
Joined
Apr 10, 2016
Messages
2,630
Location
South Jersey
Picked up a 2"x8"x8' length of board today and had the guy cut it down to size for me. Of course they don't do precise cuts, so I still had to trim two of them a little.

Got busy with some glue and screws and assembled a 22"x16-1/2" frame and painted it a couple of coats of black paint. Tomorrow I'll top it with a piece of 3/4 ply.

After that its just a matter of setting it in place next to the black electrical work bench and sliding the HF End Locker on it.
 

Attachments

  • black frame for end locker.jpg
    black frame for end locker.jpg
    19.1 KB · Views: 21
Last edited:
OP
M

Motorman55

Well-known member
Joined
Apr 10, 2016
Messages
2,630
Location
South Jersey
I set the HF End Locker on the wooden platform frame and shimmied it into place. I had to add a couple of small wood blocks under the wood frame to level it. These are temporary and will be replaced with a one piece shim painted black to match.

With that done, I turned my attention to painting the two pegboards over the long gray shelving on the other side of the garage. I decided on the 'Banner Red' acrylic paint. Took 4 coats to cover them.

While the final coat of red paint was drying on the pegboards, I cut and nailed on the edge trim to both shelves and applied 2 coats of black paint to finish.

In between all the above tasks I kept busy cleaning up and trying to put things away. I was partially successful. Lots more to do.
 

Attachments

  • IMG_3929.jpg
    IMG_3929.jpg
    101.4 KB · Views: 44
  • IMG_3931 (2).jpg
    IMG_3931 (2).jpg
    76.9 KB · Views: 38
  • IMG_3938.jpg
    IMG_3938.jpg
    152.1 KB · Views: 45
  • IMG_3937.jpg
    IMG_3937.jpg
    150.4 KB · Views: 43
  • IMG_3936 (2).jpg
    IMG_3936 (2).jpg
    158.9 KB · Views: 48
OP
M

Motorman55

Well-known member
Joined
Apr 10, 2016
Messages
2,630
Location
South Jersey
Today I unbolted the Craftsman bench grinder from its stand and relocated it to sit on top of the small Craftsman side cabinet that I previously bolted to the side of the large roller tool cabinet (which is now stationary since removing its wheels.)

Next I wrapped an electrical cord with some yellow electrical tape (to make it easy to see and avoid hitting it accidently) and made a drop cord from the ceiling to power the bench grinder.
 

Attachments

  • IMG_3950 (2).jpg
    IMG_3950 (2).jpg
    116.1 KB · Views: 61
  • IMG_3940 (2).jpg
    IMG_3940 (2).jpg
    147.5 KB · Views: 58
  • IMG_3939.jpg
    IMG_3939.jpg
    105.6 KB · Views: 61
OP
M

Motorman55

Well-known member
Joined
Apr 10, 2016
Messages
2,630
Location
South Jersey
Started playing around with the possibility of mounting my vintage Snap-On MT-540 tester onto the now freed up bench grinder stand.

The base of the MT-540 Tester's lined up perfectly with the bench grinder stand top mount. It would just be a matter of cutting a piece of rubber to the size of the stands mounting plate to isolate the Tester from the stand before bolting it down.

I also would need to have a bracket of sorts to hang the various Tester cables. So I started looking around and found the two top mounting plates from my Craftsman Table Saw stand that I no longer use. They're pre-bent on a 45o angle and have some pre-drilled mounting holes.

I put one under the front of the Tester and it looks like it'll work ok. If I want I could also add the other one to the back of the tester for more mounting options. Selecting some rubber grommets from the HF grommet kit, I pushed them into a few of the holes to hold the small +/- tester leads. Larger cables could be hung from hooks bolted to the mounting plate(s).

I would add four wheels to the bottom of the stand legs to make it mobile. To finish it off, I could paint every thing red to match the MT-540 Tester.

I'll update on this project as it progresses along.
 

Attachments

  • IMG_3943.jpg
    IMG_3943.jpg
    133.2 KB · Views: 33
  • IMG_3948.jpg
    IMG_3948.jpg
    142.4 KB · Views: 31
  • IMG_3947.jpg
    IMG_3947.jpg
    134 KB · Views: 32
  • IMG_3953.jpg
    IMG_3953.jpg
    135.7 KB · Views: 36
  • IMG_3944.jpg
    IMG_3944.jpg
    147.3 KB · Views: 32
  • IMG_3952.jpg
    IMG_3952.jpg
    149 KB · Views: 32
Last edited:
OP
M

Motorman55

Well-known member
Joined
Apr 10, 2016
Messages
2,630
Location
South Jersey
I picked up this Kobalt 26 gal, 1-1/2 HP compressor at the dump today for 'free'. The compressor is shot/blown apart, but all I want is the tank anyway.

The pressures switch, gauges, control valve, check valve and safety valve are all in excellent condition. Actually they look brand new. Even the paint on the tank is in excellent condition as are the wheels and pads.

The gauges themselves still had the original clear protective film on them which I peeled off to exposed perfectly clear plastic lenses and dial faces/needles.

The tank is dated 10/2008. I scoped the inside of the tank and its clean with the exception of some oil residue. I'm going to power wash the inside of the tank thru the top pressure gauge mounting hole and flush it out.

The drain valve was missing, but the threads in the mounting hole were perfect, so I plugged it up and pressurized the tank to about 30 Lbs. thru the tanks check valve with my other small compressor. No leaks and the tanks check valve worked fine.

I pulled off the bad motor/pump from the kobalt tank and placed the Smith pump and mounting plate on top to check for fitment. Just need to do some modifications.

Another project....
 

Attachments

  • IMG_3954 (2).jpg
    IMG_3954 (2).jpg
    103.8 KB · Views: 36
  • IMG_3985.jpg
    IMG_3985.jpg
    147.9 KB · Views: 35
  • IMG_3958.jpg
    IMG_3958.jpg
    148.2 KB · Views: 38
  • IMG_3964.jpg
    IMG_3964.jpg
    117.9 KB · Views: 34
  • IMG_3965.jpg
    IMG_3965.jpg
    153.4 KB · Views: 37
  • IMG_3981.jpg
    IMG_3981.jpg
    153.7 KB · Views: 38
  • IMG_3982.jpg
    IMG_3982.jpg
    150.2 KB · Views: 35
Last edited:
OP
M

Motorman55

Well-known member
Joined
Apr 10, 2016
Messages
2,630
Location
South Jersey
Here's a couple more pics of the Kobalt unit. It looks to me as though the unit itself may have fallen over and that's what cracked/broke the pump.

The pump side was trashed and it also broke the mounting on the motor side. The cooling vane is still intact as well as the piston and rod. The compressor head is also intact with the valves as well as the finned discharge line. The motor turns freely and the motor capacitors are undamaged.

I bet this motor would run if powered up.

The gauges still had the clear protective film on them. I peeled them off and you can see in the photo the gauges are perfect. There's no corrosion at all on anything. Also the handle is undamaged.
 

Attachments

  • IMG_3956.jpg
    IMG_3956.jpg
    147.1 KB · Views: 29
  • IMG_3957.jpg
    IMG_3957.jpg
    102 KB · Views: 30
  • IMG_3955.jpg
    IMG_3955.jpg
    155.9 KB · Views: 32
OP
M

Motorman55

Well-known member
Joined
Apr 10, 2016
Messages
2,630
Location
South Jersey
Made some progress on the compressor project today.

I mounted the pump and motor and temporarily hooked it up and ran & tested. Everything works and looks good to go.

Now to plumb it and wire it. The Lowes is still open so I'll make a run there once I make a list of needed fittings, copper tubing and wire.
 

Attachments

  • IMG_3990.jpg
    IMG_3990.jpg
    123.7 KB · Views: 24
  • IMG_3989.jpg
    IMG_3989.jpg
    152.3 KB · Views: 23
  • IMG_3991.jpg
    IMG_3991.jpg
    153.6 KB · Views: 20
OP
M

Motorman55

Well-known member
Joined
Apr 10, 2016
Messages
2,630
Location
South Jersey
Yesterday after finding the damaged Kobalt air compressor at the dump and running it home to unload, I took the wife over to the local garden center to pick up some things for the house/yard.

Bought 6 Forsythias and some soil to plant along the property line on the side of the house (waiting for delivery)

Also purchased a couple of 'flats/trays' of flowers and potting soil along with a large 2 pc cast cement 'shell' design bird bath which we took home in the car.

The bird bath will go in the front of the house on one side. But first I have to cut down a 6' tall Juniper that's seen better days.

So I'll get to use some of the yard tools this week. Which reminds me I still have to hook up the garden hose.
 
OP
M

Motorman55

Well-known member
Joined
Apr 10, 2016
Messages
2,630
Location
South Jersey
Today I plumbed and wired the Smith 1/2 HP and Gould Motor to the 'free' Kobalt air tank.

I didn't buy any new parts to do it, just used what I had on hand and parts from the Kobalt broken motor. What I ended up with is this 'Frankenstein' of a compressor. :wtf:

I've got it set to kick on around 50# and off at around 75# which is plenty of air pressure for what I want to use it for.

When I get more time I'll redo it properly with new fittings and copper tubing and make it a little more squared away. Then I'll paint it a single color.

Meanwhile it works great.
 

Attachments

  • IMG_3993.jpg
    IMG_3993.jpg
    117.6 KB · Views: 25
  • IMG_3992.jpg
    IMG_3992.jpg
    152 KB · Views: 23
OP
M

Motorman55

Well-known member
Joined
Apr 10, 2016
Messages
2,630
Location
South Jersey
Getting back to the garage layout.

After getting the HF End Locker in place I realized I was short a few inches in my wall length measurements. So a redo of the right side of the garage wall setup was in order.

The 36 drawer parts cabinet now serves as the base for the right side of the new 6' long narrow bench top. On top of the 36 drawer cabinet I placed the two small gray drawer cabinets. These will now hold various Roloc discs, Angle grinder cut off/wire discs, bench grinder wheels, blast cabinet nozzles, etc.

I then hung the larger gray shelving unit above the two gray drawers leaving enough space underneath to place a couple small plastic parts drawers I've yet to order. This upper shelving unit will hold various shop items and cleaning products.

I kept the left side of the bench space empty underneath to store a small portable work bench (a project I'm working on now) that I can roll in and out as needed.

I finished the left side of the bench off by adding a small shelf above it to hold a small Craftsman box which will now hold the welding wire rolls, tips etc. The new HF Titanium welder fits nicely under the small shelf.

As always the end goal is to make lots of storage and extra work bench space in a small footprint in a small garage/shop.
 

Attachments

  • IMG_4035.jpg
    IMG_4035.jpg
    117.7 KB · Views: 24
  • IMG_4037.jpg
    IMG_4037.jpg
    82.1 KB · Views: 26
  • IMG_4038.jpg
    IMG_4038.jpg
    100.1 KB · Views: 29
  • IMG_4032.jpg
    IMG_4032.jpg
    149.6 KB · Views: 31
  • IMG_4033.jpg
    IMG_4033.jpg
    80.6 KB · Views: 29
  • IMG_4031.jpg
    IMG_4031.jpg
    149.8 KB · Views: 30
Last edited:
OP
M

Motorman55

Well-known member
Joined
Apr 10, 2016
Messages
2,630
Location
South Jersey
And now back to the left side of the garage...

With the left side shelving unit pretty well done, its time to start thinking how I want to store the supplies in it. So the first thing I'll need to do is empty the shelves of everything and sort thru what I need to keep and what I can throw out. That'll take a better part of a day to finish.

Meanwhile, not shown in the photo, is about a 3+ feet length of wall space to the left of the shelving unit. Right now I have my yard tools hanging on the wall space there and off of hooks screwed into the wood shelf that extends from above the red pegboard over to the garage door wall.

I'm thinking of building a 3'W x 18"D floor to ceiling cabinet with double doors out of plywood in that space. We'll see.

OK, time to get some stuff done...
 

Attachments

  • IMG_3938.jpg
    IMG_3938.jpg
    8 KB · Views: 239
Last edited:
OP
M

Motorman55

Well-known member
Joined
Apr 10, 2016
Messages
2,630
Location
South Jersey
Just goofing around in the shop today and found myself I crafting a small heat shield for the '74 Harley rear pipe.

I made it from a larger chrome shield off another bike I had. Just made a basic cut and shaped it. I sanded the chrome some to help the paint stick better. Then marked and drilled the holes. Gave it a final sanding to knock off any burrs.

I mounted it temporarily for size and fit. Next I'll paint it Hi-Temp Flat Black. I still have to re-paint the exhaust pipes sometime this month. Waiting for the temps to get up near 70 degrees. Have some other things to re-paint on the bike too.
 

Attachments

  • IMG_4057.jpg
    IMG_4057.jpg
    150.9 KB · Views: 16
  • IMG_4056.jpg
    IMG_4056.jpg
    151.5 KB · Views: 14
  • IMG_4055.jpg
    IMG_4055.jpg
    148 KB · Views: 13
  • IMG_4054.jpg
    IMG_4054.jpg
    125.6 KB · Views: 14
  • IMG_4052.jpg
    IMG_4052.jpg
    144 KB · Views: 14
  • IMG_4063.jpg
    IMG_4063.jpg
    147.2 KB · Views: 21
To avoid these ads, REGISTER NOW!
Top Bottom