
You are using an out of date browser. It may not display this or other websites correctly.
You should upgrade or use an alternative browser.
You should upgrade or use an alternative browser.
My 4'x7' Trailer Build Thread
- Thread starter aka Larry
- Start date
zoominomad
Active member
- Joined
- Sep 10, 2014
- Messages
- 42
Thanks for the detailed post about your trailer! I love reading about the trailers that people build. Lots of interesting info here, and if you still have the spreadsheet you spoke of, I'd love to get a copy of it. Should I PM you my information for it? Thanks again for the great thread!
Update.
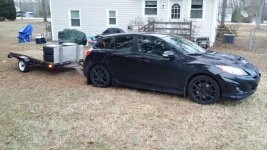
Several times lately I've had to borrow the company truck to haul 10ft long sections of EMT or other items. No big deal until the last time I used it and the boss gave me **** about it. Use of the truck occasionally (like once a month) is one of the few perks I have and it kind of ticked me off.
I decided to do something about it by making a trailer extender for my trailer. It doesn't need to hold much weight, just act as a bearing surface to secure a long load items like 2x4s or EMT sections, or a 4x8 sheet of plywood.
The idea was to make it easy to extend and retract as needed, but extend the overall length from 7' to 10'. I had one section of leftover 1" square tubing so I cut it in half and left 2' on the trailer for support with 3' cantilevered off the back. It would be secured with 4 tabs and 1/4-20 bolts.
I welded it together and it became clear that the tubing by itself would be too weak in the cantilevered position. I decided to modify the design and convert the tube into a girder or ladder frame if you will by adding some 1/2" square tubing.
Here are a few pics:
Retracted position

Extended position:

I took it to Lowes yesterday and extended it once I got there. It worked like a champ. Here you can see it in action outside the store:

Several times lately I've had to borrow the company truck to haul 10ft long sections of EMT or other items. No big deal until the last time I used it and the boss gave me **** about it. Use of the truck occasionally (like once a month) is one of the few perks I have and it kind of ticked me off.
I decided to do something about it by making a trailer extender for my trailer. It doesn't need to hold much weight, just act as a bearing surface to secure a long load items like 2x4s or EMT sections, or a 4x8 sheet of plywood.
The idea was to make it easy to extend and retract as needed, but extend the overall length from 7' to 10'. I had one section of leftover 1" square tubing so I cut it in half and left 2' on the trailer for support with 3' cantilevered off the back. It would be secured with 4 tabs and 1/4-20 bolts.
I welded it together and it became clear that the tubing by itself would be too weak in the cantilevered position. I decided to modify the design and convert the tube into a girder or ladder frame if you will by adding some 1/2" square tubing.
Here are a few pics:
Retracted position
Extended position:
I took it to Lowes yesterday and extended it once I got there. It worked like a champ. Here you can see it in action outside the store:

jeopardy98
Well-known member

shortykorte
Well-known member
That's a great attachment. Sized for most needs then extended when you need the occasional conduit or 12 footer. I would like to see a close up of how the extension stays in place.
Update 7/5/18.
As of last month, my trailer is now 7 years old. It has served me well, but it's not looking as good as it used to, so a few months ago I decided the trailer needed a repaint. After building a motorcycle trailer for friend this spring using composite decking I decided I wanted to replace mine. My buddy gave me the decking free several weeks ago, and with a two month gap of not needing the trailer, I decided now is the time to get it done.
A couple of weekends ago I pulled it in the shop and removed all the old PT decking, screws, tie-downs, and toolbox. I've also decided to redo most of the lighting since the adhesive LED strip lights haven't held up aesthetically (they all still work) so I've ordered new LEDs for the clearance lighting. I also ordered new stainless-steel machine screws and nylon lock nuts to secure the new decking, along with new stainless-steel tie-downs to replace the old rusted ones.
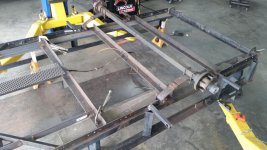
I started by removing the old decking, toolbox, fenders, lighting, and wheels so basically just the frame and axle is left:

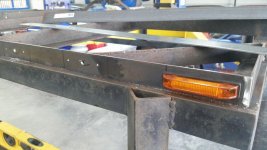
To accommodate the new clearance lighting along the sides, I'm adding some 1-1/2" flat bar to form a skirt of sorts. In the first pic I have it clamped in place and in the second you can where I've stitch welded it to the frame.


I plan to sand the frame to remove any rust and get the frame ready to be repainted. The initial coating was done via rattle cans, but this time I'll be using Rustoleum and my HF gun to get a better coating.
Stay tuned for further updates and pics.
As of last month, my trailer is now 7 years old. It has served me well, but it's not looking as good as it used to, so a few months ago I decided the trailer needed a repaint. After building a motorcycle trailer for friend this spring using composite decking I decided I wanted to replace mine. My buddy gave me the decking free several weeks ago, and with a two month gap of not needing the trailer, I decided now is the time to get it done.
A couple of weekends ago I pulled it in the shop and removed all the old PT decking, screws, tie-downs, and toolbox. I've also decided to redo most of the lighting since the adhesive LED strip lights haven't held up aesthetically (they all still work) so I've ordered new LEDs for the clearance lighting. I also ordered new stainless-steel machine screws and nylon lock nuts to secure the new decking, along with new stainless-steel tie-downs to replace the old rusted ones.
I started by removing the old decking, toolbox, fenders, lighting, and wheels so basically just the frame and axle is left:
To accommodate the new clearance lighting along the sides, I'm adding some 1-1/2" flat bar to form a skirt of sorts. In the first pic I have it clamped in place and in the second you can where I've stitch welded it to the frame.
I plan to sand the frame to remove any rust and get the frame ready to be repainted. The initial coating was done via rattle cans, but this time I'll be using Rustoleum and my HF gun to get a better coating.
Stay tuned for further updates and pics.
Attachments


Stuart in MN
Well-known member
Are clearance lights required on a trailer that small in your state? Or are they just for aesthetics. Don't think I've ever seen them used here.
sqznby
Well-known member
Great build. And nicely done.
It looks like its held up quite well over the years, especially being in Eastern NC.
Where about do you live?
I'm with you, LEDs are great.
What paint are you planning on using for round two?
It looks like its held up quite well over the years, especially being in Eastern NC.
Where about do you live?
I'm with you, LEDs are great.
What paint are you planning on using for round two?
Great build. And nicely done.
It looks like its held up quite well over the years, especially being in Eastern NC.
Where about do you live?
I'm with you, LEDs are great.
What paint are you planning on using for round two?
Thank you!
I live in Wilson, NC.
I'm planning on using Rustoleum Gloss Black in the 1-quart can, using my HF spray gun to apply it.
Last edited:
zmotorsports
ALLIANCE MEMBER
The trailer looks great. I don't know how I missed this on the original build.
Looking forward to the updated version.
Looking forward to the updated version.
sqznby
Well-known member
Thank you!
I live in Wilson, NC.
I'm planning on using Rustoleum Gloss Black in the 1-quart can, using my HF spray gun to apply it.
Oh cool. My daughter lives in Wilson. I'm out in Morehead City.
Nice. Those HF guns work surprisingly well.
Looking forward to the end results, especially all lit up with the LEDs.
HOTFR8
Banned
How do you see the rear lights when you use the extension? Here that would be illegal.

HOTFR8
Banned
Very clever. Here the extension would not be legal as our dimensions have to be set for registration. I managed to some time ago buy the lights you have on the bottom in bulk and have them for sale.
driftpin
Well-known member
Looks like a good upgrade you have.
I have a 4' X 10' utility trailer which I refitted, keeping just the original hot-dip galvanized U-channel frame. It was originally a made-in-Miami FL small boat trailer. I bought a Northern Tool Supply axle and springs; I already had galvanized wheels. New tires of course, and it's got old-style lighting, and a 2" X 6" PT deck, with low PT 2" X 10" sides held together with Simpson Strong-Tie galvanized through-bolted brackets. From the dump weight tickets, it's carried debris from remodeling of 2,000 lbs, it weighs 500 lbs.
Here's a pic of an extension I made for my truck. Unfortunately it was stolen from my home before I got a chance to use it much. Like you, I was looking for some support for longer loads of materials, and to give my motorcycle a longer bed rather than having the rear wheel bearing solely upon the tailgate. It was never intended to carry much weight.
Attachments


Bauschracing1
Member
The tractor supply farm paint is great for trailers and is oil based. It holds up well. You have to follow directions and put on each coat and let dry complete before spraying the next.
Sent from my iPad using The Garage Journal mobile app
Sent from my iPad using The Garage Journal mobile app
larry4406
Well-known member
Excellent build thread! Thanks for the update as I never saw the original build.
Yarz
Well-known member
Here the extension would not be legal as our dimensions have to be set for registration.
Does that include the tongue length?
If not, you could make some form of extending tongue with a support bracket. Then when you need to haul longer material, extend the tongue and slide the material under the front crossbar of the trailer, to rest on the support bracket.
The dimensions of the cargo area of the trailer would never change.
HOTFR8
Banned
Does that include the tongue length?
If not, you could make some form of extending tongue with a support bracket. Then when you need to haul longer material, extend the tongue and slide the material under the front crossbar of the trailer, to rest on the support bracket.
The dimensions of the cargo area of the trailer would never change.
Yes it does include the length to the tounge. Under a certain size in Victoria (6x4 and smaller) we do not have to register a trailer. Although that has a few issues. If the trailer is over a certain weight or carries an engine then it must be registered. An engine can be a boat with a motor. This is only Victoria and if I take my trailer into another state I can be booked for an unregisterd vehicle.

The extension idea here would mean you register it how it measures with the extension in place.
https://www.vicroads.vic.gov.au/registration/new-registration/register-a-trailer-or-caravan
Click on the + sign Trailer types and registration requirements and read more.
Last edited:
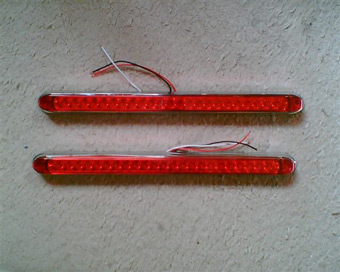
Update 7/12/18.
One problem I've always had with the trailer is backing it when it's not loaded. When it's loaded with my tires, they stickup high enough for me to see it, but otherwise I have to get out and open the toolbox lid. Back when I had my Jet Ski, I added guide poles to that trailer, which were really designed for getting the Jet Ski straight onto the trailer, but it got me thinking.
After a some research, I discovered many of the side-by-side, and dune buggy crowd who like to play around on the dunes at night attached lighted whips so they can be more easily seen. They use fiberglass rods wrapped with LEDs, which of course peaked my interest, so a few weeks ago I ordered the materials to build my own.
Basically it's a pair of 3/8" diameter x 36" long fiberglass rods, wrapped with 8' of 5050 LED strips each, all covered with clear heat-shrink to make it weatherproof. It was a little tedious wrapping the first one until I figured out a good technique, but the second one went pretty quick. I hooked them up to be sure they worked and took a pic to share. I'm happy with how they turned out, and can't wait to get them installed on the trailer.
Attachments

Last edited:
Yarz
Well-known member
Neat idea! I have the same issue with seeing my little trailers.
Are you going to put them on a switch, or just connect to the running lights, so they're on all of the time?
Are you going to put them on a switch, or just connect to the running lights, so they're on all of the time?
sqznby
Well-known member
Wow, they look great. Nicely done.
Where do you get your LED supplies from? Superbrightleds?
Where do you get your LED supplies from? Superbrightleds?
7/16/18 Update.
I did get to work on the trailer project for a few hours yesterday. I've been spending all my free time lately on helping my buddy build a new 24 Hours of Lemons car. I've debated starting a thread on it, but not sure how many of you would be interested in seeing us build a 1998 Lincoln Mark VIII LSC and removing 10" of it's wheel base?
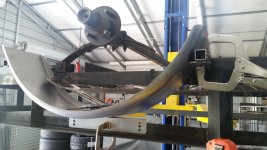
When I installed the old fenders on my trailer during the initial build, I simply welded the side flanges directly to the frame, which turned out to be a mistake. Since those fenders weren't really rigid, the bouncing of the trailer stressed the thin sheet metal until it finally cracked. For their replacement, I bought a set of rolled fenders, which are much more rigid, and made from a heavier gauge steel.
The task yesterday was to get them centered over the wheel and level, along with building a proper support for attachment. I used some 1" square tubing welded to the trailer's lower frame rail, along with a piece of 1/8" flat bar welded to the fender itself. Just in case the fender gets damaged, and need future replacement, I've decided to attach it to the support using 3/16" rivets instead of welding it in place. I only got to finish one before I ran out of time though.
Here are a few pics:


I did get to work on the trailer project for a few hours yesterday. I've been spending all my free time lately on helping my buddy build a new 24 Hours of Lemons car. I've debated starting a thread on it, but not sure how many of you would be interested in seeing us build a 1998 Lincoln Mark VIII LSC and removing 10" of it's wheel base?
When I installed the old fenders on my trailer during the initial build, I simply welded the side flanges directly to the frame, which turned out to be a mistake. Since those fenders weren't really rigid, the bouncing of the trailer stressed the thin sheet metal until it finally cracked. For their replacement, I bought a set of rolled fenders, which are much more rigid, and made from a heavier gauge steel.
The task yesterday was to get them centered over the wheel and level, along with building a proper support for attachment. I used some 1" square tubing welded to the trailer's lower frame rail, along with a piece of 1/8" flat bar welded to the fender itself. Just in case the fender gets damaged, and need future replacement, I've decided to attach it to the support using 3/16" rivets instead of welding it in place. I only got to finish one before I ran out of time though.
Here are a few pics:
Attachments


jhn9840
Well-known member
Can’t speak for anyone else, but I think the Lemons cars are pretty darn cool.
jhn9840
John
jhn9840
John
7/19/18 Update.
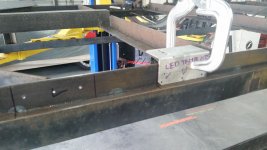
Got a little more done on the trailer yesterday after work. I worked on mounting the other fender, but didn't finish due to needing another section of flat bar. It happened to be in the trunk on my car, but I forgot my wife and I swapped cars yesterday.
I decided to move onto drilling the mounting holes for the new LED clearance lighting. Once I decided on the spacing, I made a drilling template from a piece of scrap angle. I made some marks and then clamped it into place so I could drill pilot holes for the outer mounting screws and larger center hole for the wiring:

Once I had the holes drilled, it was time for a test fit:

I got the holes drilled for (8) of the (20) lights before the boss got home and I called it a day. I'm working late at the office tonight, we go out for dinner Friday nights, Saturday I'll be working on the Hot Rod Lincoln Project, so it looks like it will be Sunday before I can get back to work on the trailer.
Got a little more done on the trailer yesterday after work. I worked on mounting the other fender, but didn't finish due to needing another section of flat bar. It happened to be in the trunk on my car, but I forgot my wife and I swapped cars yesterday.
I decided to move onto drilling the mounting holes for the new LED clearance lighting. Once I decided on the spacing, I made a drilling template from a piece of scrap angle. I made some marks and then clamped it into place so I could drill pilot holes for the outer mounting screws and larger center hole for the wiring:
Once I had the holes drilled, it was time for a test fit:
I got the holes drilled for (8) of the (20) lights before the boss got home and I called it a day. I'm working late at the office tonight, we go out for dinner Friday nights, Saturday I'll be working on the Hot Rod Lincoln Project, so it looks like it will be Sunday before I can get back to work on the trailer.
Attachments
7/23/18 Update.
I got a little more work done on the trailer yesterday. I finished drilling all the holes for the lighting, and got the second fender mount finished. I need to weld in a pair of angle supports for the toolbox and a few other welded tabs before I can move forward with sanding the frame to get ready for paint.
I got a little more work done on the trailer yesterday. I finished drilling all the holes for the lighting, and got the second fender mount finished. I need to weld in a pair of angle supports for the toolbox and a few other welded tabs before I can move forward with sanding the frame to get ready for paint.
7/30/18 Update.
With my buddy out of town, I didn't work on the Hot Rod Lincoln project, so I had time to get more done on my trailer. With all the time I've put in on this refresh, I think I could have built another trailer!
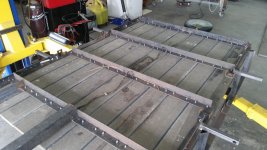
So I finally got all the holes drilled for the new lighting, and moved on to relocating the tabs that hold the trailer extender in place. The tabs had to be moved because the new fender mounts interfere with the old tab locations. Since the extender sits on top of the decking, the challenge was to get some of the decking in place, while gravity was against me. My neighbor was out of town for the weekend, so I was on my own trying to figure out a way to hold a 6'-0" board in place while clamping the ends. I finally decided to place the boards on jack stands, lower the trailer down using the lift to within an inch or so, allowing me to clamp everything in place as seen here.

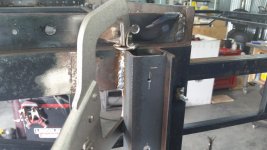
With everything clamped in place, I welded on new tabs made from 3/4" flat bar with 1/4-20 nuts up front:

In the rear, I drilled the existing frame and welded on a pair of square 1/4-20 nuts:


Once the new extender tabs were complete, I decided to go ahead and match-drill all the boards using the existing holes. Once finished, all the screws will be stainless-steel, countersunk flush with the deck, and secured with nylon locking nuts. For now, I decided to use some temporary #8-32 pans machine screws to hold all the boards in place. Unlike Mike, I didn't have the means to make my own screws, so went to the hardware store and bought some.

Since there is no way these boards are drilled perfect enough to be interchangeable, I numbered each one and marked it's orientation with a Silver Sharpie.

That's all I had time for this weekend. I have two more things that need to be welded into place, and then I'll be ready to sand and repaint the frame.
Stay tuned...
With my buddy out of town, I didn't work on the Hot Rod Lincoln project, so I had time to get more done on my trailer. With all the time I've put in on this refresh, I think I could have built another trailer!
So I finally got all the holes drilled for the new lighting, and moved on to relocating the tabs that hold the trailer extender in place. The tabs had to be moved because the new fender mounts interfere with the old tab locations. Since the extender sits on top of the decking, the challenge was to get some of the decking in place, while gravity was against me. My neighbor was out of town for the weekend, so I was on my own trying to figure out a way to hold a 6'-0" board in place while clamping the ends. I finally decided to place the boards on jack stands, lower the trailer down using the lift to within an inch or so, allowing me to clamp everything in place as seen here.
With everything clamped in place, I welded on new tabs made from 3/4" flat bar with 1/4-20 nuts up front:
In the rear, I drilled the existing frame and welded on a pair of square 1/4-20 nuts:
Once the new extender tabs were complete, I decided to go ahead and match-drill all the boards using the existing holes. Once finished, all the screws will be stainless-steel, countersunk flush with the deck, and secured with nylon locking nuts. For now, I decided to use some temporary #8-32 pans machine screws to hold all the boards in place. Unlike Mike, I didn't have the means to make my own screws, so went to the hardware store and bought some.
Since there is no way these boards are drilled perfect enough to be interchangeable, I numbered each one and marked it's orientation with a Silver Sharpie.
That's all I had time for this weekend. I have two more things that need to be welded into place, and then I'll be ready to sand and repaint the frame.
Stay tuned...
Attachments


Last edited:
Looks great! Stainless bolts with stainless nuts gall, and can be a real pain in the *** if they aren't perfectly clean and lubed with anti seize. Have you considered using galvanized nuts? They will last for a long time and can be removed easily when you need to make repairs.
Looks great! Stainless bolts with stainless nuts gall, and can be a real pain in the *** if they aren't perfectly clean and lubed with anti seize. Have you considered using galvanized nuts? They will last for a long time and can be removed easily when you need to make repairs.
I'm very familiar with the galling of SS bolts. At my old job we used tons of large SS bolts (ever held an 1-1/2" bolt?) that had to be re-used and we used a lot of anti-seize. Hated getting that stuff on my hands!
Thankfully now anti-seize comes in a stick form, which I'll be using in the on the final install.
Thanks for following along.
zmotorsports
ALLIANCE MEMBER
7/30/18 Update.
Unlike Mike, I didn't have the means to make my own screws, so went to the hardware store and bought some.
Stay tuned...
 Ha, ha, ha.
Is that a composite or Trex planking you are using on the deck? I thought about using that on mine but worried about the flex between crossmembers. If it is Trex, have you walked on it yet and can you feel much give between your crossmembers?
Trailer is looking great by the way.
I wanted to see if you were paying attention Mike.
Is that a composite or Trex planking you are using on the deck? I thought about using that on mine but worried about the flex between crossmembers. If it is Trex, have you walked on it yet and can you feel much give between your crossmembers?
Indeed the planks are composite. The decking was given to me (in exchange for some work) by a friend. I looked into using it when I built the trailer initially, but it was over double the cost of standard PT lumber, so I decided against it. To answer your question, I have stood on it, and I didn't notice any flex. It's pretty dense stuff, and even heavier than PT lumber.
Trailer is looking great by the way.
Thanks, but it's taking forever it seems. I'll need the trailer for an event in early September, so I must have it done before then.
Thanks for following along.
zmotorsports
ALLIANCE MEMBER
I wanted to see if you were paying attention Mike.
Indeed the planks are composite. The decking was given to me (in exchange for some work) by a friend. I looked into using it when I built the trailer initially, but it was over double the cost of standard PT lumber, so I decided against it. To answer your question, I have stood on it, and I didn't notice any flex. It's pretty dense stuff, and even heavier than PT lumber.
Thanks, but it's taking forever it seems. I'll need the trailer for an event in early September, so I must have it done before then.
Thanks for following along.
Yep, I was pickin' up what you were layin' down.

Thanks for the info on the planking. If/when I need to replace mine down the road I may look a bit closer at that. For now I think I need to reapply some Linseed oil to my utility trailer now that I am done using it to move dirt and rocks around.

EVOLVO
Well-known member
I'm very familiar with the galling of SS bolts. At my old job we used tons of large SS bolts (ever held an 1-1/2" bolt?) that had to be re-used and we used a lot of anti-seize. Hated getting that stuff on my hands!
Thankfully now anti-seize comes in a stick form, which I'll be using in the on the final install.
Thanks for following along.
I've held bolts that weigh 50# and got torqued to 16,200 ft lbs with a 2 1/2" drive hydraulic torque wrench! Can't remember exactly but I think the socket was about 5 1/2".
I've held bolts that weigh 50# and got torqued to 16,200 ft lbs with a 2 1/2" drive hydraulic torque wrench! Can't remember exactly but I think the socket was about 5 1/2".
Damn! IIRC the 1-1/2" ones we used (joining sections of 48" pipe flanges) were torqued to something like 300 ft-lbs, and we didn't have any hydraulic aid. Bolts like that are a beast for sure.