To avoid these ads, REGISTER NOW!

My 4'x7' Trailer Build Thread

OP
A

aka Larry

Well-known member
Joined
May 2, 2012
Messages
8,011
Location
Eastern, NC
8/3/18 Update.

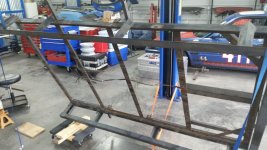
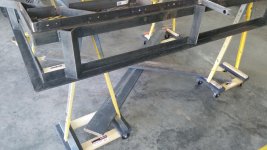
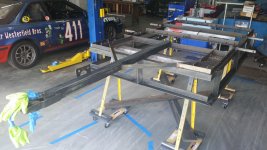
The next step was to mark the locations to match-drill the tool box to a new section of the frame, which I added since previously the box was mounted to the decking. To do this, the frame needed to be flipped, and it's too large/heavy for me to do by myself. I had the idea to use the lift, which turned out to be more of a challenge that I thought. I used a ******** two lift arms, three dollies, along with another wrapped around the opposite post to control the swing. I should have taken video because I'm sure it would have been funny seeing me wrestle this thing. I'm embarrassed to say it took me over an hour to get it flipped, but I did get it done without any damage to the trailer, lift, or myself.

It will need to be flipped back over to sand and paint the bottom, then flipped again to do the same to the top, but I think I'll just ask my co-worker to come over and give me a hand next time!

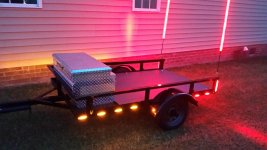
Here are a couple of in-process pics of the fiasco:
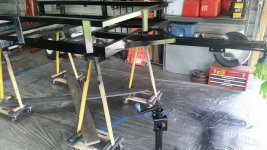
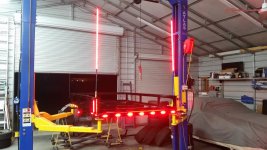
attachment.php


attachment.php
 

Attachments

  • 20180802_184201.jpg
    20180802_184201.jpg
    151.7 KB · Views: 488
  • 20180802_183452.jpg
    20180802_183452.jpg
    152.5 KB · Views: 492
To avoid these ads, REGISTER NOW!
OP
A

aka Larry

Well-known member
Joined
May 2, 2012
Messages
8,011
Location
Eastern, NC
8/6/18 Update.

Saturday morning I finished up all the welding. I added some tabs to attach the toolbox and some expanded metal in the areas beside the toolbox where I store my jack stands. I also match-drilled the fender struts and attached them with clecos so I could see how they looked. Pic:


attachment.php


Next up is sanding the frame to get it ready for painting. It's supposed to be hot and humid all this week, so I'm not sure how motivated I'll be. Stay tuned...
 

Attachments

  • 20180804_120642.jpg
    20180804_120642.jpg
    149.6 KB · Views: 455
OP
A

aka Larry

Well-known member
Joined
May 2, 2012
Messages
8,011
Location
Eastern, NC
Looks great. Nice use of the Cleco's.:thumbup:

Thanks Mike. Anytime I have an excuse to break out the clecos I do it. I bought a set about 4 years ago when I installed this Lexan rear window in my team's old Prelude race car. Don't know how I could have done it without 'em!

attachment.php
 

Attachments

  • clecos.jpg
    clecos.jpg
    41.2 KB · Views: 437

zmotorsports

ALLIANCE MEMBER
Joined
Oct 20, 2009
Messages
21,312
Location
Northern Utah
Thanks Mike. Anytime I have an excuse to break out the clecos I do it. I bought a set about 4 years ago when I installed this Lexan rear window in my team's old Prelude race car. Don't

I'm the same way, I love using Cleco's. Such time savers and able to keep things neat and tidy during fabrication.
 
OP
A

aka Larry

Well-known member
Joined
May 2, 2012
Messages
8,011
Location
Eastern, NC
8/10/18 Update.

I'm getting closer to being ready for paint. I sanded the top side a couple of nights ago, flipped it back over, and re positioned it back on the lift in preparation for sanding the bottom side. Since I'll need to move it to a different bay in the shop, and painting it at waist level will be easier, I decided I needed to come up with some sort of rolling support.

Before I started this refresh project I purchased (4) of the smaller mover's dollies from HF. I attached a 1x2 to each of the dollies so I could then attach the legs of each sawhorse to it with screws. To join all (4) dollies together, I used a couple of leftover decking boards to form an X-brace. Seems like it will be stable enough to move it back and forth between the bays.

Hopefully I'll get a little painting done this weekend.

Pics:

attachment.php


attachment.php
 

Attachments

  • 20180809_184641.jpg
    20180809_184641.jpg
    147.3 KB · Views: 392
  • 20180809_184630.jpg
    20180809_184630.jpg
    147.5 KB · Views: 387
OP
A

aka Larry

Well-known member
Joined
May 2, 2012
Messages
8,011
Location
Eastern, NC
Update 8/13/18.

Saturday morning was spent doing almost my least favorite thing in the shop...sanding. I sanded the whole bottom half of the frame, along with the fenders, axle, springs, and tongue jack. After lunch, I wiped it all down and got ready for painting. I started by taping a plastic tarp to the floor, and then rolled the frame onto it. Then I taped up the coupler and covered the safety chains with some used rubber gloves as seen here. BTW, yes, I covered my race car before I started painting!


attachment.php


Finally it was time to drag out all the painting stuff, which is kind of a pain since I don't paint too often. I used gloss black Rustoleum Farm and Implement paint, using acetone as the reducer, and some enamel hardener. This time I decided to actually play with the gun settings, so I taped a piece of paper to the back of the garage door for some test patterns. As it turns out, I should have done this a long time ago because it makes a huge difference...duh! I started by changing the width of the fan from wide to narrow since most of the frame is about 2" wide. When I did that, the paint volume setting was waaaay too high causing instant runs on the paper. I played with that until I got it right, then I was ready to spray the actual frame.

Painting all sides of a frame is kind of a PITA, but using a gun vs. a rattle can is 100x better. I was able to lay down more paint, a more even coat, with way less over spray, resulting in a lot less waste. With the addition of the enamel hardener, the flash time of this Rustoleum is drastically reduced from about 8 hours down to 2 hours, depending on how much is used. I actually used an entire quart of paint on the bottom and sides of the frame, fenders, and the axle assembly. I got three good coats on all of it, and was pleased with how it turned out.

A couple of buddies helped me flip the heavy beast of a frame Sunday afternoon, and after they left, I wiped down the top half and gave it a good coat before dinner. After being our in the heat all day, I decided I would stop there and paint another coat tonight if the rain holds off long enough.

Here's where it stands now:


attachment.php


attachment.php
 

Attachments

  • 20180811_121126.jpg
    20180811_121126.jpg
    151.5 KB · Views: 339
  • 20180812_171917.jpg
    20180812_171917.jpg
    153.6 KB · Views: 345
  • 20180812_171926.jpg
    20180812_171926.jpg
    155.4 KB · Views: 343
Last edited:

jalbrecht55

Active member
Joined
Jun 5, 2011
Messages
41
Location
Silverdale, WA
Looks nice, great little trailer. I've been thinking I need to build something similar (just for house chores).

Do you recall what ratios you used for paint, acetone and hardener? What kind of hardener did you use? I know nothing about painting but I have a few quarts of rustoleum, a can of acetone and a HF gun a friend gave me, I've been thinking I need to try it out.
 
OP
A

aka Larry

Well-known member
Joined
May 2, 2012
Messages
8,011
Location
Eastern, NC
Looks nice, great little trailer. I've been thinking I need to build something similar (just for house chores).

Do you recall what ratios you used for paint, acetone and hardener? What kind of hardener did you use? I know nothing about painting but I have a few quarts of rustoleum, a can of acetone and a HF gun a friend gave me, I've been thinking I need to try it out.

Thanks!

The ratio I used was 5 parts paint, 2 parts acetone, and about a tablespoon of hardener. The entire can of hardener is supposed to be mixed with a gallon of paint, but since I was only using a quart, I kind of guessed at the amount. Here's a link to the hardener I used.
 
OP
A

aka Larry

Well-known member
Joined
May 2, 2012
Messages
8,011
Location
Eastern, NC
Yesterday I got home with the intent of taking full advantage of the cooler temps and finishing up the painting of the frame. I went out to the shop to open the doors and then go back in to grab a bite before getting started. While I was at it, I wanted to go ahead a fill the air compressor so I turned it on and...nothing. Well sh*t!

After some diagnostics, I finally determined my pressure switch is bad so I ordered a new one that should be here tomorrow. Hopefully I can get my air compressor up and running again so I can get this painting part of the project finished.
 
OP
A

aka Larry

Well-known member
Joined
May 2, 2012
Messages
8,011
Location
Eastern, NC
Update 8/16/18.

The new pressure switch for my air compressor arrived yesterday, so I promptly installed that and got the compressor back up and running. Once that was done, I laid on another good coat of paint on the top half of the trailer frame. With that, the painting portion of the frame is done.

I'll let it fully cure for a few days before I move it back over to the lift to start installing the new lighting.

Stay tuned...!!!
 
To avoid these ads, REGISTER NOW!
OP
A

aka Larry

Well-known member
Joined
May 2, 2012
Messages
8,011
Location
Eastern, NC
8/17/18 Update.

I had planned to take the night off, but the boss had plans yesterday hosting a party with some girlfriends in the house, so I decided to sweat it out and get more work done on my trailer project.

I figured it would be easier to mount the LEDs in the frame's current bare state, so I started on the rear. I mounted the brake/taillights first, and then moved onto the marker lights. Each light was mounted with all stainless-steel hardware and individually grounded to the frame with a pigtail and star washers. In total last light I got (15) lights mounted and grounded. Once all the light are mounted, I'll run the power wires between them. (15) lights down, and only (14) more to go, not counting the lighted whips.


attachment.php
 
Last edited:
OP
A

aka Larry

Well-known member
Joined
May 2, 2012
Messages
8,011
Location
Eastern, NC
8/24/18 Update

I worked on the lighting last night until 9:00, but I finally got it done! Those (29) LEDS are fun to look at, but a lot less fun to wire them them all up. Here are a couple of pics I took before I called it a night:


attachment.php


attachment.php
 

Attachments

  • lights_2.jpg
    lights_2.jpg
    153.2 KB · Views: 206
  • lights_1.jpg
    lights_1.jpg
    155.8 KB · Views: 205
OP
A

aka Larry

Well-known member
Joined
May 2, 2012
Messages
8,011
Location
Eastern, NC
Looking great. I don't think you have enough illumination though.:bounce:

Thanks Mike. I have an small LED fetish I will admit. :bounce:

I hoping to get the new decking installed this weekend, along with the axle, so I can make it a roller. I need my lift for more important stuff like my race car!
 

bradpac

Well-known member
Joined
Sep 8, 2013
Messages
721
Location
Central TX
That's an impressive amount of LEDs right there. I'd hate to see your rig if you were an over the road trucker.
 
OP
A

aka Larry

Well-known member
Joined
May 2, 2012
Messages
8,011
Location
Eastern, NC
Finally got the wheels and tire rack painted this weekend so now the trailer refresh is finally complete.

I forgot to mention in my earlier posts how I got all fancy and recessed the new stainless-steel tie-downs so they would be flush with the deck. I actually did these free hand with a router, and was quite pleased with how they turned out.

Tie-down pics:


attachment.php


attachment.php


Overall Pics:


attachment.php


attachment.php


Night shots:


attachment.php


attachment.php


attachment.php
 

Attachments

  • trailer_01.jpg
    trailer_01.jpg
    149.8 KB · Views: 152
  • trailer_02.jpg
    trailer_02.jpg
    151.1 KB · Views: 153
  • trailer_03.jpg
    trailer_03.jpg
    140.2 KB · Views: 151
  • trailer_04.jpg
    trailer_04.jpg
    139.6 KB · Views: 1,061
  • trailer_05.jpg
    trailer_05.jpg
    131.1 KB · Views: 151
  • trailer_06.jpg
    trailer_06.jpg
    138.1 KB · Views: 1,078
  • trailer_07.jpg
    trailer_07.jpg
    122.3 KB · Views: 151
OP
A

aka Larry

Well-known member
Joined
May 2, 2012
Messages
8,011
Location
Eastern, NC
Thanks Mike!

Truth be told I'm just glad to be done with it and get it back into service. I'll get it all loaded it all up Thursday night, and be ready to hitch to my Mustang first thing Friday morning. I'm leaving work early and headed to the track for the weekend!

Thanks to everyone who have followed along and taken the time to comment.
 
To avoid these ads, REGISTER NOW!
Top Bottom