
Just wanted to share my install to give others ideas or motivation to your garage's heated. 
I went with the Beacon Morris 75K in my detached garage (22x45 with 12'8" ceiling). I have had great luck with them. First one I installed in my attached garage 7 or 8 years ago and zero issues. This is now my 5th unit installing (helping friends install there's) All ZERO issues).
One friend bought a Mr.Heater 80k unit.... Guess what nothing but problems. After the 3rd fail (2 different sensors, then the circuit board took a ****) he returned it and bought the BM like I told him to start with.
Ran the gas line and electrical to the aprox location I would be installing the unit. ( shout out to Amcrest WIFI camera's, they work great )
)


First get your self a sheet rock jack. Makes the job 1000 times easier. They can be bought cheap on ebay or just rent one. I bought mine for $120 shipped, and have used it quite a bit.

Escalade works good if your to lazy like me to drag out the extension ladder


From there it is pretty self explanatory. Hang unit, cut hole for exhaust, hook up gas and electric.


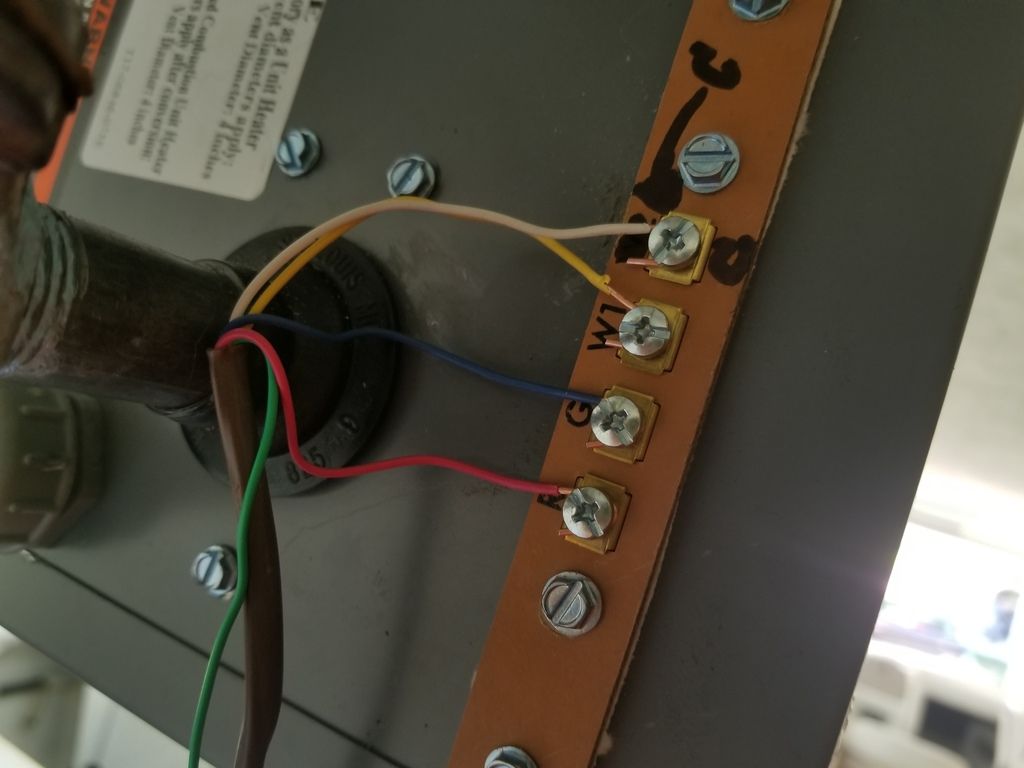

Last I went with a Honeywell WIFI 8000 thermostat. Side note if you need a "C" wire for your thermostat (most if not all wifi or smart thermostat need it to power it up). It is there on the circuit board in the unit just isn't hooked up. Take your self a white piece of wire and run it from the board to w2 terminal on the back side of the unit (W2 isn't used).


I went with the Beacon Morris 75K in my detached garage (22x45 with 12'8" ceiling). I have had great luck with them. First one I installed in my attached garage 7 or 8 years ago and zero issues. This is now my 5th unit installing (helping friends install there's) All ZERO issues).
One friend bought a Mr.Heater 80k unit.... Guess what nothing but problems. After the 3rd fail (2 different sensors, then the circuit board took a ****) he returned it and bought the BM like I told him to start with.
Ran the gas line and electrical to the aprox location I would be installing the unit. ( shout out to Amcrest WIFI camera's, they work great
)


First get your self a sheet rock jack. Makes the job 1000 times easier. They can be bought cheap on ebay or just rent one. I bought mine for $120 shipped, and have used it quite a bit.

Escalade works good if your to lazy like me to drag out the extension ladder


From there it is pretty self explanatory. Hang unit, cut hole for exhaust, hook up gas and electric.


Last I went with a Honeywell WIFI 8000 thermostat. Side note if you need a "C" wire for your thermostat (most if not all wifi or smart thermostat need it to power it up). It is there on the circuit board in the unit just isn't hooked up. Take your self a white piece of wire and run it from the board to w2 terminal on the back side of the unit (W2 isn't used).


Last edited:
