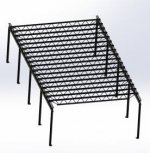
another great craigslist score. I got 28 bar joists, qty18 21ft x 16, qty 4 23ft x 16, qty 6 18ft x 14. plus 13 steel posts. should be seeing a 2nd floor on the middle section and the last 12 feet of the left section in the future. This will be a woodshop for my cnc router and future woodworking tools as well as storage and an office. this is the first load, it was too much for my small trailer.

You are using an out of date browser. It may not display this or other websites correctly.
You should upgrade or use an alternative browser.
You should upgrade or use an alternative browser.
my Florida dream garage project
- Thread starter LutzTD
- Start date


rixtrix1
Well-known member
Great find on Craigslist!
shortykorte
Well-known member
Not something you find everyday. You'll definitely enjoy having the second story. I wanted to sell my joist but didn't. Having a 20x24 and 8x24 loft has really helped.
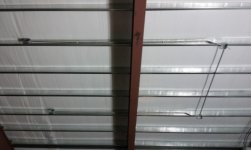
I would like to use the floor joist like this. This layout uses the 21ft joists at 2ft on center to allow a full cover of the middle bay. I was thinking to cover this with 2 layers of 1/2 plywood and then vinyl tile or roll out vinyl. Does anyone have a better idea for floor cover?
Attachments

Bib Overalls
Well-known member
I like your plan for a center bay loft. Creative. Most folks would build it off a wall.
shortykorte
Well-known member
I would like to use the floor joist like this. This layout uses the 21ft joists at 2ft on center to allow a full cover of the middle bay. I was thinking to cover this with 2 layers of 1/2 plywood and then vinyl tile or roll out vinyl. Does anyone have a better idea for floor cover?
What is your joist spacing going to be? On top of the office area I ended up with 2 layers of 7/16 OSB staggered. I think those joist are 16" OC, pretty solid. I used a single layer of 7/16 OSB on the loft storage area but it was weak. When I put in the smaller loft, I ran across 3/4" t&g OSB decking. Since it was so much better, I pulled out the single layer OSB on first loft and put down the t&g.
So to answer your question, 3/4" T&G OSB decking. Very solid, tighter seams and is intended for decking. I got it at Lowes or HD
madoc1
Well-known member
What is your joist spacing going to be? On top of the office area I ended up with 2 layers of 7/16 OSB staggered. I think those joist are 16" OC, pretty solid. I used a single layer of 7/16 OSB on the loft storage area but it was weak. When I put in the smaller loft, I ran across 3/4" t&g OSB decking. Since it was so much better, I pulled out the single layer OSB on first loft and put down the t&g.
So to answer your question, 3/4" T&G OSB decking. Very solid, tighter seams and is intended for decking. I got it at Lowes or HD
i second this, altho my first thought was 3/4 t&g plywood. didn't know they made it in osb.
jim
What is your joist spacing going to be? On top of the office area I ended up with 2 layers of 7/16 OSB staggered. I think those joist are 16" OC, pretty solid. I used a single layer of 7/16 OSB on the loft storage area but it was weak. When I put in the smaller loft, I ran across 3/4" t&g OSB decking. Since it was so much better, I pulled out the single layer OSB on first loft and put down the t&g.
So to answer your question, 3/4" T&G OSB decking. Very solid, tighter seams and is intended for decking. I got it at Lowes or HD
I have them at 24" OC, which is overkill. If I need to go to 18" OC for the decking then I will just spread the joists to 4ft or 6ft and put down some joists under the floor to span the bar joists, they are way overkill at 24" apart
I could afford 2 layers of this glued together with 4ft staggered joints, this would float on top of the bar joists
http://www.lowes.com/pd/Severe-Weat...ywood-Sheathing-Application-as-2-x-4/50441860
http://www.lowes.com/pd/Severe-Weat...ywood-Sheathing-Application-as-2-x-4/50441860
rixtrix1
Well-known member
I could afford 2 layers of this glued together with 4ft staggered joints, this would float on top of the bar joists
http://www.lowes.com/pd/Severe-Weat...ywood-Sheathing-Application-as-2-x-4/50441860
While 24'"OC is overkill for the joists, it's pushing the span for flooring material, depending on the load you plan on keeping up there. Should be able to Google a calculator to see what requirement would meet your needs.
While 24'"OC is overkill for the joists, it's pushing the span for flooring material, depending on the load you plan on keeping up there. Should be able to Google a calculator to see what requirement would meet your needs.
looks like if I get this 23/32 tongue and groove it will give me a good rating with 1 layer at 24" OC
http://www.lowes.com/pd/Plytanium-2...Plywood-Subfloor-Application-as-4-x-8/3602906
I just plan to put woodworking equipment, like a table saw, joiner and my 5x10 router maybe some light storage, not engine blocks or anything like that, so its not going to be a huge load
Attachments

Last edited:
Stillridin
Member
I read your whole post last night. Very impressive work on the shop and the machines. What size footings where required for your shop? I'm getting ready to build a garage soon. Maybe in another month or so it will be bearable. But less daylight. Always had a shop, but never at home. It's going to be nice to walk out the door and into the shop. No driving 30 mins there, than back. Nice find on the mustang and the jag. I've never been to that British auto repair shop in Land O Lakes on 41 but may be a good resource.
Last edited:
I read your whole post last night. Very impressive work on the shop and the machines. What size footings where required for your shop? I'm getting ready to build a garage soon. Maybe in another month or so it will be bearable. But less daylight. Always had a shop, but never at home. It's going to be nice to walk out the door and into the shop. No driving 30 mins there, than back. Nice find on the mustang and the jag. I've never been to that British auto repair shop in Land O Lakes on 41 but may be a good resource.
the architect assumed 2000psi for the soil bearing so the foundation is 3'8" wide under the columns and 3' wide under all of the walls by 1 foot thick, then a stem wall is 16" off of that to start the masonry.
worked on the jaguar this weekend. It took me several weekends to finally free up the rear brakes. The design is such that the brake pads need to be removed first to get the calipers out, so having the calipers frozen against the rotors made getting the pads out a challenge. I didnt want to disturb anything, the factory tie wires are still in place and the next owner will likely appreciate this factory detail. Anyway, this weekend I finally got the rear end assembly reinstalled under the chassis and bolted in. Should go a little faster for the front frames. My fingers are crossed.....
shortykorte
Well-known member
So what happen with the lathe project and the floor joist?
Bib Overalls
Well-known member
The material you linked to in Post 609 is 2 feet by 4 feet. I agree with the others. Go with 3/4" T&G OSB decking. That is what I used for my loft and it is sturdy. Be hard to find another solution that gives equal performance for less money.
The material you linked to in Post 609 is 2 feet by 4 feet. I agree with the others. Go with 3/4" T&G OSB decking. That is what I used for my loft and it is sturdy. Be hard to find another solution that gives equal performance for less money.
no wonder it was so cheap, didnt notice the size....
Im also watch craigs as plywood comes up a lot, need to find the beams first, was just looking for rough magnitude of the total cost
well never a shortage of projects. I ordered a bolt kit for the jag front end, as the old bolts are just thrown in a bag and rusty, rusty, rusty. They didnt show up, even though a ordered them monday. I took a long weekend just to knock out some of the jag reassembly, so not going to get to work on that. (I did put the bolts I think are correct in the derusting soup, so maybe tomorrow I can use old bolts) So today, with nothing to do and a 4 day weekend I decided to work on a project I already have the materials for, the front wall paint. I did manage to put another coat on, looks 100% better now. I think Im still one gallon short, Ill go get 1 tomorrow as im not quite out of funds though close with the jag in limbo. I also have the wire and sub box for the second phase electrical distribution, so I could get that knocked out this weekend. that would be nice. We will see what the evaporust does for the old bolts, if they are clean Ill work on the jag, if not looks like Ill be pulling wire.
madoc1
Well-known member
evaporust is great stuff. if you leave it in a long time it will turn the steel black. now on the bolts that might be a good thing. good luck on the jag. at least that is something i can understand. 
jim
jim
evaporust is great stuff. if you leave it in a long time it will turn the steel black. now on the bolts that might be a good thing. good luck on the jag. at least that is something i can understand.
jim
I thought that too, but the black cleans off with water and leaves a pretty good finish. You just cant put chemically blued parts in as it removes that finish, so far everything else has been safe.
sean Buick 76
Well-known member
Really cool cars, garage and metalworking projects!
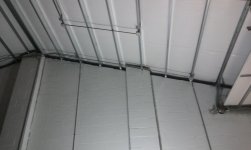
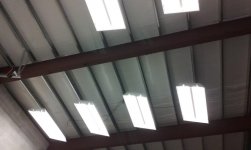
started running some outlets and lights. takes a lot of time. the outlet below, by the time I went back and forth to the store 3 times because I thought I already had the materials and didnt when I got back. the 3rd try I just bought everything I would need and finally got it. then the 2 conduit runs up to the ceiling were another 4 hours of up and down. At least Im not climbing a ladder. I want to have a drop on each wall between the columns and then the nearest will drop down for a switch then go to outlets on the ceiling for troffer lights. Cant wait to not be tripping on extensions and to actually be able to see. I did score a free LED stand light 7000 lumens dual head from work, was a design project that didnt go any where, so thats helping a lot and all the light you see in the pictures is from those lights shining up on the white wall and ceiling and reflecting back.
Attachments


Last edited:
jaguar project also has some updates. I have reassembled the front and rear suspension and we dropped in the motor this weekend, should say dropped the car onto the motor as it had to come from the bottom. but its in. should be listing it soon as it is now mobile enough for an easy transport to its new owner.
Attachments

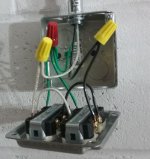
have been running more conduit. the transition from the roof pitch to a column back to the roof pitch is kicking my ****, but Im finally done with that part. I have a short straight section and then an 8 footer with 2 bends to catch the last wall outlet and I can start pulling wires. I already wired the face plates sitting in s comfy chair in my living room watching tv. is this OK to do the jumper like this? They will wire nut to the feeders in each box.
Attachments


shortykorte
Well-known member
Scotty, I need more power. Looking good. Great way to wire the receptacles. 
got the second to last conduit in, I can put that last piece in when I get the lift back in that area. In the mean time I have wire pulled and I'm hooking up receptacles starting farthest out and working toward the load center. here's the first one, exciting for me, maybe not so much for you ")
Attachments

shortykorte
Well-known member
Power, we did more power!
As they say "how do you eat an elephant?"
Looking good. I remember the feeling after conning my brother in to running power in my place.
As they say "how do you eat an elephant?"
Looking good. I remember the feeling after conning my brother in to running power in my place.


all the conduit and boxes in, wire pulled and hooked up. I now have 3 quad outlets on the west wall of phase 2 and 4 switched quad outlets on the ceiling for lights. woohoo. A lot of work but nice to have handy power. Now to finish the troffer mods and get them hung. pictures not great sorry, but here they are.
Attachments


Bighead38
Well-known member
rrrrrrrr...pliunk, socket sliding down metal roof then hitting the ground. you might have heard me a dozen times. there is a wrap around piece that will screw through these. I can get the edge with a ladder from the side so I didnt put any screws in there until I see how the side trims mount.
Im going to cut a craftman driver. im afraid the HF will wear and knick the paint on the screw heads. Its about a 1000 screws total
Might be too late but what size do you need? I ask because instead of cutting up a tool you could just get a set intended for that purpose. If I am reading it correctly then this would work perfect for you if it comes in the correct size.
https://www.zoro.com/milwaukee-nut-...2yC-FGwxSimGnPOtTRf-uxoClZTw_wcB&gclsrc=aw.ds
Lol I am an idiot sometimes. I didn't realize I was at the beginning of the thread and didn't look at the dates. So obviously way too late for that use lol. Hey it's the thought that counts right?
Last edited:
Might be too late but what size do you need? I ask because instead of cutting up a tool you could just get a set intended for that purpose. If I am reading it correctly then this would work perfect for you if it comes in the correct size.
https://www.zoro.com/milwaukee-nut-...2yC-FGwxSimGnPOtTRf-uxoClZTw_wcB&gclsrc=aw.ds
Lol I am an idiot sometimes. I didn't realize I was at the beginning of the thread and didn't look at the dates. So obviously way too late for that use lol. Hey it's the thought that counts right?
yes it is thanx
I did buy a set of purpose built drivers, the screws were also cheap so they still didnt stay in that well. I learned to buy a little better screw in the future with a slightly better formed hex and they work much better. go US made screws 


shortykorte
Well-known member
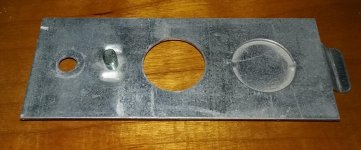
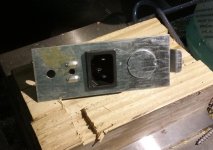
Nothing better than light in the shop. What are IEC connectors?

Bob Heine
ALLIANCE MEMBER
TD, I like that approach. I cut the computer connector off and make custom length power cords for garage door openers, low voltage lighting transformers and audio/video equipment to cut down on the cable clutter and rats nests.like a computer connector, cords and connectors have a lot of options and are cheap to retrofit. now I can plug in the lights anywhere
I may start scavenging the sockets from the box of dead power supplies in the attic. I'm in rehab to move from overt to secret hoarding.