To avoid these ads, REGISTER NOW!

New 24 x 32 Garage

OP
M

mineallmine

Well-known member
Joined
May 22, 2014
Messages
100
Location
Ontario, Canada
Almost done air...and some tire storage too

Finishing up the air lines hopefully this weekend. Can't install the quick connects until next week as I had to order them. I ordered Milton V style couplers after reading on here of the benefits. What a pain it was to find a vendor local. Ironically the price beat the best I found on line.

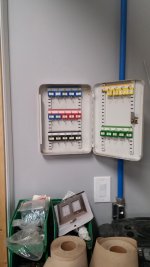
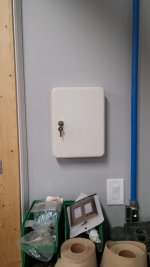
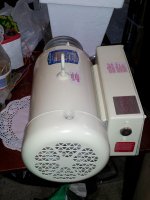
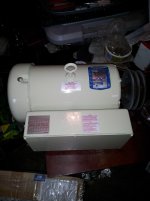
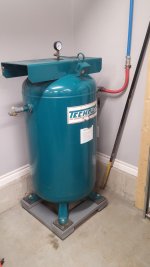
Also ordered my magnetic starter and 3/4 regulator for the compressor. Soon be able to assemble and wire it up and do leak testing of all the air system. Can't wait

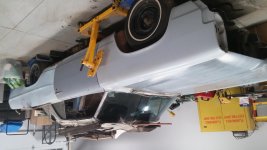
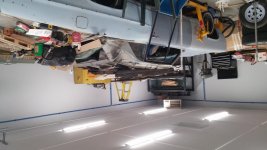
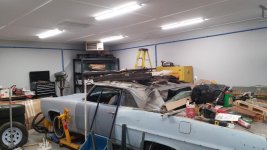
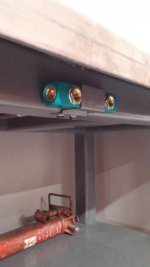
Also finally got my tire racks up. Frees up a lot of space on the floor too. It worked out really well without planning that the bottom of the tire rack is just over 6 feet off the floor with the top bumped up against the air line.:rocker: No smashing my head off here (at 6' myself)

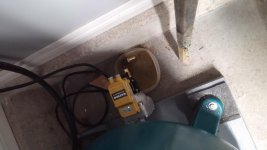
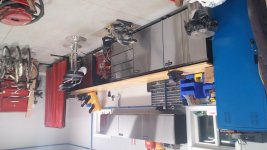
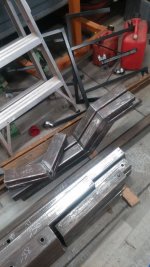
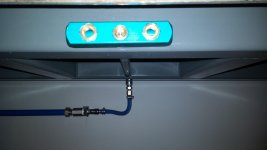
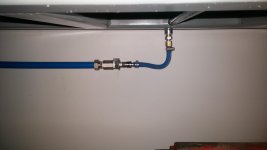
The last 2 pics are of the air line under my welding table. It ends at a quick connect that will have a flexible hose run from it to the hard pipe on the welding table that will feed the manifold block that will be mounted at the front of the welding table (last picture mocked up). Still have to straighten the air line a tiny bit (ran out of time before work) and make a bracket to hold the manifold to the table as I couldn't get one with rear feed and holes to mount it. Luckily I now have use of my brake (as apparent by the bracket in picture I made to secure the air line under the table. I also made one for the termination by the compressor). I LOVE having the proper tools to do the job finally.
 

Attachments

  • 20171129_211320.jpg
    20171129_211320.jpg
    141.4 KB · Views: 180
  • 20171129_211324.jpg
    20171129_211324.jpg
    141 KB · Views: 147
  • 20171202_205630.jpg
    20171202_205630.jpg
    135.6 KB · Views: 176
  • 20171208_211949.jpg
    20171208_211949.jpg
    134.7 KB · Views: 139
  • 20171214_122225.jpg
    20171214_122225.jpg
    140.6 KB · Views: 135
  • 20171214_124332.jpg
    20171214_124332.jpg
    142.8 KB · Views: 140
Last edited:
To avoid these ads, REGISTER NOW!
OP
M

mineallmine

Well-known member
Joined
May 22, 2014
Messages
100
Location
Ontario, Canada
Great build thread, I'd love to get a set of plans to build the very same setup in eastern Ontario ( Campbellford) my sincere condolences to you and your family over the loss of your son, I expect you and he would have loved to have time together in this shop.

I could scan the plans I made and send them to you but they are only basic plans for basic dimensions and floor plan layout as well as foundation plans. Just the basics I needed to pull permits...nothing about electrical or layout and such. A lot was seat of your pants as it were. Came up with it as I went along. Worked out pretty well actually if I do say so myself. Wiring I laid it out in my head and pictured locations for everything and wired it as such.
 
OP
M

mineallmine

Well-known member
Joined
May 22, 2014
Messages
100
Location
Ontario, Canada
Couple small additions...not much but sentimental none the less

Added a key box that I got from my fathers garage after he passed away a number of years ago. I remember it from when I worked for him at a young age and again after he retired and had it in his personal shop.

Also prepped the new motor for my compressor. Compressor came with a 3 phase 575V motor, so I sold it and am using a near new 5 HP 240V single phase Baldor Farm duty motor I got really cheap with some compressor parts. All that was wrong was one lead burnt off one of the caps. Just paid $10 for an exact replacement cap and we're good to go.

Also found this little gem when cleaning up. It's a small 1/15th HP motor I picked up at a yard sale for $5. Runs so quiet and smooth its unbelievable. I am going to remove the grinding stone and install a buffing wheel, and add a toggle to the box at the rear of the motor for polishing stainless and aluminum trim. It'll be perfect due to the long shaft of the motor.
 

Attachments

  • 20171214_122709.jpg
    20171214_122709.jpg
    144.6 KB · Views: 60
  • 20171214_122659.jpg
    20171214_122659.jpg
    137.1 KB · Views: 76
  • 20171209_155625.jpg
    20171209_155625.jpg
    133.9 KB · Views: 88
  • 20171209_155616.jpg
    20171209_155616.jpg
    134.1 KB · Views: 69
  • 20140424_193838.jpg
    20140424_193838.jpg
    134.7 KB · Views: 53
  • 20140424_193824.jpg
    20140424_193824.jpg
    140.1 KB · Views: 51
  • 20140424_192822.jpg
    20140424_192822.jpg
    136.7 KB · Views: 56

shortykorte

Well-known member
Joined
Sep 1, 2014
Messages
8,039
Location
Tallahassee, Fl
Nice score on the motors. On the key box, I like how the hooks are adjustable. Cool that it also has meaning.


Sent from my iPhone using Tapatalk
 
OP
M

mineallmine

Well-known member
Joined
May 22, 2014
Messages
100
Location
Ontario, Canada
Nice score on the motors. On the key box, I like how the hooks are adjustable. Cool that it also has meaning.


Sent from my iPhone using Tapatalk

I actually wound up with 2 of the Baldor motors. One came with my compressor I was going to build (wound up selling tank when I scored the new one) and another when I was going to build another. Got the motor for $150 completely rebuilt by previous owner with new bearings and all internals. (He did this for a living). So now I have an identical backup, not as pretty though.:lol:
 
OP
M

mineallmine

Well-known member
Joined
May 22, 2014
Messages
100
Location
Ontario, Canada
Small steps forward...

As it's so close to Christmas and work being really busy getting very little time in the shop, but every minute counts right.

Finally can say the air lines are finished. All installed and tightened. Just need the couplers to come in this week and my magnetic starter and I can finish it up. Have the rubber line to go from the compressor to the air line system, just waiting to build a platform with rubber feet to isolate the vibration of the compressor and also give it a little extra height so I can properly plumb in my Kaeser auto drain.

Also fabbed up a bracket to hold the air manifold in place under my welding table. As it didn't have any holes to allow me to secure it I bent up this little bracket. Some I was able to do with my brake but some due to back to back bends I had to use my vise and a metal block as it wouldn't fit the brake. Came out pretty good considering.

Go the main fittings on the tank ready as well. As soon as the platform is built I will install the pump and motor and guard. No point making it heavier than necessary before then.:dunno:

Not too bad for only a few hours over the weekend between work and family time and taking my youngest son out to finish his Christmas shopping.
 

Attachments

  • 20171217_192031.jpg
    20171217_192031.jpg
    135.2 KB · Views: 81
  • 20171216_120343.jpg
    20171216_120343.jpg
    138.3 KB · Views: 75
  • 20171216_120336.jpg
    20171216_120336.jpg
    140.8 KB · Views: 79
  • 20171217_192053.jpg
    20171217_192053.jpg
    139.3 KB · Views: 91
  • 20171216_120213.jpg
    20171216_120213.jpg
    135.1 KB · Views: 96
  • 20171216_120158.jpg
    20171216_120158.jpg
    140.2 KB · Views: 80

lakeroadster

Well-known member
Joined
Jan 19, 2015
Messages
5,166
Location
Central Colorado
Cool build thread mineallmine.

Did you install any blow down valves at the low point of you air lines to purge condensation?

We built our first shop by ourselves, me and the wife, back in the mid 1980's, and it was a 24 x 32 also.

Pace yourself.. I screwed up my shoulder overdoing it.. took about 10 years before that healed up.
 

Attachments

  • 1985 - 1253 Stichter 008.jpg
    1985 - 1253 Stichter 008.jpg
    136.9 KB · Views: 67
Last edited:
OP
M

mineallmine

Well-known member
Joined
May 22, 2014
Messages
100
Location
Ontario, Canada
Cool build thread mineallmine.

Did you install any blow down valves at the low point of you air lines to purge condensation?

We built our first shop by ourselves, me and the wife, back in the mid 1980's, and it was a 24 x 32 also.

Pace yourself.. I screwed up my shoulder overdoing it.. took about 10 years before that healed up.

At all air manifolds except the welding bench there are drain valves. I may remove one of the end caps later and install something for draining water there too...time will tell.

At the main line out of the compressor I am going to make sure there is no droop so condensation can flow back into the tank and out the auto drain.

The main close in was real quick from foundation to closed in building with siding windows and doors and roof in less than 6 months. rest has been a little slower with a burst here and there..(insulation and drywall was quick...wiring slow over winter with no heat)....now it's finalizing setup and organizing everything...really slow as everything just got pushed inside when things got crazy...finally coming together now.

As to the shoulder...mine is already screwed up from my work...only now stating to get a little better.
 
Last edited:
OP
M

mineallmine

Well-known member
Joined
May 22, 2014
Messages
100
Location
Ontario, Canada
More baby Steps

Finally got my compressor isolation platform built and installed. Just a 2x6 cut into 4 equal 2ft lengths and screwed together. Then I had an old heavy piece of rubber matting (little lighter than a hockey puck but not much) I cut a coupe slices off of and made squares.

4 I drilled 4 counterbore holes in to screw to the bottom as feet and keep the screws from hitting the floor and the others in between the compressor feet and platform anchored with 3 1/2 inch 3/8 lag screws.

Being overly picky I decided to paint the platform so it would look cleaner and blend in with everything else I have done. I am quite happy with the results.

There is perfect amount of room in the dip on the side of the platform to mount my Kaeser auto drain, which was a big part of the reason I built the platform instead of just adding rubber feet.

Hope to get the pump and motor mounted by the weekend.
 

Attachments

  • 20171219_203618.jpg
    20171219_203618.jpg
    134.7 KB · Views: 95
  • 20171219_172352.jpg
    20171219_172352.jpg
    132.3 KB · Views: 72
OP
M

mineallmine

Well-known member
Joined
May 22, 2014
Messages
100
Location
Ontario, Canada
Very nice work. I need to do the same thing, however, don’t want to take it on by myself.

I didn't really want to myself, but I am picky about how things are done and seeing some of the new houses going up around here I knew it would either be really difficult or very expensive to find a contractor to build it to my standards. (Father was a contractor so I learned a bit of what to watch for).

This is why I did it myself. I have had 2 buddies hire contractors this year to do theirs and both wound up firing them. One for workmanship and the other because he kept screwing him around on getting it done. This way I'd only have myself to blame and I learned a lot on the way as well. I am very pleased with what I accomplished. I am no expert by any means but I think I did a good job. Not to mention saved a bundle.:beer:

Only downside of doing it myself is life often slows down progress. Family obligations and long work hours make it difficult to get the finer details done. Some days it feels like I am getting no where while others it is a noticeable improvement. Not complaining about family obligations mind you...love spending time with the family, just would like to have it done to start working on different memories with the kids.:)
 
OP
M

mineallmine

Well-known member
Joined
May 22, 2014
Messages
100
Location
Ontario, Canada
2 steps forward...3 back

Made a bit more progress over the last week...then a few steps backward:dunno:

I installed my pump on my compressor tank and after some creative thinking was able to plumb it in. For some reason the original copper line as it was wouldn't reach the inlet to the tank. Best I can figure previous owner had it changed and set up a little different than factory. Some fittings on the inlet were missing when I bought it. I just added another 90 to the outlet and changed the orientation of the original 90 and it fit great...better than it was when I got it. That part went well.

I also got my kaeser auto drain installed. I used a 1/2" 90 to 1/2" pipe on the bottom of the tank to the auto drain with a union near the auto drain. This allows me to orient the auto drain as I want and also ease of removal for service of the auto drain if necessary (which actually became necessary...see below). This went well also.

This is where it all started to go wrong...

I ordered a magnetic motor starter off ebay for my compressor and when it came in I discovered the contactor inside was not the same as the label on the housing. I ordered a 32A overload and it was labeled as such but the installed contactor maxed out at 18A. Fortunately the seller was quick to refund my money. I ordered a better starter the next day...hope to get it this week.

Then I decided to try to pressurize my tank to check for leaks...this never went so well. I discovered the intake gasket was blown...not a huge surprise as previous owner mentioned they needed to be changed every so often...I guess I should have guessed it was gone already and he just didn't want to say. $60 later and I should have a set of 4 here hopefully early next week. (one to replace bad one and complete spare set).

I also discovered a leak in my auto drain. Took it off to investigate and found the diaphragm in the solenoid that cycles to release the water had actually turned to sludge. Not sure what caused it but everything else looked ok and actually really clean. Solenoid actuates as it should, just the diaphragm is shot. Got lucky here as these drains are really expensive...(got mine cheap...really cheap...now I know why). I found a guy on ebay selling new original kaeser complete rebuild kits for these auto drains for $40 shipped. Hope to have this next week as well.

Hopefully next week will see a little more forward progress and less backwards direction.

:beer:

Also got half of my Milton "V" style fittings for my air supply. Thanks again to the guys of Garage Journal for that suggestion. Got a start on putting parts for the cars in totes and labeling them to put in the attic to get things organized as well. The wife is going to help me get through the organizing part of it over the next little while...she is better at keeping me on track. I can keep it clean once done but get distracted easily if left to do it on my own:eek:

Last time I went out to organize I built a nice mount for my led light for my snowblower and wired it up...looks great but wasn't what I set out to do:D
 
Last edited:
OP
M

mineallmine

Well-known member
Joined
May 22, 2014
Messages
100
Location
Ontario, Canada
Finally a bit of progress...not much but any is an improvement.

Got the air leaks fixed on my compressor system. Rebuilt the auto drain and upon install found another leak. Had to take it apart again and polish one of the shafts the O-rings go on as it had a small scratch allowing air to bypass.

Replaced the blown gasket in my pump and got my new magnetic starter and it looks like real nice quality. Have all my wiring and fittings and hope to wire it up this weekend.

Did find 2 more small issues when doing my pressure test again. Found my check valve was stuck (actually some material of some sort was jammed in it holding the Teflon disc from sealing). I am guessing this contributed to the blown intake gasket. Second I realized I had a momentary brain fart. I placed a quick coupling on the side of the tank on the inlet side. After looking at it again I realized this would only work when the pump was running (funny thing is this helped me discover the check valve issue...that and the pump not letting me turn it by hand due to back pressure).

Anyhow...got all that fixed up and now hope to add oil to the pump, wire it up and hopefully I'll have a fully operational air system.:rocker:

Then it's back to final setup. If I'd stop finding NOS parts for my projects I might get a chance to get it all put away...;)

Auto drain not showing in this picture and still have to mount the magnetic starter and put the belt guard back on after I adjust the pulley and tighten the belts.
 

Attachments

  • compressor setup.jpg
    compressor setup.jpg
    137.9 KB · Views: 64
Last edited:
To avoid these ads, REGISTER NOW!

53PontiacSD

Well-known member
Joined
Sep 18, 2016
Messages
512
Location
The Panhandle of Texas where two interstates meet
Hi nice job there. I can relate to hiring contractors. Ours was one big loser. If he wasn't, he would make a great used car salesman. He and his guys could come up with more excuses than anyone I've ever seen. Am glad to get them out of here. I do have two questions for you, 1... is the wooden structure under your compressor for the sake of sound deadening or to get some room of the floor?
2...is that a 62-4 Pontiac Catalina I see in the shadows of the shop underneath all that stuff? Thanks for your time in posting. And sorry for the loss f your son.

Billy
 
OP
M

mineallmine

Well-known member
Joined
May 22, 2014
Messages
100
Location
Ontario, Canada
The wood platform plays 2 functions:

1 primary function is to isolate vibration from the compressor to the floor thus making the compressor a little quieter and keeps it from dancing around floor (thus the rubber pads). If it was just metal legs to the floor the vibration noise would travel through the floor.

2. I made the platform double thick to allow clearance for the kaeser auto drain.

The car under the pile of stuff is a 1964 pontiac catalina convertible. It is one of my two project cars. I have just started getting it cleaned off again.

Sorry for the upside down photos...uploaded from my phone
 

Attachments

  • 20171122_194352.jpg
    20171122_194352.jpg
    138.9 KB · Views: 57
  • 20171122_202502.jpg
    20171122_202502.jpg
    132 KB · Views: 49
  • 20171129_211320.jpg
    20171129_211320.jpg
    141 KB · Views: 45
Last edited:

53PontiacSD

Well-known member
Joined
Sep 18, 2016
Messages
512
Location
The Panhandle of Texas where two interstates meet
LOL that's ok I just flipped the monitor over to see them upright. Awesome project. So now are you going to sort of enclose the compressor to help with more noise suppression?I've thought about that or building a shed out side to house it in. Thanks for the input.

Billy
 
OP
M

mineallmine

Well-known member
Joined
May 22, 2014
Messages
100
Location
Ontario, Canada
No, no enclosure. I had it running today and it's actually pretty quiet. You can easily carry on a conversation with it running. Just need to install the guard and it's complete.
 

Attachments

  • 20180204_173001.jpg
    20180204_173001.jpg
    129.6 KB · Views: 40
  • 20180204_172555.jpg
    20180204_172555.jpg
    139.4 KB · Views: 44
OP
M

mineallmine

Well-known member
Joined
May 22, 2014
Messages
100
Location
Ontario, Canada
Finally a bit more progress. Got out the last couple days and got most of the trim and extras from the 2 project cars sorted and up in the attic. Cleaned off the trunk of the convertible and also got the worktop cleaned and mostly organized.

Also cleaned up the loading dock light my sister in law got for me at a garage sale this past summer. Just need to make a mount to put it up on the wall and wire it up.

Plan for the next couple days is a bit more organizing and hopefully clean out the trunk of the convertible and get ready to pull the engine and ******. Think I'm going Rio start on this one first.

Sorry again for upside down pics. Uploaded them from my phone
 

Attachments

  • 20180222_192213.jpg
    20180222_192213.jpg
    139.7 KB · Views: 56
  • 20180222_192202.jpg
    20180222_192202.jpg
    132.8 KB · Views: 45
  • 20180222_192151.jpg
    20180222_192151.jpg
    130.4 KB · Views: 45
OP
M

mineallmine

Well-known member
Joined
May 22, 2014
Messages
100
Location
Ontario, Canada
So not much new with the shop. Kinda in disarray again now. I have managed to hang a couple signs, got the loading dock light mount made and just have to wire up the light and install the switch.

Picked up a dart board and case as well. Hoping to have that installed by the weekend. Also hoping to get some more cleaning and organizing done.

Hoping to have the shop mostly organized before the snow flies. Have some yard cleanup and organizing to do as well as some basement organizing so the house stuff in the garage has a home to go to. I want all garage in the garage and all house and otherwise in the house and otherwise before the snow flies.

On a side note, did get the convertible front stripped and the engine/****** pulled and am now busy cutting metal to build a rotisserie to pull the body soon:thumbup:
 
OP
M

mineallmine

Well-known member
Joined
May 22, 2014
Messages
100
Location
Ontario, Canada
Got some more time out in the shop over the last couple weeks. Garage is still in a huge mess (maybe even worse). Haven't had much time to spare so I have been focusing on getting my rotisserie built, then I plan to do a full purge/clean/organize session to get things in order.

Really happy with how the rotisserie is coming along. I'm not a professional welder but have done a fair bit over the years...just takes time to get smooth again after a while away. Used stick to ensure good penetration and solid welds. The tubing will break before these welds let go:)
 

Attachments

  • rotisserie 4.jpg
    rotisserie 4.jpg
    83.3 KB · Views: 40
  • Rotisserie 3.jpg
    Rotisserie 3.jpg
    88.2 KB · Views: 40
  • Rotisserie 16.jpg
    Rotisserie 16.jpg
    76.8 KB · Views: 43
  • rotisserie 15.jpg
    rotisserie 15.jpg
    151.5 KB · Views: 42
  • rotisserie 14.jpg
    rotisserie 14.jpg
    151.9 KB · Views: 46
  • rotisserie 6.jpg
    rotisserie 6.jpg
    148.2 KB · Views: 42

camarosrus69

Well-known member
Joined
Aug 7, 2013
Messages
243
Location
South central Kansas
That is an impressive rotisserie. Did you build from some plans or are you winging it? It looks hell for stout, which you want if you;re removing big chunks of metal from the car.
 
OP
M

mineallmine

Well-known member
Joined
May 22, 2014
Messages
100
Location
Ontario, Canada
I purchased some plans and am following them mostly but have changed up a few things I wanted to improve on. Definitely heavy built rotisserie for sure. Don't believe in going half way on any build. If I'm going to do it going to do it right the first time.
 
To avoid these ads, REGISTER NOW!
Top Bottom