
You are using an out of date browser. It may not display this or other websites correctly.
You should upgrade or use an alternative browser.
You should upgrade or use an alternative browser.
Between 265 & 485 SQ/FT Nick's Two-Car Detached Vdub Garage
- Thread starter nicholam77
- Start date
Workspaces sized between 265 and 485 squarefeet.
Finallygotit
ALLIANCE MEMBER
Excuse me?? "Too much" is a relative term and I think you set your bar waaaaay too low.......I've been buying too much stuff lately.
Now break out that plastic and lets get shopping!! We love to see pictures of new toys.....er I mean tools.

Bob Heine
ALLIANCE MEMBER
Nick, my comment completely backfired on me. Out of curiosity I checked the price of a Milwaukee cordless trim router. Turns out Amazon has the M18 Fuel model on sale for 22% off at $180. Checking eBay, there was a slightly used one for $119 with free shipping. Of course there's those pointy tacks added to the order so it's $127.33. The US Post Office has already been notified.I've heard good things about this one as well. I don't have any DeWalt batteries or charger so that would add a bit. Despite the fact that I probably *should* own a trim router, all three of these options are probably going to go on the back burner. I've been buying too much stuff lately.
NICE TRY BOB

That's tool only but I already have Milwaukee M12 and M18 batteries and chargers. I think it's time to ban myself from this site.
EDIT: My silly 'tacks' comment is from an old joke:
A very young man goes into a drug store, walks up to the counter and tells the pharmacist he wants to buy a package of condoms but wants to know how much they cost. When the druggist said a dollar fifty the young man says OK. The druggist rings up the sale and says that will be a dollar fifty-six. The young man asks what the six cents is for. When the druggist says it's the tax, the young man gets upset and says "No no, I want the kind you pull on".
Last edited:
OP
nicholam77
Well-known member
The depth adjustment is night and day faster/easier to use/set, the base removal is easier and it has a built in light. I actually like the base more as well.
Thanks, that is helpful. The light alone sounds like a winner.
I think it's time to ban myself from this site.
Never! We need you Bob.
Excuse me?? "Too much" is a relative term and I think you set your bar waaaaay too low.
Now break out that plastic and lets get shopping!! We love to see pictures of new toys.....er I mean tools.
I'm sorry, I will try to set my bar higher
You mean pictures like this?
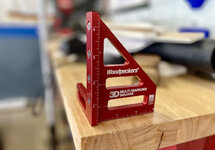
I was referring to some recent big ticket items like travel and furniture, but hope this satisfies for now. I also picked up a few small things from Prime Day even though I promised myself I wouldn't.
Closet Door Install
While I have a few of your attentions, I have a question for the group on how to deal with the hinge holes on my hollow core doors. But first, here's where I'm at:
I marked the holes for the hinges on the stud frame, using some shims to space the reveals according to my Fusion document.
(3mm off each side, and 5mm off the top just on the right, due to out-of-level top of the opening)

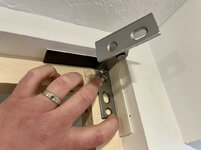

Here's where I screwed up. You'll notice an oval hole in the middle, and two tight holes. I absentmindedly pre-drilled them all, which basically eliminates any adjustability.
I guess my thought was I am working from the top down, so I wouldn't need to move them, but that turned out to not be the case.
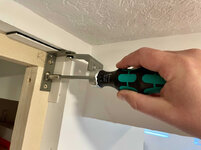
I used this spacer strip (also calculated based on my Fusion document) to space between the top and bottom hinges.

On the bottom hinges I managed to only drill the oval holes first.
Now the next frustration. Despite trimming a little off the top and a little off the bottom of the doors, only 1 in 4 hinge holes per door hit solid 'wood' (MDF). The other three went through hardboard into the void.
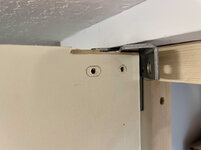
I believe the hardboard is close to 1/4" thick, so the screws did bite, but I am worried about them loosening over time, or if the door is bumped hard.
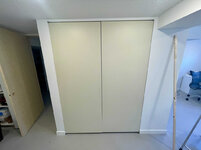
Additionally, the door on the right is a little bit higher, and the middle gap is wider at the top that the bottom.


It's not by large amounts, but the whole point of this frameless look IMO is for a perfect looking install. Part of the challenge. I intend to redo it.
So, by my estimation, the top hinge of the door on the right needs to come down about 3mm, and off the edge another 2mm.
Trouble is, like I mentioned, I already drilled all the holes.
My thought was to either fill them with epoxy, or remove the stud framing and make a new one.
As for the holes in the doors themselves that could use some reinforcement... I would love any suggestions!
I had a thought of shooting expanding foam in. Not that that would hold the screw threads, but it might prevent them from wiggling or wobbling? Or a blob of epoxy or something on the threads as it goes in? I assume the void inside is pretty large.
I'll leave you with this new bit of garage swag my daughter ordered me to put somewhere.
I give you: Taco Kitten!


Regarding the door repair... your best bet is to get some solid material in there. It may take some work, but you should be able to remove the factory wood that is sandwiched between the door skin, and then glue in a new board. I had to do this on a door in the basement of my last house.
Bob Heine
ALLIANCE MEMBER
As for the holes in the doors themselves that could use some reinforcement... I would love any suggestions!
Nick, I agree with Brad. Drill out the foam core to an even depth with a slightly undersized forstner bit. I would avoid using a spade bit with such thin walls adjacent to the foam. Square the holes with a chisel and insert a piece of wood trimmed to the correct dimensions and then glue and clamp the wood in the hole. My belt and suspender mind would secure the insert to the solid edge with stainless trim screws (unless it's an amazingly dry basement).Regarding the door repair... your best bet is to get some solid material in there. It may take some work, but you should be able to remove the factory wood that is sandwiched between the door skin, and then glue in a new board. I had to do this on a door in the basement of my last house.
OP
nicholam77
Well-known member
Regarding the door repair... your best bet is to get some solid material in there.
Uggggg, I know this is probably the answer, I just don't want to. Due to the door construction it's going to be a PITA.
Drill out the foam core to an even depth with a slightly undersized forstner bit. I would avoid using a spade bit with such thin walls adjacent to the foam.
There is no foam core inside the door, it's completely hollow (except probably a thin cardboard honeycomb pattern). The cleanest thing to do would probably be drill from the top or edge, and maybe just replace the corner where the hinges go. Will definitely take some chisel work.
I did find these toggle anchors for hollow core doors, not sure if they are any good or not.
I'll probably do the solid wood approach, but man, why is it always two steps forward and one step back? I'm reaching the point of burnout on this basement overhaul, and I have so far to go. Could really use a win!
Finallygotit
ALLIANCE MEMBER
Nick, just remember, you're learning. Don't think for a second that a lot of us haven't been where you are at right now. Just fix the door and move on. Hang in there! This too shall pass.Uggggg, I know this is probably the answer, I just don't want to. Due to the door construction it's going to be a PITA.
There is no foam core inside the door, it's completely hollow (except probably a thin cardboard honeycomb pattern). The cleanest thing to do would probably be drill from the top or edge, and maybe just replace the corner where the hinges go. Will definitely take some chisel work.
I did find these toggle anchors for hollow core doors, not sure if they are any good or not.
I'll probably do the solid wood approach, but man, why is it always two steps forward and one step back? I'm reaching the point of burnout on this basement overhaul, and I have so far to go. Could really use a win!
Uggggg, I know this is probably the answer, I just don't want to. Due to the door construction it's going to be a PITA.
Drill an inspection hole in the end of the door to see how much material you have to remove. This will help guide your course of action. Only removing a few inches from the corner might be an option if there is a lot of material. If you find there's only a 1/2" strip left, you probably won't have too much trouble removing the material completely.
I'll probably do the solid wood approach, but man, why is it always two steps forward and one step back? I'm reaching the point of burnout on this basement overhaul, and I have so far to go. Could really use a win!
Every. Damn. Time. I totally understand...
You've got some wins though. Take a breath, step back, and look around at how much you've got done instead of looking at what you still need to do. You'll get through it. One piece at a time.
Nick, just remember, you're learning. Don't think for a second that a lot of us haven't been where you are at right now. Just fix the door and move on. Hang in there! This too shall pass.
Exactly! We've all screwed up and will screw up again.
OP
nicholam77
Well-known member
Nick, just remember, you're learning. Don't think for a second that a lot of us haven't been where you are at right now. Just fix the door and move on. Hang in there! This too shall pass.
Thanks for the words of encouragement, Dan. I am always learning. That's why I love this forum and asking for help, there are so many here with much knowledge and experience. At the same time, this was unavoidable as the doors had to be trimmed down to fit the existing opening. I guess I could have replaced the wood bits from the jump, but due to the door construction I couldn't see how thick the frame was and took the gamble.
I will do just as you said, fix it and move on.
Drill an inspection hole in the end of the door to see how much material you have to remove. This will help guide your course of action. Only removing a few inches from the corner might be an option if there is a lot of material. If you find there's only a 1/2" strip left, you probably won't have too much trouble removing the material completely.
Good idea. Based on the hinge hole locations, it can't be much more than 1/2" left in there, maybe 3/4" tops. My thought with replacing just a piece on the corner was actually not to do anything with the top strip, but rather bore a (square) hole in the edge right under what's left of the top strip, and slide a block in there. I don't really *need* the screws to hit the frame, just something solid. The filler piece would of course have plenty of wood glue on the faces for the "skins" to adhere to. I'll do some examining and see what would be easiest.
You've got some wins though. Take a breath, step back, and look around at how much you've got done instead of looking at what you still need to do. You'll get through it. One piece at a time.
Yes, that's true, and I fully intended for this project to take a long time. My gripe was more just the challenges of working on an old house. It's not just this door thing... it's the cumulation that the floors that weren't really what we were after, the baseboard nightmare, nothing is standard size or plumb/level, everything has to be fiddled with and custom fitted. I understand I'm being a pessimist in the moment, but that's how I'm feeling... summer is slipping away and I'm doing a lot of this work at night. I'm at that point where the excitement has worn off (I started this in February!) and I'd like to move on to other things, but I feel captive to it.
*deep breath*
Ok, back to it.
I assume the top held the fan too? Spraying from. Inside to outside? I need to do this. All outside, but still worry about certain parts getting wet. Advice. PleaseThanks!
Thanks Jake,
You DO have a surplus of space compared to me
Of course I'd like a bigger space, but I haven't even finished this one in 8 yrs time so maybe it's a good thing!
I'm about to start a big project at work, so basement progress will likely halt for the next few months. But I did manage to fill about 300 nail holes, caulk, and paint, so the office side is pretty much done except the closet doors. Which I have on order.
So here's some updated pics to leave off with.
I also got my other desk top in and more computers / printer set up.
I am loving the new shade garden close to the back windows. I feel the room comes across darker in the phone pics, but the whole office is much brighter and more nature-y.
I've had to shim the IKEA cabinets, and this isn't necessarily the final form for the desk. I have some ideas to customize it, but it was easiest for now to put things back how they were and usable, until I get farther along.
With the 3d printer on the desk, I made a small custom bracket in Fusion 360 for a Thunderbolt 4 breakout box for work.
I've been thinking of switching to OnShape for modeling, but every time I want to design a little project I don't want to take 15x as long trying to figure out a new software, and Fusion is *just* comfortable enough to be a barrier to switching. So far, anyways.
Lastly I cleaned our AC for the first time since living here.Yes, I know, I'm awful.
I vacuumed and scooped out the seeds and debris, foamed it, and rinsed it.
Not perfect but it's definitely cleaner. We have cold air in the house and it seems to be performing ok, but hopefully this gave it a little boost and I promise I'll be better going forward.





OP
nicholam77
Well-known member
I assume the top held the fan too? Spraying from. Inside to outside? I need to do this. All outside, but still worry about certain parts getting wet. Advice. Please
Yeah, fan is in the top. I brushed it off but mine wasn't very dirty. I did not wet the fan and tried to avoid directly spraying any electrical harnesses. I was able to balance the top without disconnecting any wires. I'd watch a quick YouTube vid, make sure you are shutting the power off correctly etc.
I have the weird fuzzy coils, and I sprayed both ways. I think if you have normal fins you ideally would spray inside to outside and rinse the same way. Most of the dirt is probably on the outside, so if you spray the other way you could just push it deeper into the fins. But I would spray the other way after as well once the bulk of it is clean. Also if you have two walls of fins, you'll need to spray both ways anyways.
That's my advice as a newbie, but again... quite a few short and useful videos on YouTube.
kaymccampbell
Well-known member
If it'll make you feel better, a new house is the same ****. We built our house, with our own little hands, and I'm always amazed when I find everything is within about 1/8 overall, after 40 years.Thanks for the words of encouragement, Dan. I am always learning. That's why I love this forum and asking for help, there are so many here with much knowledge and experience. At the same time, this was unavoidable as the doors had to be trimmed down to fit the existing opening. I guess I could have replaced the wood bits from the jump, but due to the door construction I couldn't see how thick the frame was and took the gamble.
I will do just as you said, fix it and move on.
Good idea. Based on the hinge hole locations, it can't be much more than 1/2" left in there, maybe 3/4" tops. My thought with replacing just a piece on the corner was actually not to do anything with the top strip, but rather bore a (square) hole in the edge right under what's left of the top strip, and slide a block in there. I don't really *need* the screws to hit the frame, just something solid. The filler piece would of course have plenty of wood glue on the faces for the "skins" to adhere to. I'll do some examining and see what would be easiest.
Yes, that's true, and I fully intended for this project to take a long time. My gripe was more just the challenges of working on an old house. It's not just this door thing... it's the cumulation that the floors that weren't really what we were after, the baseboard nightmare, nothing is standard size or plumb/level, everything has to be fiddled with and custom fitted. I understand I'm being a pessimist in the moment, but that's how I'm feeling... summer is slipping away and I'm doing a lot of this work at night. I'm at that point where the excitement has worn off (I started this in February!) and I'd like to move on to other things, but I feel captive to it.
*deep breath*
Ok, back to it.
Last edited:
OP
nicholam77
Well-known member
If it'll make you feel better, a new house is the same ****.
Thanks for the reality check KayWe built our house, with our own little hands, and I'm always amazed when I find everything is within about 1/8 overall, after 40 years.
That is awesome!
kaymccampbell
Well-known member
Too much attention to detail.
That is awesome!
jar944
Well-known member
If it'll make you feel better, a new house is the same ****.
This.
My last place was undoubtedly built by a blind carpenter on a Friday afternoon. That house was 9 years old when I bought it and had more issues than replies in this thread.
Some of the more amusing floor issues, you could feel the slope while walking on it.


OP
nicholam77
Well-known member
Thanks to everyone's encouragement to get over myself and just fix the doors the right way, I started to do just that, last night. I like to think I have a high standard of work for myself, despite not being a professional of any sort, and since I definitely make mistakes... a big part of that is fixing them and redoing steps until I'm happy. I think I was just feeling frustrated and I appreciate the encouragement to get back on track.
I decided the easiest and most time-efficient solve was to slide a small block in the top / bottom.
Even extracting that small bit was an exercise in patience, and a combo of the forstner bit, multi-tool, utility knife, and chisel.

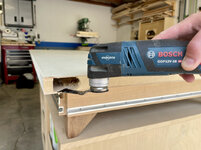

You can see how the one screw just missed the edge. Hardboard is not very thick.
I did some calculations based on what I trimmed from the doors, and the top/bottom frame pieces are 3/4" wide, before trimming. Even the edge is only 3/4". No wonder the screws hit air.
I fashioned a block out of some leftover stud material and drenched it in glue, and then clamped.


My vindication against the door is the near perfect fit of the block.

That was the bottom. On the top... I was trying to decide how best to approach with the hinge recess. I decided to just replace it all and need to re-router it after.
During that one I managed to slice my thumb with the chisel.

Right next to my thumbnail. I don't think it's super deep but lots of blood and hurt like hell in the immediate aftermath.
After 40min on the couch, contemplating how the accident occurred (it was the side of the chisel that got me), I felt good enough to go back out there... albeit sans the use of my left thumb.
Damn these doors!!!
Anyways, got the top block glued in and clamped.

Still need to do the other door, and then re-router the hinge recesses, but by then it was 8:30pm and I felt like being done for the night.


I decided the easiest and most time-efficient solve was to slide a small block in the top / bottom.
Even extracting that small bit was an exercise in patience, and a combo of the forstner bit, multi-tool, utility knife, and chisel.
You can see how the one screw just missed the edge. Hardboard is not very thick.
I did some calculations based on what I trimmed from the doors, and the top/bottom frame pieces are 3/4" wide, before trimming. Even the edge is only 3/4". No wonder the screws hit air.
I fashioned a block out of some leftover stud material and drenched it in glue, and then clamped.
My vindication against the door is the near perfect fit of the block.
That was the bottom. On the top... I was trying to decide how best to approach with the hinge recess. I decided to just replace it all and need to re-router it after.
During that one I managed to slice my thumb with the chisel.
Right next to my thumbnail. I don't think it's super deep but lots of blood and hurt like hell in the immediate aftermath.
After 40min on the couch, contemplating how the accident occurred (it was the side of the chisel that got me), I felt good enough to go back out there... albeit sans the use of my left thumb.
Damn these doors!!!
Anyways, got the top block glued in and clamped.
Still need to do the other door, and then re-router the hinge recesses, but by then it was 8:30pm and I felt like being done for the night.
Jeff Ivers
Well-known member
Nice job on the door repair. Reminds me of a time someone brought me a door they wanted 1/8 inch taken off the bottom of. Sure - no problem - get the door up on the table saw and start a cut and all of a sudden the blade veers into the part of the door he didn't want cut. Turned out the bottom of the door had less that 1/8 inch of solid material!
sawduststeve
Well-known member
Hiya Nick
Firstly, you’re doing a great job, repairs and all, keep at it, it will be done.
Back to the palm router, it doesn’t need to get spendy. I bought this one a few years ago now.
It’s a solid Chineseium copy of a better brand, can you guess which one
I only use it for hinges and lock face plates and keeps, it’s done a load, but keeps on going.
£35 eBay. But best of all is its name it’s branded as a Merry
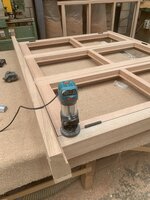
I haven’t used a chisel to cut in a hinge for years
Cut around with a Stanley knife, router out close to the scribe, then cut out the rest with the knife.
I’ve cut the bottom of off countless hollow core doors and had to re glue a solid block back in, a headless pin gun can speed things along while waiting for the glue to set.
It’s the best way to go. Good work.
A match stick dipped in glue then tapped into an unwanted screw hole usually does the trick.
Steve
Our house is 200/250 years old and I’ve found embracing the unlevel uneven side to it all, makes my live easier.
Firstly, you’re doing a great job, repairs and all, keep at it, it will be done.
Back to the palm router, it doesn’t need to get spendy. I bought this one a few years ago now.
It’s a solid Chineseium copy of a better brand, can you guess which one
I only use it for hinges and lock face plates and keeps, it’s done a load, but keeps on going.
£35 eBay. But best of all is its name it’s branded as a Merry
I haven’t used a chisel to cut in a hinge for years
Cut around with a Stanley knife, router out close to the scribe, then cut out the rest with the knife.
I’ve cut the bottom of off countless hollow core doors and had to re glue a solid block back in, a headless pin gun can speed things along while waiting for the glue to set.
It’s the best way to go. Good work.
A match stick dipped in glue then tapped into an unwanted screw hole usually does the trick.
Steve
Our house is 200/250 years old and I’ve found embracing the unlevel uneven side to it all, makes my live easier.
Bob Heine
ALLIANCE MEMBER
So it's the new place on your block?Our house is 200/250 years old and I’ve found embracing the unlevel uneven side to it all, makes my live easier.
OP
nicholam77
Well-known member
Nice job on the door repair. Reminds me of a time someone brought me a door they wanted 1/8 inch taken off the bottom of. Sure - no problem - get the door up on the table saw and start a cut and all of a sudden the blade veers into the part of the door he didn't want cut. Turned out the bottom of the door had less that 1/8 inch of solid material!
Thank you, Jeff. Just an 1/8", wow, I guess I shouldn't be complaining!
Hiya Nick
Hey Steve... I appreciate all the tips and kind words.
I've had a look at those Amazon / eBay knock off trim routers, I see they even have the corresponding plunge base as well. It's definitely something I've considered and may just do that in the interim. Glad to know yours has held up. Sad to say it, but these days I'm not doing a lot of routing... I will get a nice trim router eventually, but I like to justify those purchases a *little*, and I am happy with my main router for most tasks.
Interesting about not using the chisel... I did have a utility knife going as well but I think it needed a new blade, the thicker MDF chunks were overpowering it. Noted for next time.
I haven't really done much chiseling. I know enough not to keep my hands in front of it, but hey, accidents happen.
Nice tip on the match stick. I tried filling the holes with 5min epoxy because I had some on hand... we'll see how that goes, I haven't got to the point of re-drilling them yet. If it doesn't work I'll try your idea or glue some dowels in there. Probably should have tried that first.
I've made some more progress and am painting the doors now. I don't know if that is confidence or foolishness, but hopefully I'll have a more complete update by the end of the weekend.
Thanks!
sawduststeve
Well-known member
Yep, in our village we’re known as the people who bought the new build.So it's the new place on your block?

OP
nicholam77
Well-known member
Anyone clicking in for a closet update, I may have gotten a bit distracted

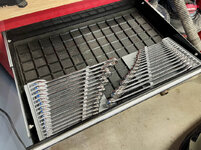
I've had my imperial wrench set sitting on my office desk for months, and finally decided to finish up that project and get the 3d-printed holder tweaked and made.
Jury's still out on Gridfinity for me, but I think it's going to work nicely for my wrench drawer, anyways.
More on the closets, soon.
I've had my imperial wrench set sitting on my office desk for months, and finally decided to finish up that project and get the 3d-printed holder tweaked and made.
Jury's still out on Gridfinity for me, but I think it's going to work nicely for my wrench drawer, anyways.
More on the closets, soon.
Finallygotit
ALLIANCE MEMBER
Closets! Closets! Closets! We need closet updates! 
OP
nicholam77
Well-known member
Closets! Closets! Closets! We need closet updates!
Wow, I didn't realize demand was so high!
This one is for you Dan, back in my scary router tower:

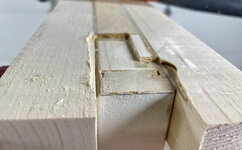
Turns out chiseling wood is much better than chiseling MDF (just a little clean up needed). Managed not to chop my fingers off.

Currently they are in the 'paint booth', which happens to be the office. It's way too hot and humid in the garage for painting.
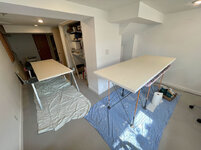
One more coat and then I can reinstall.
cccoltsicehockey
Well-known member
The wrench holders look great. I need some of those. Laying them flat in a drawer takes up so much space.
RickP
Well-known member
I really like those wrench holders, and I'm still a gridfinity fan. I've also let my drawer organizer printing get stalled for months. I'm going to use these wrench holders as a kick to get me started again -- thanks!
I've had my imperial wrench set sitting on my office desk for months, and finally decided to finish up that project and get the 3d-printed holder tweaked and made.
Jury's still out on Gridfinity for me, but I think it's going to work nicely for my wrench drawer, anyways.
OP
nicholam77
Well-known member
The wrench holders look great. I need some of those. Laying them flat in a drawer takes up so much space.
Thanks, and agreed! These are for the Tekton metric and imperial sets. The wrenches are friction fit so it was a bit of a PITA / trial + error to get it right.
I'm happy to share files with anyone that wants them. Eventually I will add them to my Printables page. I do need to fix a few dimensions on the imperial one I just made.
I really like those wrench holders, and I'm still a gridfinity fan. I've also let my drawer organizer printing get stalled for months. I'm going to use these wrench holders as a kick to get me started again -- thanks!
Thanks! Gridfinity is great if you can fill the whole drawer with Gridfinity bins. I find it a bit high effort (nothing against Gridfinity, but just custom 3d printed tool holders in general). Lots of hours and test prints. But, they do look nice and are space efficient.
I think my design is *pretty* good, but it takes a lot of plastic and as mentioned above the wrenches are friction fit. Otherwise they would slide out of the holders. In my latest one I added a little 'guard rail' against that (in blue), although it could be taller:
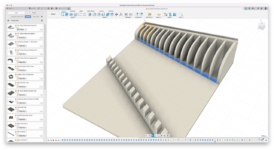
If you have any cool 3d printed organizers, I'd love to see them (Gridfinity or otherwise). I'm always looking for ideas and inspiration.
Pritchett's closetsClosets! Closets! Closets! We need closet updates!
OP
nicholam77
Well-known member
In case someone has this same Tekton Wrench set as me, I found a new model on Printables for it for Gridfinity. Mine might be *slightly* more compact, it's hard to tell, but this one looks like a nice design and good labels.
 www.printables.com
They also have ones for Tekton sockets as well.
I'll put mine up eventually, but need to do some cleanup on the files.
Printables
www.printables.com
They also have ones for Tekton sockets as well.
I'll put mine up eventually, but need to do some cleanup on the files.
OP
nicholam77
Well-known member
Ok, so after 3x coats of paint, and several installation attempts, I finally got the result I was after (or close to it):
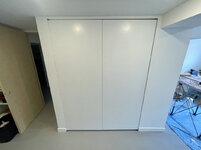

The left side reveal is much tighter than the right, but I don't care about that too much. I mostly cared about the center gap and that the doors lined up with each other horizontally.
The center gap is nice and even, but it's very tight. I can't quite fit my 2mm / 1/8" shim between, so it's less than 2mm. Probably too tight. But... I'm not going to do any extra work on it, so now I need to make the 2nd closet match those extremely tight tolerances.
My wife happened to look at it a few times during my installs (when the gaps weren't right), and she begged me not to finesse it. "It's perfect like it is! No one will ever notice!"
I can't tell you how many times I've been told "no one will ever notice" by family, friends, etc. But the truth is, I am chasing perfection for myself. Just because someone else won't notice doesn't mean it doesn't matter. Even on a subliminal level, details matter! I don't think I ended up with perfection by any means, but on a personal level I need to know I did my best.
Having the closet doors on definitely changes the feel of the room... I am looking forward to getting the other ones done and finding some rugs for the space.
The left side reveal is much tighter than the right, but I don't care about that too much. I mostly cared about the center gap and that the doors lined up with each other horizontally.
The center gap is nice and even, but it's very tight. I can't quite fit my 2mm / 1/8" shim between, so it's less than 2mm. Probably too tight. But... I'm not going to do any extra work on it, so now I need to make the 2nd closet match those extremely tight tolerances.
My wife happened to look at it a few times during my installs (when the gaps weren't right), and she begged me not to finesse it. "It's perfect like it is! No one will ever notice!"
I can't tell you how many times I've been told "no one will ever notice" by family, friends, etc. But the truth is, I am chasing perfection for myself. Just because someone else won't notice doesn't mean it doesn't matter. Even on a subliminal level, details matter! I don't think I ended up with perfection by any means, but on a personal level I need to know I did my best.
Having the closet doors on definitely changes the feel of the room... I am looking forward to getting the other ones done and finding some rugs for the space.
Finallygotit
ALLIANCE MEMBER

cccoltsicehockey
Well-known member
The doors look great. Obviously a bit of a headache at the time for you but worth it to you in the end all the same.Ok, so after 3x coats of paint, and several installation attempts, I finally got the result I was after (or close to it):
The left side reveal is much tighter than the right, but I don't care about that too much. I mostly cared about the center gap and that the doors lined up with each other horizontally.
The center gap is nice and even, but it's very tight. I can't quite fit my 2mm / 1/8" shim between, so it's less than 2mm. Probably too tight. But... I'm not going to do any extra work on it, so now I need to make the 2nd closet match those extremely tight tolerances.
My wife happened to look at it a few times during my installs (when the gaps weren't right), and she begged me not to finesse it. "It's perfect like it is! No one will ever notice!"
I can't tell you how many times I've been told "no one will ever notice" by family, friends, etc. But the truth is, I am chasing perfection for myself. Just because someone else won't notice doesn't mean it doesn't matter. Even on a subliminal level, details matter! I don't think I ended up with perfection by any means, but on a personal level I need to know I did my best.
Having the closet doors on definitely changes the feel of the room... I am looking forward to getting the other ones done and finding some rugs for the space.
I hear you on chasing the perfection for yourself and no one else. Been there done that and will continue to do it for better or worse of my own health.
patlun
Well-known member
, I am chasing perfection for myself. Just because someone else won't notice doesn't mean it doesn't matter. Even on a subliminal level, details matter! I don't think I ended up with perfection by any means, but on a personal level I need to know I did my best.
Even if someone else won't notice it you know it is there. That is one of the problems we all have I think. I have become so old that I have learned to live with some flaws. The last words in the quote is the key I think. Have we done our best for now, we need to be able to live with it. That will not prevent us from redoing things when we have become better or learned new methods.
From a distance (from Sweden) it looks nice!
The room looks clean and light
Last edited:
kaymccampbell
Well-known member
I've learned that if I'm happy with it sans glasses, then it's good enough.I can't tell you how many times I've been told "no one will ever notice" by family, friends, etc. But the truth is, I am chasing perfection for myself. Just because someone else won't notice doesn't mean it doesn't matter. Even on a subliminal level, details matter! I don't think I ended up with perfection by any means, but on a personal level I need to know I did my best.
I can't tell you how many times I've been told "no one will ever notice" by family, friends, etc. But the truth is, I am chasing perfection for myself. Just because someone else won't notice doesn't mean it doesn't matter. Even on a subliminal level, details matter! I don't think I ended up with perfection by any means, but on a personal level I need to know I did my best.
You aren't alone by any means, and I think it's very important to embrace it and to come to terms with the fact doing the best possible work is something that is very important to you. It's not something you should feel bad about! I've found that if I don't do it "right" the first time, the project is never actually done. But I also know with a busy family and budget spread across many projects, that I need to be ok if it isn't finished to a world class level of excellence every time.
An investment in quality tools and organization is an investment in time and mental health. I often forget or take for granted just how fortunate we are to have everything we have, but I also know we've work hard to position our family to be where we are.
We would have likely paid close to $10k in labor to have professionals knock out some of the projects I've completed in the last few weeks, and there is a good chance that some of them would have done sub par work. But because I've slowly built up an arsenal of tools and knowledge, I am able to complete them w/ the only costs being materials. I don't have to spend an hour looking for a tool, or spend 30 minutes setting something up. I've got the tools, they are well organized and easy to access, they are accurate and ready to use. Often times that is the difference between a successful and unsuccessful project.
SamYoung
Well-known member
I feel you on the perfectionist and the desire to do it right the first time. I've found that the key is learning that even perfection must have a tolerance range. This is coming from someone who's tightest measured tolerances were .000025" tolerance windows.
For me, the ones I can directly compare at the same time are critical/tighter and the ones the others are looser. Your gaps look symmetrical for that pair of doors when you look at it. In the case of your other closet, you can probably see the top and bottom reveals of both door sets as you look down the hall so I can see wanting them to be the same. On the other hand, its a hall where you can't step back far enough to see the center and side reveal between the 2 door sets at the same time, so I wouldn't stress as much about keeping them the exactly the same. Save that for a set of door in a corner or next to each other on a wall in a large room where you can visually see them at the same time. focus on just making that closet door side and center reveals symmetrical and the top and bottom reveal proportions similar so they look good as you look down the hallway at both.
For me, the ones I can directly compare at the same time are critical/tighter and the ones the others are looser. Your gaps look symmetrical for that pair of doors when you look at it. In the case of your other closet, you can probably see the top and bottom reveals of both door sets as you look down the hall so I can see wanting them to be the same. On the other hand, its a hall where you can't step back far enough to see the center and side reveal between the 2 door sets at the same time, so I wouldn't stress as much about keeping them the exactly the same. Save that for a set of door in a corner or next to each other on a wall in a large room where you can visually see them at the same time. focus on just making that closet door side and center reveals symmetrical and the top and bottom reveal proportions similar so they look good as you look down the hallway at both.
Basement is looking good sir! My guess is you're growing tired of the mess and a host of projects everywhere you look....but it's definitely coming along and a space you'll be proud of and be able to enjoy for as long as you're there!
Last edited:
OP
nicholam77
Well-known member
I've learned that if I'm happy with it sans glasses, then it's good enough.
I love that
, but in my case I have Keratoconus, and going sans glasses would likely lead to some pretty shoddy work!You aren't alone by any means, and I think it's very important to embrace it and to come to terms with the fact doing the best possible work is something that is very important to you. It's not something you should feel bad about! I've found that if I don't do it "right" the first time, the project is never actually done. But I also know with a busy family and budget spread across many projects, that I need to be ok if it isn't finished to a world class level of excellence every time.
Thanks Jon, that is very accurate to me, and I will try to be aware of that last part in particular.
I feel you on the perfectionist and the desire to do it right the first time. I've found that the key is learning that even perfection must have a tolerance range. This is coming from someone who's tightest measured tolerances were .000025" tolerance windows.
For me, the ones I can directly compare at the same time are critical/tighter and the ones the others are looser. Your gaps look symmetrical for that pair of doors when you look at it. In the case of your other closet, you can probably see the top and bottom reveals of both door sets as you look down the hall so I can see wanting them to be the same. On the other hand, its a hall where you can't step back far enough to see the center and side reveal between the 2 door sets at the same time, so I wouldn't stress as much about keeping them the exactly the same. Save that for a set of door in a corner or next to each other on a wall in a large room where you can visually see them at the same time. focus on just making that closet door side and center reveals symmetrical and the top and bottom reveal proportions similar so they look good as you look down the hallway at both.
Thanks, that's great advice. I'm confident I can at least get the top/bottoms the same. It will be close enough, and knowing what's inside the doors now I have a better idea on how to tackle the 2nd pair since those need to be cut down even more.
Basement is looking good sir! My guess is you're growing tired of the mess and a host of projects everywhere you look....but it's definitely coming along and a space you'll be proud of and be able to enjoy for as long as you're there!
Thanks Logan! Yes it's tiring, but I'm taking it a bit at a time. Trying to maximize the times I feel motivated, and I've also had some days where I *could* be working on it but just don't feel like it, and I don't force myself. It's a long slog and I'm trying to avoid total burnout.
As far as staying here, I probably will be for the foreseeable future. My plan was never to die in this house, but it's evolved beyond what I thought was a stepping stone, I don't see us moving anytime soon. Part of it is prices, part of it is the areas we want to be in, part of it is my desire for a very specific type of house (Modern / Midcentury-Modern, or otherwise contemporary but architect-designed), with privacy and/or views. It's not impossible, but would take a lot of extra cash and the pickings are slim. Building with a real architect would be awesome, but I've briefly looked into that and it's cost-prohibitive. I think it would be much easier to find a property that fits the criteria but needs to be refreshed and remodeled. Even that would be a few $100k more than what we could sell for, and then probably the same in remodeling (over time). I probably *could* take on a bigger mortgage once we drop our daycare bills, but I also do not like to live at the limit and prefer to have flexibility for travel and other things. Anyways, I'm getting off track, but I'm very grateful to have what we have and that we got in when we did at a young age, and the mission is to keep making it the best it can be for us.
And in all honesty, even if my dream house popped up and I could afford it, I would be a bit sad to leave this one. I've put so much effort into it.