
You are using an out of date browser. It may not display this or other websites correctly.
You should upgrade or use an alternative browser.
You should upgrade or use an alternative browser.
Between 265 & 485 SQ/FT Nick's Two-Car Detached Vdub Garage
- Thread starter nicholam77
- Start date
Workspaces sized between 265 and 485 squarefeet.
Nick I just found this photo from the Bavarian Woodworker. Looks like he used dominos to attach his MFT top.
 T_B_W_0319 by bjohnson388, on Flickr
Bret
T_B_W_0319 by bjohnson388, on FlickrBret
OP
nicholam77
Well-known member
Nick I don't see any reason why those outside legs can't just be glued and clamped without using fasteners.
Bret
Thanks Bret! That's kinda what I was thinking/hoping, but wanted an expert like yourself to confirm
")
Nick I just found this photo from the Bavarian Woodworker. Looks like he used dominos to attach his MFT top.

Bret
Nice pic, I had not seen that one before. Seems pretty similar to what I'm going for in terms of the clamping. Looks like they purchased the actual MFT extrusions. If only I had a Domino!

I'm sure I could figure out a way to do similar floating tenon with the router, but I don't want to complicate fitting everything together and if I can get away without it I'd rather save the time. There's already way more steps to this project than I want there to be, haha.
-----------------------------------------------
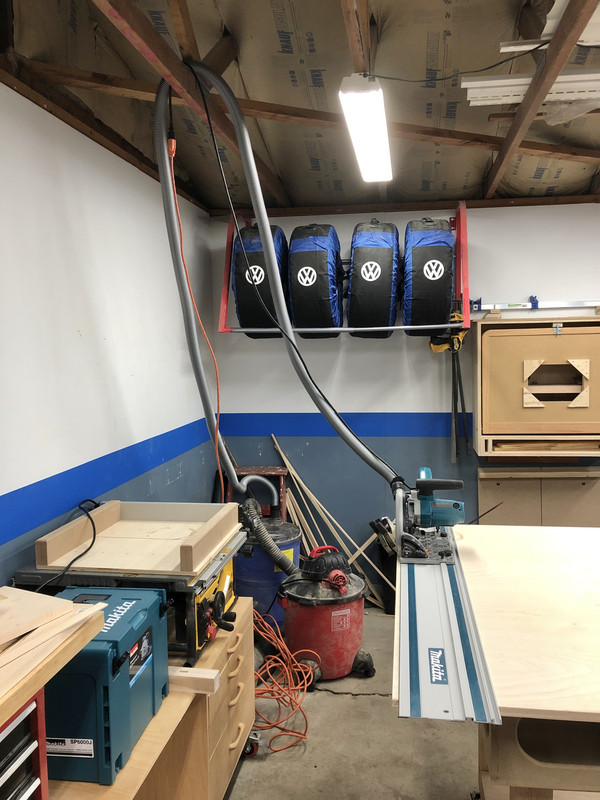
I did put my money where my mouth is and get out in the garage last night for some small progress cutting the side pieces of plywood.
Tried putting the hose + cord through the ceiling. It did make it easier to manage, maybe I'll have to put a hook up there in a convenient spot once this project is done.
To cut these to size I ripped one clean edge with the tracksaw, then marked the width opposite that clean edge on both ends, using one of the leg parts as reference:
Despite doing this, my track moved slightly on one of the cuts and I had to trim it again.
To cut the length I cut another fresh edge near the end, as square as I could. To do this I clamped my picture frame miter jig to the plywood. This was cut on my crosscut sled and is the largest "square" I have.
Then I measure out the length with a rule and make a mark on both ends and line up the tracksaw to the marks.
I built the whole table saw cart this way, and it turned out pretty decent. But the two side panels I cut tonight, while the corners seem pretty square, were not exactly the same size. This illustrates exactly why this tracksaw station will be so helpful, because while the tracksaw is an awesome tool, I think it has 4 weaknesses without accessories:
1. Making accurate 90 degree square cuts
2. Lining up track to pencil marks is not 100% accurate
3. No repeatability, leading to parts that are slightly different
4. If bottom of workpiece is not supported there is some tearout

If you haven't seen it yet, Rockler makes a pretty nifty ceiling track system that helps suspend and guide dust collection hoses and cords:
https://www.rockler.com/4-tracks-for-rockler-ceiling-track-system
That being said, I've been looking into making my own track/trolley system and have found that if you are willing to get creative with some strut channel, skate wheel bearings, washers/bushings, and 1.25" long x 5/16" diameter roll pins, you should be able to DIY a solution at a significant savings over what they charge. I am in the planning stages now, but should be getting around to it sooner than later and can report back with what I find.
OP
nicholam77
Well-known member
If you haven't seen it yet, Rockler makes a pretty nifty ceiling track system that helps suspend and guide dust collection hoses and cords:
https://www.rockler.com/4-tracks-for-rockler-ceiling-track-system
I hadn't seen that. It looks well thought out, but I agree, expensive. Definitely interested to see how yours turns out!
Metallitubby
Well-known member
Fellow Vortexer checking in.
OP
nicholam77
Well-known member
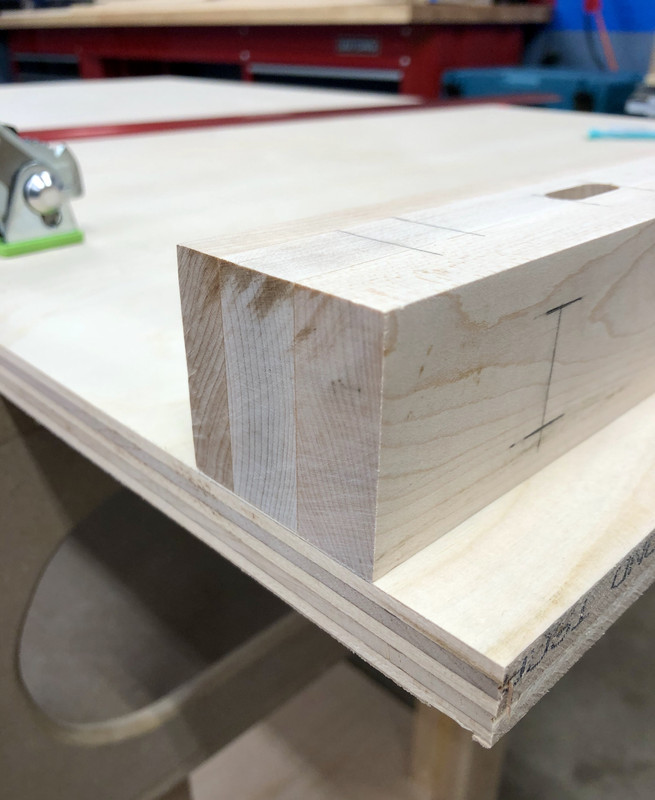
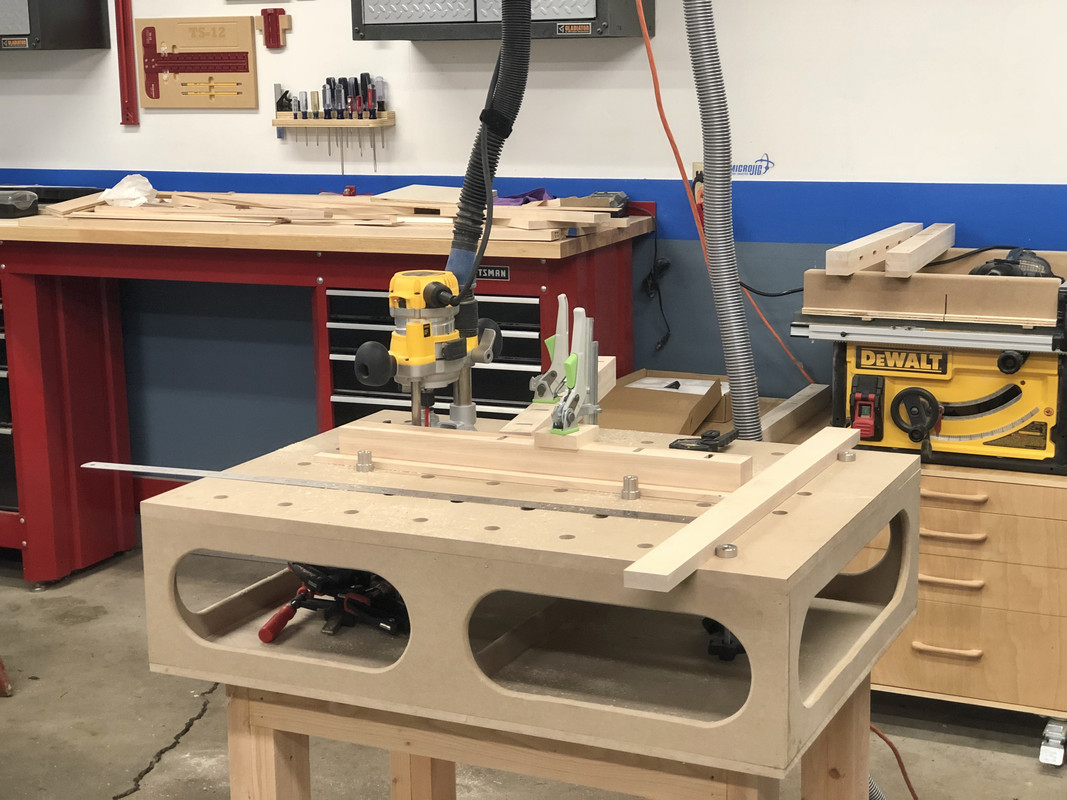
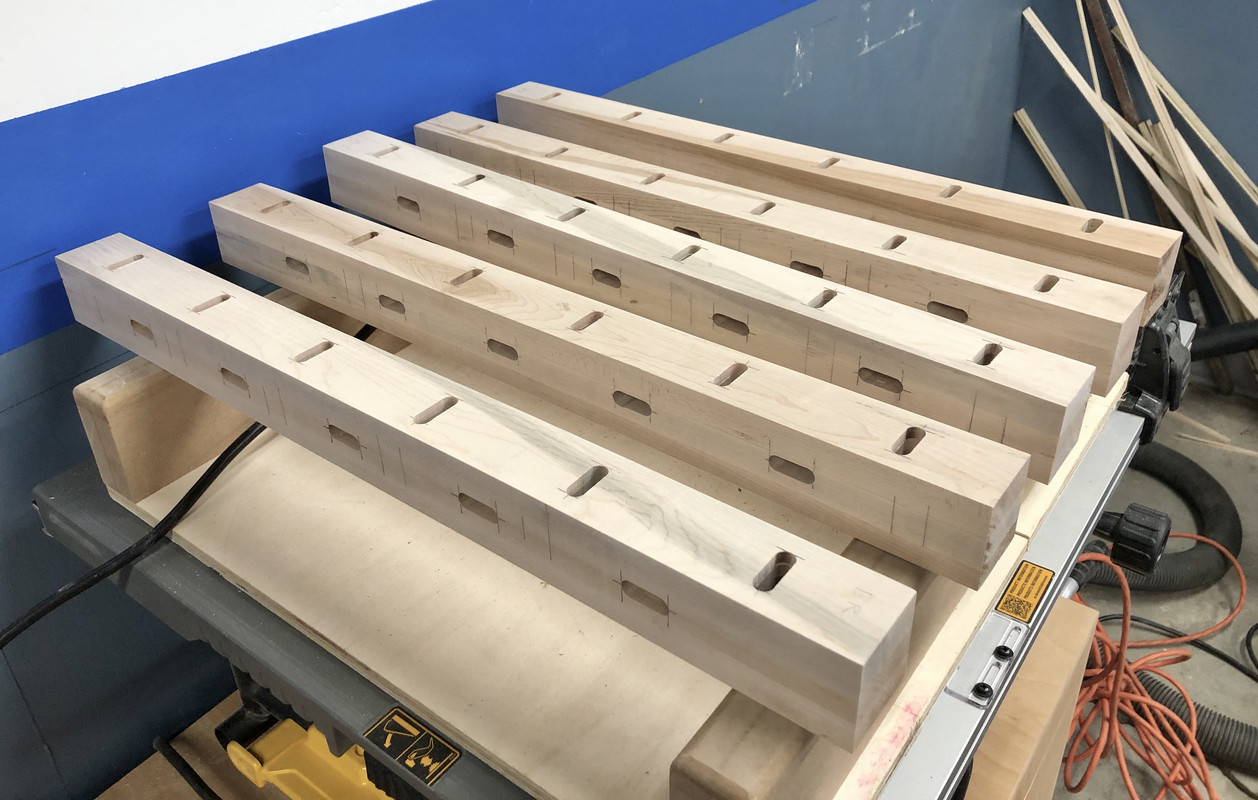
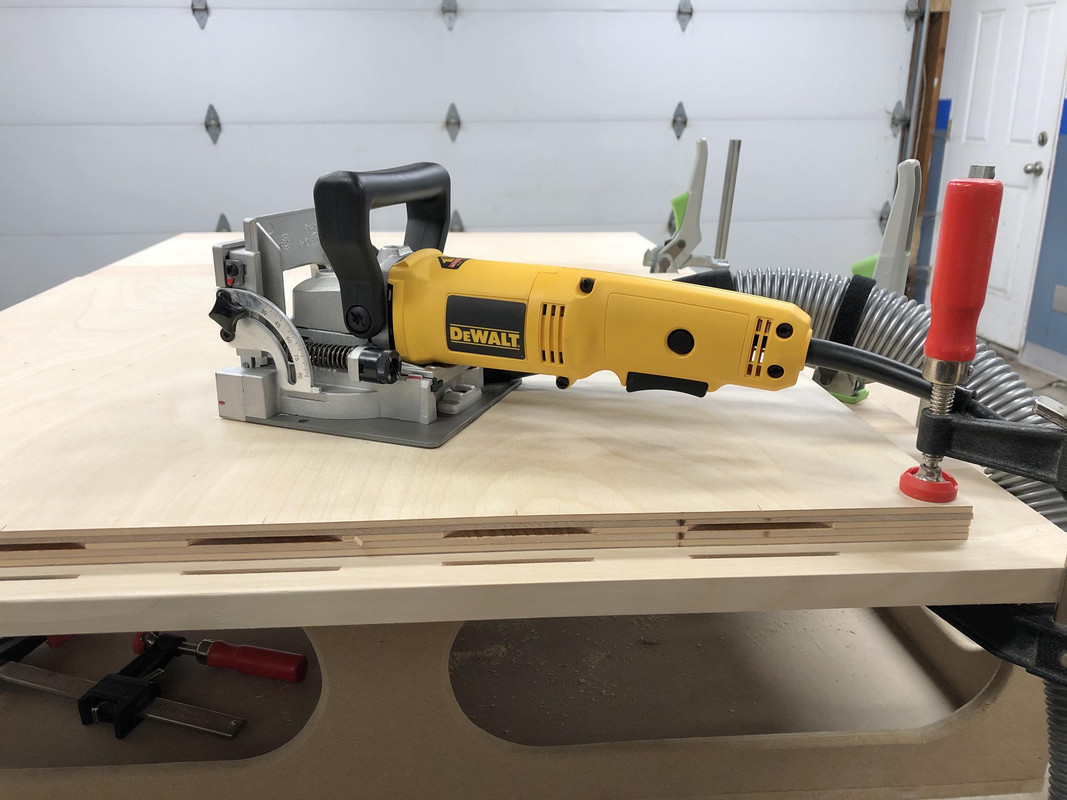
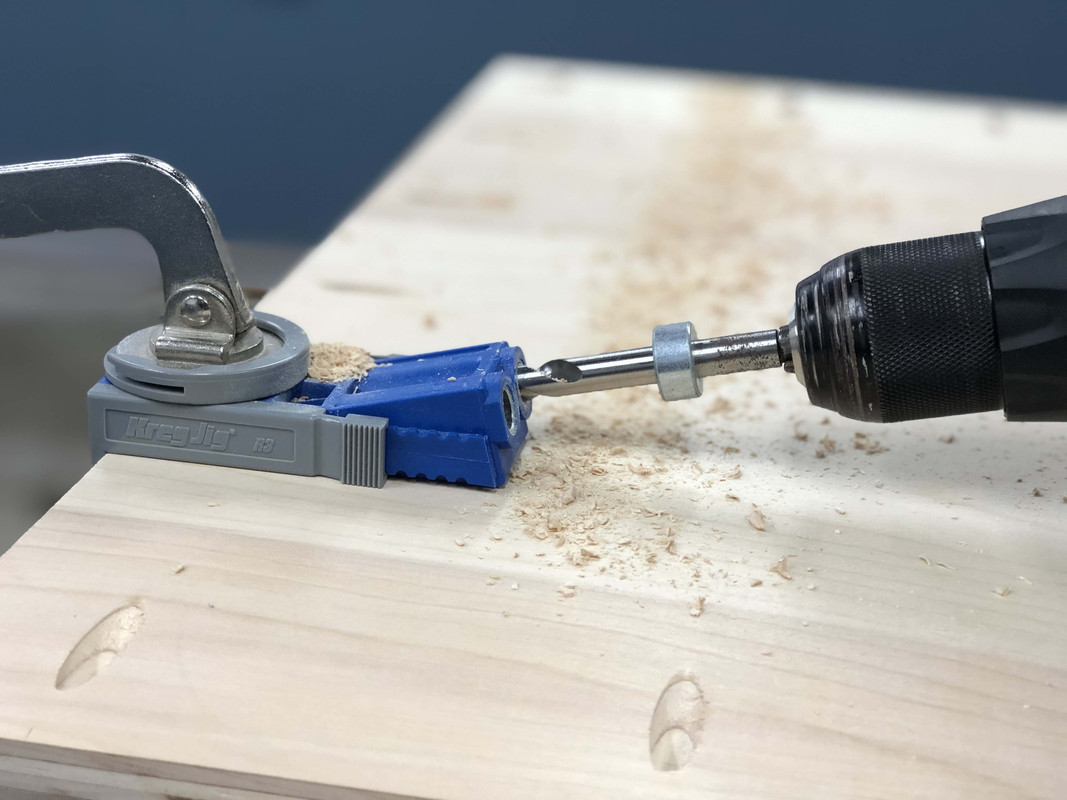
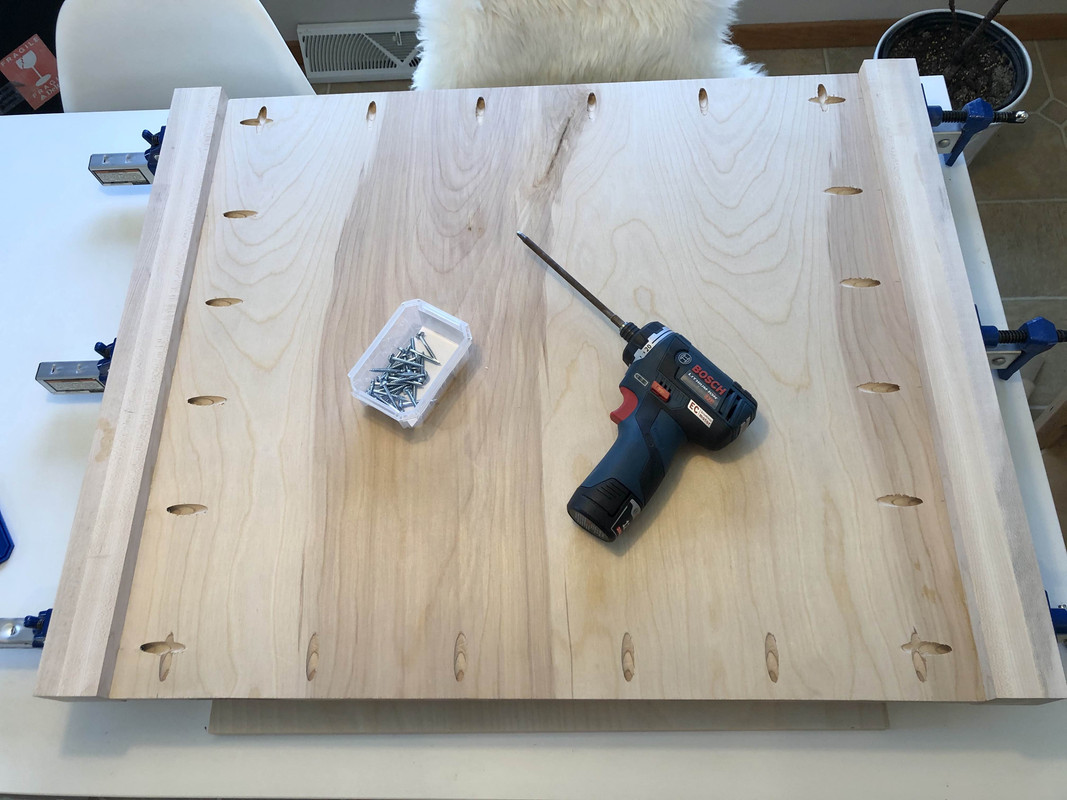
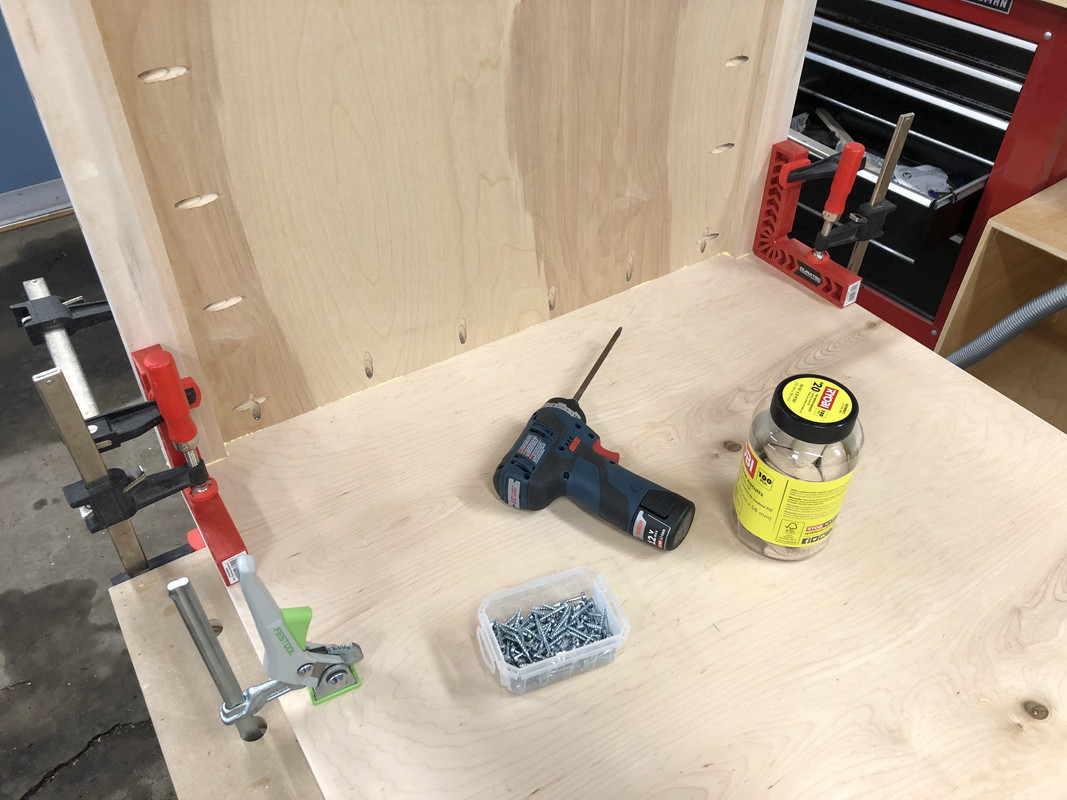
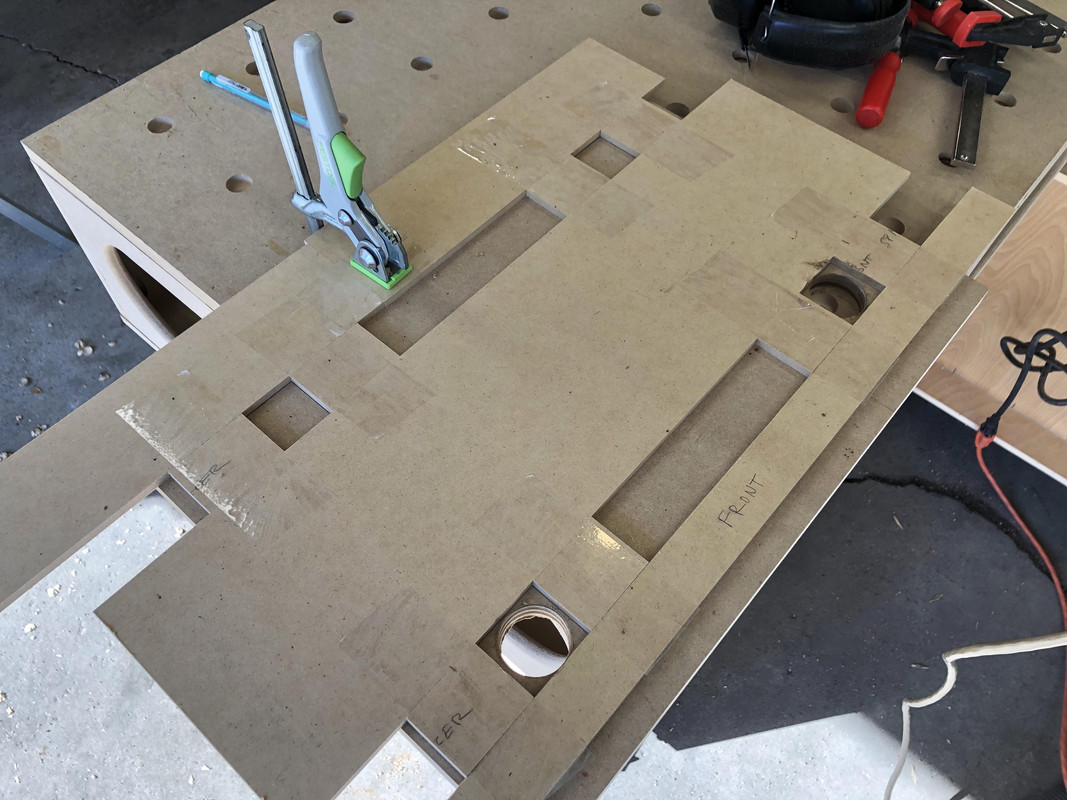
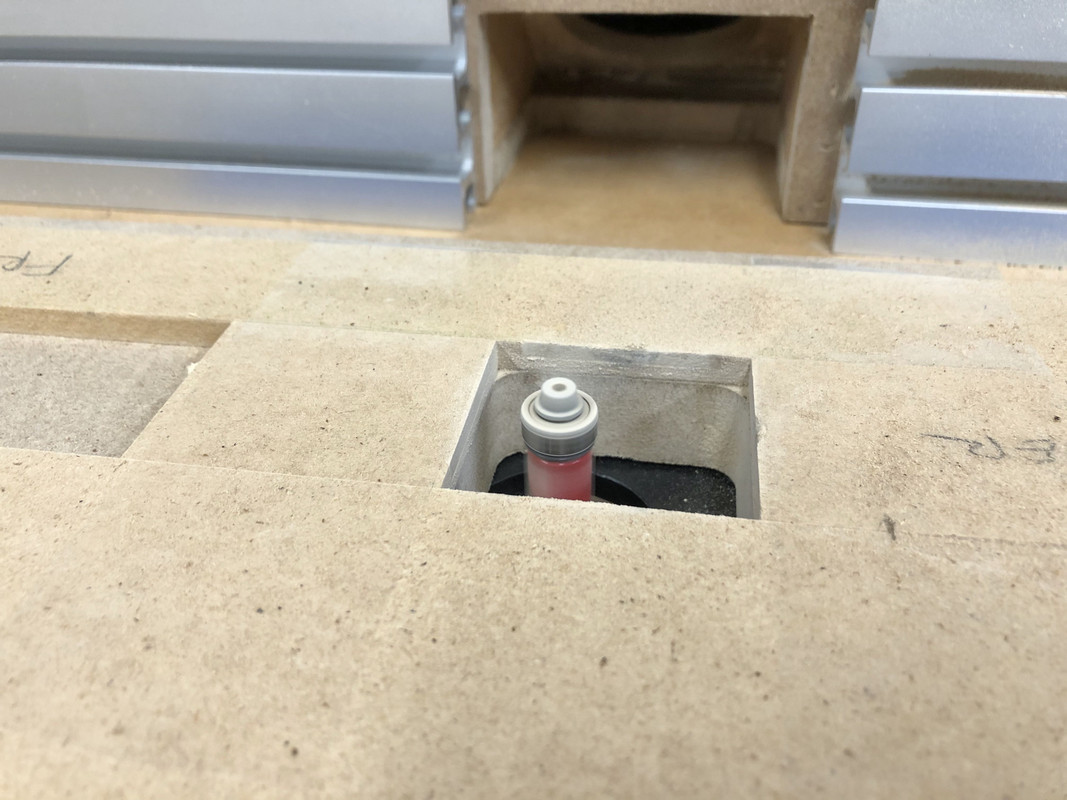
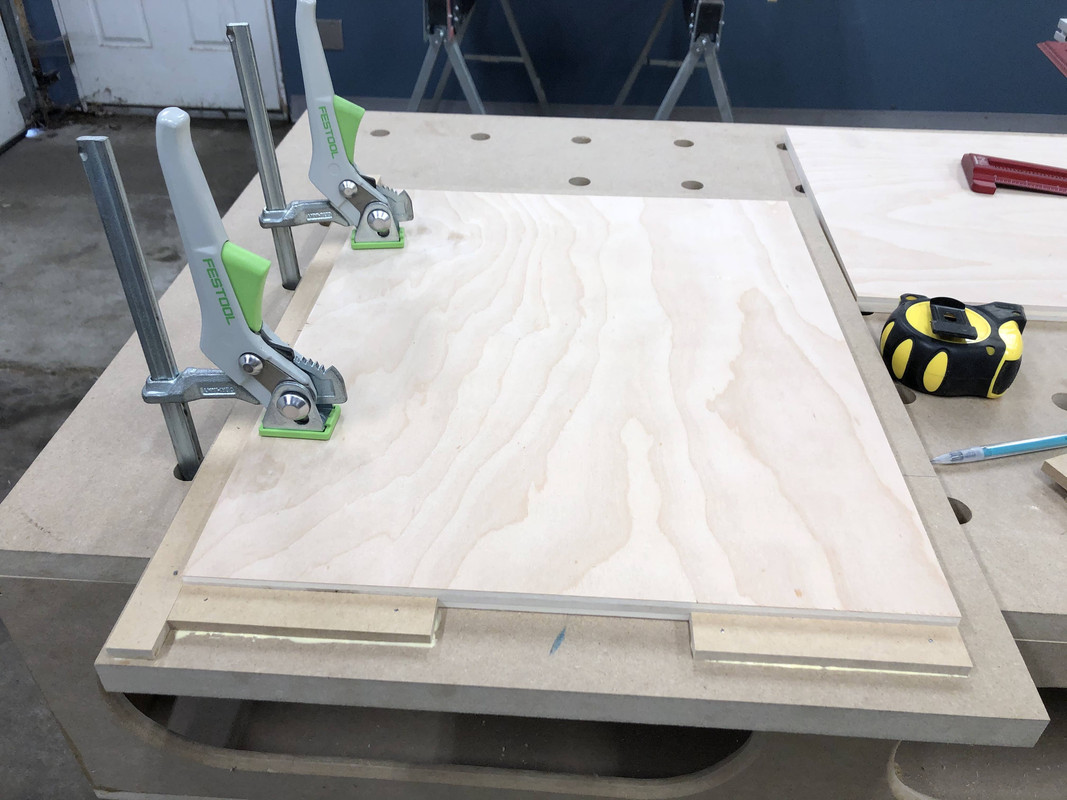
I fit in some more time this weekend on the track saw bench. Finishing the mortises on the legs.
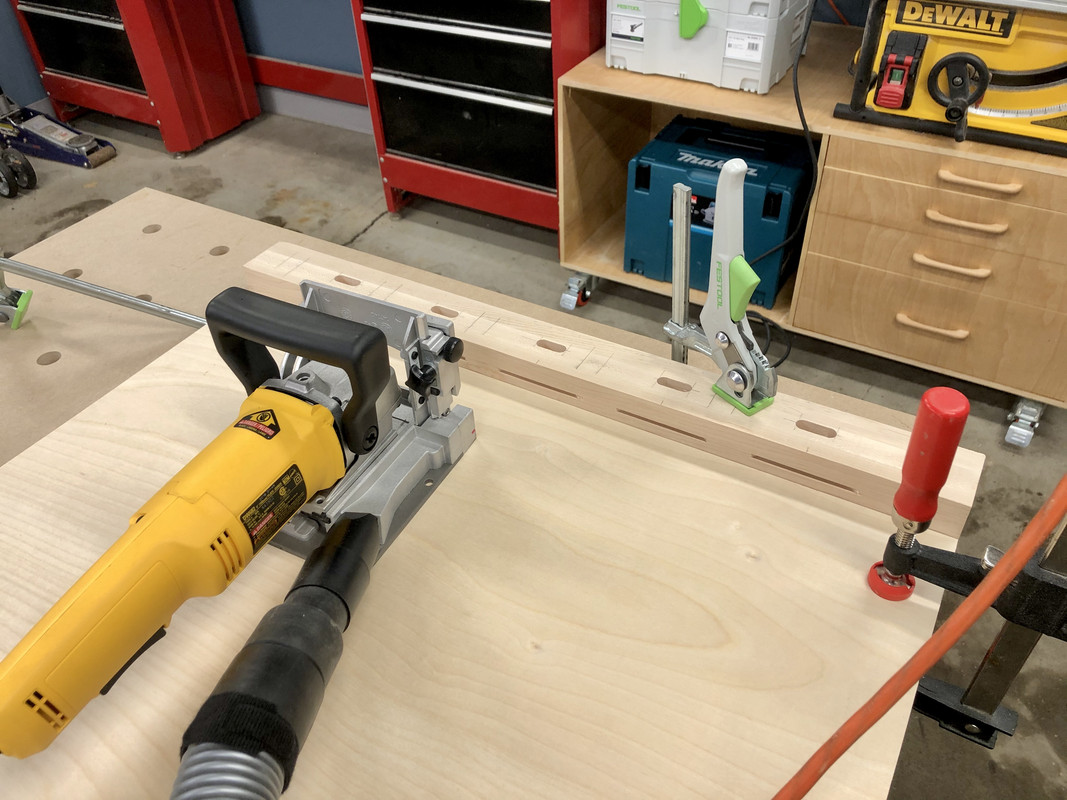
Using the edge guide for the vertically oriented ones was pretty straightforward, but I was a bit unsure how to do the horizontal ones. This is the arrangement I came up with:
Using bench dogs and a linear clamp (Chinese knockoff of the Festool MFT Clamping Elements), I secured the leg to my workbench cart.
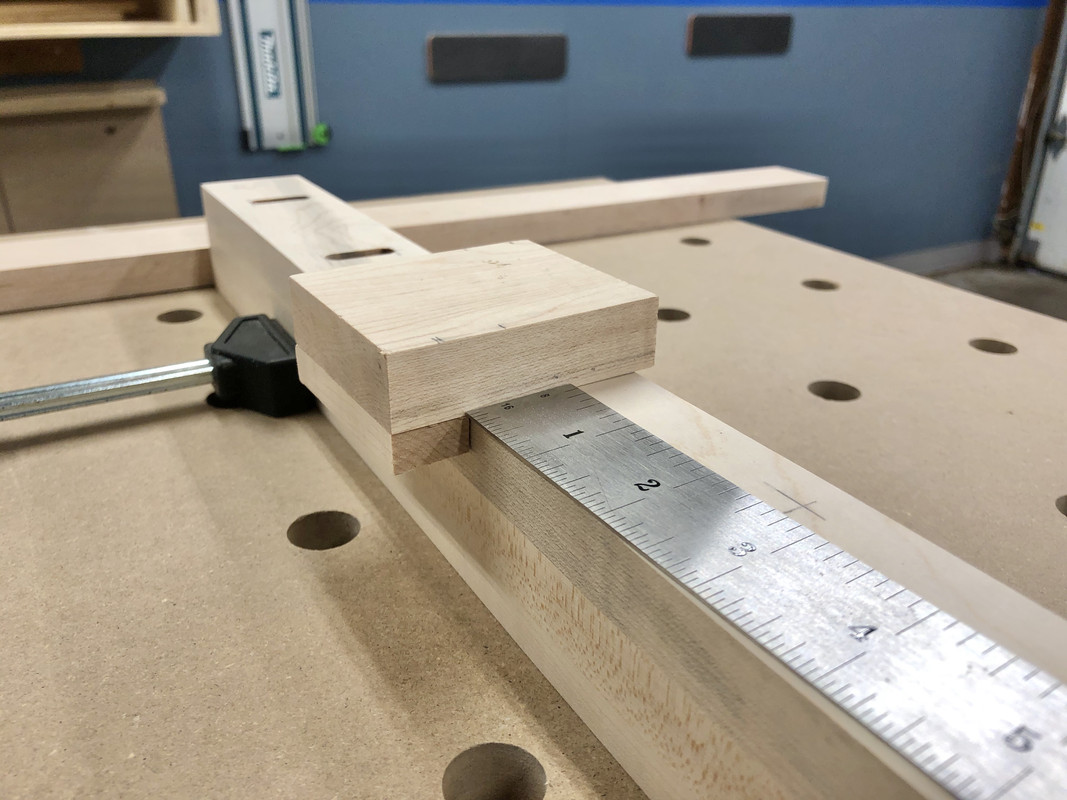
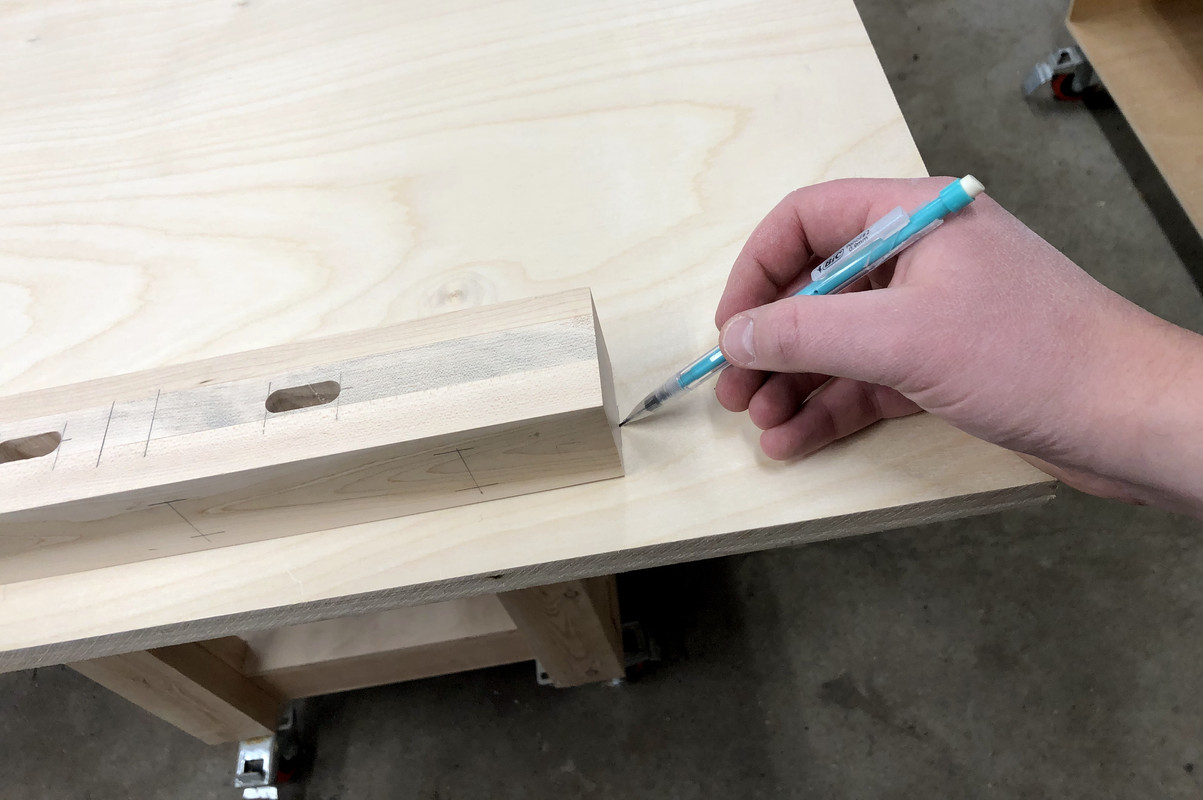
I made a small stop block support piece as seen above. I discovered the flat edge of my router base is 2.5" from the center of the bit, so I would line up the "stop block" 2.5" from the center line of the mortise.
Then clamped it down with a quick clamp:
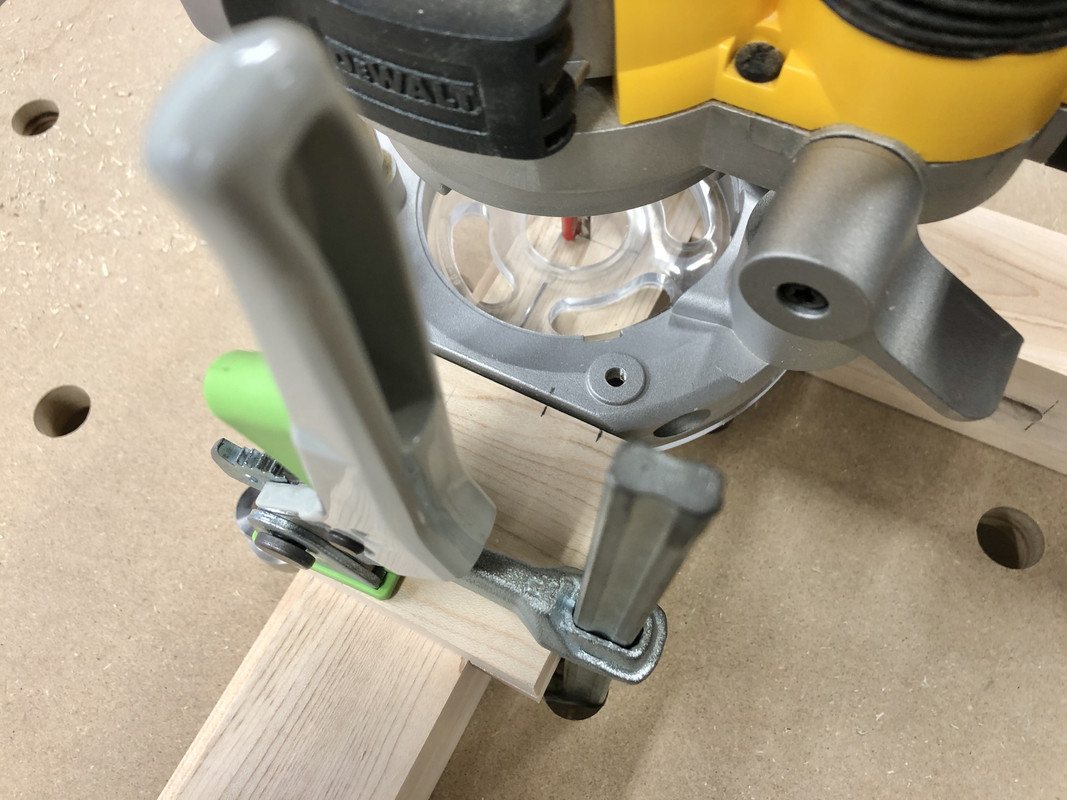
If you look closely in the pic above I drew a start and stop line on the stop block, and an indexing line on the router base itself, in pencil so it can be erased later.
This way I didn't have to eyeball everything each time. Just position support block 2.5" away from layout, and route from start to stop line each pass.
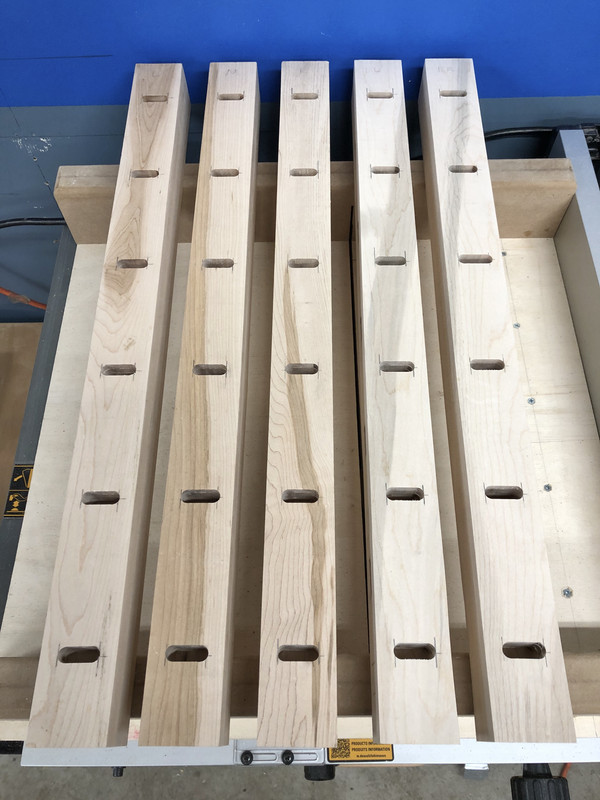
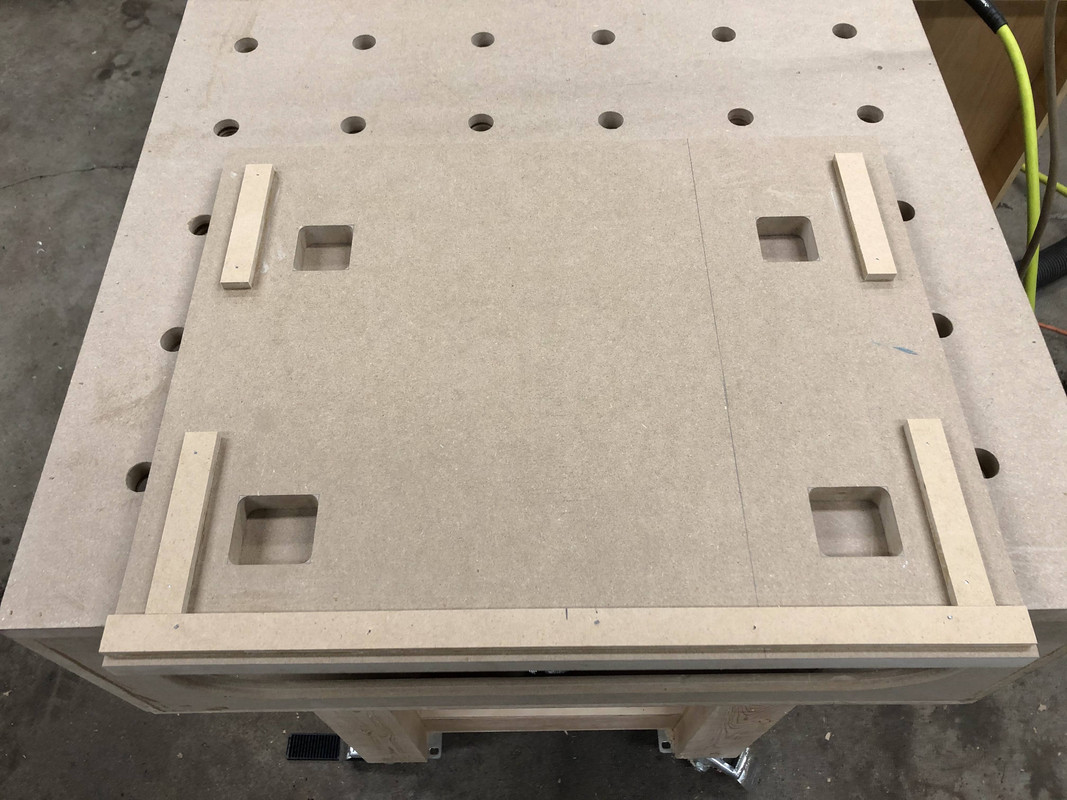
Despite "the system", it was still time consuming to do all of them. If you include ALL the mortises for clamping, it's 50, each one 4 passes with the router, so 200 passes overall.
Kinda makes me wish I just did circular holes
One step closer!
Oh, and I got a new snowblower! Sorry bdbecker, I went against your advice and got a single stage due to cost and storage room. It does have electric start, though. The repair shop wanted $517 to fix the old one. It was indeed a carb issue... but apparently a lot of other things, too. My dad said he hadn't done any maintenance on it pretty much ever, and it was about 30 yrs old. So I sucked it up and bought a new one.
We had 5-6" snow yesterday, kinda wet by the end of the day, and it worked amazingly well, even through the compacted snow from roof raking, and the "plow walls".

Using the edge guide for the vertically oriented ones was pretty straightforward, but I was a bit unsure how to do the horizontal ones. This is the arrangement I came up with:
Using bench dogs and a linear clamp (Chinese knockoff of the Festool MFT Clamping Elements), I secured the leg to my workbench cart.
I made a small stop block support piece as seen above. I discovered the flat edge of my router base is 2.5" from the center of the bit, so I would line up the "stop block" 2.5" from the center line of the mortise.
Then clamped it down with a quick clamp:
If you look closely in the pic above I drew a start and stop line on the stop block, and an indexing line on the router base itself, in pencil so it can be erased later.
This way I didn't have to eyeball everything each time. Just position support block 2.5" away from layout, and route from start to stop line each pass.
Despite "the system", it was still time consuming to do all of them. If you include ALL the mortises for clamping, it's 50, each one 4 passes with the router, so 200 passes overall.
Kinda makes me wish I just did circular holes
One step closer!
Oh, and I got a new snowblower! Sorry bdbecker, I went against your advice and got a single stage due to cost and storage room. It does have electric start, though
. The repair shop wanted $517 to fix the old one. It was indeed a carb issue... but apparently a lot of other things, too. My dad said he hadn't done any maintenance on it pretty much ever, and it was about 30 yrs old. So I sucked it up and bought a new one.We had 5-6" snow yesterday, kinda wet by the end of the day, and it worked amazingly well, even through the compacted snow from roof raking, and the "plow walls".
OP
nicholam77
Well-known member
Fellow Vortexer checking in.
Nice! Mk7, or what do you have?
I'm not as active on vortex anymore because the car mods have slowed down, but I do still check in from time to time.

OP
nicholam77
Well-known member
topcok88, absolutely
Of course as I'm sure you may know, the concept I was copying (Timothy Wilmots System Workbench) was created with a Domino.
After attempting it with the router, I can see why the Domino would be worth every penny to some. I really enjoy efficient tools, and while the Domino does one simple thing that can be achieved with other methods for the most part, it does it very efficiently, and I can respect that. Add in the Festool tax and the price starts to make sense. Sadly I do not have the extra $1k lying around, so I will continue doing it the hard way!

There was no real reason I couldn't have just used a Forstner bit and drilled regular old holes by hand, but making the slots did help me get more familiar with my router and plunge base setup, so that's a plus.
Of course as I'm sure you may know, the concept I was copying (Timothy Wilmots System Workbench) was created with a Domino.
After attempting it with the router, I can see why the Domino would be worth every penny to some. I really enjoy efficient tools, and while the Domino does one simple thing that can be achieved with other methods for the most part, it does it very efficiently, and I can respect that. Add in the Festool tax and the price starts to make sense. Sadly I do not have the extra $1k lying around, so I will continue doing it the hard way!
There was no real reason I couldn't have just used a Forstner bit and drilled regular old holes by hand, but making the slots did help me get more familiar with my router and plunge base setup, so that's a plus.
OP
nicholam77
Well-known member
No doubt you got a lot of experience on the plunge base and router. Can’t buy that and it will give you a huge appreciation when you do eventually get a domino.
Sent from my iPhone using Garage Journal
I like how you say "when" and not "if".
-----------------------------------------------------
I don't know if it makes sense to post these incremental updates, but I got another 1.5 hrs in on the bench last night, cutting biscuit and pocket hole joinery.
Biscuit joiners seem to get a lot of hate but I honestly love mine! It's fast and completely dustless and fun to operate. I always have issues with wood warping, including plywood, and I feel like taking the time to do these biscuits is going to save my *** getting everything aligned for assembly and glue up.
Add in the pocket holes and some glue and should be plenty strong, no need to worry whether a biscuit has strength properties.
So that covers attaching the sides to the legs... trying to decide if I want to add in biscuits to the top and bottom connections, too, or just pocket screws.
Bob Heine
ALLIANCE MEMBER
Nick, I like belt-and-suspender solutions so biscuits and pocket screws would be my approach but I wouldn't glue the top down. Some day, for some reason, I see that top needing to come off the base.
OP
nicholam77
Well-known member
Nick, I like belt-and-suspender solutions so biscuits and pocket screws would be my approach but I wouldn't glue the top down. Some day, for some reason, I see that top needing to come off the base.
Thank you Bob, that is a great tip! I think you are probably right and I would not have thought of that until it's too late!

Nick good update. I see no reason to not update small details. It is called the Garage "Journal". From what I know you are suppose to write in your journal daily.
My comment on the biscuit jointer. I have seen some hate thrown around but not as much as pocket holes get. Here is my take. Use whatever is going to get the job done. The days of building an heirloom piece of furniture with just handtools and hide glue is just period purists. If we have modern glues and techniques to achieve the same result I feel like the people from that era would use them.
Ok off my soapbox. I guess my point is you do you and what you like and don't worry about what people think.
Bret
sawduststeve
Well-known member
Nick, very (VERY) nice work mate, good attention to detail.
Thanks for posting.
Gotta love a biscuit jointer, they increase the amount of glue and add stability to a joint, I've one,I use when appropriate and funnily enough I was given one by an old boy who was retiring, just yesterday. One on the van and one in the workshop, perfect.
Certainly don't envy you your snow.
Have a great weekend
Steve
OP
nicholam77
Well-known member
Nick good update. I see no reason to not update small details. It is called the Garage "Journal". From what I know you are suppose to write in your journal daily.
Bret
Ha! I'm not quite as prolific as you...
I have seen some hate thrown around but not as much as pocket holes get.
Too funny, I did not know there was pocket hole hate as well!
I think they are perfect for plywood-case "shop furniture". I probably wouldn't use them on hardwood furniture... oh wait I guess I used them on the bathroom, haha. Oh well, I was still pretty green at that point. One day I would definitely like to try some more traditional joinery like M&T, there is still time, though.Nick, very (VERY) nice work mate, good attention to detail.
Thanks for posting.
Gotta love a biscuit jointer, they increase the amount of glue and add stability to a joint, I've one,I use when appropriate and funnily enough I was given one by an old boy who was retiring, just yesterday. One on the van and one in the workshop, perfect.
Certainly don't envy you your snow.
Have a great weekend
Steve
Thank you, Steve! Can't complain about two of the same tool!
If you don't like our snow, you should have experienced the temps yesterday, we had a cold snap down to -11 F, wind chills down to -30 F. That's -23/-34 C for you in Celcius.
sawduststeve
Well-known member
If you don't like our snow, you should have experienced the temps yesterday, we had a cold snap down to -11 F, wind chills down to -30 F. That's -23/-34 C for you in Celcius.
Nick, holy cow, thats ^^^ chilly in anyones money,C or F.
We're just being battered by storm Ciara last week and storm Denis this weekend. I only just prefer being under water to being under snow.
It's supposed to be 15/58d Sunday but the 80mph winds take the edge of the temps.
Take care
Steve
Nick, holy cow, thats ^^^ chilly in anyones money,C or F.
We're just being battered by storm Ciara last week and storm Denis this weekend. I only just prefer being under water to being under snow.
It's supposed to be 15/58d Sunday but the 80mph winds take the edge of the temps.
Take care
Steve
sawduststeve
Well-known member
Nick just thought I would share it is suppose to be 74* here tomorrow and no snow.
Hope you get some shop time this weekend.
Bret
Nick, don’t listen to him Nick, he’s just trying to make us jealous.
Steve
It has worked, just a little, to be fair, but don’t tell him.
OP
nicholam77
Well-known member
Nick, don’t listen to him Nick, he’s just trying to make us jealous.
Steve
It has worked, just a little, to be fair, but don’t tell him.
It's definitely worked on me
80 mph winds, that's serious! Hope no damage with it
Nick just thought I would share it is suppose to be 74* here tomorrow and no snow.
Hope you get some shop time this weekend.
Bret
As stated above, very jealous of that weather, Bret
Sadly I did not get any shop time this weekend, but had a wonderful weekend with the family. My wife works 3 out of every 8 weekends, so a lot of weekends me and the kiddo are home alone. The way it happened to fall lately and with our vacation, this was the first weekend in a month that the 3 of us were home during the day together, so we did some fun stuff like hiking by the Mississippi river.
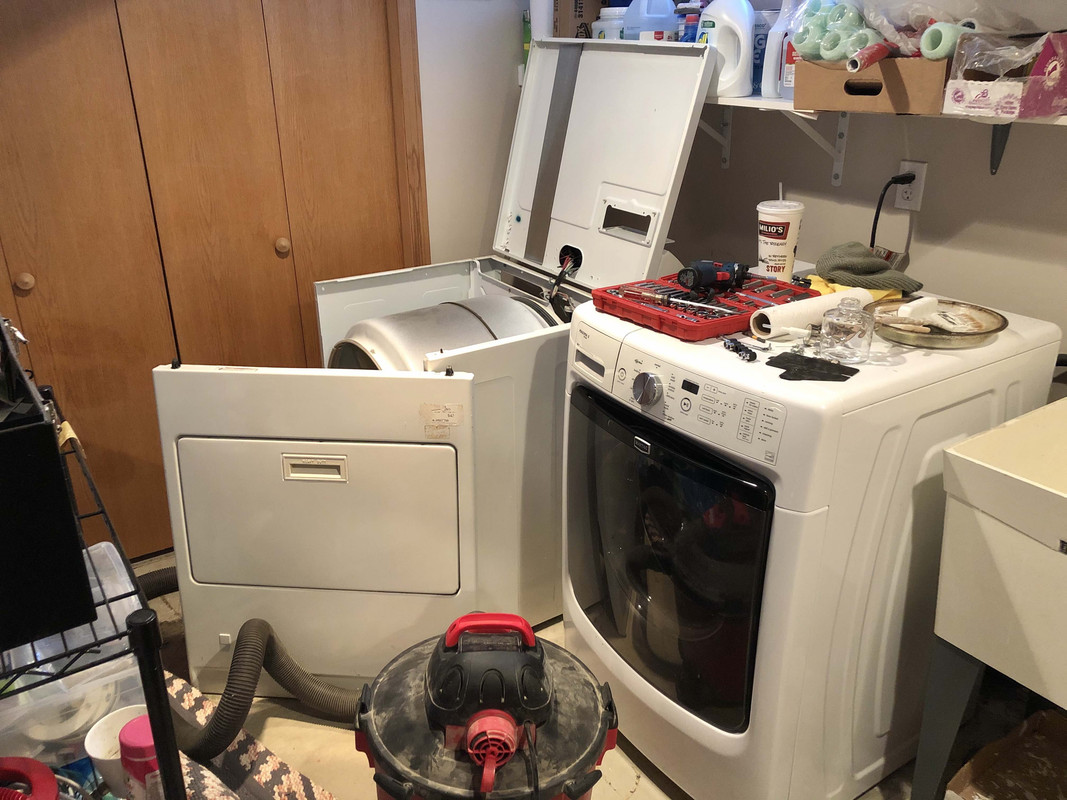
I did, however, get to a project that's been eating away at me for months... our laundry dryer machine has not been drying our clothes properly. Was taking 2-3 cycles to dry stuff. I thought it might just be clogged with lint, but I quickly discovered the real problem.
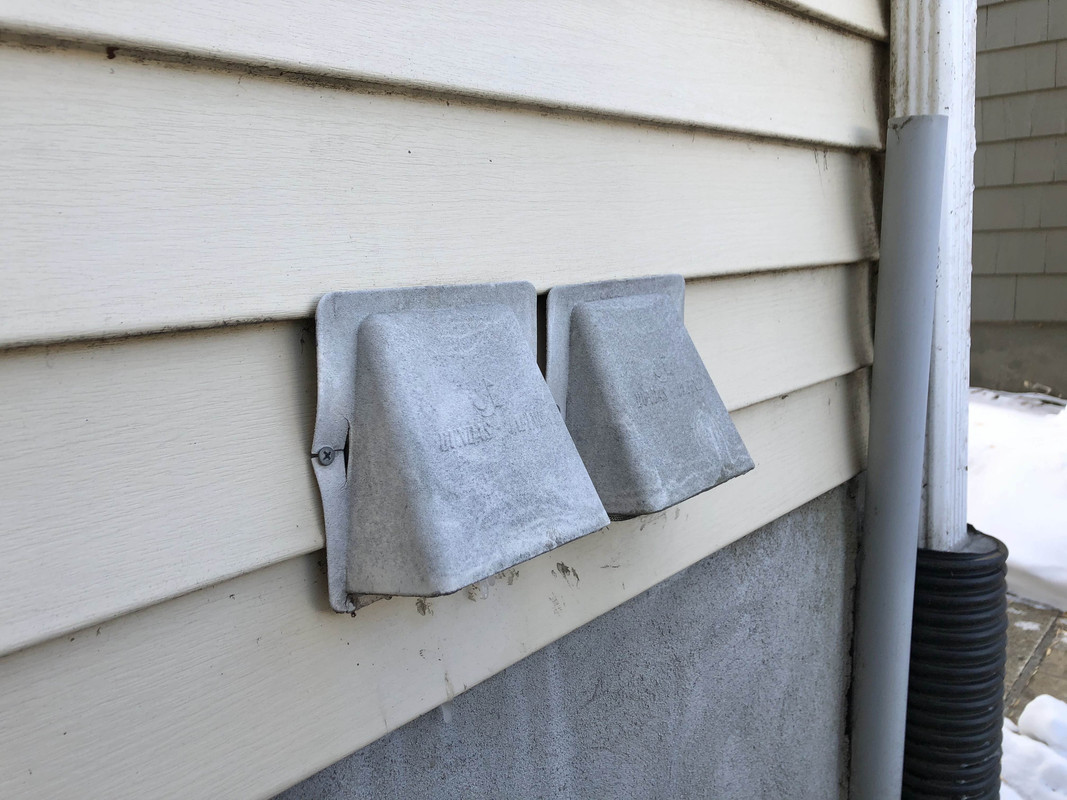
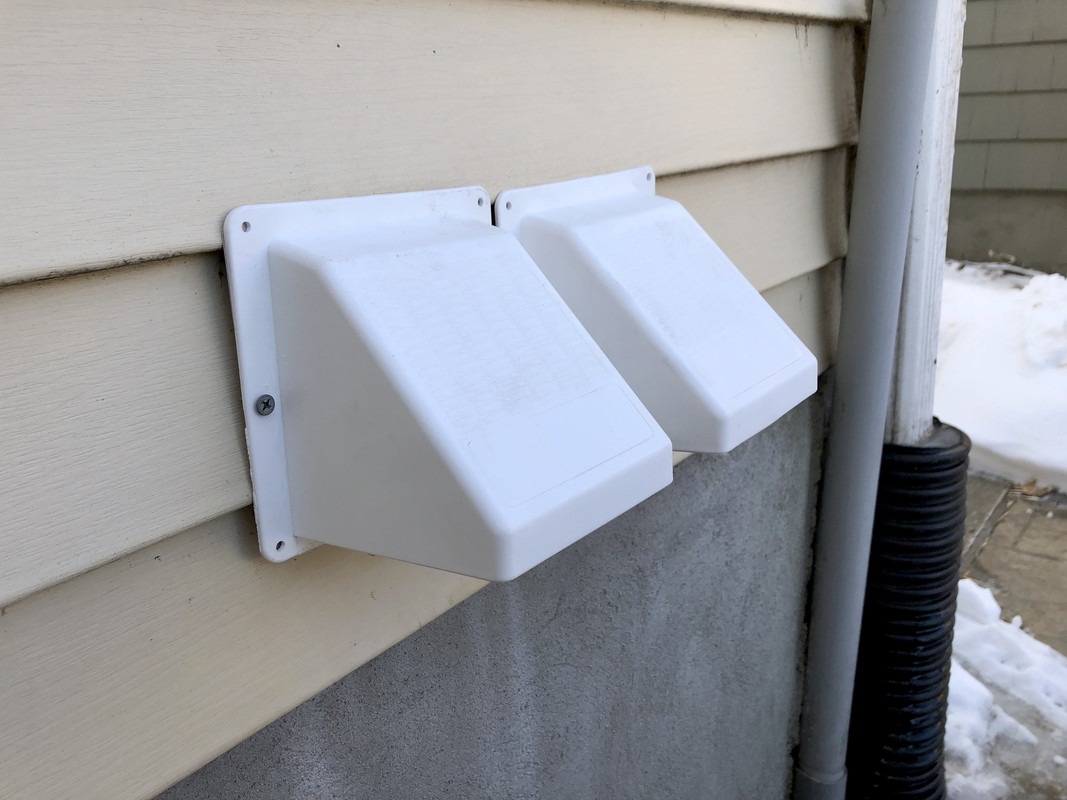
Checking the exterior vents I remembered about a year ago I caulked some mesh screens in the vents because we had some mice in the laundry room and I wasn't sure where they were getting in. Well... the mesh was completely solidified with frozen lint and melted caulk.
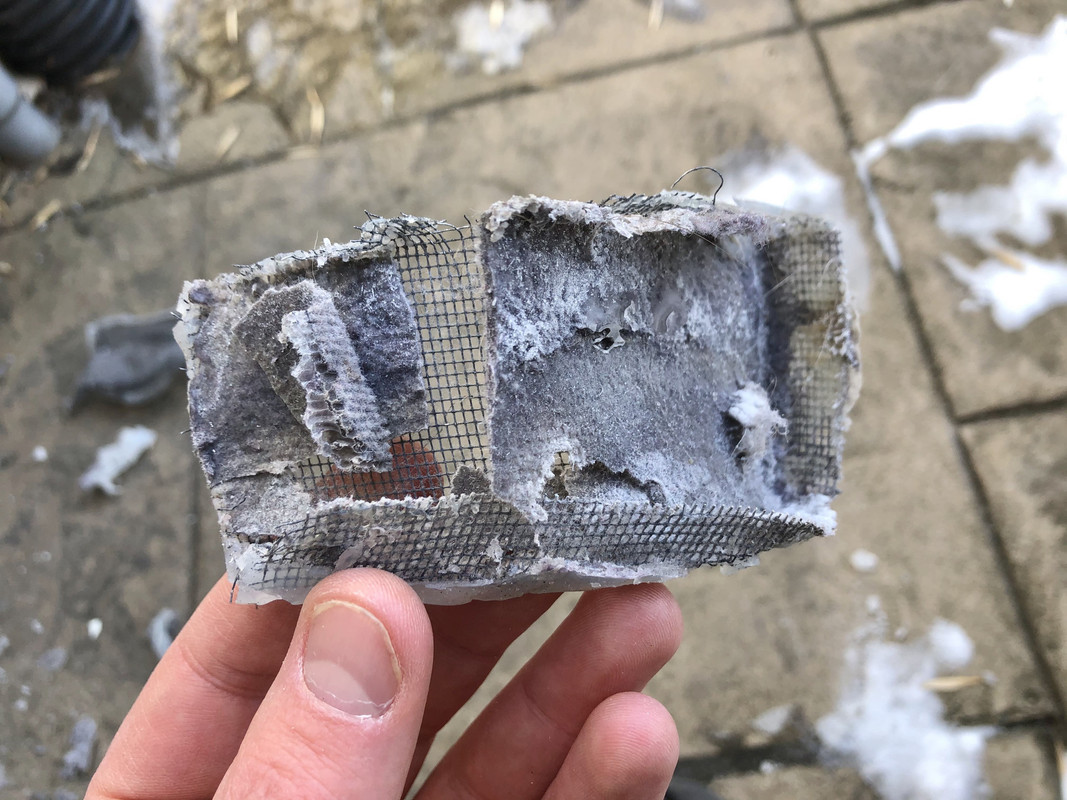
Basically, very little, if any, air was getting out.
Well, now I know not to do that.Step two was to blow out the ducting as best as possible. Not a lot, but a few dust bunnies came out the other end.
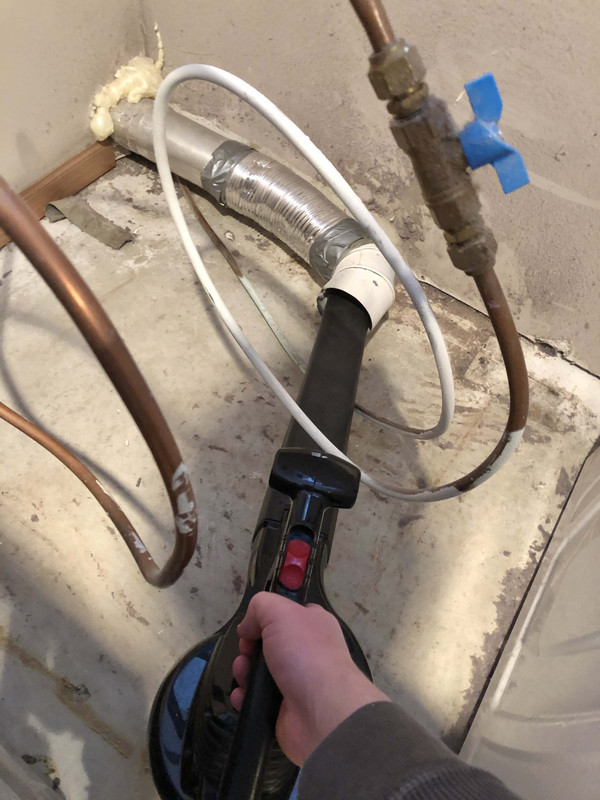

This was probably enough, but I had already planned to take the dryer apart and vacuum it, so I went ahead and did that.
Took the back panel off, removed the lint trap box, and thoroughly cleaned.
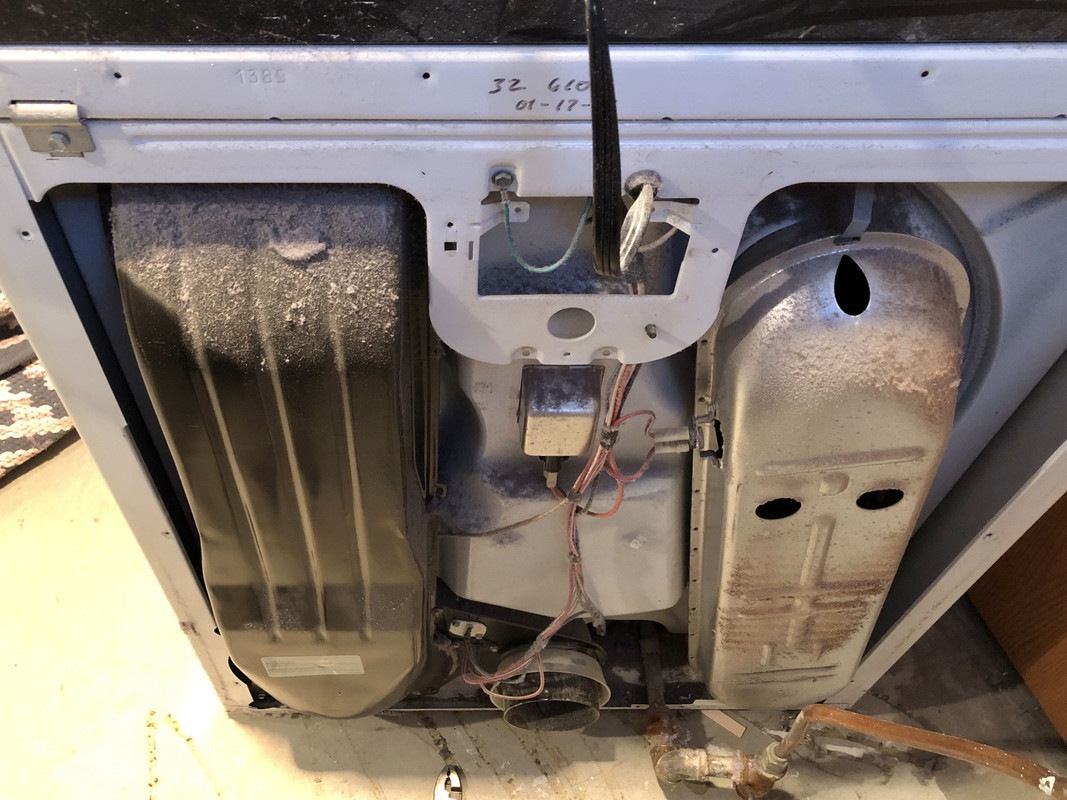

Then took the top and front off and vacuumed inside.
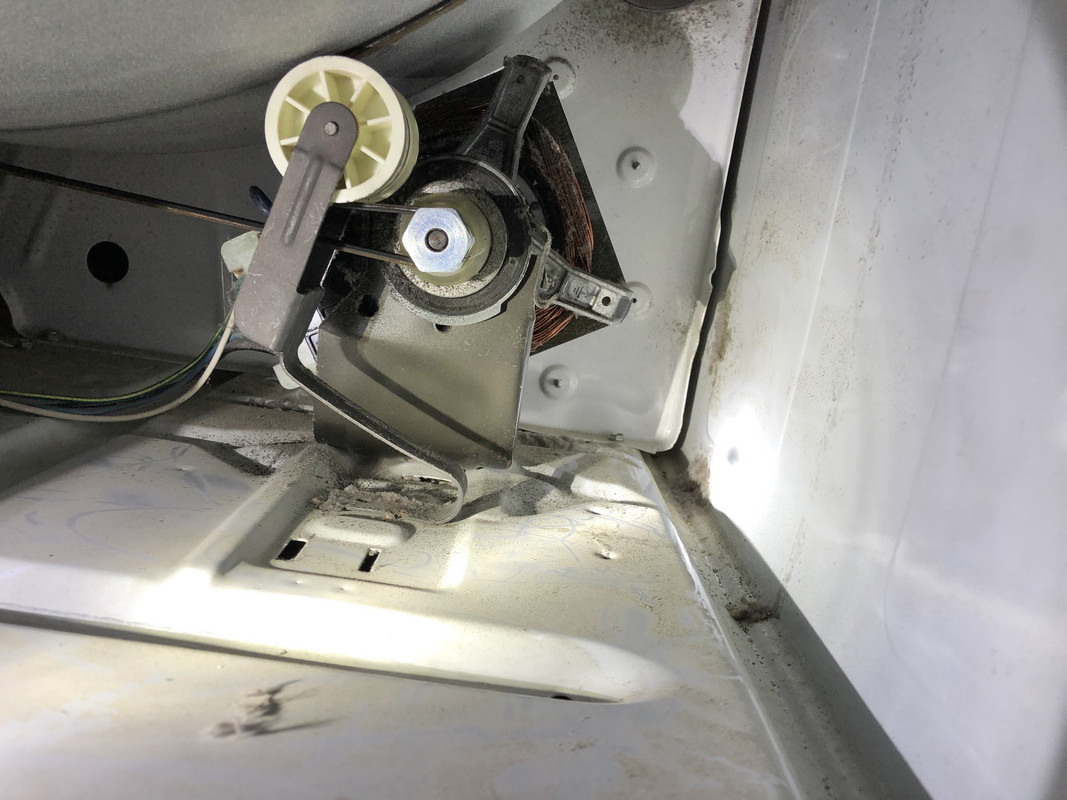
Not as much lint on the motor as I thought there might be.
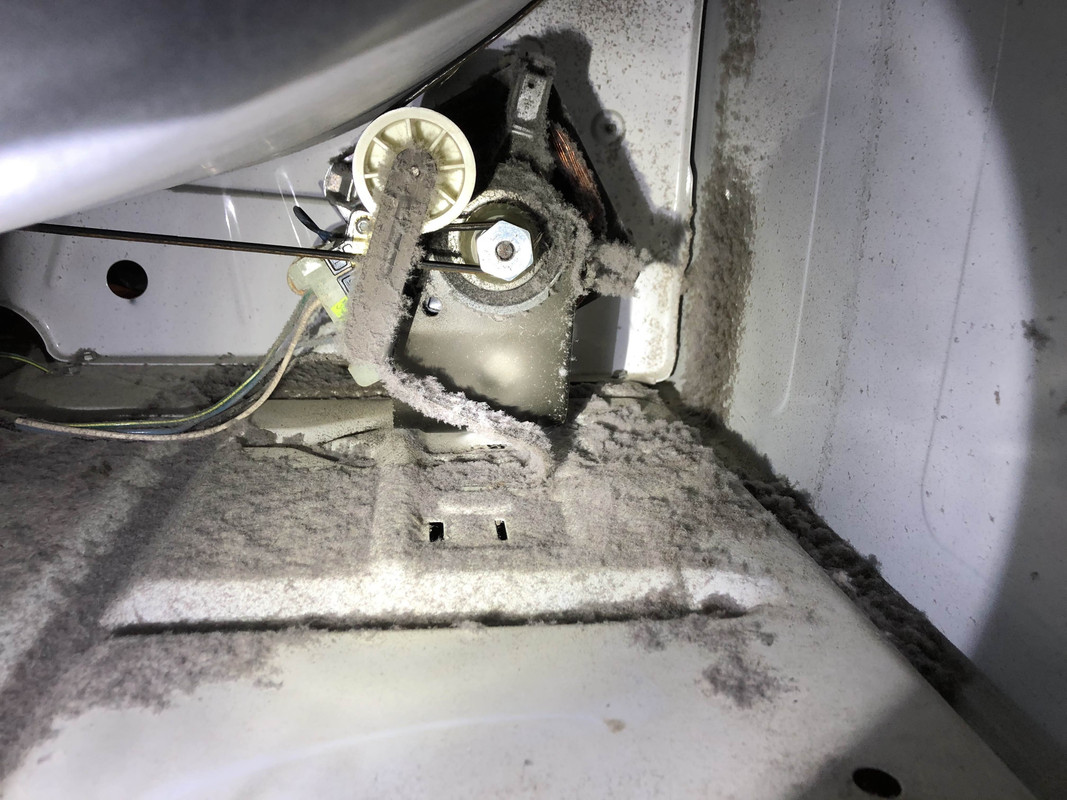
All clean.
Wrapped up with a quick trip to Home Depot for some new vents because I cracked one of the old ones and they were very brittle:
I even recovered about 17 coins from the dryer, so hey, I got paid for my time!
The laundry room is still a disaster, but at least the dryer is working perfectly again. We have this random toilet in there that I wish I could get rid of and use for storage space...
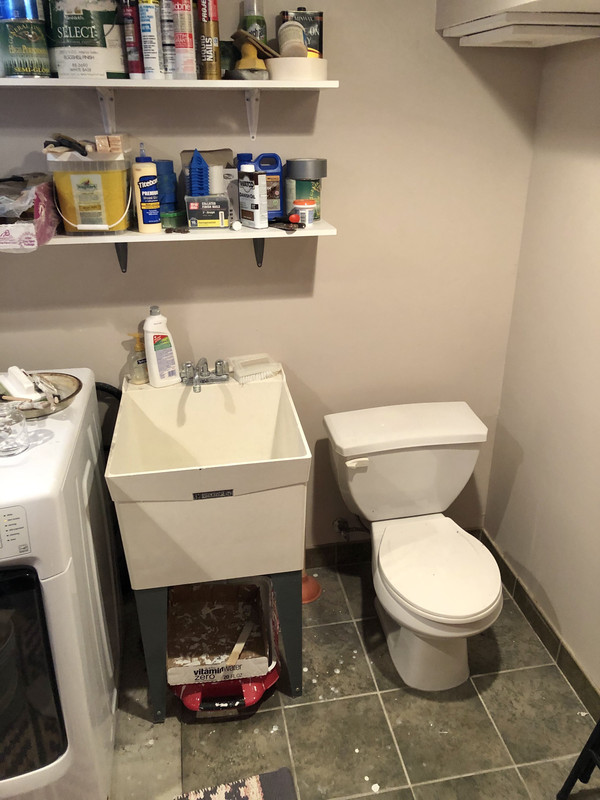
Anyone know if it is possible to cap off / delete a toilet?
Sorry for the boring update, wish it coulda been progress on the track saw bench, but it seems like every week there is a new thing to fix in this place!
Hope everyone had a great weekend,
OP
nicholam77
Well-known member
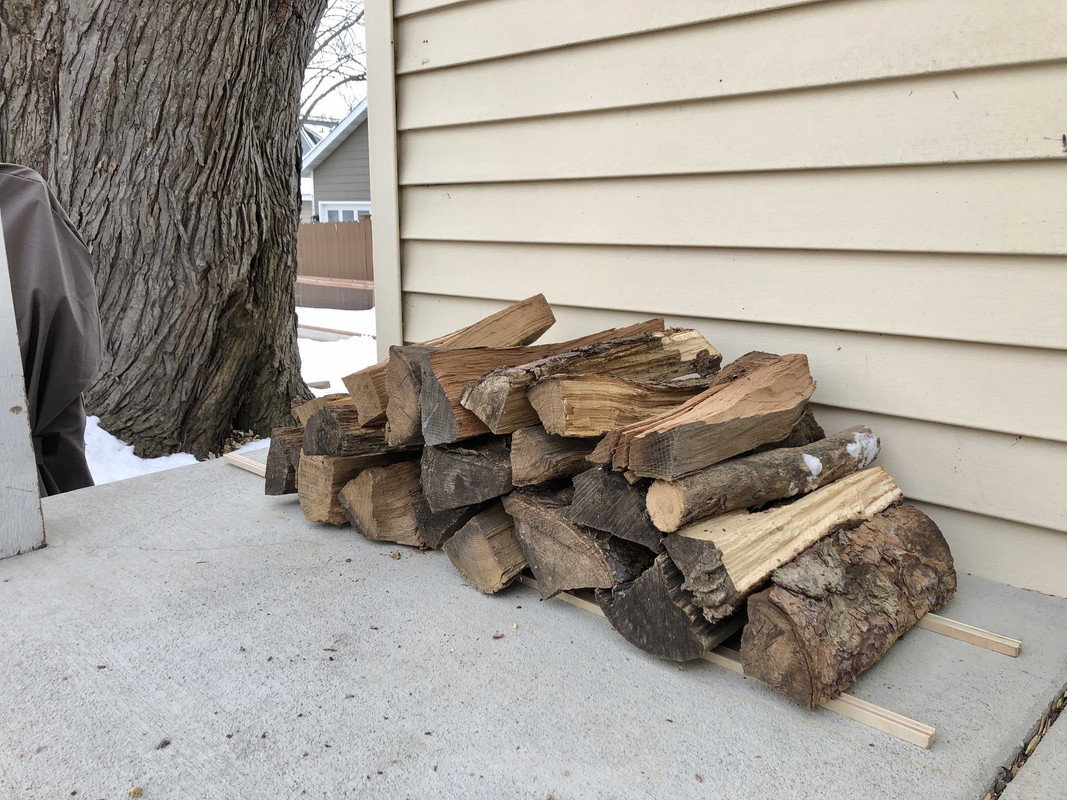
Almost forgot, inspired from bdbecker's thread, I picked up a copy of Norwegian Wood: Chopping, Stacking, and Drying Wood the Scandinavian Way. (Loving it so far, btw). And why not, after all I am 100% Swedish.
My dad had offered me some firewood recently so I grabbed some of that this weekend (mostly oak, and some birch from a tree in his front yard he cut up a few years ago). I didn't take a lot but wanted to attempt some more wood burning fires. Made a small pile outside our back door.
My fires always start out like this:
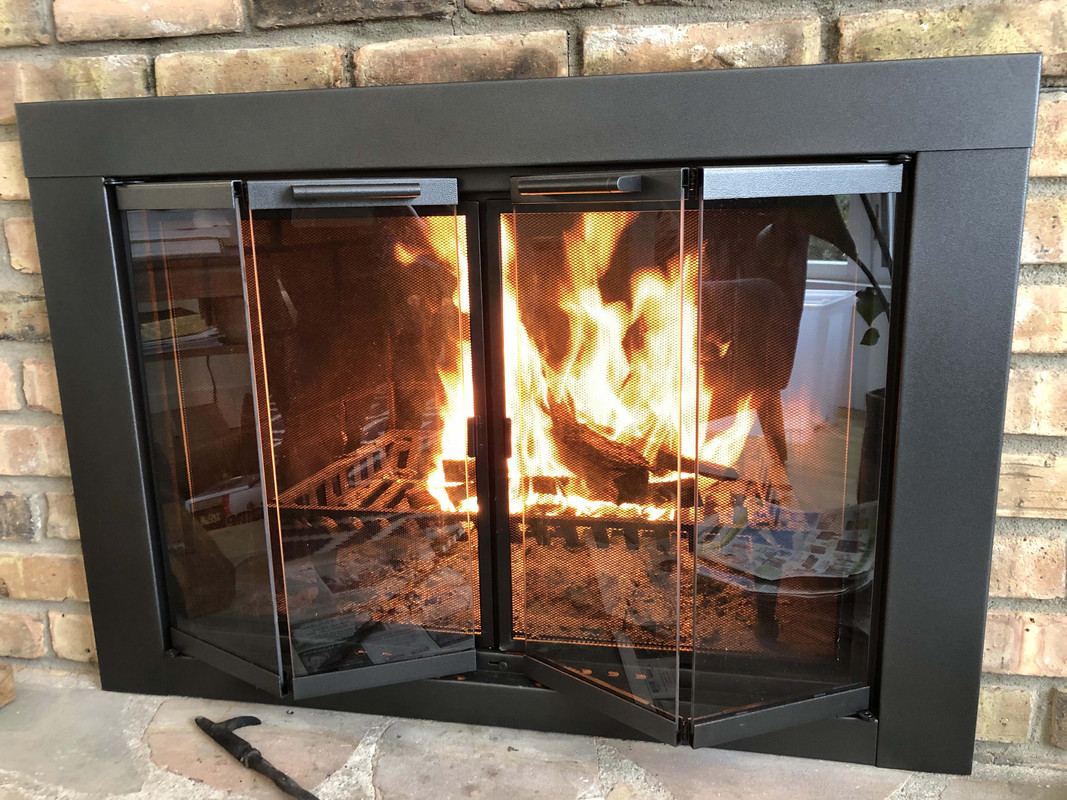
And then quickly turn to this:
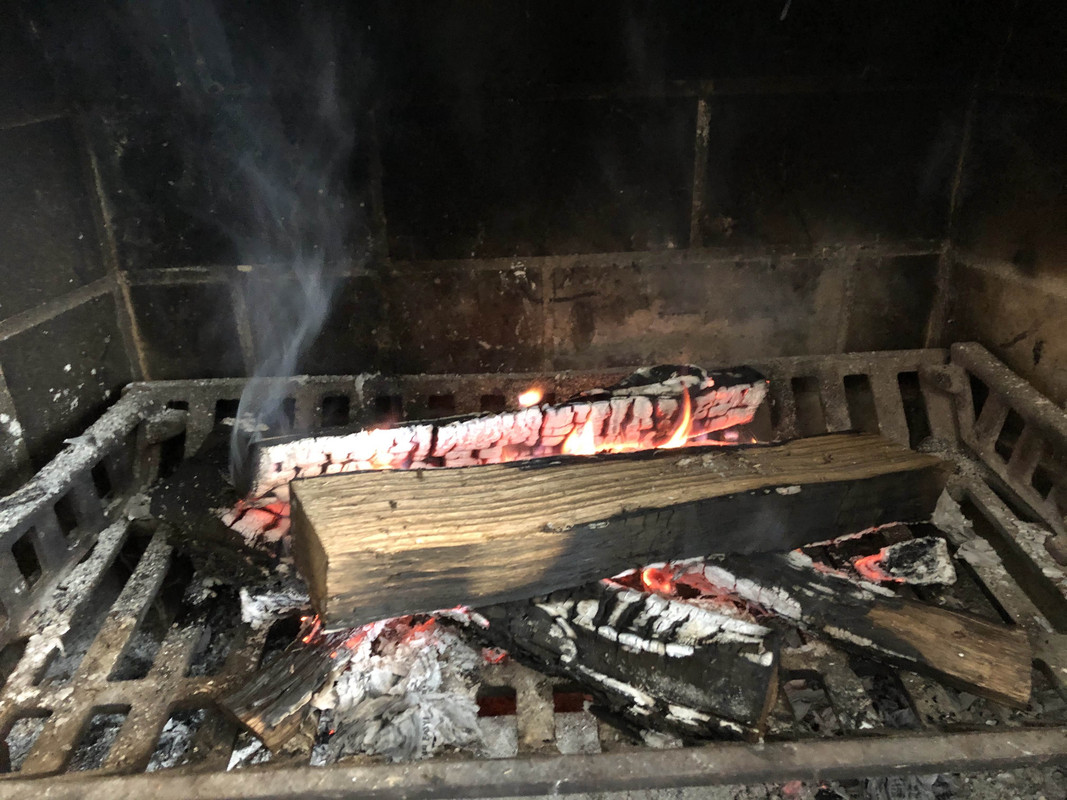
Seems like one side of the log will catch and burn well, but then the flames go down and the other half doesn't burn. Well it took a lot of effort, stoking, newspapers, but after 20-30min I had a well-burning fire going.
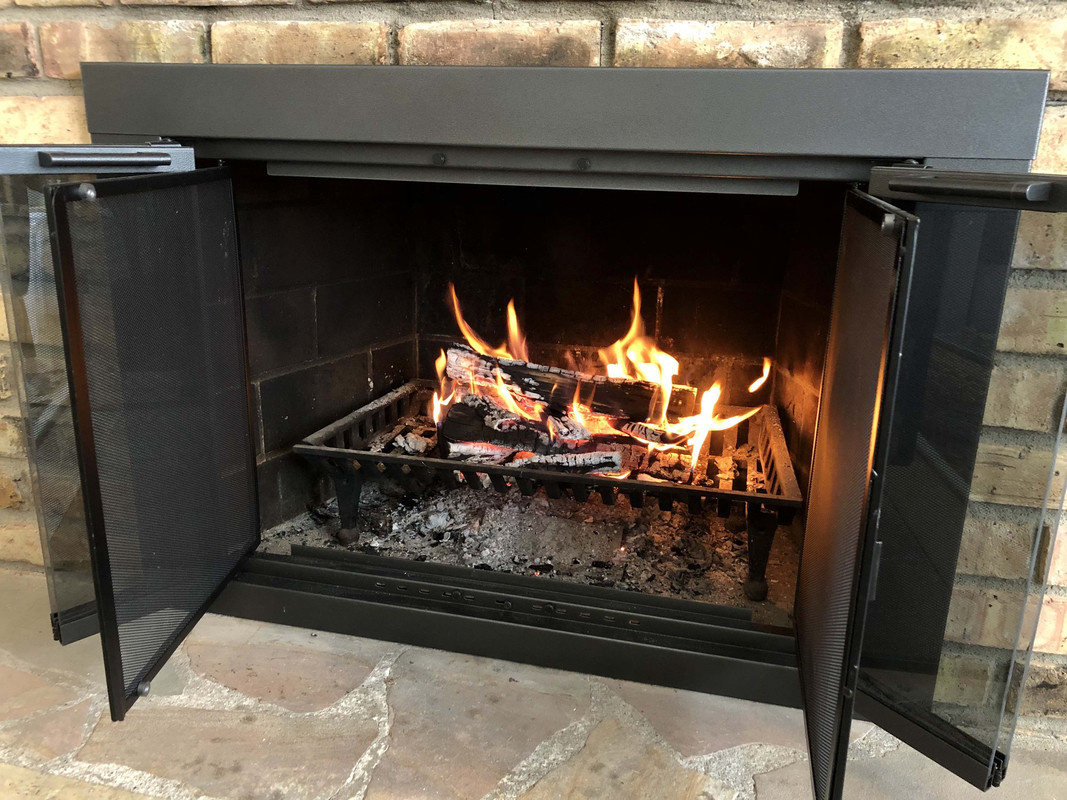
Our living room is horribly inefficient so I think it was just sucking the heat out, but it was still cozy.
My dad had offered me some firewood recently so I grabbed some of that this weekend (mostly oak, and some birch from a tree in his front yard he cut up a few years ago). I didn't take a lot but wanted to attempt some more wood burning fires. Made a small pile outside our back door.
My fires always start out like this:
And then quickly turn to this:
Seems like one side of the log will catch and burn well, but then the flames go down and the other half doesn't burn. Well it took a lot of effort, stoking, newspapers, but after 20-30min I had a well-burning fire going.
Our living room is horribly inefficient so I think it was just sucking the heat out, but it was still cozy.
wasfast
Well-known member
A very good idea to vacuum out the accumulated lint. Lint is actually very flammable once ignited.
Side Story: I had a plumber come to the condo I owned to add a tap for a sprinkle system off the main in the house. The condo had a crawl space with the dryer duct going through the floor and running horizontally to the outside.
The plumber was soldering the copper line when the entire underside of the house had a near explosion of lint catching fire. The dryer duct had a loose taped seam that had leaked for years under the house. The plumber emerged from the crawlspace door with a look somewhere between terror and anger. He was unharmed thankfully.
OP
nicholam77
Well-known member
wasfast, scary stuff. I read somewhere the #1 cause of house fires is laundry dryers (no idea if that's true or not). That's why I went ahead and did the full disassembly, I got worried since the duct was blocked it may have been very linty inside and on the motor. Didn't look THAT bad to me after probably years of no cleaning, but I feel better taking the precaution!
wasfast
Well-known member
I lived in Oregon for 51 years and always had an electric dryer. It's common in California to have gas fired dryers. Terrible combo with lint!
Enough scary talk. Back to the garage......
Enough scary talk. Back to the garage......
Mr. Roboto
Well-known member
Yikes! Good call on the thorough cleaning... funny how these seemingly simple things escalate into disassembling the entire dryer hahaha.
You can remove the toilet. Should be as simple as closing and unhooking the water supply line, removing the toilet from the flange, and blocking the drain pipe. Oatey makes a few options. One is more of a temporary plug to use during construction, or you can get a test plug for the diameter of drain pipe you have. This is much more secure and permanent in my opinion. Something like this:
https://www.homedepot.com/p/100204964
OP
nicholam77
Well-known member
Yikes! Good call on the thorough cleaning... funny how these seemingly simple things escalate into disassembling the entire dryer hahaha.
You can remove the toilet. Should be as simple as closing and unhooking the water supply line, removing the toilet from the flange, and blocking the drain pipe. Oatey makes a few options. One is more of a temporary plug to use during construction, or you can get a test plug for the diameter of drain pipe you have. This is much more secure and permanent in my opinion. Something like this:
https://www.homedepot.com/p/100204964
Thanks, that is very helpful. I had seen similar, but always mixed impressions on whether it could be used as a "permanent" solution for sealing off a toilet drain, since they usually say they are "temporary" or for "testing". Interestingly enough in manufacturer's FAQ sheet it does say it can be used to permanently seal off an opening. I think I'm going to try this. Lot's of other stuff to tackle first, but I'd really like to make use of that area for a cabinet / storage solution, or even a small fridge or something. The toilet is never used and a waste of floor space!
OP
nicholam77
Well-known member
Forced myself to make some more progress last night. Wasn't feeling motivated, it was snowing, and I'm annoyed that I've been carrying my tools and parts back and forth from the house to work on it. But... once I got out there it was enjoyable. Sometimes it's just getting over that initial mental hurdle.
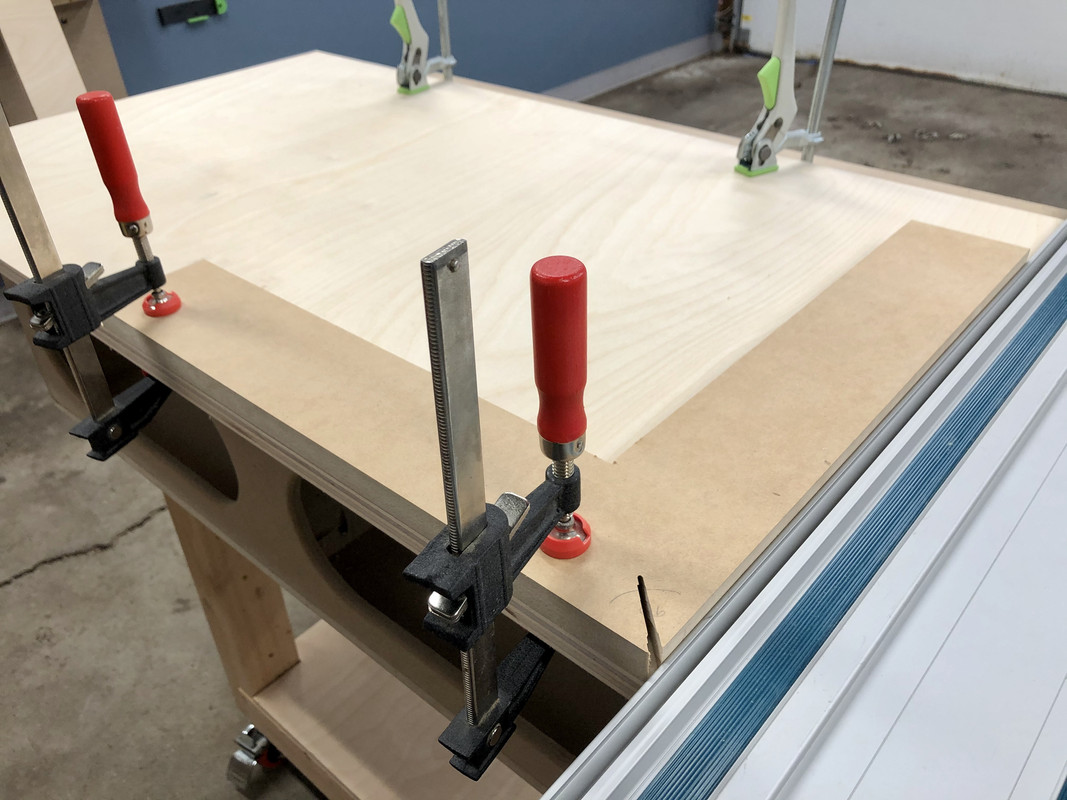
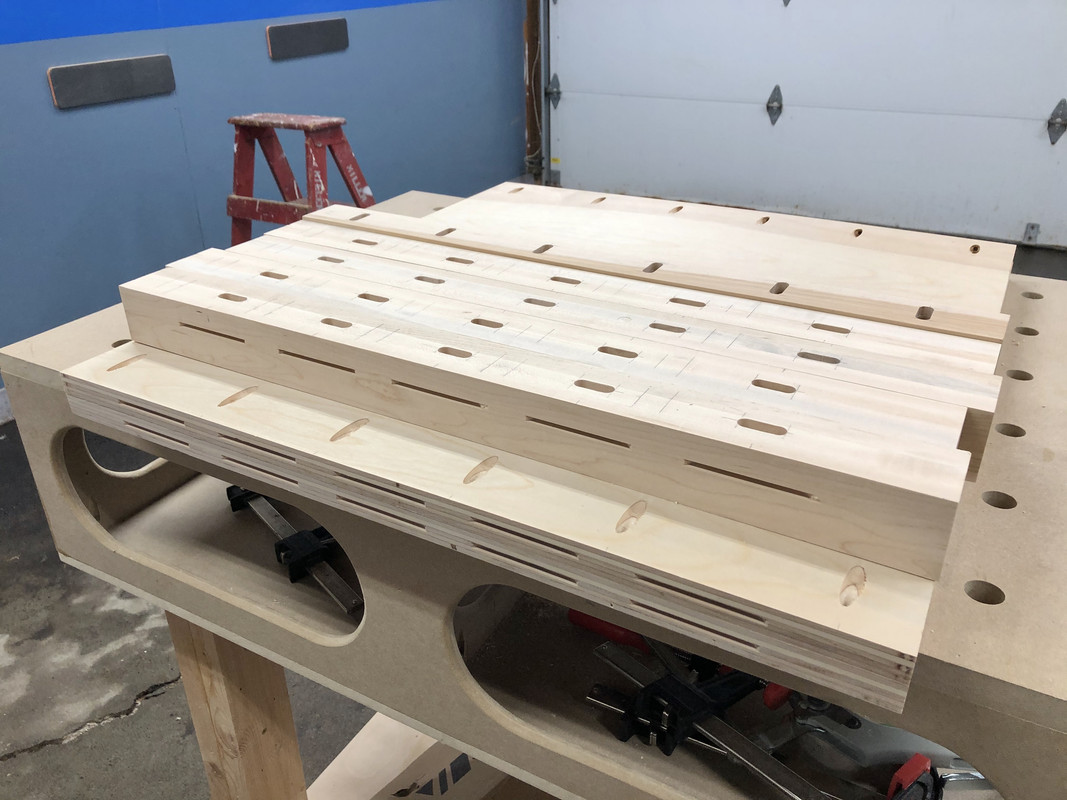
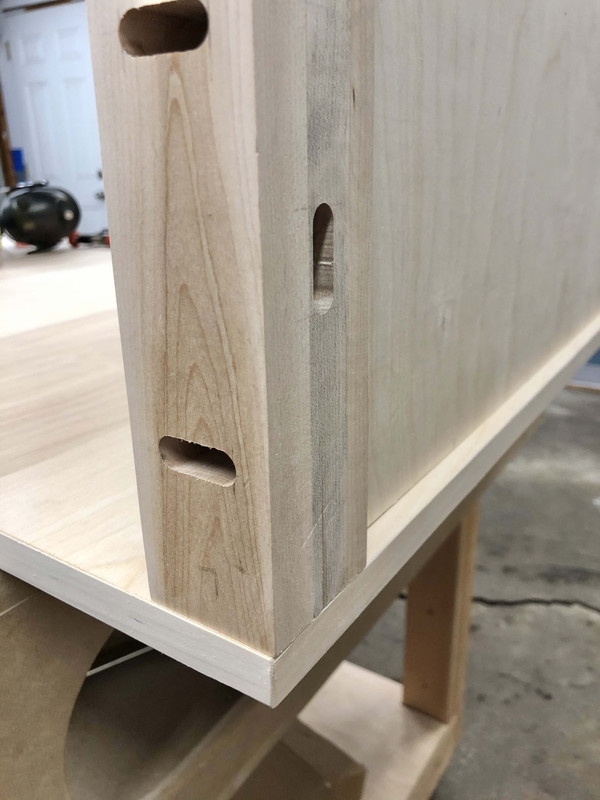
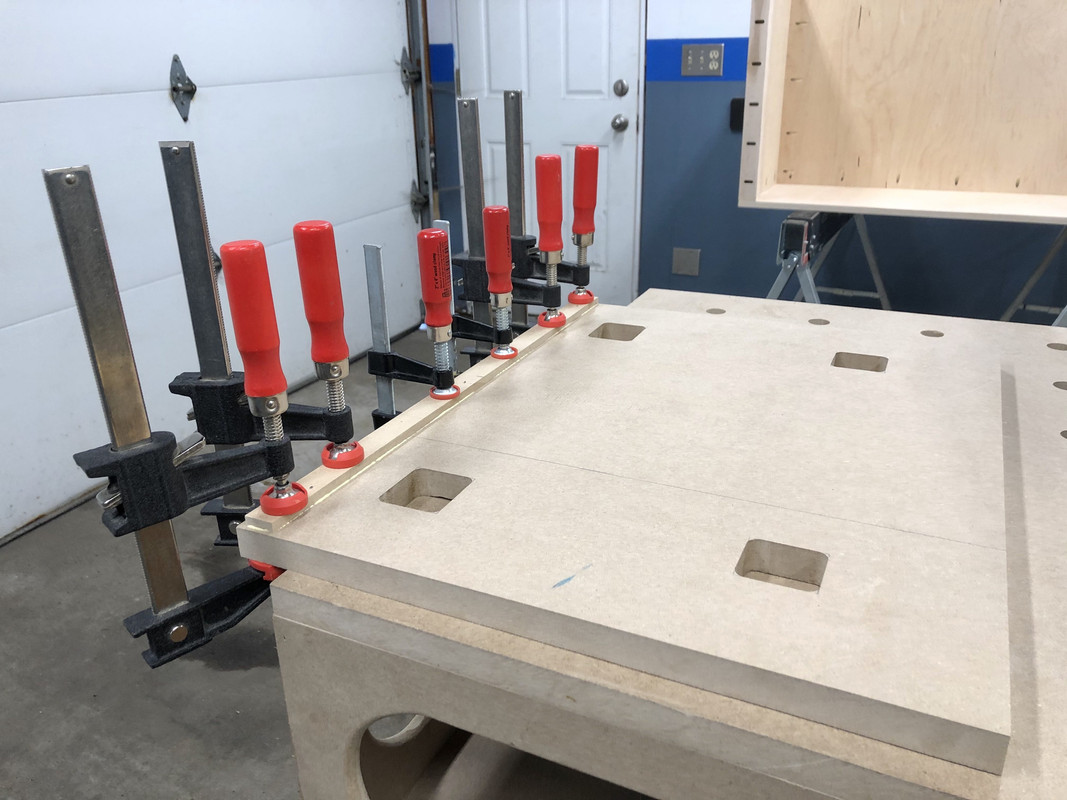
I continued cutting biscuit slots, this time to connect the sides to the top and bottom panels.
Orienting the biscuit joiner can be a bit of a mind puzzle for me. I've never used the fence... always just referenced off the bottom for 3/4 material. Just gotta make sure to reference off the same face for both parts, which can quickly get confusing.
Once the joiner is laid out, cutting the biscuits is so fast and dustless it's awesome.
After completing one side I dry-fit a bunch of biscuits to test my measurements. If it was wrong I wouldn't want to screw up the whole bench!
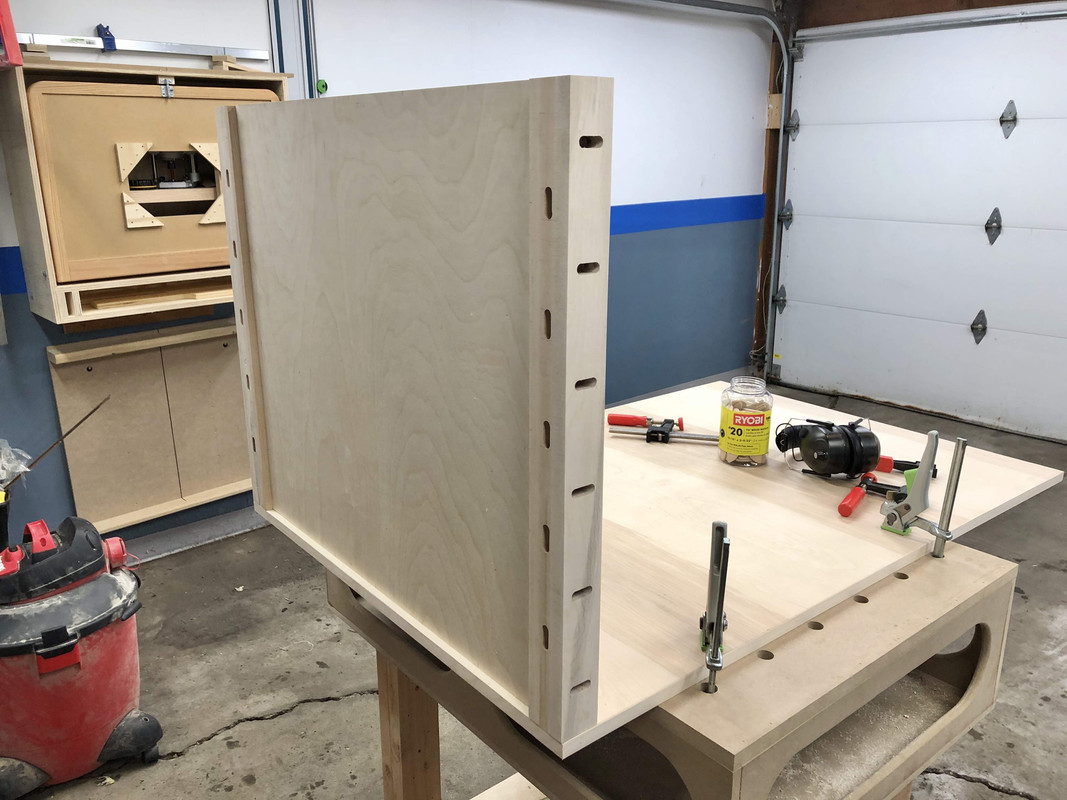

Fortunately it lined up great and even self-supported without clamps. The legs were almost perfectly flush with the outside edge.
The biscuits are taking extra time but it's making me think it's going to pay off when putting all the pieces to this sucker together. Especially since some of my panels have warped a bit and pocket screws like to "wander" as you drive them in.
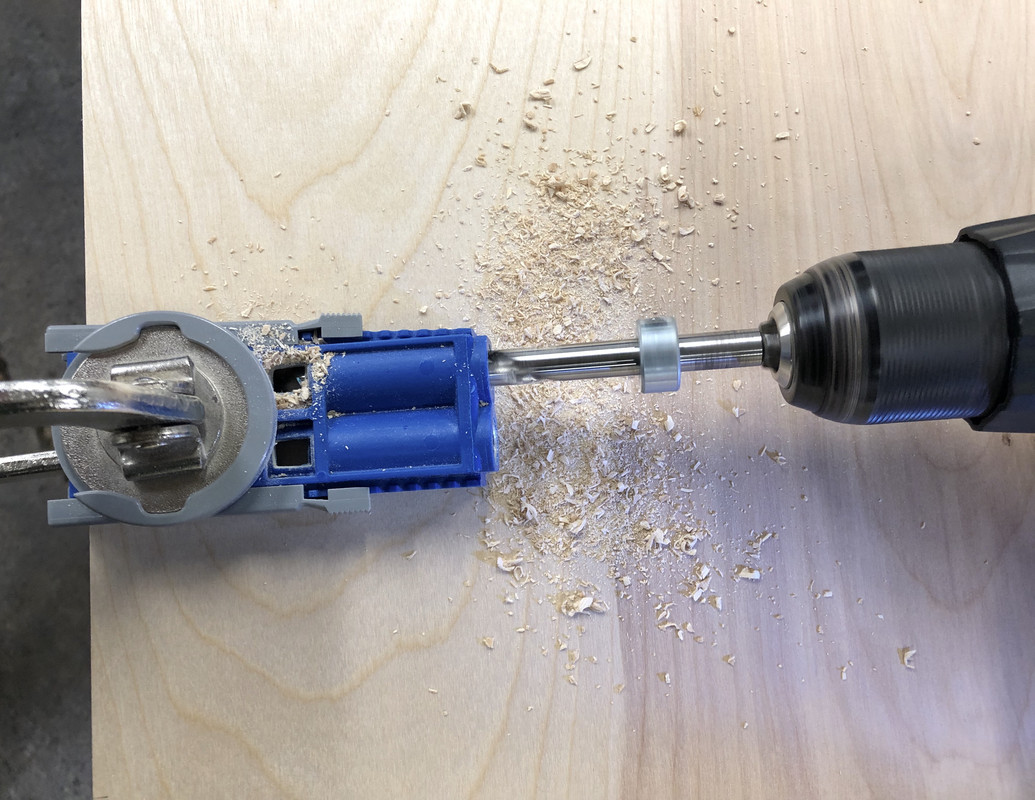
Speaking of which, I did more pocket holes as well, and I know you're all dying to see another picture of my pocket hole jig in action, so without further ado:
Stupidly I forgot to adjust the jig for 3/4" material, so I need to remember to only use 1" screws on the top and bottom or they will poke through!
Not sure what I will do with the old cart once the new one is finished. No immediate need to get rid of it, I guess. It will be kind of nice to have two mobile surfaces... right now when I have large plywood parts like this I have no clean place to put them while one is being worked on.
I continued cutting biscuit slots, this time to connect the sides to the top and bottom panels.
Orienting the biscuit joiner can be a bit of a mind puzzle for me. I've never used the fence... always just referenced off the bottom for 3/4 material. Just gotta make sure to reference off the same face for both parts, which can quickly get confusing.
Once the joiner is laid out, cutting the biscuits is so fast and dustless it's awesome.
After completing one side I dry-fit a bunch of biscuits to test my measurements. If it was wrong I wouldn't want to screw up the whole bench!
Fortunately it lined up great and even self-supported without clamps. The legs were almost perfectly flush with the outside edge.
The biscuits are taking extra time but it's making me think it's going to pay off when putting all the pieces to this sucker together. Especially since some of my panels have warped a bit and pocket screws like to "wander" as you drive them in.
Speaking of which, I did more pocket holes as well, and I know you're all dying to see another picture of my pocket hole jig in action, so without further ado:
Stupidly I forgot to adjust the jig for 3/4" material, so I need to remember to only use 1" screws on the top and bottom or they will poke through!
Not sure what I will do with the old cart once the new one is finished. No immediate need to get rid of it, I guess. It will be kind of nice to have two mobile surfaces... right now when I have large plywood parts like this I have no clean place to put them while one is being worked on.
OP
nicholam77
Well-known member
This past weekend I decided to take apart the bed in our "guest" bedroom. We never have guests and I want to turn it into a playroom on the main floor for our daughter. She was very keen on the idea.

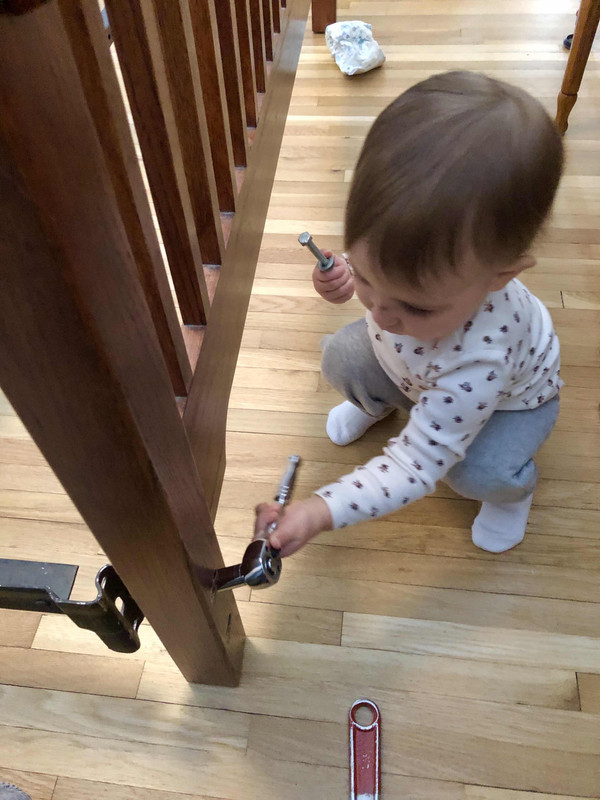
She saw me using the ratchet and immediately wanted to use it, and used it with the correct ratcheting motion. She is very mechanically inclined and loves anything that moves or interfaces with something else (zippers, jar lids, buttons). Now I want to get or make her a little tool box.
On Sunday I got some time in on the track saw bench. I glued up the legs to the side panels on our kitchen table.
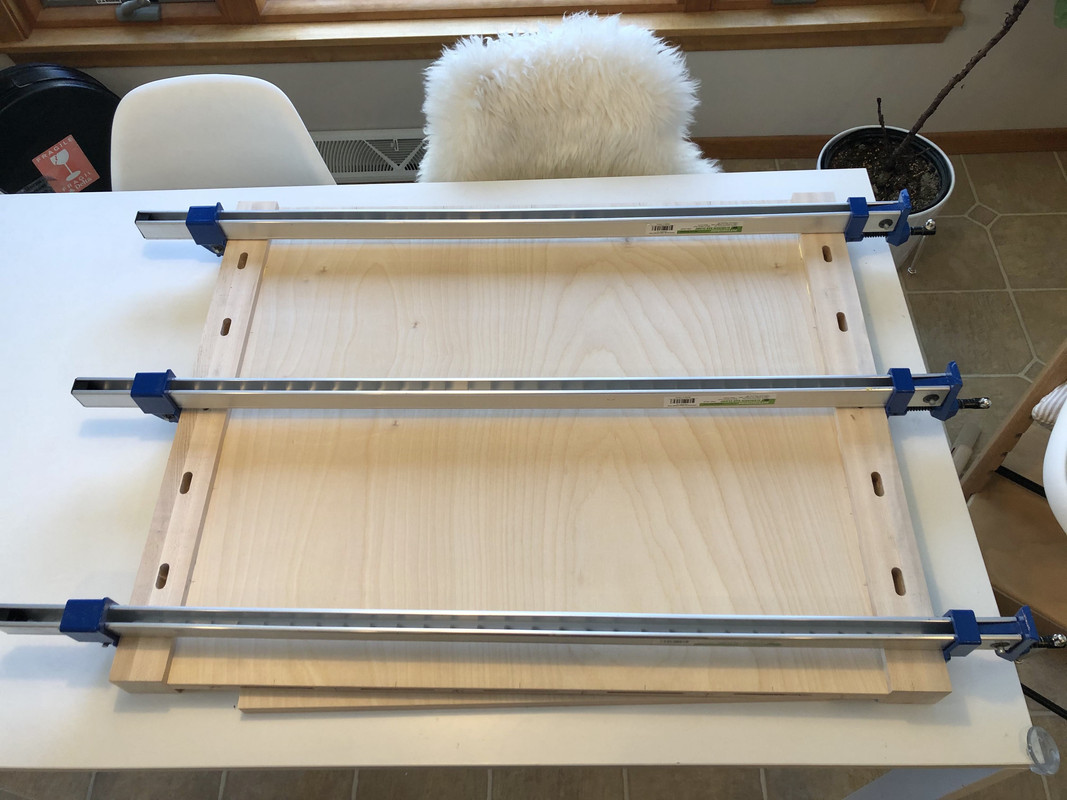
I have to say, the biscuits made this easy. While still in the clamps I flipped it over and zipped in the pocket screws.
The nice thing is the pocket screws act as clamps for the glue, so I can immediately take off the clamps and do the next panel.
After that I moved out to the garage and did some light sanding before attaching the sides to the bottom panel.
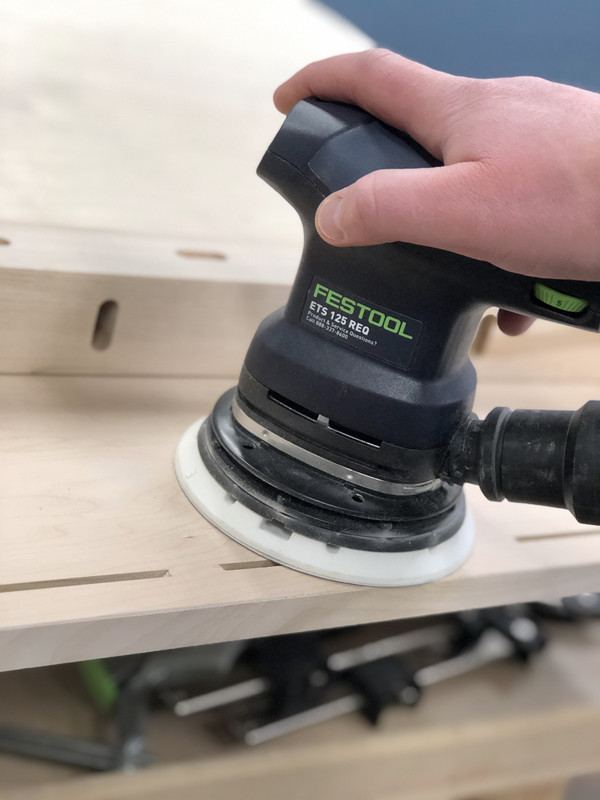
After using this Festool sander a few times now, I still am perplexed by how it jumps around the surface. It doesn't feel like a smooth action, it pulls and yaws and is jittery. I only have the 1 piece of 120 grit that came with it... and have tried all speeds... but if anyone has experience with it please let me know if this is normal or user error!
Aside from that oddness, it does leave a nice finish and is virtually dustless, something I can't say about my DeWalt.
Dry fitting the sides, somehow the right side did not line up flush. I double-checked the biscuit measurements and couldn't figure out why it wasn't lining up.
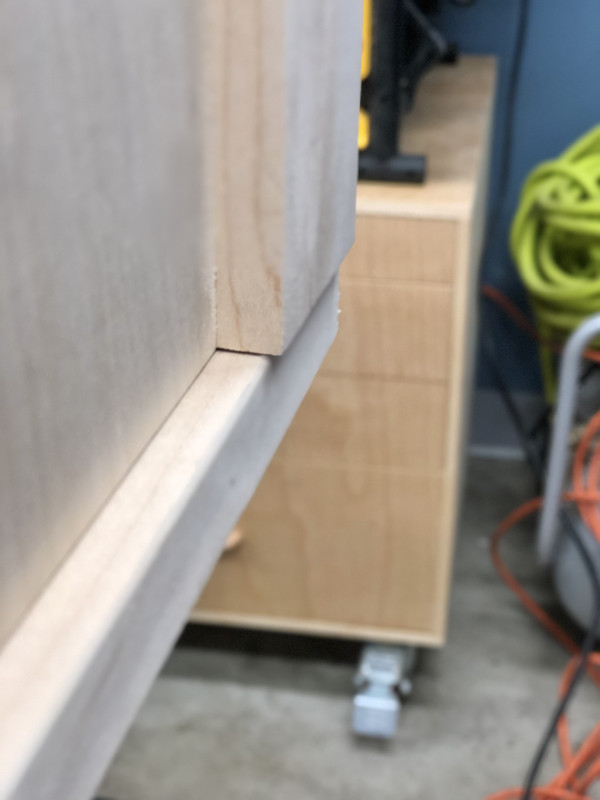
Frustrating, but I chose to skip biscuits on that side and just use pocket screws and glue.
In the clamps:
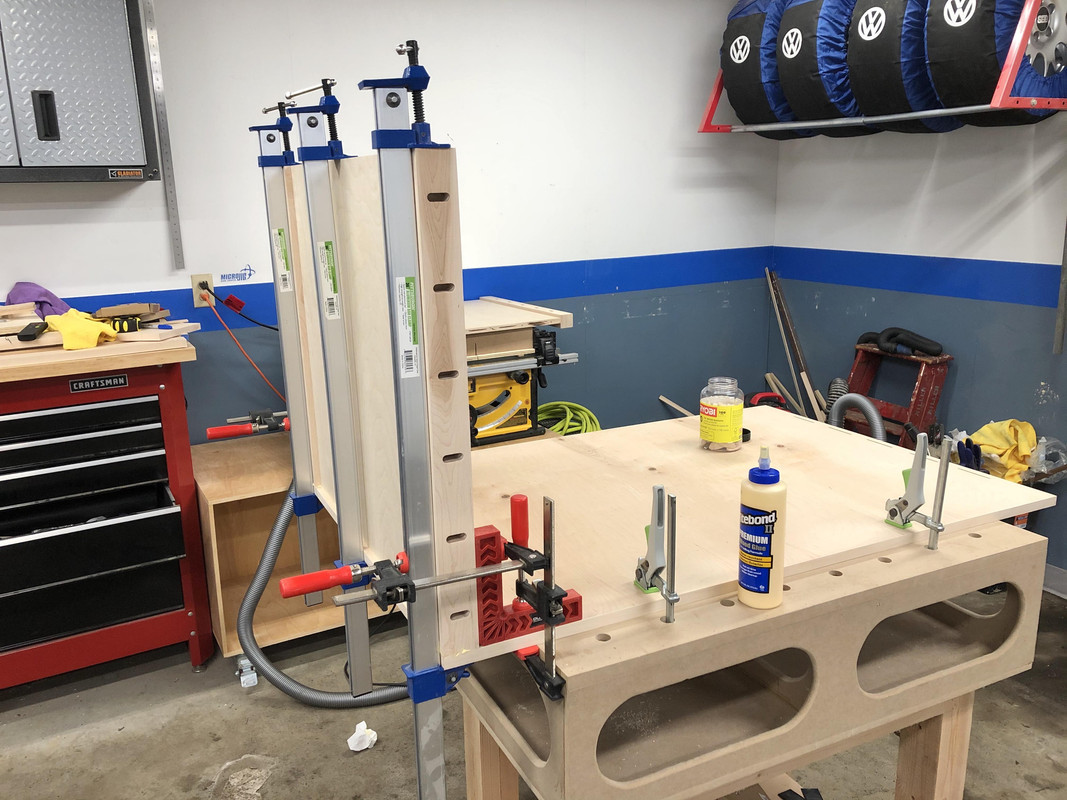
Same thing here, did the pocket screws and then can take the clamps off while the glue dries and do the other side.
I hate glue squeeze out. It's satisfying to scrape away in the same way that picking a large booger is satisfying, but it's not my favorite task.
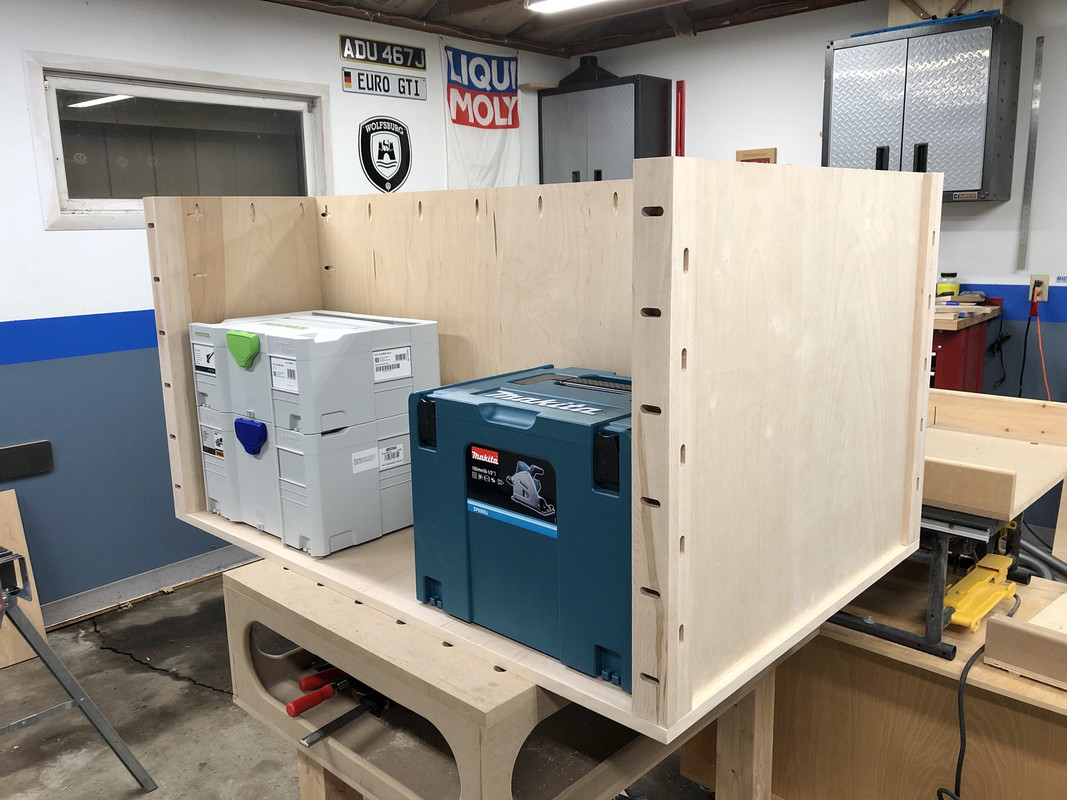
Both sides on, it's starting to take shape:
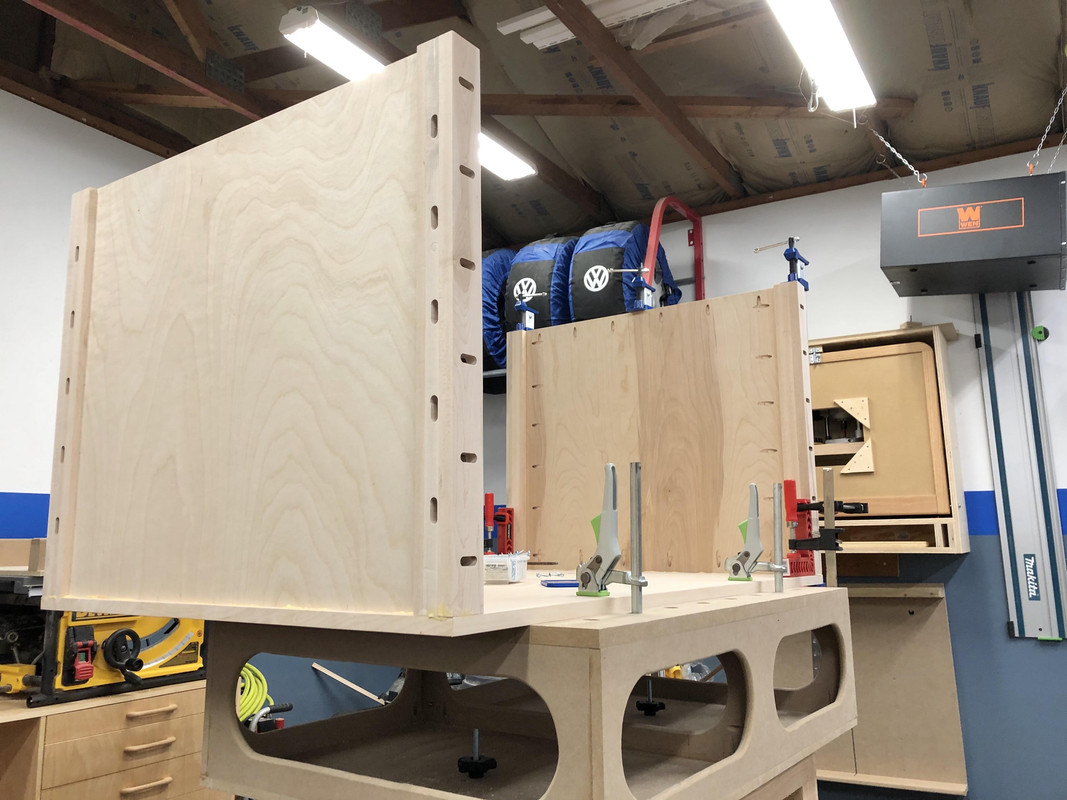
I was pressed on time and didn't take pictures of the next part, but it's more of the same. Fitting the middle divider. Here is where I left off, with some Systainers placed for fun.
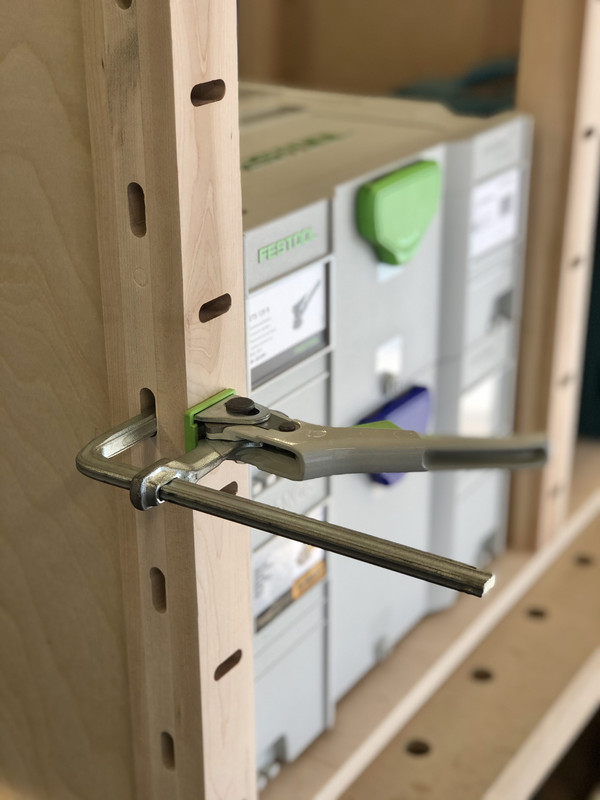
And demo of the face clamping mechanism:
All-in-all I'm happy with how it's coming together, although I've made some mistakes that I wouldn't accept for furniture, like the plywood built-ins on my to-do list. I'm hoping this track saw station will really produce square cuts and minimize some of the error.
It's sitting on my table saw right now, it sticks out 6" farther, it will be a tight fit with the cars! Guess I need a bigger garage...
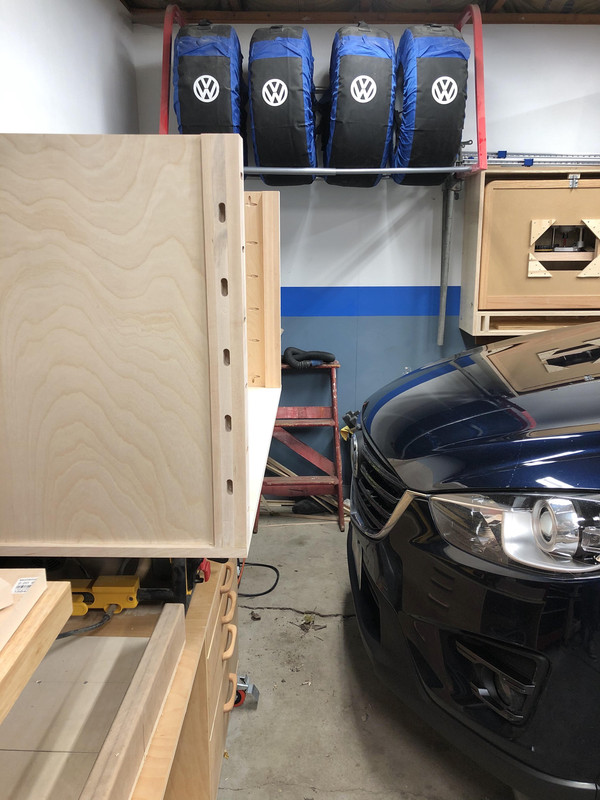
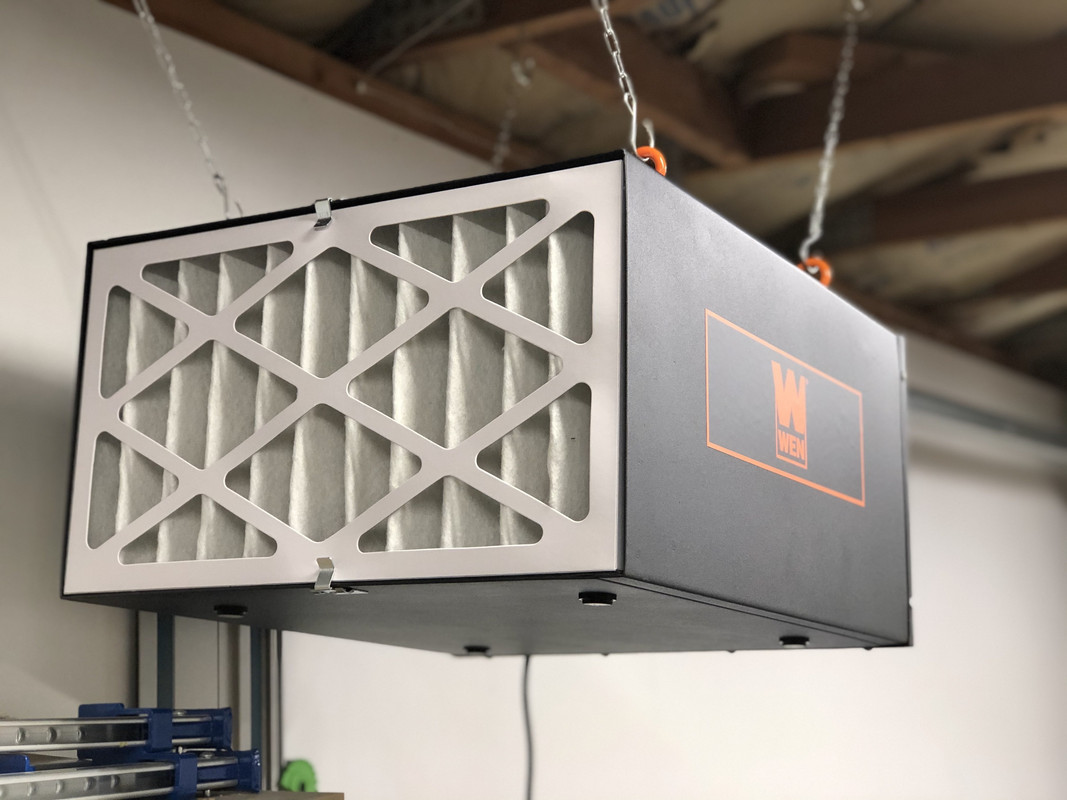
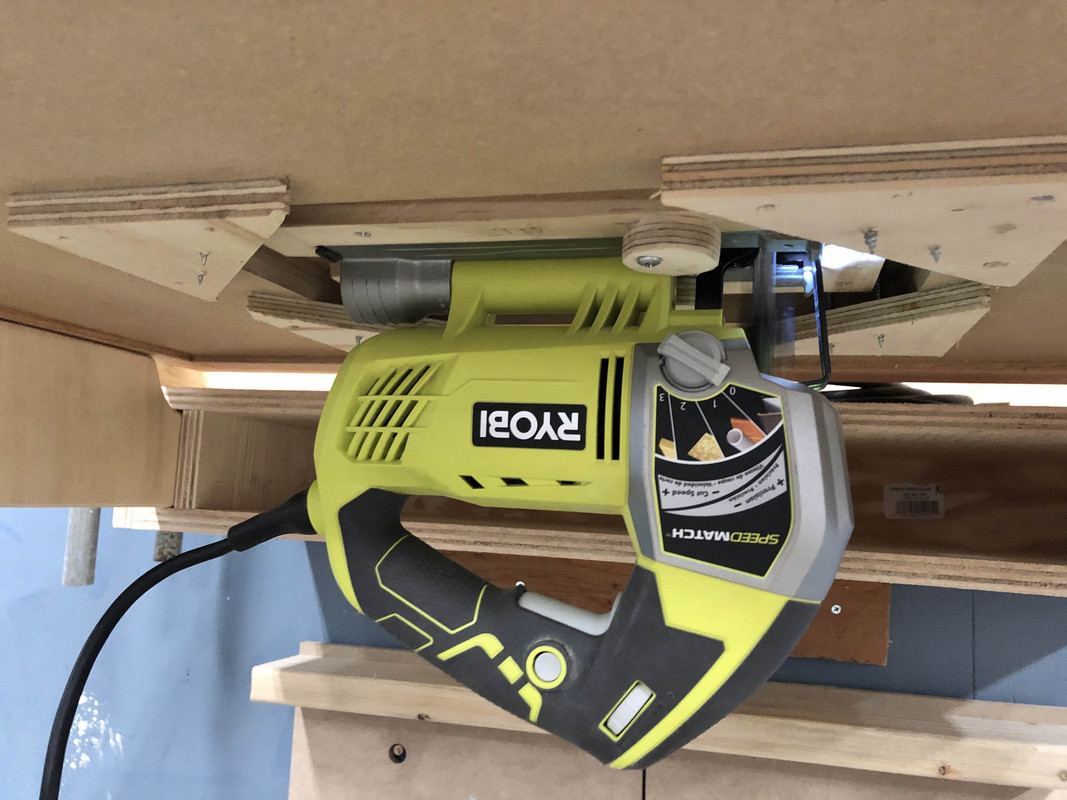
Lastly, my wife got me this WEN air filtration box as an early birthday gift. I threw it up quick to test out, but will need to do a better mounting job later plus wire some electrical for it. It seems really nice, though! I usually have the garage door closed so hopefully this will help keep the air cleaner.
She saw me using the ratchet and immediately wanted to use it, and used it with the correct ratcheting motion. She is very mechanically inclined and loves anything that moves or interfaces with something else (zippers, jar lids, buttons). Now I want to get or make her a little tool box.
On Sunday I got some time in on the track saw bench. I glued up the legs to the side panels on our kitchen table.
I have to say, the biscuits made this easy. While still in the clamps I flipped it over and zipped in the pocket screws.
The nice thing is the pocket screws act as clamps for the glue, so I can immediately take off the clamps and do the next panel.
After that I moved out to the garage and did some light sanding before attaching the sides to the bottom panel.
After using this Festool sander a few times now, I still am perplexed by how it jumps around the surface. It doesn't feel like a smooth action, it pulls and yaws and is jittery. I only have the 1 piece of 120 grit that came with it... and have tried all speeds... but if anyone has experience with it please let me know if this is normal or user error!
Aside from that oddness, it does leave a nice finish and is virtually dustless, something I can't say about my DeWalt.
Dry fitting the sides, somehow the right side did not line up flush. I double-checked the biscuit measurements and couldn't figure out why it wasn't lining up.
Frustrating, but I chose to skip biscuits on that side and just use pocket screws and glue.
In the clamps:
Same thing here, did the pocket screws and then can take the clamps off while the glue dries and do the other side.
I hate glue squeeze out. It's satisfying to scrape away in the same way that picking a large booger is satisfying, but it's not my favorite task.
Both sides on, it's starting to take shape:
I was pressed on time and didn't take pictures of the next part, but it's more of the same. Fitting the middle divider. Here is where I left off, with some Systainers placed for fun.
And demo of the face clamping mechanism:
All-in-all I'm happy with how it's coming together, although I've made some mistakes that I wouldn't accept for furniture, like the plywood built-ins on my to-do list. I'm hoping this track saw station will really produce square cuts and minimize some of the error.
It's sitting on my table saw right now, it sticks out 6" farther, it will be a tight fit with the cars! Guess I need a bigger garage...
Lastly, my wife got me this WEN air filtration box as an early birthday gift. I threw it up quick to test out, but will need to do a better mounting job later plus wire some electrical for it. It seems really nice, though! I usually have the garage door closed so hopefully this will help keep the air cleaner.
Bob Heine
ALLIANCE MEMBER
I don't think I've never heard that before.Guess I need a bigger garage...

Lapkritis
Well-known member
My fires always start out like this:
And then quickly turn to this:
Seems like one side of the log will catch and burn well, but then the flames go down and the other half doesn't burn. Well it took a lot of effort, stoking, newspapers, but after 20-30min I had a well-burning fire going.
Our living room is horribly inefficient so I think it was just sucking the heat out, but it was still cozy.
We burn a lot of wood here to supplement our heat pump and the oil furnace. If you enjoy a good wood fire (we certainly do) then I would recommend a stove or insert. Normally a fire that needs a lot of coaxing to get running indicates green wood that needs to season/dry longer. If possible, try to split, stack and cover the wood to dry for a full calendar year (minimum) before burning. I'm currently processing logs into 20" splits to burn in our Englander 30NC for next winter now in hopes of getting our oil bill down to $0.
Sent from my SM-N960U using Tapatalk
Nick,
We used wood burning fireplaces for over 40 years in three different homes. The last home we were in almost 30 years. Make sure the wood is seasoned and dry. I only covered the top of the wood pile and allowed air to flow through the wood pile. If you cover the top AND sides it may get moldy. I arranged the wood pile on something to get it off the ground. Pallets work very well and you can usually find someplace that is happy to get rid of them. When it comes to the fire - I was told (and it worked for me) to arrange the newspaper, smaller pieces of wood and kindling on the bottom, and the larger pieces on the top. It seemed to get the fire going and the flames worked there way up and the larger pieces ignited and kept burning. We moved to a new home last month that has a gas fireplace and although it is easy, I do miss the wood burning fireplace. Good luck. Mike
We used wood burning fireplaces for over 40 years in three different homes. The last home we were in almost 30 years. Make sure the wood is seasoned and dry. I only covered the top of the wood pile and allowed air to flow through the wood pile. If you cover the top AND sides it may get moldy. I arranged the wood pile on something to get it off the ground. Pallets work very well and you can usually find someplace that is happy to get rid of them. When it comes to the fire - I was told (and it worked for me) to arrange the newspaper, smaller pieces of wood and kindling on the bottom, and the larger pieces on the top. It seemed to get the fire going and the flames worked there way up and the larger pieces ignited and kept burning. We moved to a new home last month that has a gas fireplace and although it is easy, I do miss the wood burning fireplace. Good luck. Mike
Metallitubby
Well-known member
Nice! Mk7, or what do you have?
I'm not as active on vortex anymore because the car mods have slowed down, but I do still check in from time to time.
I am the resident Honda guy (although I've owned 29 VWs over the years). I'm building a house and shop outside of Atlanta on 9 acres that I recently purchased and am scouting ideas for the shop, finishes, hardware, etc.
Nick - concerning your sander jumping around on you. What vac are you using? And have you turned the suction down per the Festool instructions? Some of the vacs can be dialed down and some of them you can open up another port to reduce the suction.
Sent from my iPhone using Garage Journal
Sent from my iPhone using Garage Journal
OP
nicholam77
Well-known member
I don't think I've never heard that before.
Ha! I guess we all want more space...
I am the resident Honda guy (although I've owned 29 VWs over the years). I'm building a house and shop outside of Atlanta on 9 acres that I recently purchased and am scouting ideas for the shop, finishes, hardware, etc.
Ah, gotcha. That's a lot of VW's. The GTI is only my 2nd, 2.slow mk4 Jetta before that. Your house/shop project sounds amazing!
Nick - concerning your sander jumping around on you. What vac are you using? And have you turned the suction down per the Festool instructions? Some of the vacs can be dialed down and some of them you can open up another port to reduce the suction.
Sent from my iPhone using Garage Journal
I think you are spot on. Probably should have read the instructions closer.
I actually posted on FOG asking about it too and got the same response. And it totally makes sense. I am just using a ShopVac connected to a dust right separator bin. I recently cleaned the filter and new bag in the vac, too, so suction is probably WAY too strong. It doesn't have any speed settings but I'll check for the extra port. When I have time I will also run the sander without the vac attached to be sure, but I'm 99% sure that's my issue. If I can't get it to work, I have been eyeing the new CT15 that's about to be released, still feels like crazy money for a vac but almost half the price of the MIDI for similar specs. With this new bench I am already wondering where I am going to store my ShopVac/Dust Right combo as it takes up a lot of room.
OP
nicholam77
Well-known member
Nick,
We used wood burning fireplaces for over 40 years in three different homes. The last home we were in almost 30 years. Make sure the wood is seasoned and dry. I only covered the top of the wood pile and allowed air to flow through the wood pile. If you cover the top AND sides it may get moldy. I arranged the wood pile on something to get it off the ground. Pallets work very well and you can usually find someplace that is happy to get rid of them. When it comes to the fire - I was told (and it worked for me) to arrange the newspaper, smaller pieces of wood and kindling on the bottom, and the larger pieces on the top. It seemed to get the fire going and the flames worked there way up and the larger pieces ignited and kept burning. We moved to a new home last month that has a gas fireplace and although it is easy, I do miss the wood burning fireplace. Good luck. Mike
We burn a lot of wood here to supplement our heat pump and the oil furnace. If you enjoy a good wood fire (we certainly do) then I would recommend a stove or insert. Normally a fire that needs a lot of coaxing to get running indicates green wood that needs to season/dry longer. If possible, try to split, stack and cover the wood to dry for a full calendar year (minimum) before burning. I'm currently processing logs into 20" splits to burn in our Englander 30NC for next winter now in hopes of getting our oil bill down to $0.
Sent from my SM-N960U using Tapatalk
Thanks for the tips! The wood I used most recently was from my dad's house, it's been in the pile for more than a year, probably multiple years. He did have it mostly covered with a tarp though. Before that I just got the small bundles from the hardware store. I need to rig up a better place I can store / dry the wood.
I've also always done the kindling and smaller pieces on bottom approach, lighting a bunch of newspaper balls from underneath. It always lights well, it just seems once I put on a bigger piece it only one side burns well and then the flames kind of go down. But... I also tried opening the ash cleanout vent all the way for more air and that seemed to work better. My glass doors are not tempered and it says not to close them while the fire is burning or they may shatter. I figured the fire was getting enough air from the living room itself so only had the ash vent cracked, but opening it fully seemed to help a bit, anyways.
I'd love a freestanding stove but no spot for one. Does the fireplace insert go in my brick fireplace opening? What is the purpose of that? I'll have to do some research.
Rockcam
Well-known member
Love your thread. Good attention to detail, and I’m learning a bunch.
My wallet feels differently, as I finally pulled trigger on the Makita track saw thanks to you. And received a 118” Makita track today from Tool Nut. Much better price than amazon, and they delivered in two days via FedEx Freight.
I also ordered the Bosch hose and couplers. Thank you for posting the details which made it too easy (too easy, actually). They came today.
Keep up the great work!
Last edited:
OP
nicholam77
Well-known member
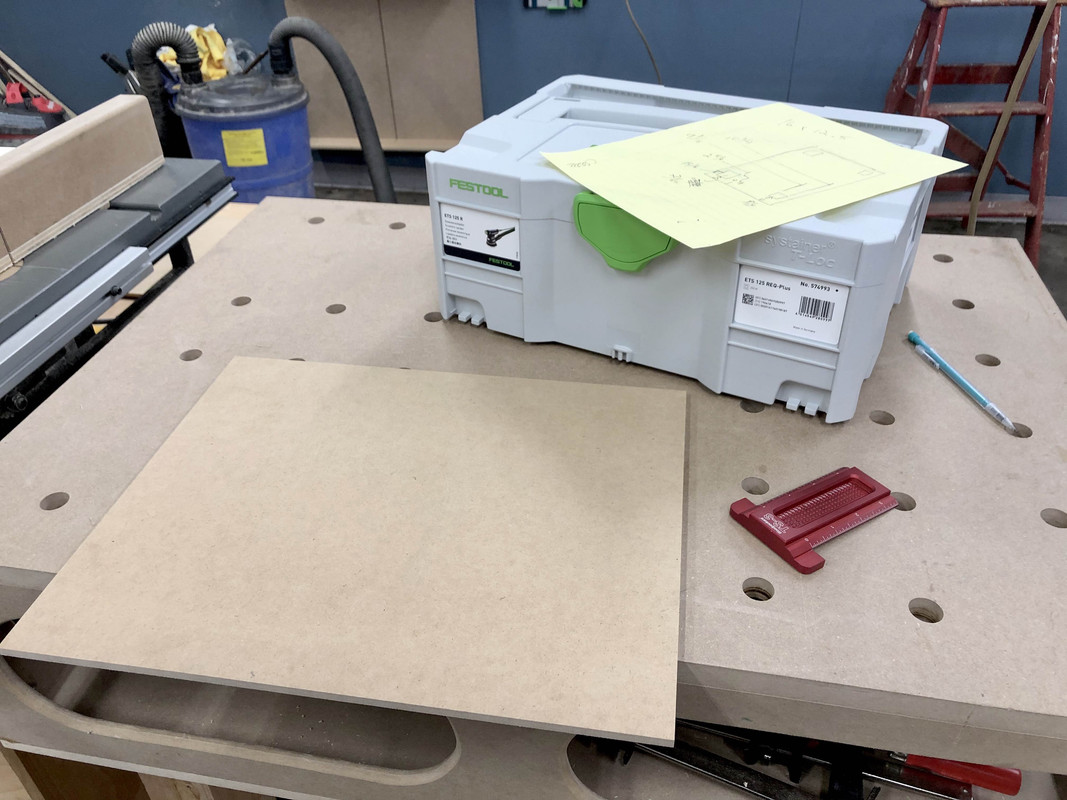
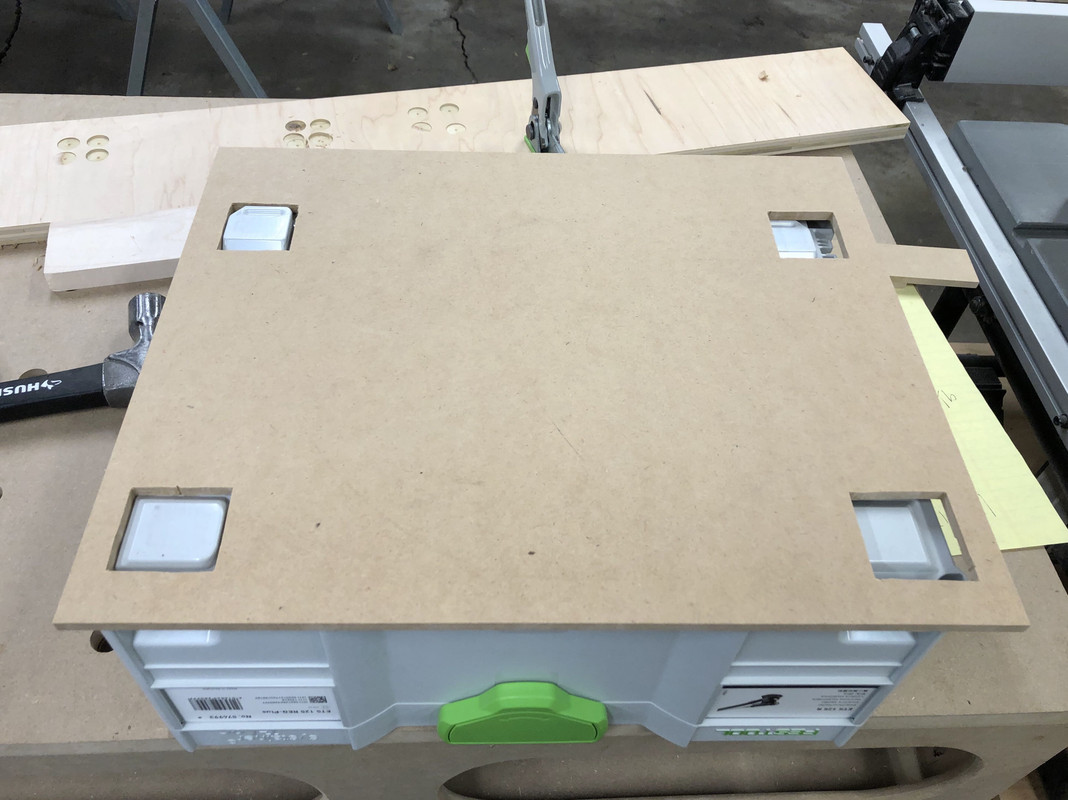
Happy Monday everyone. This weekend I built a Systainer Shelf Jig.
Systainers have 4 little "feet" on the bottom that allow them to stack securely and interlock with one another. I wanted to make holes for the feet in the drawers of my track saw bench so they will sit recessed and hold the Systainer in place.
I found more than a few schematics for this online, but they were all in millimeters and I couldn't wrap my head around it:
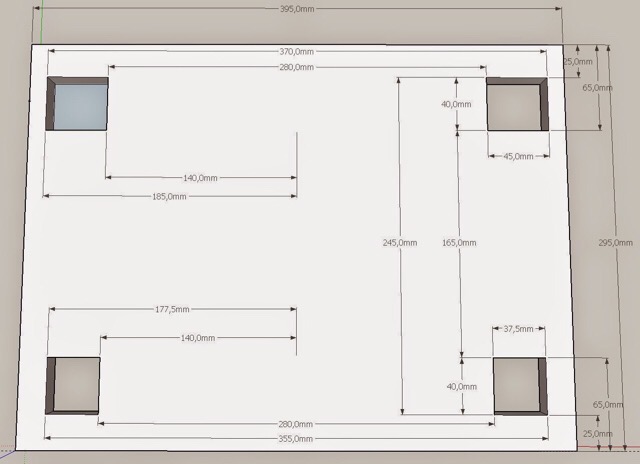
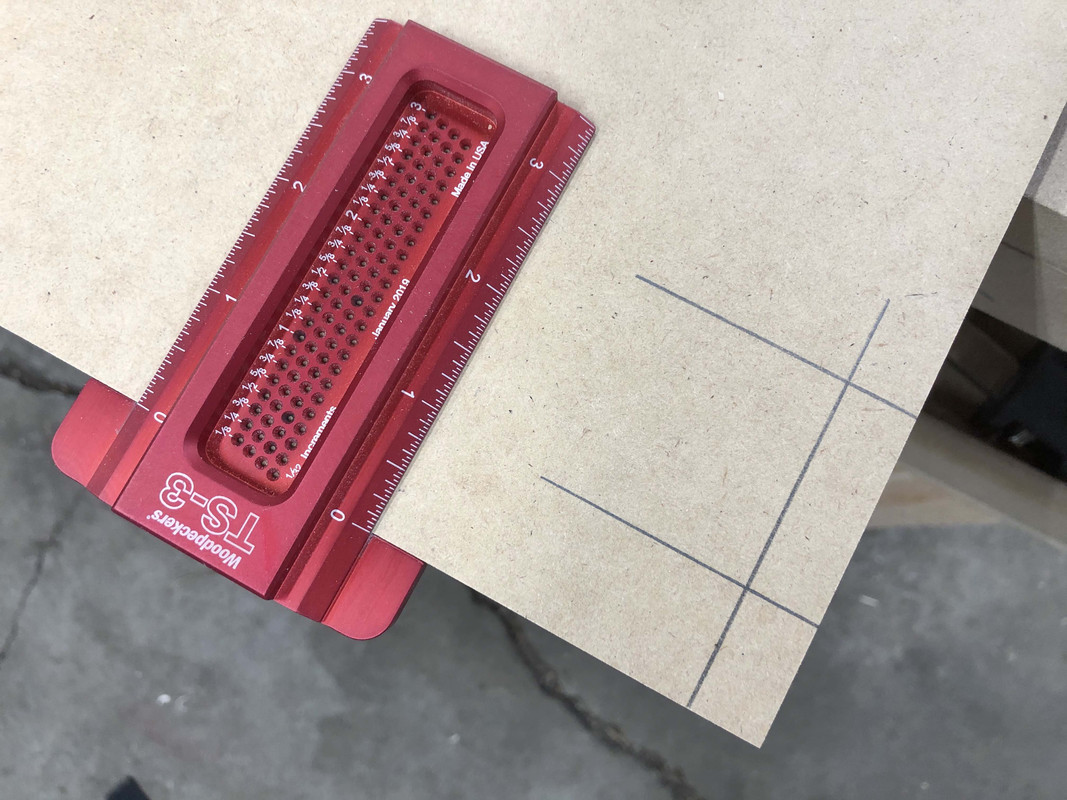
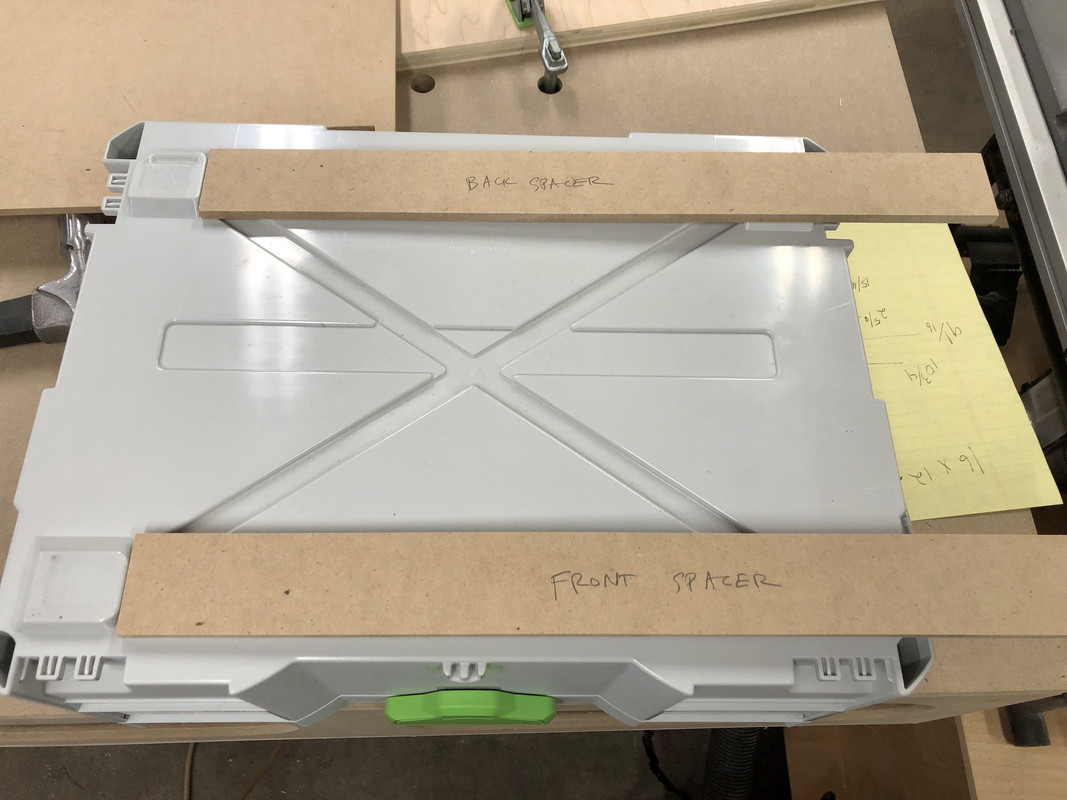
The "feet" also have some awkward bevels and the front and back ones are different sizes. That combined with the fact that the Systainer bottom has some indents and is not a perfect rectangle... it starts to get complicated. But I tried to take my own imperial measurements:
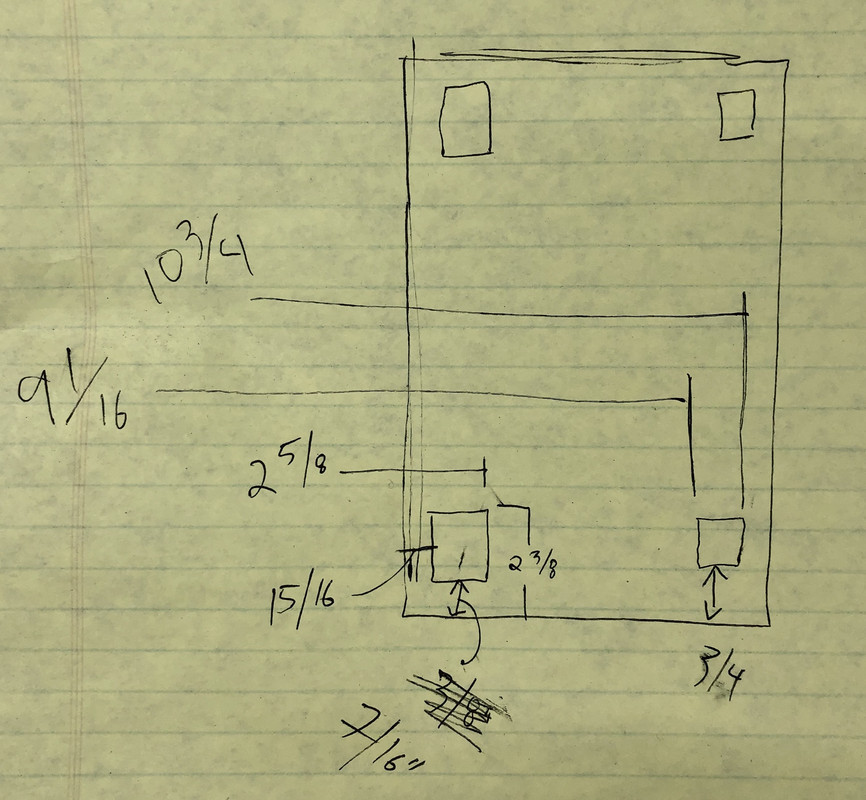
With my "plans" drawn up, I grabbed a piece of 1/4" MDF I had laying around and started to lay out the holes:
Then I drilled access holes for the jigsaw and cleaned them up on the jigsaw (router) table:
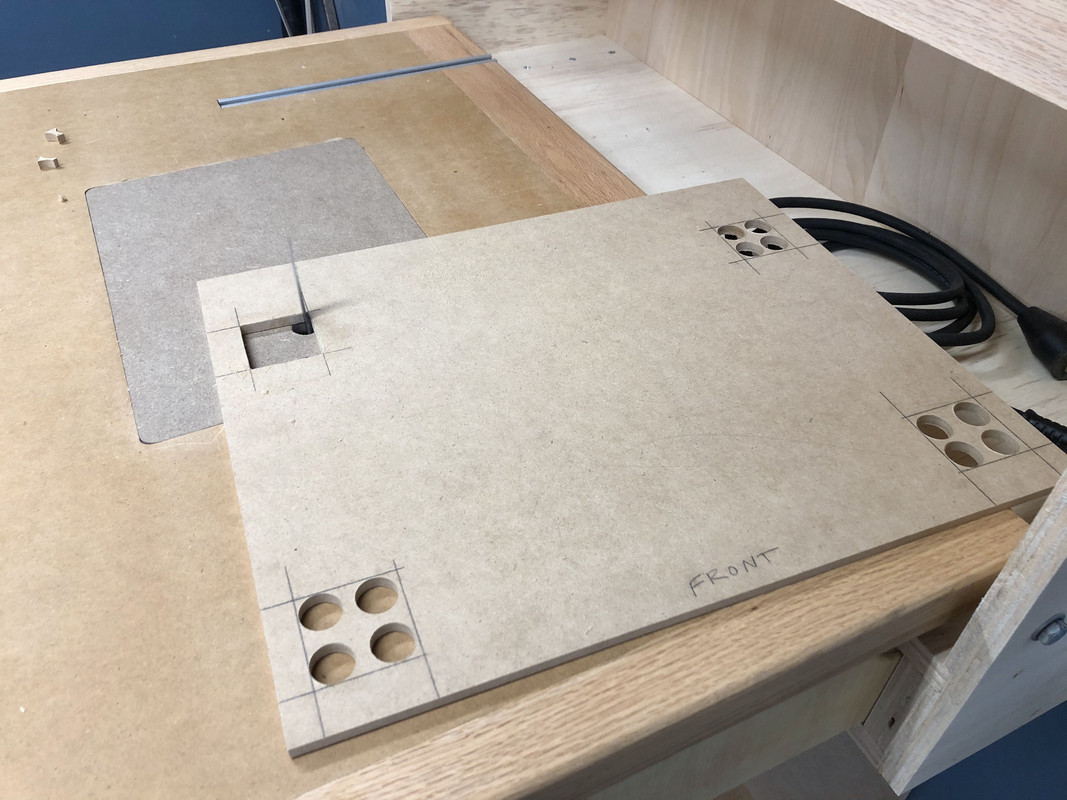
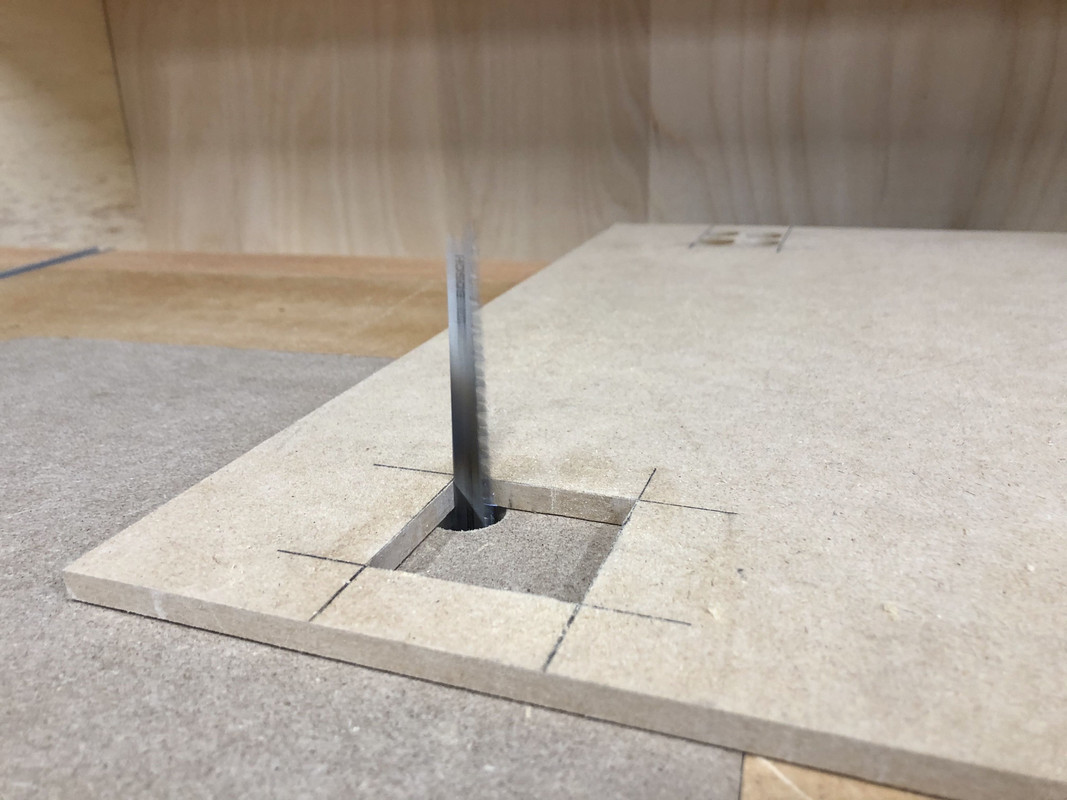
I have to say this is a half-assed solution and doesn't work that well. Maybe it's partly the jigsaw, I've never really liked it. The blade deflects way too much and it's very difficult to get straight, perpendicular cuts.
Anyways, placed the template on the Systainer bottom and:
AAAAAARRRRRRRRGH!!!!! 
I had cut the MDF to the width of the drawer I plan to use, not the width of the Systainer, and I referenced the edges, not the center, when doing the layout. So it didn't quite line up. That's a precious 2 hours wasted.
Not wanting to be defeated I started again with another method I'd seen online -- cutting little bits to the right size and taping them together like a puzzle, thus creating the voids based on the actual reference object:
Stuck this contraption to a piece of 3/4" MDF with double-sided tape to transfer the template to a solid piece. I cleared most of the void waste with a hole saw, which got very burn-y and smokey. I'm pretty sure burn-y is a word.
Then template route at the router:
This was dusty as $#&!.
But the results were accurate and due to the template bit bearing I got a nice little radius in the corners.
Last step was to glue some small MDF strips as guides for placing the actual shelves/drawers on the jig.
I don't know if I have enough room but I might add some of those little toggle clamps to hold the shelf in place while doing the template routing.
But essentially I've made a jig that can accurately place the Systainer feet holes on a 16" wide shelf, which gives about 1/4" space on all sides of the Systainer.
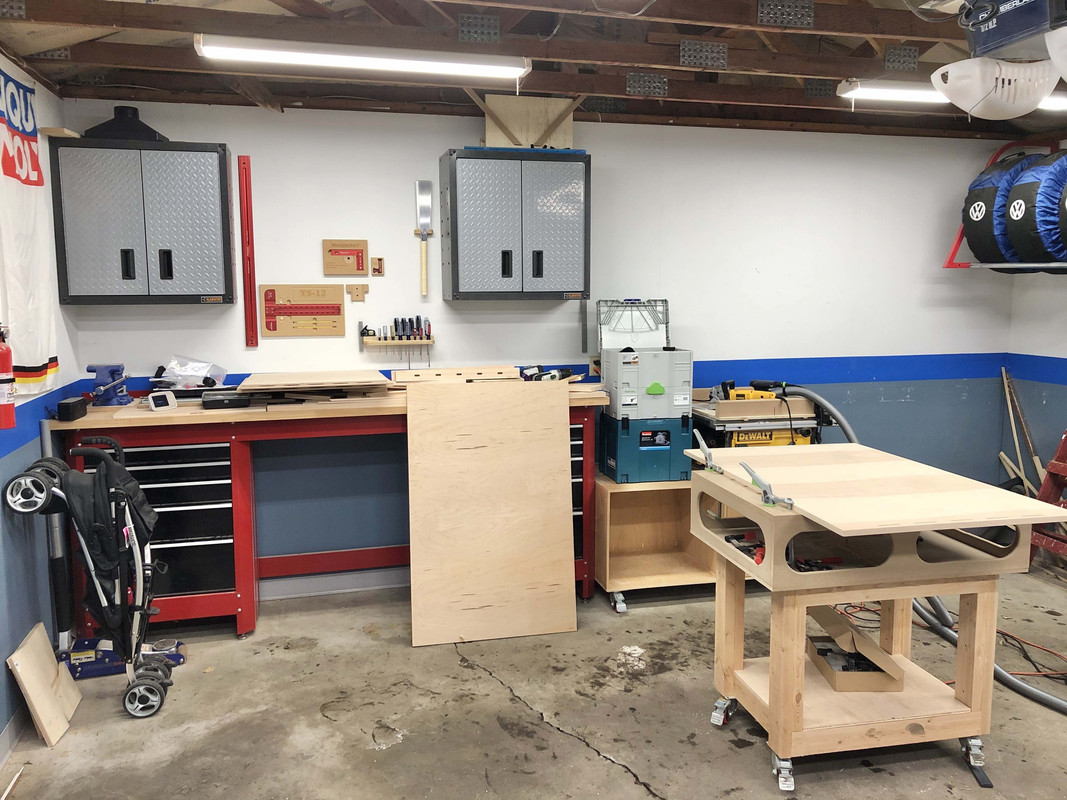
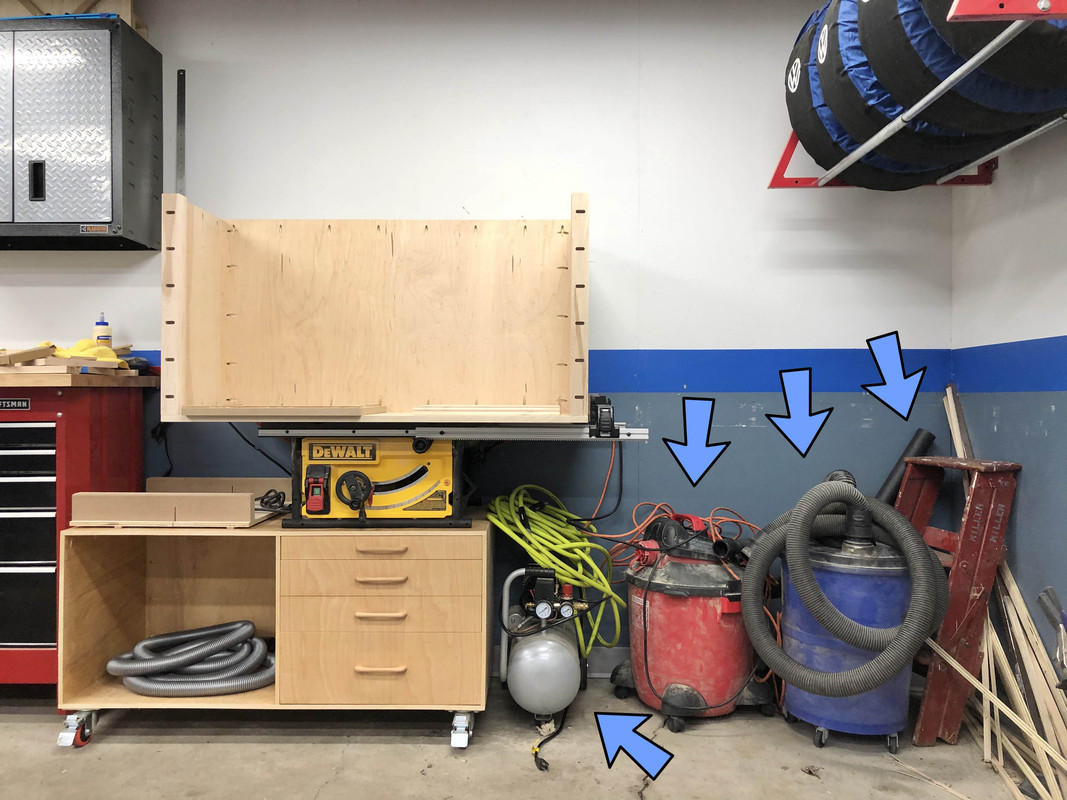
As I'm getting closer to finishing the carcass, I need to figure out where to put this ****, because that's where the new bench is going to go:
Systainers have 4 little "feet" on the bottom that allow them to stack securely and interlock with one another. I wanted to make holes for the feet in the drawers of my track saw bench so they will sit recessed and hold the Systainer in place.
I found more than a few schematics for this online, but they were all in millimeters and I couldn't wrap my head around it:
The "feet" also have some awkward bevels and the front and back ones are different sizes. That combined with the fact that the Systainer bottom has some indents and is not a perfect rectangle... it starts to get complicated. But I tried to take my own imperial measurements:
With my "plans" drawn up, I grabbed a piece of 1/4" MDF I had laying around and started to lay out the holes:
Then I drilled access holes for the jigsaw and cleaned them up on the jigsaw (router) table:
I have to say this is a half-assed solution and doesn't work that well. Maybe it's partly the jigsaw, I've never really liked it. The blade deflects way too much and it's very difficult to get straight, perpendicular cuts.
Anyways, placed the template on the Systainer bottom and:
AAAAAARRRRRRRRGH!!!!!
I had cut the MDF to the width of the drawer I plan to use, not the width of the Systainer, and I referenced the edges, not the center, when doing the layout. So it didn't quite line up. That's a precious 2 hours wasted.
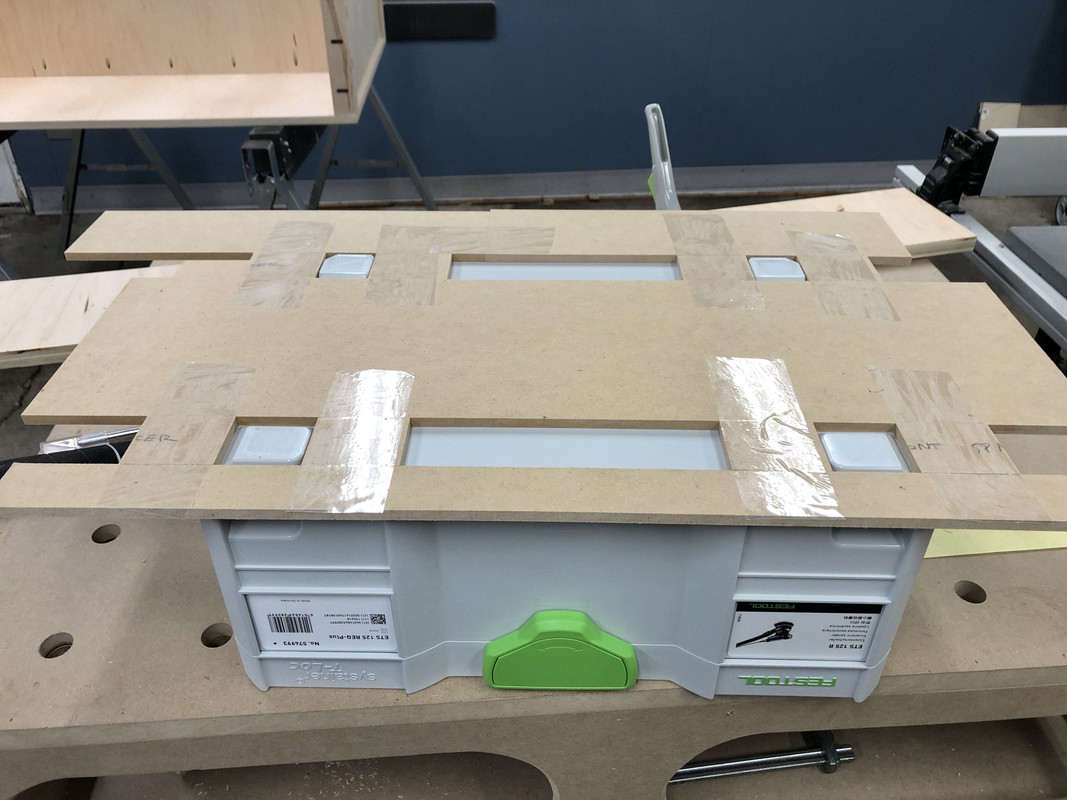
Not wanting to be defeated I started again with another method I'd seen online -- cutting little bits to the right size and taping them together like a puzzle, thus creating the voids based on the actual reference object:
Stuck this contraption to a piece of 3/4" MDF with double-sided tape to transfer the template to a solid piece. I cleared most of the void waste with a hole saw, which got very burn-y and smokey. I'm pretty sure burn-y is a word.
Then template route at the router:
This was dusty as $#&!.
But the results were accurate and due to the template bit bearing I got a nice little radius in the corners.
Last step was to glue some small MDF strips as guides for placing the actual shelves/drawers on the jig.
I don't know if I have enough room but I might add some of those little toggle clamps to hold the shelf in place while doing the template routing.
But essentially I've made a jig that can accurately place the Systainer feet holes on a 16" wide shelf, which gives about 1/4" space on all sides of the Systainer.
As I'm getting closer to finishing the carcass, I need to figure out where to put this ****, because that's where the new bench is going to go:
OP
nicholam77
Well-known member
Love your thread. Good attention to detail, and I’m learning a bunch.
My wallet feels differently, as I finally pulled trigger on the Makita track saw thanks to you. And received a 118” Makita track today from Tool Nut. Much better price than amazon, and they delivered in two days via FedEx Freight.
I also ordered the Bosch hose and couplers. Thank you for posting the details which made it too easy (too easy, actually). They came today.
Keep up the great work!
Thanks for reading, Rockcam! It would be much easier for me to just post finished projects, but then I wouldn't be posting very often. While some of the building details might be boring to some, my hope is that with each project there might be somebody out there that finds it useful. I'm really not that inventive and have learned almost everything I know from others more experienced, mostly on forums and the internet (YouTube, etc).
I hope you like the track saw as much as I do. You will have to report back once you've used it a bit and let me know what you think. I am jealous of the 118" track -- so far I've managed to cut all my plywood the short way, but it would be very handy for the big sheets.
Kriesel
Well-known member
This was dusty as $#&!.
Did the new air filtration help??