To avoid these ads, REGISTER NOW!

Between 265 & 485 SQ/FT Nick's Two-Car Detached Vdub Garage

Workspaces sized between 265 and 485 squarefeet.
OP
N

nicholam77

Well-known member
Joined
Dec 18, 2016
Messages
2,672
Location
Minneapolis, MN
That explains the unexpected readings.

🤣 Haha! Yeah, when I went back and re-read your comment I sort of figured that. Well... I'll check it out sometime, although after adjusting the trim pots I've had no layer shifts and I think the Y-motor is running cooler.

Some aggressive sandpaper taped to your bench or on an Orbital sander held gently upside down in a vice (since the texture will help with the glue) and just lightly pass both sides by hand.

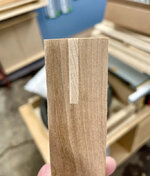
I tried this with taping sandpaper to the bench. I actually meant the splines were .02" too thick, so .5" mm. Although that was just measuring the opening and spline thickness with calipers, so likely need some wiggle room like you said. It just seemed like it was going to take forever to do all 8 splines.

I tried clamping my orbital sander to my bench with 80 grit (lowest I have on hand) and it was extremely difficult to hold the small pieces to it with any sort of pressure.

I ended up realizing I had just enough stock to remake the spline wedges, so I sanded that down first this time on the larger piece, then cut into pieces. They seemed to fit ok.

But... when I went to assemble tonight, after adding glue they just wouldn't fit. I forced one in but not all the way, and it got stuck. Tried to tap it with a hammer and one of my miters popped apart. :mad: I think I needed to sand them down even more!

To be continued tomorrow...

Maybe it's time you started a Youtube channel to get some sponsorship or join PBS. You have always got some neat project going, thanks for continuing to share.

Ha! I've thought about YouTube before, but I'm not sure how I feel about being on camera, and I don't own video production equipment. Or have the time. Time is a big one. I edit video professionally, went to film school etc, so I actually have the skills to make content like that but it is very time consuming.

But I like sharing on here and I'm glad you find it mildly interesting!

🍻
 
To avoid these ads, REGISTER NOW!

Bakafish

Well-known member
Joined
Feb 7, 2017
Messages
477
Location
Tokyo
A lot of people do not bother to cut the splines flush with the sides until they are glued in place, they just cut short sections and let the edges stick out, then trim them with a small hand saw and then plane or sand them flush. As you discovered, (most) glue swells the wood, so you need the splines to be somewhat loose fitting (or have a very rough surface that renders it more compressible and has gaps for the glue to migrate to. Biscuits, dominoes and dowels are rough not because they are cheap, but because it is a design decision.) The splines do show an edge, so you can't go too crazy with the gaps and roughness unless your choice of glue helps hide that seam.

Double sided tape (or the masking tape crazy glue trick where you put masking tape on both surfaces, add crazy glue to one side and accelerator on the other, then join) will allow you to attach all these little pieces to a single larger piece of wood and should make sanding them down as a group easier. Alternatively, 3D printing, routing a pocket or gluing a V shape recess tool that is sized to hold the little pieces one at a time. Because you cut them triangularly, they should wedge themselves into a proper recess easily. Ideally you would use a sander that has a unidirectional mode, like a belt sander or a locked Festool Rotex and that would push the piece into the notch while you apply pressure from above. Just work on one piece first, make a test slot to fit it in and establish the required thickness before working on the rest of them so you don't need to make them a third time :)
 
OP
N

nicholam77

Well-known member
Joined
Dec 18, 2016
Messages
2,672
Location
Minneapolis, MN
@Bakafish I cut the splines oversized by about 1/4", so they will need to be trimmed. Normally I'd leave them longer but I was trying to be as efficient as possible with the limited material. I won't be making them a 3rd time because I don't have any more wood.

When it comes to the fit, I do know how they should fit, I just screwed up. I've made a good number of frames this way before but I guess it had been too long. Since I don't have a great way to thickness the spline material, normally I move the fence once a very small amount when using the spline jig. This time I foolishly made the assumption that a 1/8" blade and 1/8" stock would fit, and completely forgot about the nuance. What you said about glue swelling etc is a great reminder, though.

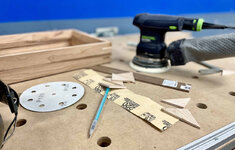
Awesome suggestions about how to sand the small parts. Unfortunately for me, I'm out of double-sided tape, don't have CA glue or accelerant, definitely don't have time to figure out the 3D printing part, but your suggestions did give me the idea to hold the spline piece on some sandpaper so it wouldn't slide around. I was able to pin it down with one finger and use the orbital sander. My belt sander is broken.

IMG-5254.jpg

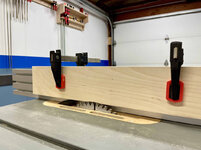
I usually trim the splines with a hand saw but for the two splines I forced in last night I tried using a sacrificial fence on the table saw and that worked pretty well.

IMG-5251.jpg

IMG-5253.jpg

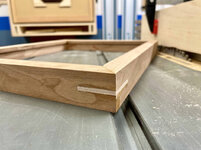
One looks pretty good and the other one has small gaps that I'll fill with sawdust + glue.

Of course, before settling back to sanding down all the pieces, I attempted to widen the slot on one corner with the jig again since I thought it would be faster, and cut it too wide. Should have listened to you! I just had to make my life a little more difficult. Swearwords were uttered. That one I'm going to try to make a little shim to fit in the extra space.

Overall I think they will end up passable with the errors mostly fixed, but I'm frustrated with myself for slowing the process down and making a bunch of mistakes as 1) I should have the experience to know better and 2) I really need to get these finished!

🍻
 
OP
N

nicholam77

Well-known member
Joined
Dec 18, 2016
Messages
2,672
Location
Minneapolis, MN
Thickness planer won't work on those small pieces - unless you make a jig. How about laying them on a belt sander for a bit?

Sorry Jeff, didn't mean to ignore your comment. I was just joking about the thickness planer. Just trying to find an excuse to add one to the arsenal, ya know? 😁

Belt sander is a good idea, but mine's broken. I think I've got it sorted now, though. But I appreciate the suggestions.
 

Jeff Ivers

Well-known member
Joined
Apr 9, 2010
Messages
2,561
Location
Oklahoma
Sorry Jeff, didn't mean to ignore your comment. I was just joking about the thickness planer. Just trying to find an excuse to add one to the arsenal, ya know? 😁

Belt sander is a good idea, but mine's broken. I think I've got it sorted now, though. But I appreciate the suggestions.
I hear you on looking for an excuse for a thickness planer! About 20 years ago, I watched Norm Abrams turn some pallet lumber into a beautiful coffee table with the help of a planer. I finally justified one a couple of years ago - no, I haven't made a coffee table!
 

Bakafish

Well-known member
Joined
Feb 7, 2017
Messages
477
Location
Tokyo
Just trying to find an excuse to add one to the arsenal, ya know? 😁

I hear you on looking for an excuse for a thickness planer!

One of those is on my list too. The "go to" thickness planer seems to be the DeWalt, but they do not work properly over here due to the wonky power we use. Fortunately the Makita units are not far from first place. The space to usage ratio is really high for me though, so I've been waiting for the right project to push me into buying.
 

kaymccampbell

Well-known member
Joined
Feb 27, 2015
Messages
29,584
Location
Upstate New York
One of those is on my list too. The "go to" thickness planer seems to be the DeWalt, but they do not work properly over here due to the wonky power we use. Fortunately the Makita units are not far from first place. The space to usage ratio is really high for me though, so I've been waiting for the right project to push me into buying.
Go with the Makita. Be glad. The NWA has one of those big DeWalt planers and it constantly pops it's internal breaker, or just refuses to run. It's got maybe 25 hours on it. I've got an older, yardsale Craftsman lunchbox planer with hundreds of hours on it, just from me, and it can't get enough abuse.
 

bj383ss

Well-known member
Joined
Sep 29, 2011
Messages
3,166
Location
TX
I'm going to be an enabler again and say go Planer. I like Ridgid myself but that is all I have ever had. I agree I see everyone using the Dewalt but if I was going to spend that much money I would just go with the 15" Grizzly and call it done.

Bret
 
OP
N

nicholam77

Well-known member
Joined
Dec 18, 2016
Messages
2,672
Location
Minneapolis, MN
Ok got the splines in, the one I cut the slot too wide I added a shim:

IMG-5268.jpg

I've been doing my glueing inside because the garage is around 20° F.

Trimmed it, ran it through the table saw zero clearance fence:

IMG-5271.jpg

And it looks not too bad! Except off center but oh well.

IMG-5274.jpg

Lots of sanding, 80 / 120 / 220 grit. And some hand sanding.

IMG-5275.jpg

I tested 3 oil-based wiping finishes this morning (MinWax Wipe On, Watco Danish Oil, and Arm-R-Seal). I liked the Arm-R-Seal the best but it has the longest drying time (12 hrs). Ugggghh, I don't know how I'm going to get a 2nd coat on and finish everything else before tomorrow morning (that's when we are exchanging gifts).

IMG-5278.jpg

It's the final countdown!!!

If I don't post again, Merry XMAS or Happy Holidays to everyone! xmas

🍻
 

patlun

Well-known member
Joined
Apr 12, 2015
Messages
242
Location
Värmland, Sweden
Eftersom du är 100% svensk så tar vi det väl på svenska? :devilish:
(Because you are 100% Swedish maybe we can take this in Swedish?)

I have been reading your thread over Christmas and I am impressed over your progress with your house and woodwork. Those cabinets in the living room is really nice.

I use the SUVA-protection that followed with my DeWalt 745 to get overhead dust collection. It is not perfect but if I adjust it so it is a couple of millimeter above the surface of the material and let the dust collection run for some seconds after the cut is finished most of the saw dust is removed. That said I often place the saw outside when sawing.

Strange that your printer suddenly started to behave badly. I understand that your adjustment of voltages fixed your problem, or have it come back? My first thought when I saw the bad prints was "is the belts correctly adjusted" because it started so suddenly
 
OP
N

nicholam77

Well-known member
Joined
Dec 18, 2016
Messages
2,672
Location
Minneapolis, MN
Eftersom du är 100% svensk så tar vi det väl på svenska? :devilish:
(Because you are 100% Swedish maybe we can take this in Swedish?)

Ha, @patlun I wish I could speak Swedish! My dad knows a little, but only because he took it in college. To clarify I am an American of Swedish descent (great-grandparents moved to the U.S.). I don't even touch the pickled herring my dad puts out for the holidays. A disappointment, really. :LOL:

I have been reading your thread over Christmas and I am impressed over your progress with your house and woodwork. Those cabinets in the living room is really nice.

Thank you!

Strange that your printer suddenly started to behave badly. I understand that your adjustment of voltages fixed your problem, or have it come back? My first thought when I saw the bad prints was "is the belts correctly adjusted" because it started so suddenly

It was indeed strange. The precipitating event was I came to check on it during a long print, and it was stopped with the nozzle touching the part. I couldn't cancel or pause or restart. It was like it just glitched out. I don't know if that was due to overheating or what. But after that is when the layer shifts started happening bad. Belts were an early thought for me too, they didn't seem way off or anything, but I did adjust them a lot without improvement.

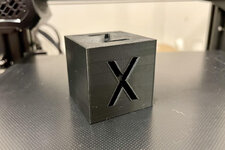
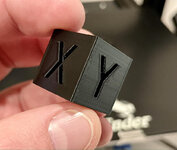
Adjusting the voltages has fixed the layer shifting, and the Y-motor seems to be cooler to the touch. But my print quality still isn't back to where it was when I first got the machine. Comparing one of the first prints I did (an X-Y-Z cube) to a current one, the original is almost perfect and the new one has warping, rough surfaces, blobs, etc. Below, the white cube is the early print, and the black cube is one from yesterday.

IMG-5351.jpg

I've tried messing around with slicer settings, watched lots of YouTubes, but I still don't fully know what I'm doing and I'm not really sure how to fix it.
 

patlun

Well-known member
Joined
Apr 12, 2015
Messages
242
Location
Värmland, Sweden
Ha, @patlun I wish I could speak Swedish! My dad knows a little, but only because he took it in college. To clarify I am an American of Swedish descent (great-grandparents moved to the U.S.). I don't even touch the pickled herring my dad puts out for the holidays. A disappointment, really. :LOL:
I can tell you a secret, that pickled herring is not my favorite food either. :LOL:
It was indeed strange. The precipitating event was I came to check on it during a long print, and it was stopped with the nozzle touching the part. I couldn't cancel or pause or restart. It was like it just glitched out. I don't know if that was due to overheating or what. But after that is when the layer shifts started happening bad. Belts were an early thought for me too, they didn't seem way off or anything, but I did adjust them a lot without improvement.

Adjusting the voltages has fixed the layer shifting, and the Y-motor seems to be cooler to the touch. But my print quality still isn't back to where it was when I first got the machine. Comparing one of the first prints I did (an X-Y-Z cube) to a current one, the original is almost perfect and the new one has warping, rough surfaces, blobs, etc. Below, the white cube is the early print, and the black cube is one from yesterday.

IMG-5351.jpg

I've tried messing around with slicer settings, watched lots of YouTubes, but I still don't fully know what I'm doing and I'm not really sure how to fix it.
PLA?
I get some blobs when the filament is damp. Then i dry it in the oven 50 ℃ (122 ℉ )for 3-4 hours.
Which nozzle temperature are you using? Speed? I have not used my Ender 3 for a while but if i remember correctly I used the default 50mm/s and printed at 210℃ with a generic PLA.
Is the cooling fan running?

all3dp.com have some good guides, search for problems or troubleshooting on that site and see if you find something.

Are you using the latest version of your slicer? I have used Cura 4.12.1 for a while now.
 

Bob Heine

ALLIANCE MEMBER
Joined
Oct 24, 2009
Messages
10,707
Location
Boca Raton, Florida
I don't even touch the pickled herring my dad puts out for the holidays.
Nick, my grandmother was born in Sweden and my grandfather was born in Denmark. They emigrated to England, then Canada and finally to the US. Growing up, Christmas Eve smelled pretty bad because Grandma always served Lutfisk. Lutfisk (Lutefisk in Norway) is dried cod that is brought back to death and served with potatoes, peas and a white sauce. I washed the Lutfisk down with large quantities of pickled herring because it was so much milder. I was afraid something else on the buffet would gag me out worse than the Lutfisk.
 
OP
N

nicholam77

Well-known member
Joined
Dec 18, 2016
Messages
2,672
Location
Minneapolis, MN
I can tell you a secret, that pickled herring is not my favorite food either. :LOL:

Well that makes me feel a little bit better. My dad is always complaining about how the herring is going to die out with him — he knows I'm a lost cause but this XMAS he was trying to get my 3-yr-old to try it. Didn't happen. :ROFLMAO:

PLA?
I get some blobs when the filament is damp. Then i dry it in the oven 50 ℃ (122 ℉ )for 3-4 hours.
Which nozzle temperature are you using? Speed? I have not used my Ender 3 for a while but if i remember correctly I used the default 50mm/s and printed at 210℃ with a generic PLA.
Is the cooling fan running?

all3dp.com have some good guides, search for problems or troubleshooting on that site and see if you find something.

Are you using the latest version of your slicer? I have used Cura 4.12.1 for a while now.

Yep, PLA. Could be damp? It's winter here so relative humidity is fairly low, but I have left it sitting on the spool in the house air for 3+ weeks now. Maybe I'll try the oven trick to see.

Using 200°C for the nozzle temp, printing @ 50mm/s (20mm/s for initial layers). I have tried going slower than 50 mm/s but hasn't seemed to make a noticeable difference. Bed temp is 60°C, although I've tried 50°C as well, same thing don't really notice an impact.

Part cooling fan is running 100% after layer 4. Some of the warping does seem like a cooling issue, but I can't turn the fan up any further haha. On the X-Y-Z cube for example one of the vertical edges looks pretty clean, whereas another is worse. I wonder if the fan is cooling better from one side?

I've been on all3dp.com, definitely some good info, I'll have to circle back. Problem for me is I'm new to it and there are soooo many possible causes and adjustments it's a bit overwhelming when something is off.

I am using Cura, mine is 4.11.0 release but it's the same version I've used all along. So at one point it worked...

Yes, I could update Cura, update the printer firmware, etc, but what I don't understand is the first 30+ prints off the machine were fine with the current setup, then it had that glitch and went downhill.

Nick, my grandmother was born in Sweden and my grandfather was born in Denmark. They emigrated to England, then Canada and finally to the US. Growing up, Christmas Eve smelled pretty bad because Grandma always served Lutfisk. Lutfisk (Lutefisk in Norway) is dried cod that is brought back to death and served with potatoes, peas and a white sauce. I washed the Lutfisk down with large quantities of pickled herring because it was so much milder. I was afraid something else on the buffet would gag me out worse than the Lutfisk.

Very cool, Bob. You always have a relatable story, haha. My grandparents served Lutfisk as well, although I was too young to remember that or partake (thank goodness). I've only heard bad things :ROFLMAO:. They served other traditional Scandinavian fare as well. Thankfully my parents decided to drop the Lutfisk tradition. Sorry you were subjected to it.

Those frames and turned out great, Nick! What a cool idea. I'll have to keep that one in my pocket for a later Christmas.

Thank you! IMO a quality frame and matte go a long way in making a piece of artwork look good. I've done a handful in this style and they aren't too hard since they are squared off and no profiles. The main thing is just having an accurate crosscut sled, and a way to cut the splines accurately. Like @Bakafish said and I painfully re-learned this go around, just don't make them too tight or too loose and you'll be good!

The splines aren't strictly necessary, but it gives me peace of mind they won't fall apart, and I really like the visual detailing of the joint that you don't usually find in store-bought frames.

🍻
 

bdbecker

ALLIANCE MEMBER
Joined
Nov 18, 2015
Messages
5,574
Location
Iowa
Is your PLA brittle when you pull it off the spool? I had a heck of a time burning up a spool of Hatchbox brand filament as it kept wanting to break in random places. This would cause inconsistent feeding, which could contribute to some of the issues you are experiencing. If I pulled a 3-4' chunk of filament off the spool and ran it through my hands to test the pliability, I would usually find at least one spot in that length where it was brittle enough to snap. Sometimes it'd only be an inch or so that was affected, other times it'd snap several times over the course of a foot, and then the rest of the length would feel normal.

I think I just had a bad batch with that spool as Hatchbox seems to be generally well regarded. This spool was also fresh out of the bag and was used up over the course of a week. I probably should have returned it, but this was right in the midst of the pandemic when PLA was hard to come by. Otherwise I've had no issues with running other brands like eSUN, Amazon Basics, and Overture.
 

patlun

Well-known member
Joined
Apr 12, 2015
Messages
242
Location
Värmland, Sweden
I am using Cura, mine is 4.11.0 release but it's the same version I've used all along. So at one point it worked...

Yes, I could update Cura, update the printer firmware, etc, but what I don't understand is the first 30+ prints off the machine were fine with the current setup, then it had that glitch and went downhill.

I think that is the correct approach. Change so few things as possible.

One thing I have done in Cura is to create a new machine (Add Printer) so I have a fresh config and see if that makes any difference. That have saved me a couple of times
 

Bakafish

Well-known member
Joined
Feb 7, 2017
Messages
477
Location
Tokyo
Is your PLA brittle when you pull it off the spool?
Brittle or stringy PLA is almost always moisture issues. PLA is resistant to moisture, but it is affected by it and can even be bad out of the vacuum bag. Dehydrating it is always a good first step.

Adjusting the voltages has fixed the layer shifting, and the Y-motor seems to be cooler to the touch. But my print quality still isn't back to where it was when I first got the machine. Comparing one of the first prints I did (an X-Y-Z cube) to a current one, the original is almost perfect and the new one has warping, rough surfaces, blobs, etc. Below, the white cube is the early print, and the black cube is one from yesterday.
It doesn't look good. 200C seems a bit low, I use 220C (but I do have a hardened steel nozzle which is not as thermally conductive.) Speaking of nozzles, you might be suffering from a partial blockage which is causing poor extrusion quality. It looks like it is under-extruding at the start and end points of each layer. There are "cold pull' methods on the web on how to clean a nozzle, and special cleaning filament that makes that easier, but with cheap Brass nozzles it is easiest to just swap them out (they may have even provided a spare.) Maybe order a handful of 0.6mm (a little bigger than the default 0.4mm improves reliability (less clogging) without sacrificing much quality) brass nozzles and give a fresh one a try.
 
To avoid these ads, REGISTER NOW!
OP
N

nicholam77

Well-known member
Joined
Dec 18, 2016
Messages
2,672
Location
Minneapolis, MN
Is your PLA brittle when you pull it off the spool?

It doesn't seem overly brittle to me, but idk exactly how it should feel. It's not snapping, haha. I'm using Microcenter Inland filament, which I've read is made by Overture and then Microcenter re-brands.

One thing I have done in Cura is to create a new machine (Add Printer) so I have a fresh config and see if that makes any difference. That have saved me a couple of times

Good idea. I may need to go there if I can't get it figured out.

It doesn't look good.

Lol! Yeah, I know. I didn't even realize how bad it was until I looked at that first cube from when the printer was brand new. Aside from the "elephants foot" everything is crisp and silky smooth. And some of my very first prints were drafts of the MFT flip stop, and they are all perfectly smooth. Yes, they are just squared off rectangles, but they look great. My latest prints do not look good.

Speaking of nozzles, you might be suffering from a partial blockage which is causing poor extrusion quality. It looks like it is under-extruding at the start and end points of each layer.

Great idea. I did have a "spaghetti monster" print that I didn't catch right away, not sure if that could have clogged something? I swapped the nozzle out just now (it did come with a spare!), and have loaded another X-Y-Z cube. 30min and we'll see.
 

loganb

ALLIANCE MEMBER
Joined
Dec 29, 2011
Messages
5,579
Location
Omaha, NE
Was gonna comment as well, 200C is colder then I run PLA on, mine is normally at 215, one I found seems to like 220 better...don't recall which though.

Also agree with Baka that a nozzle change to .6 may help with flow and clogging even though you don't have enough hours on it to wear the factory one out....and if it does nothing it means it's one thing less to worry about. If you do change nozzle diameter don't forget to reslice with the new nozzle diameter instead of just running an old program sliced at a .4 nozzle! And if you find no issues or difference with the .6 it means you can just print stuff faster!

And awesome work on those frames...turned out great!
 

Bakafish

Well-known member
Joined
Feb 7, 2017
Messages
477
Location
Tokyo
I did have a "spaghetti monster" print that I didn't catch right away, not sure if that could have clogged something?
My experience is that the Creality hot end can develop a small gap between the nozzle and the bowden tube inside of the hotend. This leads to filament filling that gap and degrading as it is no longer part of the flow. The degraded material will then create restricted flow and can shed small insoluble bits that can block the nozzle or stick to the side and cause extrusion issues. There is a pretty simple "fix" where you cut a short section of the boden tube and that section is held firmly in place by a (printable) spacer and the top fitting so that gap can't develop. I've used a variant of that solution for some time successfully.

Also, I should have mentioned that changing the nozzle should be done when it is at temperature, and you should make sure to clean any cruft from the hotend when you are in there. There are good YouTube instructional videos for the 'fix' I mentioned above and proper nozzle changes. These Creality machines are a little fiddly at first, but once they are working they tend to be very stable.
 
OP
N

nicholam77

Well-known member
Joined
Dec 18, 2016
Messages
2,672
Location
Minneapolis, MN
200C seems a bit low, I use 220C
Was gonna comment as well, 200C is colder then I run PLA on, mine is normally at 215, one I found seems to like 220 better...
I run PLA between 215 and 220.

Wow ok, I guess maybe I've been running it low? But again it worked well at one point... the printer's default "preheat PLA" is 200C, and so is the default Ender 3 Cura profile, as well as some articles I read so that's why I was in that zone. So I can learn, what's the reason for running it hotter? What does that help?


Also agree with Baka that a nozzle change to .6 may help with flow and clogging even though you don't have enough hours on it to wear the factory one out....
Also, I should have mentioned that changing the nozzle should be done when it is at temperature, and you should make sure to clean any cruft from the hotend when you are in there.

Thanks, I did look up a YouTube on how to do it, so I did do it with the nozzle heated 😁 . There was a little goop from my spaghetti monster incident that wiped away easily.

I printed some new X-Y-Z cubes at 215°C and 220°C with the new nozzle. Similar defects. But they came out super glossy and shiny compared to anything else I've printed. What's up with that? Have to say I like the matte look better...

IMG-5363.jpg


My experience is that the Creality hot end can develop a small gap between the nozzle and the bowden tube inside of the hotend.
I forgot about that one. I did it very early on.

Hmmm, ok, another thing to look up and try!

I would really like to get past this troubleshooting and back to printing stuff! Thanks for the help, everyone.

🍻
 

Bakafish

Well-known member
Joined
Feb 7, 2017
Messages
477
Location
Tokyo
I printed some new X-Y-Z cubes at 215°C and 220°C with the new nozzle. Similar defects. But they came out super glossy and shiny compared to anything else I've printed. What's up with that? Have to say I like the matte look better...
Higher temps typically improve layer adhesion and therefore increase strength. Matte may look better, but it shows you are on the low side of the temperature range, there are more matte filaments available if that finish is preferable although 'shiny' seems more popular these days.

I keep looking at those test blocks and trying to theorize what is going on. There is some latency between the extruder and the motion in the axis you are showing us. It is really struggling with those transitions at the edges and around the X relief. That right side corner looks lazy, like it isn't quite in position before changing directions (or it is under-extruding and pulling the corner in.) It isn't clear if the other axis are showing similar artifacts, but I got the impression it is only happening in one axis, which makes everything about that axis suspect. You said it can move freely by hand when the power is off, but is there any slop (backlash) when changing directions before you can feel the motor drag? Are the belts properly tensioned? Have you adjusted the eccentric nuts on the plastic guide wheels to ensure they only have linear movement? The belt and wheels under the bed are important as well. Oh, and check the tightness and cleanliness of the extruder gear as it is held on by a small grub screw that can loosen causing it to slip or lose alignment with the filament.
 
OP
N

nicholam77

Well-known member
Joined
Dec 18, 2016
Messages
2,672
Location
Minneapolis, MN
Higher temps typically improve layer adhesion and therefore increase strength. Matte may look better, but it shows you are on the low side of the temperature range, there are more matte filaments available if that finish is preferable although 'shiny' seems more popular these days.

Got it, thanks!

There is some latency between the extruder and the motion in the axis you are showing us. It is really struggling with those transitions at the edges and around the X relief. That right side corner looks lazy, like it isn't quite in position before changing directions (or it is under-extruding and pulling the corner in.) It isn't clear if the other axis are showing similar artifacts, but I got the impression it is only happening in one axis, which makes everything about that axis suspect. You said it can move freely by hand when the power is off, but is there any slop (backlash) when changing directions before you can feel the motor drag? Are the belts properly tensioned? Have you adjusted the eccentric nuts on the plastic guide wheels to ensure they only have linear movement? The belt and wheels under the bed are important as well. Oh, and check the tightness and cleanliness of the extruder gear as it is held on by a small grub screw that can loosen causing it to slip or lose alignment with the filament.

It's sort of one-sided. On the XYZ cube there are similar deformations on the X and Y reliefs, as well as the two corner edges of the cube on the Y side are a bit saggy. The two corners on the X side are better. I was wondering if it could be a part cooling fan thing because the fan duct is only on one side of the nozzle.

The X axis could move freely by hand, but there are some moments that feel like a "positive detent" where it wants to pause or snag. Changing directions no slop. I've actually since loosened the eccentric nut and now it slides more freely but I still feel those small bumps. I keep reading "make sure all the eccentric nuts, belts, and other bolts are tight", but I don't really have a gauge as to how tight. I'm using my best judgement but I'm sure there's "too tight" as well.

Extruder gear grub screw is tight. Some small filament fragments but pretty clean.

Can you slow the speed down across the board by 50% and see how a cube comes out?

I haven't tried this as I've been on a mission (see next post), but I've been printing at 50 mm/s for infill, 25 mm/s for walls. I guess I could halve that to see what happens, but I feel like I should be able to print the XYZ cube at those speeds.
 
OP
N

nicholam77

Well-known member
Joined
Dec 18, 2016
Messages
2,672
Location
Minneapolis, MN
3D Printer Mayhem

This thing is driving me nuts. But let's start out with a few positive things.

The layer shifting seems to have pretty much gone away since adjusting the stepper motor voltages. 👍

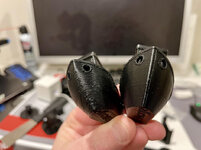
And after completing that, I finally managed to print the rest of my paper towel holders for the garage:
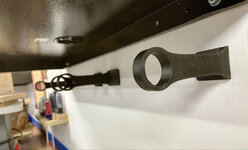
IMG_5261.jpg

IMG_5264.jpg

They work pretty well and get them off my bench top.

So it was a bit after this I wanted to dial it in even more and got stuck on the XYZ cube. Why that? Because it's one of the first things I printed when I got the printer, and that one turned out really clean. So I know it can, or could, do it. And it's small and doesn't take too long to print (~30min).

Obviously I've been posting my less-than-great cubes here the past few posts. Lots of good advice and some of it I've tried and some of it I haven't gotten too. (Trying to balance this "hobby" with work and family life).

Things I haven't tried:
— bowden tube fix
— printing the cube at half speed
— attempting to dry the filament in the oven
— update firmware

I'll get to those. But let's cover a few things I have done.

Per @Bakafish's advice I disassembled the hot end to check for leaks around the bottom of the bowden tube.
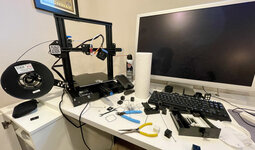
IMG-5366.jpg

Yeah, my office is turning into a ripe old mess.
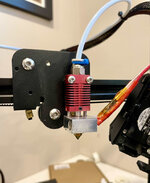
IMG-5367.jpg

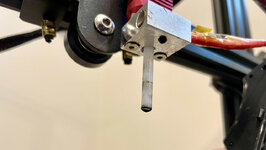
I cleaned up the bottom of the hot end and had previously changed the nozzle (to another spare Creality one that came with the printer).

Now I removed the bowden tube, gave it a fresh perpendicular cut, and that reamed it through the hot end to clear any gunk.
IMG-5368.jpg

There was some. Not a ton but definitely some to wipe away. About 3 passes and it came clean. Then I put everything back together, hopefully seated it well.

As mentioned above I haven't done the "fix", I assume this part on Thingiverse, but mean to get to it when I can.

Printed another cube and still some issues.

Then I started working through the Teaching Tech calibration steps. YES, I know I should have done this in the beginning and before complaining on here about how things aren't working right. Shame on me. But in the beginning things seemed to be working ok and I was more excited to print stuff than do a bunch of tests.

First up PID autotune. I attempted to use Pronto Pup Face (Pronterface, but for some reason that's how my brain likes to read it), and it was controlling the printer (could turn fans on and off, etc), but when I ran the autotune it never gave results. I abandoned and sent the G-code through Octoprint instead (yes, I got that set up, more later in this post). So, PID tune done.

Next was E-steps, this came out not so good. It was extruding 8mm under 100.

Esteps.png

I corrected the value and next extrusion came in within 1mm, so I called it good. Everyone suggests using calipers for this, but I happened to get a Paolini Pocket Rule for Xmas and it seemed like a great opportunity to use it. 😁

IMG-5388.jpg

After these two steps I re-leveled the bed and printed another XYZ cube, and while not perfect, it was my best so far since everything went downhill and I started getting obsessed with little plastic cubes. So that was encouraging.

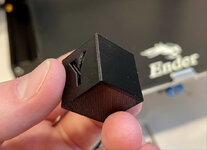
IMG-5381.jpg

IMG-5383.jpg

There's still some deformation on the X and Y relief, but the edges / corners looked much better, wasn't warped, pretty smooth, etc.

Of course I didn't stop there and had to go ahead a take 1 step forward and 10 steps back.

But first let's take a short break and talk about Octoprint. I got lucky and sourced a Raspberry Pi Zero 2 for ~$15 (Octoprint certified), power supply, micro SD, USB cable etc. All in under $45. I wanted to not break the bank on this, especially with a malfunctioning printer, so that's why I chose the Zero 2.

Install was super easy using the Raspberry Pi Imager. Was even able to set up the WiFi credentials and bonjour host name before even powering on the Pi.

rpi-imager.png

Got it powered on and first thing I noticed was BAM! firmware error message.

octoprint-firmware-broken.png

So I guess this is another strike against Creality, it doesn't format the temperature reporting correctly so Octoprint can't draw the graphs. Fortunately there is a plugin fix called Creality 2x temperature reporting fix that seems to solve it.

One interesting side effect is the Pi powers the Ender touch screen through the USB port 5v pin. This is annoying because I like to turn the printer off when not using it, but I'd be fine leaving the Pi and Octoprint server running. But that keeps the screen on. So I have to power down both.

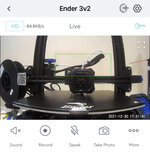
With all the test prints I've been doing, I set up an unused Wyze Cam so I could check in on things while upstairs.
IMG-5385.jpg

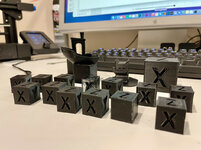
Then I went on a Cura profile binge, watching many videos, tweaking temperature, acceleration, jerk, retraction, all that good stuff. And printed a bunch more cubes. And a benchy. And some calicats. And things were not improving, and in some cases getting worse.

Getting quite a collection now.
IMG-5461.jpg

Not getting results I wanted, I jumped back into the Teaching Tech series and tried to calibrate the Flow. This involved printing some thin-walled open cubes and measuring the wall thickness. Mine came out saying my Flow should be 80 instead of 100. I have no idea what a normal correction would be but that seems like a big change?

More cubes with less flow. Tried 80, 90, 95. None looked as good as the original and still had the deformations in places.

So then I thought I'd update to the latest Cura. Just to see. Did that, no improvements.

Then... I was watching some CHEP videos on YouTube and saw one where he boasts his Ender Cura profile is so good you don't even need to run the part cooling fan on a Benchy. So I went to his website, dowloaded it for the latest version of Cura, hoping this would give me a good starting place for settings I'm really just taking some wild guesses at outside of what I've read online.

Printed a cube with his profile, and let's just say it wasn't the best: :ROFLMAO:

IMG-5464.jpg

I've spent hours and hours on this now and I'm going in the wrong direction!!

Ok, fired it up again because spaghetti monsters can happen.

IMG-5465.jpg

Dear god, still horrendous.

IMG-5466.jpg

So why does this profile work so good for CHEP but do this on mine?!?

Maybe the bowden tube made a clog again? Maybe my filament is bad? I did loosen the eccentric nuts on the X and Z axis a bit, I thought maybe they were overtightened. It's really hard to adjust just one thing at a time. And I feel like the more I test and learn the less I really know.

They say insanity is doing the same thing over and over while expecting different results. Well my version is no matter what I do, the results are always garbage, lol. And it is definitely driving me insane.

Anyways, this morning I went back to my own profile and am currently printing a 200% scaled XYZ cube to see if a larger model might go a little cleaner. Then going to follow up with some of the things I haven't done, and get some new filament.

🍻
 

patlun

Well-known member
Joined
Apr 12, 2015
Messages
242
Location
Värmland, Sweden
3D Printer Mayhem


One interesting side effect is the Pi powers the Ender touch screen through the USB port 5v pin. This is annoying because I like to turn the printer off when not using it, but I'd be fine leaving the Pi and Octoprint server running. But that keeps the screen on. So I have to power down both.

I had that problem with my CR-10S, I bought a "power blocker" for USB. Watch out when looking for those, most are data blockers

Wow you have really worked hard.
 
OP
N

nicholam77

Well-known member
Joined
Dec 18, 2016
Messages
2,672
Location
Minneapolis, MN
I had that problem with my CR-10S, I bought a "power blocker" for USB. Watch out when looking for those, most are data blockers

Thanks Patrik. I haven't found one for the Micro USB that the Pi Zero 2 (and printer) uses. I supposed I could use an adapter off the Pi to USB A and then get a USB A --> Micro cable. Definitely something to think about since I'd rather leave the Pi and Octoprint server running.
 
OP
N

nicholam77

Well-known member
Joined
Dec 18, 2016
Messages
2,672
Location
Minneapolis, MN
Print Tests Continued

Picking up where I left off, here are the results of that 200% scale XYZ cube:

IMG-5472.jpg

IMG-5473.jpg

Tiny deformations in the triangle tip of the X and Y, but overall much better. Much better corners and smoother surfaces.

This was with my own profile (not that crazy CHEP one!) at 215°C.

I've printed the 100% scale cubes with the same settings and slightly worse results. I still have a theory that there's a part cooling / stress issue going on. It seems like the larger print and therefore larger layer times helped.

To test this I printed two of the small 20mm cubes at the same time. Thereby increasing the layer time for both.

IMG-5475.jpg

My pics look better or worse depending on the lighting now that they are glossier finish at higher print temp. But in real life, they look similar quality to the 200% scale cube. So again... longer layer times good. Also, I printed them in different orientations, and the X and Y came out worse on the side away from where the part cooling fan duct points. This is consistent with my single prints where the far side was worse. So it sort of rules out the actual shape of the model or some other settings. It must have something either to do with a specific axis, or the part cooling being one-sided.

Here's some close ups:

IMG-5471.jpg


Then @loganb this is for you — I printed a single cube at half speed. That came to 25mm/s for infill, 12.5mm/s for walls, and 12.5mm/s for initial layers. So... pretty dang slow. But the results were pretty good. Again showing that longer layer times is helping.

IMG-5486.jpg

IMG-5487.jpg

It's not perfection but I'm still encouraged. Enough so that I tried another Benchy.

IMG-5488.jpg

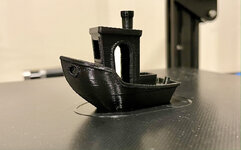
It's better than my first. If you compare the first one on the left and the new one on the right, the hull is much smoother:

IMG-5492.jpg

Still far from a perfect print but it's not a disaster.

As it was printing I heard some crackle pops, which I read is a sign of wet filament. My filament has been sitting on the spool in the open air for awhile now. I'm sure it's one of my problems. Feeling guilty I've popped it in the oven...

IMG-5489.jpg

Another XYZ cube or Benchy coming late tonight or tomorrow morning after it's been "dried", and if that helps hopefully I'll stop boring everyone with my struggles. :ROFLMAO:
 

kaymccampbell

Well-known member
Joined
Feb 27, 2015
Messages
29,584
Location
Upstate New York
Having even cooling improved my Ender experience. Thingiverse has a ton of part coolers for the Ender. I took one and modified it, because I didn't like the internal airflow. I'll have to go down to the shop and see which one it was derived from.
 

T-handle

Well-known member
Joined
Jun 17, 2019
Messages
440
Location
Northern Ostrobothnia Finland
Hi Nick and Happy New Year!

Sorry to hear your printer is acting up! I read the whole story and with my experience can't really say what's wrong.. I hope you are not mad at me that I recommended this kind of garbage 😬

My best guess is some kind of mechanical malfunction if it started from the spaghetti monster.. Maybe some kind of stepping over the belt or a broken stepper motor. It's weird that it's working with bigger parts, or is it?

I replaced my bowden tube which came with new springs. I'm not sure what material is it but it says suitable for ABS and it's blue:LOL:

I had some clogging issues with the wood filament but after I cleaned it up it's been working fine since then. I've been mainly printing Pla and Petg..

I hope you get yours working soon or maybe replaced it with warranty..
 
OP
N

nicholam77

Well-known member
Joined
Dec 18, 2016
Messages
2,672
Location
Minneapolis, MN
Having even cooling improved my Ender experience. Thingiverse has a ton of part coolers for the Ender. I took one and modified it, because I didn't like the internal airflow. I'll have to go down to the shop and see which one it was derived from.

Good to know, Kay. I've looked at all the part coolers but I have no idea what's best haha. If it's not too much trouble I'd be curious which one you use if you're happy with it. Did you have to print it with PETG or something? Would PLA melt? I haven't tried anything but PLA so far...

Also, do you know if you're using the stock fans with it? Or did you upgrade those, too?

Hi Nick and Happy New Year!

Sorry to hear your printer is acting up! I read the whole story and with my experience can't really say what's wrong.. I hope you are not mad at me that I recommended this kind of garbage 😬

Thanks Tapio, Happy New Year to you, too! Not mad at all, I was quite enjoying it for awhile there, and I think I'm on the road to getting back in business.

My best guess is some kind of mechanical malfunction if it started from the spaghetti monster.. Maybe some kind of stepping over the belt or a broken stepper motor. It's weird that it's working with bigger parts, or is it?

Yeah no idea what the initial freak out the machine had that caused the layer shifting and for it to go bananas. It is working ok with bigger parts, especially simple shapes. Struggles more with angles. But as you can see from the Benchy's it's doing alright, just not perfect surfaces.

Part of that was on me for not doing the calibration stuff from the get go, but like I said at one point I was happy with the performance. My E-steps were a whole 8mm short, but that may have changed or gotten worse when I adjusted the stepper motor voltages (I adjusted all of them, including the Extruder motor).

I hope you get yours working soon or maybe replaced it with warranty..

Me too! I feel like I'm close. Or at least close enough to make larger prints for the garage again. Not gonna win any awards with my Benchy's or calibration cubes, but at the end of the day if it can print passable functional stuff for the garage I'm ok with that. I'm going to keep trying to dial it in, though.

I've heard Creality is a nightmare to deal with warranty claims. Apparently they make you submit video evidence of the problem and try to trouble shoot it with you ad nauseam including what I consider things you shouldn't have to do (like adjusting the stepper motor voltages). Basically every attempt to not fulfill the warranty claim. Since there isn't a super obvious problem with mine like a dead motor or snapped belt or something, they could and probably would just say I need to change any of the million of parameters and calibrations one is expected to do to get good prints.
 

Mr. Roboto

Well-known member
Joined
Dec 11, 2012
Messages
2,160
Location
New Hampshire
My goodness, I just finished getting caught up on all of your 3D printer woes..... I admire your dedication to it! Definitely something new for you to keep busy with, and I'm sure that having it in your basement makes getting the time to tinker much easier than getting out to the garage. I love that you set up a camera there, too! It's super convenient having a printer at your disposal, I'd imagine. Having run 3D modeling software all day every day for 2 years straight (this was 10 year ago at this point....man, time flies) I've often thought about getting one to tinker with. I'm also into PCs, electronics etc so it checks off a lot of boxes for me.... but I'm not quite sure this is a rabbit hole I am ready to dive down after seeing what you're going through. Looks like you are making some great progress though in working out the bugs! Eager to see where you go from here.
 
OP
N

nicholam77

Well-known member
Joined
Dec 18, 2016
Messages
2,672
Location
Minneapolis, MN
Me-thinks I'll stay out of this game.

Fair enough 😁. It's definitely been frustrating at moments. The other thing is, despite sites like Thingiverse having a lot of free models designed by others, in my opinion a lot of it is junk. At least for me personally, yeah there are a lot of nice models on there but I can see myself reaching a threshold and running out of pre-designed stuff sooner than later. Enter the second component... 3D modeling. I don't know if I'll get there. But to me that's the true excitement about it. And without that skill I think it's kind of a novelty. Not to say it isn't fun to print other people's stuff, just that I can't see the printer running 24/7 indefinitely for that.

My goodness, I just finished getting caught up on all of your 3D printer woes..... I admire your dedication to it! Definitely something new for you to keep busy with, and I'm sure that having it in your basement makes getting the time to tinker much easier than getting out to the garage. I love that you set up a camera there, too! It's super convenient having a printer at your disposal, I'd imagine. Having run 3D modeling software all day every day for 2 years straight (this was 10 year ago at this point....man, time flies) I've often thought about getting one to tinker with. I'm also into PCs, electronics etc so it checks off a lot of boxes for me.... but I'm not quite sure this is a rabbit hole I am ready to dive down after seeing what you're going through. Looks like you are making some great progress though in working out the bugs! Eager to see where you go from here.

Ha! Yes, keeping me busy is an understatement. For sure nice to have something to tinker with indoors. My home office is in the basement so even if I have 10min downtime at work (read: home) I can start a print or click around in Cura. The garage is currently a frozen tundra. Not that it hasn't stopped me before, but that + the baby waking and my 3-yr-old getting out of bed it's much more enticing to stay in the house where it's warm and convenient.

I feel like you'd be right at home with it. I wouldn't take my problems as the norm. Plenty of others on this board even with the same printer or similar and no major complaints (that I've read, anyways). I've discovered there's definitely a problem-solving, tinkering element that comes with it, but I don't mind that as long as I can get to the fix. Some of the issues I've had have been user error, too, there's a bit of a learning curve.

No pressure but with your 3D modeling background... 😄
 

kaymccampbell

Well-known member
Joined
Feb 27, 2015
Messages
29,584
Location
Upstate New York
Good to know, Kay. I've looked at all the part coolers but I have no idea what's best haha. If it's not too much trouble I'd be curious which one you use if you're happy with it. Did you have to print it with PETG or something? Would PLA melt? I haven't tried anything but PLA so far...

Also, do you know if you're using the stock fans with it? Or did you upgrade those, too?
This is the v2 of the one I printed. It pretty much incorporates what I did to the file I originally downloaded. It works really well. It uses all the original hardware. I've been running mine printed in PLA for a long time with no problems. Like years.


I'm still running stock fans.

You may need to juggle the harness a bit to get everything to play nice. It only takes a minute. On mine, the part cooler duct didn't want to clip on to the heater duct too well. It was a touch wobbly. Might have been my mods, might have been the original design. I used a bit of CA glue to steady it.
 
To avoid these ads, REGISTER NOW!
Top Bottom