They wrapped up the sheet metal/building on the 7th of Dec. On the 8th my buddy came and helped me pull the wire. I was planning to pull 3x 250kcmil wire and 4x 4/0 wires at once. The 250's would be for 200 amp single phase and the 4/0 for future 3 phase service but for now I just shelved the 4/0.
To communicate while doing the pull we used my Hollyland full duplex wireless headsets, same ones I used with my brother when we drove back from Washington. They are very nice because you can both talk at once unlike walkie talkies that are one way!
Actually picked up the wire back on Nov 13th with the 55. They sent an 18 wheeler so I drove down and met him at a gas station. He had a lift gate so we just slid the whole pallet into the bed of the truck.

The building guys had left their steel sawhorses so we borrowed them to hold the wire spool. the axle was a piece of drill stem I cut from the old antenna pole on the house that now holds the starlink antenna.

My buddy recommended using a brush to apply the lube to the wire, I had just seen an old brush in the woods a few days before and it worked perfectly clamped to the purlin!

We first used a vacuum to pull a grocery bag attached to a string line through the 3" conduit. Then used the string line to pull the Mule tape through. We installed the giant chinese finger puzzle puller to the wire, then half hitches up the wire with electrical tape to hold it in place. Funnel at the front to help guide it but probably not needed. In fact the puller didn't do any work either, the half hitches were the only part that were pulling and worked fine.

Mule tape running past the brush with an extra string line in the hopes of future pulling but this line got cut.

On the pulling end we used his straps to pull from the nearby trees, if the power pole wasn't completely rotten we could have pulled off that but I can push on the pole with one finger and it moves alot. When I pushed on the pole it moved enough a wasp came out of an electrical box to investigate!

So we have the mule tape running through his ****** block to my red truck, this support ended up being too high and I lowered it down to the vacuum level because it was nearby.

Ready on the pulling end!

Bought two of these bottles but only ended up using half of one, my buddy poured it on the wire as it ran into the hole past the brush. The chinese finger trap puller came with a set of white gloves he wore while applying the lube.

All pulled through with no issues.


![IMG_20210119_121534272[1].jpg](https://www.garagejournal.com/forum/data/attachments/2103/2103022-be1f6b7f4ee1b0faf1460af672e5f3de.jpg "IMG_20210119_121534272[1].jpg")
![IMG_20210119_121643993_HDR[1].jpg](https://www.garagejournal.com/forum/data/attachments/2103/2103021-58c00aea1526b833540b72dd58c2b1e5.jpg "IMG_20210119_121643993_HDR[1].jpg")
![IMG_20211020_164354378[1].jpg](https://www.garagejournal.com/forum/data/attachments/2103/2103024-d968582f52f3a19005f9e6fe0b4ae24a.jpg "IMG_20211020_164354378[1].jpg")
![IMG_20211020_163906923[1].jpg](https://www.garagejournal.com/forum/data/attachments/2103/2103025-e0f0674c8c96c161135fcab9dd42ab46.jpg "IMG_20211020_163906923[1].jpg")


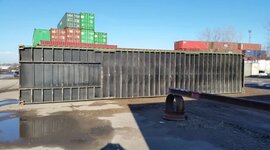
 I have been investigating "Fast-Tube" forms and with your success I think I will try them underneath a 40ft shipping container I am setting this spring.