To avoid these ads, REGISTER NOW!

One Car Garage Project for a Car Guy

N0tt0N

Well-known member
Joined
Sep 26, 2013
Messages
229
Location
DC
I've just begun a one car garage build project. I've been reading and learning so much from this site and from all the excellent contributions that I felt I should share a bit as well.

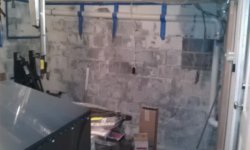
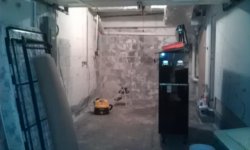
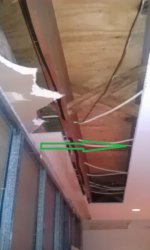
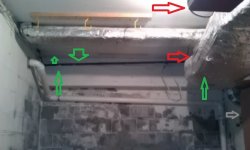
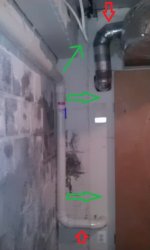
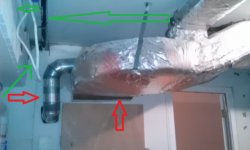
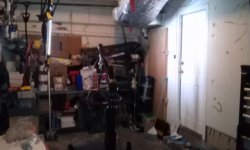
My garage, new to me for the last two years, is a small one-car garage (roughly 10’ wide by 20’ deep#. It has some legacy gorilla-style shelving in the far back and everything in the garage appears to have been randomly placed over the last twenty years #i.e., the radon evacuation vent is here and the foundation hole is here so let’s just run the 3-inch PVC pipe more or less straight across instead of hugging the corners or valences#. The left wall and the back wall are block and the right wall, the house side, is a metal studwall atop a block footer with double 5/8” on the garage side and ½” on the house side. There were some 70s-style plywood sheets with the fake vertical boards on the garage side as well with some 12” Stanley L-bracket shelving along the right wall. Main power comes in right in the middle of the left wall, of course. There’s an aging garage door opener and a single bare bulb next to it as the only light sources. No AC, no heat. Awkward undersized door leading to the HVAC backside for maintenance and filters at the back of the right wall after the door to the house in the middle of the right wall. Ceiling is drywall as well #haven’t taken a close look – assuming code required some heavy application. Random hooks, shelves, etc. scattered around the walls and ceiling. Exposed insulation wrapped house HVAC ducting. So, your basic 70s garage for people that just store stuff in it.

I like to work on my cars. This garage is a PITA for that. At just under 10” wide it is too narrow for a traditional lift. With 12” of shelving on the right and the fuse box on the left the car has to be exactly centered so you can squeeze in the doors and job yourself in the kidney every time you turn around. My tool box can’t go against any walls because of the gorilla shelving full of paint cans, cr*p, etc. I’ve been accumulating tools, parts, and even a spare engine until now I can’t even get the car in the garage enough the shut the door. Enough!

So, after reading this site for hours for some really awesome ideas I’ve begun the re-build! I am particularly inspired by several of the small garage threads like dubber’s “Dubber’s single”, allin0n72’s “Single car garage in Indianapolis” and also by Jack Olsen’s 12 Gauge Garage. Of course, the big garage threads are cool but I must work within the hole I’ve been given!

What I’ve done so far:
  1. 1. Spent two years working on my car and establishing a decent idea of what I want to do. My father was an architectural engineer and always said that the best way to decide where to put things like sidewalks is to leave them out and come back a year later and pave over the dirt paths in the grass. I’ve given things enough run time to not be hypothetical.
  2. 2. I’ve found that one of the most nerve wracking things to do is jack up a Porsche onto tall jack stands in a narrow garage. Talk about a high-pucker factor :scared:. I found an incredible lift that’s perfect for what I want called an EZCarLift that designed to 4,400 lbs. Works off an electric drill and stores in a 12” by 12” spot against the wall once you remove 4 nuts to disassemble it. It weighs less than 140 lbs and fits in a trunk with a back seat folded down - genius and highly recommended. I also got the drive over accessory so I don’t have to assemble it under the car.
  3. 3. Started on the left block wall removing random nails, screws, POTS junction boxes, and patching holes and cracks in preparation for a Dry-Lock Extreme application. There are the usual patches of paint flaking away on certain blocks but no real water issues or dampness. I’m being cautious as the rear wall and most of the left wall are below grade.
  4. 4. Removed the sucker punch shelves and the family room plywood from the right wall.
  5. 5. Sorting through all the cr*p and inventory and organize tools, parts, supplies in preparation for the design.

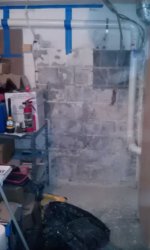
Here are some pictures as of today. I'll outline my plans next.
 

Attachments

  • IMAG0356.jpg
    IMAG0356.jpg
    92.8 KB · Views: 1,734
  • IMAG0357.jpg
    IMAG0357.jpg
    88.1 KB · Views: 1,565
  • IMAG0358.jpg
    IMAG0358.jpg
    72.7 KB · Views: 1,393
  • IMAG0359.jpg
    IMAG0359.jpg
    80.9 KB · Views: 1,350
To avoid these ads, REGISTER NOW!

dubber

Well-known member
Joined
Dec 31, 2012
Messages
5,326
Location
Canada's Capital
Welcome! I love seeing another single garage build pop up on here. I'm eagerly anticipating this. Good luck :thumbup:
 

Thruxton

Well-known member
Joined
Dec 30, 2010
Messages
767
Location
Virginia
Your working space is about the same as mine, although my shop size is 19 X 19. I can barely get my 928 inside and getting out of it when I do requires some major contortions. My lift solution was a scissors lift and I am absolutely delighted with it. Just went through suspension, brakes, wheel bearings, CV joint boots etc- absolutely impossible for me without it. Sounds like the EZ is a good solution for you. Looking forward to more pics.
 
OP
N

N0tt0N

Well-known member
Joined
Sep 26, 2013
Messages
229
Location
DC
dubber: I have a lot to live up to after your build!

Thruxton: I am totally stealing your carriage doors if I can possibly get it to work! I hate the overhead door and all the wasted/blocked space it creates. Love to see other Porsches!
 

Thruxton

Well-known member
Joined
Dec 30, 2010
Messages
767
Location
Virginia
dubber: I have a lot to live up to after your build!

Thruxton: I am totally stealing your carriage doors if I can possibly get it to work! I hate the overhead door and all the wasted/blocked space it creates. Love to see other Porsches!

Thanks! And I forgot to ask, what model is your P-car? Also, your dad's approach to designing walkways should be a) required training in all architectural schools, and b) made into law...
 
OP
N

N0tt0N

Well-known member
Joined
Sep 26, 2013
Messages
229
Location
DC
Thruxton: I have a 2006 Cayman S. I nice little sister to your 928! I have some projects planned for it as well hence the need for a re-build of the garage.

Jack Olsen: Thank you! Your build has convinced me to go with porcelain as the floor. Your video wailing away with the hammer was conclusive!
 

Attachments

  • IMAG0394.jpg
    IMAG0394.jpg
    109.8 KB · Views: 235

Thruxton

Well-known member
Joined
Dec 30, 2010
Messages
767
Location
Virginia
Thruxton: I have a 2006 Cayman S. I nice little sister to your 928! I have some projects planned for it as well hence the need for a re-build of the garage.

Jack Olsen: Thank you! Your build has convinced me to go with porcelain as the floor. Your video wailing away with the hammer was conclusive!

Really nice! Best looking Porsche since, well, you know... I really do like that car! And I like your choice of porcelain, too. Looking forward to progress pics.
 
OP
N

N0tt0N

Well-known member
Joined
Sep 26, 2013
Messages
229
Location
DC
Update for 10/8/2013

I had a productive weekend and beginning of the week. I have a first draft of my design for the garage. I’m still working out the details about where the detail items should go (power, lights, etc.). Some of these items need to wait until I can review solutions for the garage door.

The basic idea is to push everything to the end of the garage and up as high as possible to maximize the space. Since I have a black rolling toolbox already, I am planning cabinets around it so I can store some things behind it and still get access to the HVAC panel. I’ve decided to go with Moduline Cabinets in red – Tim Cass was super helpful testing ideas with me and sharing what some other folks had done. I decided not to go with the ever-popular black cabinets because I didn’t want to visually close down the space. I’m pretty sure I will go with Storewall Heavy Duty in white for the wall system. I have the samples and they are impressive. I have yet to pick out the porcelain tiles – I plan a visit to a place in DC called Stone Source that should have a broader selection than HD or Lowe’s – most of their’s looked like either fake marble or concrete and I didn’t want white. Hoping to find something in the medium to light charcoal gray, perhaps with some interesting shapes (24”x24” or 12”x36” for some visual interest to draw the eye in along the slatwall lines. So, gray floor – white walls – red cabinets – black toolbox. I’ve done some simple renders to test the ideas.

Since I want to lay the porcelain wall-to-wall and possible up the wall 6-12” it has to go in first. Then the cabinets. Then the slatwall. Somewhere before or after the floor I need to get the wiring done. Somewhere before the cabinets I need to move the interior wall in by 16” to make room for the sliding door cabinets (can’t stick into the garage so the foyer looses!). Planning shows I need to address at least one of the random placement issues of the radon evacuation pipe – shouldn’t be too tough since its PVC and only moving air. You’ll see in the plans why.

To get the floor in, of course, everything else needs to get out. Secondary planning needed for neighbor friendly shed on side of house for big things (hoist, engine stand, bikes, lawn stuff, etc.). I had a spare engine sitting on a palet that I had to hoist up onto the engine stand so I could easily move it around – should be interesting what to do with it and the tool chest while the tiles are going in  - 2 stage tile job? So got that done.
I also started demolishing the gorilla-style shelves so I can continue chipping and patching the brick and block. I also began taping out the cabinets for real-life double checking!

First issue to work through. When I initially measured the garage I had measure at the front near the door. Then I ordered the cabinets. Then I re-measured. Then I changed the order. Tim was great in changing the order. I had to narrow down two of the cabinets as the far back of the garage was slightly narrower and actually has block for about 6” on the right wall that I thought was drywall since it was hidden behind the shelves. Sorry Dad (measure twice, cut once) – but at least I caught it!

Second issue needs some thought. Given the design criteria to maximize space I was hoping to mount as much as possible directly to the blocks and run the necessary power on the outside or in vertical boxes. I know running everything behind the slatwall and cabinets would look a lot cleaner but I hate to lose even a few inches in width. It may be moot on the back wall as the placement of the radon evacuation pipe as it exits the house near the gas line is freakin 4” too far from the back wall and will interfere with the transitional shelf that takes the wall cabinets above the work desk up to the wall cabinets high on the left wall. I’ve got to creatively solve the gap. You can see on the taped out picture that if I want the cabinets to be flush together (wife says the gap would be fine – I don’t think so!) I need to move the back wall cabinets out about 4” (I could build a box with 2”x4”s like a stud wall) and down an inch. This wouldn’t be too bad since then I can run all the lines through the box to drop under the wall cabinets for lights and electric. Still thinking…

Some toys came in as well – two Reelcraft 50' reels, one for power and one for air that I plan on mounting on the ceiling. Yay!
 

Attachments

  • Garage_moduline_BackWall.jpg
    Garage_moduline_BackWall.jpg
    19.6 KB · Views: 391
  • Garage_moduline_SideWall.jpg
    Garage_moduline_SideWall.jpg
    19.1 KB · Views: 299
  • Garage_moduline_Slatwall.jpg
    Garage_moduline_Slatwall.jpg
    20.7 KB · Views: 271
  • Garage_moduline_Radon.jpg
    Garage_moduline_Radon.jpg
    16 KB · Views: 279
  • Radon1.jpg
    Radon1.jpg
    57.6 KB · Views: 425
  • Radon2.jpg
    Radon2.jpg
    67.3 KB · Views: 396
Last edited:
OP
N

N0tt0N

Well-known member
Joined
Sep 26, 2013
Messages
229
Location
DC
LOL! The chipping and scraping of the section shown in the photos brought my daughter down to threaten death if the tap-tap-tap of the hammer didn't stop! Apparently, the noise carries well through the walls and up two stories. Ah well, the price of progress is rebellious teenagers!
 

marty_p

Well-known member
Joined
Aug 1, 2008
Messages
1,411
Location
SE LoUiSiAna
Welcome to TGJ from another Martin -- a/k/a Marty.

I see great things happening to your real estate soon, so keep us pic junkies supplied as you progress! :thumbup:
 

Kaikman

Well-known member
Joined
Jul 20, 2013
Messages
59
Location
Ohio
Keep up the good work! Your garage is almost identical to mine with the cinder block on two sides, low ceilings and a third wall that is shared by the house and garage. And although I currently have a Vette, I'm seriously considering a 968. Can't wait to see how this turns out and, if you have some time, stop by my thread.
 
OP
N

N0tt0N

Well-known member
Joined
Sep 26, 2013
Messages
229
Location
DC
10/9/2013 Update

Got some time in this evening. Finished removing all the junk from the left wall. I chipped and wire brushed all the loose paint and sealer. Nice to get a wall to the next step. I've already patched about 1/4 of the wall at the front. Tomorrow I will finish removing any stray hardware, some 2"x4" bolted to the wall, back chisel, and patch. I may detach the power drop on that wall and tie it up before I apply the DryLok. Then the back wall, ew. It is currently behind the gorilla-shelves and some peg board but I can see a lot of flaking as it is the wall pretty much completely below grade.

There was what I thought was a chipboard wall protector on the left wall attached to some furring strips. I assumed it was to protect the car or something. pulled it off and it turned out to be a fold up table! Poorly made but surprising. Of course it was disgusting behind it since it appears to be original given the paint behind the mounts. Spider apocalypse. Reminded me of Pacific Heights...

I've been using the claw side of a hammer to drag along and tap the blocks to identify previous DryLok or paint that is no longer adhering to the block. Kind of getting the feel now for the sound and sight of bad paint. It seems that it is block-specific. That is, if there is bad adhesion on a block it is pretty much the entire block - perhaps something about the material of specific blocks? I had expected the pattern to be more along the lines of a path of moisture rather than by block. Wire brushing cleans them up though lots of dust! Yum! Using glasses and mask but still. Some of the block have a crumbly surface layer that I've chipped off just by dragging the hammer claw across it. Only about 1/8" or so. Hopefully not a sign of a big problem. I've been covering these with a layer of patch since they seem a bit brittle. Not a mason so I'm just reading and learning as I go. Tips/advice appreciated.

I have a contractor coming over tomorrow to look at moving the right wall. It doesn't look difficult (non-load metal stud wall) but wanted at least that part to not be on the "WTF, Honey!?!?!" list. ;)

Heading to Atlanta on Friday to attend an M96 Engine Rebuilding course for the weekend so I won't accomplish much until Monday.

Thanks for all the encouragement!
 
Last edited:
OP
N

N0tt0N

Well-known member
Joined
Sep 26, 2013
Messages
229
Location
DC
10/10/2013 Update

Contractor came out this morning to talk about moving the wall, the radon pipe, and most annoying of all the dryer exhaust winding its way across half the house and then out into the garage and then out the front of the garage. Bad news is they can't do any work for 6-8 weeks. Dryer vent blocks a number of other projects and they'd have to do an alternative exhaust out the back as time & materials since its not obvious what work would need to be done. Radon's a cinch - as long as the dryer vent is moved. Wall is a cinch. Step in garage can be removed resulting in a big step (not a biggy right now) while cutting a new step to recess it into the house would be messy (duh). Not many options on replacing the garage door that would create any room (carriage doors are hard to maintain) although - if the dryer vent moved - a taller door could be fit in the space and I could pick up 6" or so. Since I'm moving the wall I asked about loosing the center rail by using a screw-type opener and he didn't seem enthused. Trying to decide if I should look for another contractor or just do it myself since he recommended I contact the garage door firms directly and didn't seem that psyched about tiling the garage - talked about epoxy.

Just got back from an awesome architectural stone firm in DC called Stone Source (a regional east coast firm). Max was super helpful, knows Porsches, was excited to talk about what could happen in a small garage. They have an incredible inventory of stone, glass, and porcelain – so much more interesting than the faux-marble stuff at HD and Lowes. I told him I was thinking about something in the light to mid charcoal. He jumped ahead of me and described exactly what I was thinking – a tile with some “movement” (their term for grain running through) and using a 12”x24” “module” (their term for form factor). I’m really happy right now. The samples I brought home will radically improve the dusty concrete floor in the garage and draw the eye into the garage creating a bigger look. I’ve attached some pictures. I’m thinking of doing a border and splash in one color and the center of the garage in the other.
 

Attachments

  • IMAG0400.jpg
    IMAG0400.jpg
    64.4 KB · Views: 251
  • IMAG0403.jpg
    IMAG0403.jpg
    60.9 KB · Views: 197
  • IMAG0405.jpg
    IMAG0405.jpg
    75.1 KB · Views: 202

andyhurz20

Well-known member
Joined
May 11, 2012
Messages
64
Location
Wethersfield, CT
Welcome to GJ! I am going to be watching this intently since my garage is 10x19 and I too work on all my cars. I bought a Mac Tools (a.k.a. Challenger MR6 with a Mac Tools sticker on it!) scissor lift at the beginning of this year. It has been a priceless tool for a guy that does a lot of work on cars! Good luck on your build, I love the materials that you have picked in the last post!
 
OP
N

N0tt0N

Well-known member
Joined
Sep 26, 2013
Messages
229
Location
DC
andyhurz20: Thanks! We've decided to use the large black tile shown in the cetner with no trim. They are 12"x24" and we'll include a 6" border on the walls to widen the visual effect and help with clean up while protecting the walls. Stone Source is recommending a contractor to lay the tiles and we've decided to go with them since they will also be able to take out a cement step and flatten out some rises around the step. Getting excited!

Working backward I now need to investigate re-routing a ridiculously long dryer vent running through the garage and take it up through a stack in the, um, living room and out the back of the house. This will be a mess but will both free up garage door space and also dry the clothes faster by eliminated 50' of tin! See, honey, it all makes sense! ;)
 
OP
N

N0tt0N

Well-known member
Joined
Sep 26, 2013
Messages
229
Location
DC
Tile Designs

Here are a few tile designs we considered. We're pretty sure we're going with the first (A) in a grid as it has a classic look and requires less cutting. I've attached a marketing photo of that design although the photo shows the polished version and we'll be using the natural (unpolished) version. We looked at doing some two tone version like in (D) but the classic look of the tiles is interesting enough and we thought it would distract rather than enhance the depth of the floor. We're going up the walls 6" and will have some sort of leading edge treatment - waiting to hear on what accessory pieces they have or if they'll simply ramp it like Jack Olsen did.

Btw, the plain gray tiles are just ones I didn't bother overlaying the image of the tile on.
 

Attachments

  • Q-Stone-Minimal-Main.jpg
    Q-Stone-Minimal-Main.jpg
    60.4 KB · Views: 288
  • TileDesignD.jpg
    TileDesignD.jpg
    80.2 KB · Views: 142
  • TileDesignC.jpg
    TileDesignC.jpg
    105.6 KB · Views: 132
  • TileDesignB.jpg
    TileDesignB.jpg
    107.2 KB · Views: 132
  • TileDesignA.jpg
    TileDesignA.jpg
    106.8 KB · Views: 135
  • QStoneMinimalNightNatural.jpg
    QStoneMinimalNightNatural.jpg
    100.5 KB · Views: 138
To avoid these ads, REGISTER NOW!
OP
N

N0tt0N

Well-known member
Joined
Sep 26, 2013
Messages
229
Location
DC
The Joys of Prep

Spent about 4 hours today chipping, chiseling, and steel brushing the back right wall. I still have to do the center back wall but that will finish the stripping of the old paint and some type of waterproofing paint that has lost adhesion and separated from the block. I'll work on the final section tomorrow and possible begin patching the wall after I remove some old nails. I also have to read up on how to remove sleeved studs that were put in to hold up some 2"x4" studs that supported shelves and hangers. Then waterproofing and paint.
 

Attachments

  • WallPrep.jpg
    WallPrep.jpg
    72.4 KB · Views: 282
OP
N

N0tt0N

Well-known member
Joined
Sep 26, 2013
Messages
229
Location
DC
More Prep

Well, I think if I had just decided to strip the block completely I would have chosen another tool and been done by now. Ah well, 90% through with the chipping, scraping, and steel brushing. Took out the last section of gorilla-style shelves, some pegboard, and the 2"x4"s bolted to the wall as well. More scenes from Pacific Heights with the grasshoppers, centipedes, and spiders :shocking: - I defended the universe with my ShopVac. I also added to my design objectives list - NO F&CK'N BUGS! I think I'll order a 55-gallon drum of expanding caulk.

I ran out of deltoids and triceps so I still have to pull a number of nails and studs before I can begin patching.

But, All the walls are cleared and almost prepped! So close. I think I'll head to the fridge for some consolation.
 

Attachments

  • MoreWallPrep.jpg
    MoreWallPrep.jpg
    69.5 KB · Views: 249
OP
N

N0tt0N

Well-known member
Joined
Sep 26, 2013
Messages
229
Location
DC
Left work a bit early today. Finished chiseling out all the nails and screws that had bled rust all over everything. I'll be covering the wall up with StoreWall but I don't see why I shouldn't deal with these now and not have then bleed through the new paint again. Found a decent how-to on removing sleeve anchors. Looks like a total PITA. Next I will have to get up on a step stool to prep that top section of the back wall. It comes out about a foot from the back wall. I thought it was on a beam but now it looks to be just a painted board that doesn't appear to tie in on the ends underneath so the brick/block must be cantilevered over the garage - not sure why. Anyway, I should have done the top section first as it needs to be chipped, patched, and painted in order to move the Radon evacuation pipe up to it. No pictures as it doesn't look like I did anything!

Tonight I will plan out the StoreWall solution. May carry it into the HVAC room next door that is currently bare studs on the inside. Might just drywall that and put in shelves.
 

Lobstrosity

Member
Joined
Jul 30, 2009
Messages
23
Location
Vancouver, Canada
Those tiles are going to look great! I like that size for the garage, it'll really modernize the space. I need to start planning how I'm going to convince my wife that tiles are necessary for the garage!

About your dryer vent, have you considered one of those kits that let you direct vent inside your house? Not as a long term solution, but it might benefit the house over the winter and until the contractors have time to do a permanent solution... In the meantime you can then continue work on the garage space?
 
OP
N

N0tt0N

Well-known member
Joined
Sep 26, 2013
Messages
229
Location
DC
Lobstrosity: I'm being told that these tiles do not stain, break, abrade, and even an unlikely scratch won't show because they are the same all the way through (as opposed to a glazed tile that may be white inside). I'm told that they are one of the only floor coverings that adds value and then retains it through the life of the house. Its a investment, dear, not an expense! Good luck with that ;)

Great idea on the temporary solution to the dryer! Man, you just eased my mind given the chain of dependencies. I'll have to do a bit of research! Thank you!
 
OP
N

N0tt0N

Well-known member
Joined
Sep 26, 2013
Messages
229
Location
DC
Last night I finished pulling all the nails (new, rusting, and rusted away), lead anchors, and, YES, the dread sleeve/wedge anchor bolts! After reading 30 entries on how the wedge anchors were permanent unless the previous guy drilled the holes 2x deep so you could pound them in and forget about them I found a DIY entry that worked on 12 of the 14 bolts. The last two didn't work because the process works by tapping in the bolt (to get the wedge out of the sleeve) and then grabbing the sleeve AND the bolt and slowly pulling/leveraging the whole unit out but these two had rusted sleeves that broke apart at the expansion slots leaving the inner part of the sleeve buried in the hole out of site. The holes were also too shallow to fully disengage the bolt as well so that may have contributed to the issues. Those d*mn wedge/sleeves are so good the bolt twisted right off at the surface. Not optimal but better than two bolts sticking out of the wall.

So, I am done with that phase. I think I will go ahead and apply the wash that's supposed to remove effervescence on block even though I don't think I actually had any. The back wall (all under grade) had extensive separation of the previous waterproofing/paint and maybe there was some there and I simply knocked/scraped it all off during the stripping process. Can't see the harm in applying it before patching. May get some time in tomorrow for that! Some progress at least!
 
Last edited:
OP
N

N0tt0N

Well-known member
Joined
Sep 26, 2013
Messages
229
Location
DC
Last night I realized that the first back corner I had done on the left I was a bit less aggressive than later so I went back and chipped and steel brushed that corner again. Glad I did. Another couple pounds of flakes. Vacuumed out all the holes and divits.

I noticed a slightly raise crease in the center of the back of the garage. Not sure if it was intentional like to create some slope but it will probably prove a problem for the tile. May have to see what sort of grinding makes sense to flatten it out a bit.

Read Dakota's tile thread this morning. Very informative!
 
OP
N

N0tt0N

Well-known member
Joined
Sep 26, 2013
Messages
229
Location
DC
Back after being out of town for a few days. Got an hour or two in today after work washing down the back wall with water and a brush. Found a few places I need to revisit with the chipper. Plan on applying the DryLok Etch tomorrow morning to the back wall and then patch in the afternoon. Lost a week! :(

Need to finish the plan out for the Storewall and get that ordered tonight. Waffleing between going with the Dover White and Bright White trim or do it all in Bright White.

Tile guy recommends doing the floor first, then the cabinets, then the Storewall, then do the tile kick trim once its clear where the Storewall will sit on the finished walls in case the trim pieces need to be brought out with a back board to look consistent all the way round. Sounds like a plan.

Wife agrees to not let the re-routing of the dryer vent get in the way of the garage plan even if it means temporarily venting indoors or, more probably, sending the laundry out! ;) You just have to find the right angle for your sales pitch! ;)
 
Last edited:
OP
N

N0tt0N

Well-known member
Joined
Sep 26, 2013
Messages
229
Location
DC
Got to spend two days this beautiful weekend advancing the cause! First step, stop piddling around and get to work! I set up a 10'x20' StorageLogic canopy with sides for temporarily locating the bulky garage contents I couldn't move into the house. Mostly scrap wood and big heavy things. I've attached a few pictures of it going up. Makes for a convenient, close location for moving things in and out of the garage during each big step coming up. I had to get a permit for a temporary storage unit but it was a nominal fee so no problem. I really like the tent. Should be useful in other circumstances as well. Tied it down to the heavy items inside.

With a garage that is now emptier than when I moved in (I've taken out all the shelving, plywood decorative wall cover, peg board, and 2"x4" wall hangers!) I was a lot more productive than when worrying about not knocking over something. So much faster to work! Spent the remaining hours Saturday and all day sunday finishing the re-chipping, steel brushing, and vacuuming the wall. I had wanted to get the DryLok Etch done but couldn't lift my arms by the end of Saturday, doh!

Note to self - Pros know exactly what needs to be done and have the discipline to do it therefore they don't waste time. Amatures like me learn as we go, don't have the discipline to finish each block before getting distracted by easy pickings on the next block, and therefore have to repeat certain steps because we didn't finish the previous step correctly! Stop wasting time and take it step by step from now on! :bowdown:
 

Attachments

  • IMAG0427.jpg
    IMAG0427.jpg
    67.9 KB · Views: 261
  • IMAG0426.jpg
    IMAG0426.jpg
    96.7 KB · Views: 163
  • IMAG0425.jpg
    IMAG0425.jpg
    126 KB · Views: 156
  • IMAG0424.jpg
    IMAG0424.jpg
    53 KB · Views: 163
OP
N

N0tt0N

Well-known member
Joined
Sep 26, 2013
Messages
229
Location
DC
Design Phase I Complete

Spent the last three days focused on finalizing the design, including the movement of the wall between the garage and the house about 16" into the house which is a huge improvement. Creating the layout for the StoreWall solution was surprisingly time consuming mostly because of how it interacted with the placement of the cabinets and some of the other immovable items in the garage (electric supply box, HVAC access, etc.). Very happy with the design at this point. I've attached two renderings of the design I made with Sweet Home 3D. The left wall hasn't changed a lot from the original concept. The right wall is significantly improved. Demolition starts Monday!

I also attached a scan of the layout work I did to put together the StoreWall order. A bit hard to read but I also made many minor design decision while pulling it together. I'm going to use their InstallStrips everywhere as they allow for trivial mounting (and removal!) with only the top groove in a wall receiving screws from the front to hold everything. Using dowels between all the butts. They recommend staggering the alignment to minimize the apparent gaps but I've decided to align the butts along clear design breaks (where cabinets also align vertically, etc.). I think the butts scattered all over would look worse. YMMV. I'm going with Brite White rather the considered alternative of Dover White (greyish White) with Brite White trim. I am getting the finishing trim as well.

I have removed the metal electric outlets from the middle of the left wall (4x3-prong) and the back wall (Dryer Socket) and tied to up. I will have no outlets in the StoreWall as I want to mount in straight to the block (via the InstallStrips) and not loose the extra inches I don't have. Since I'll be boxing in the electric supply box and there is already a 4x3-prong mounted on its backer board I will reposition the left wall outlet next to that as well and present them through the new cover of the supply box. On the back wall I intend to bring the electric down from the open faced box that will hide the gas supply line and the radon evacuation PVC pipe (the StoreWall will mount to the framing for the box on the front side so it can be easily removed to access not only those utilities but also to run anything that needs to cross the garage in the back since that is perpendicular to the joists) and then behind the box behind the wall cabinets. The drop will power under cabinet lights and two power strips mounted right underneath the cabinets above the worktable.

I still have some work to do now laying out the rerouting of all the crappy wires that were simple run across the garage ceiling and stapled there. I also have to layout at least a portion of the general lighting solution. I'm really enamored of RealCarriageDoors so I'll have to think of a potential two phase lighting scheme for when I get rid of the hideous overhead door!

I have some ugly HVAC ducting running through the garage wrapped in sagging insulation. I'm looking in to the best way to hide those. Maybe removing the wrap, boxing them in with 1"x and then filling the gaps with expanding foam insulation?

Onward!

Garage_LeftWall.jpg
Garage_RightWall.jpg
 

Attachments

  • StorewallLayout.pdf
    123.7 KB · Views: 53
Last edited:
OP
N

N0tt0N

Well-known member
Joined
Sep 26, 2013
Messages
229
Location
DC
Final Design Layout!

Had a great design session with the folks that will be doing most of the licensed work on the build. I'm really excited about the outcome. Here are the major design changes and a few pics of what they look like. I have to say the openness of the space is an incredible contrast with the current cluttered look.

1. The HVAC distribution ducting running across the garage to feed a register in the floor upstairs will be turned and moved into the box originally conceived to hide the gas supply line and the radon evacuation PVC pipe. That conveniently brings the face of the box on the back wall out to flush with the wall cabinets! The box will be open in the front with the StoreWall covering the opening for easy access and maintenance of any wiring, etc.

2. The door to the house will be moved flush with the existing interior wall in the house (i.e., deeper toward the back of the garage by 5") rather than where it was originally. This allows the two sliding door cabinets to move 5" deeper as well and therefore widens the cubby in the foyer near the front of the house to be a more useable size for shoes and coats.

3. The major HVAC ducting that was out in the middle of the garage running front to back will now be turned at the blower 90 degrees and head straight toward the front of the house rather than into the garage, left, to the front, left, and back into the house at the front. It will eat into the space above the door and the sliding door cabinets in the right wall if they cant squeeze some of it up into the joists but in any case will be both smaller and out of the main area. Too cool!

4. With all wiring running along the top of the left wall in a removable box to the back of the garage into the box described in 1. above and then either into the house or up between joists to come forward again in the ceiling there will now be no exposed wires anywhere.

5. Sent out quote requests for the StoreWall and for Carriage Doors (realcarriagedoors.com)! Their doors are just beautiful and the Franklin door openers are cool. We'll see what their delivery schedule looks like as it would be nice to remove all the current opener mechanicals attached to the ceiling during the build even if that meant we couldn't open the door until the carriage doors arrived. May have to remove the door and then cover the opening with a tarp to maintain access.

6. Did a short dance of happiness.

Garage_Final_LeftWall.jpg

Garage_Final_RightWall.jpg
 
Last edited:

Kaikman

Well-known member
Joined
Jul 20, 2013
Messages
59
Location
Ohio
Thread is looking good. I can't wait to see your designs come to life! I've decided to go with tile on my floor as well, so I'll be eagerly anticipating your reviews of your floors once they're installed.
 
OP
N

N0tt0N

Well-known member
Joined
Sep 26, 2013
Messages
229
Location
DC
Kaikman: Thanks! Tiles are ordered and expected in 7-10 days. Demo starts Monday. I have some patching to do this weekend in the block wall before the DryLok goes on.

Carriage doors have an 8-10 week production wait but I'm pretty set on them. Will probably remove the current wooden overhead now and put up a temporary wood cover over the hole with some what to get things in and out.

Need to plan the lightening now that I will have a clear ceiling!

Need to plan the StoreWall accessories.
 
OP
N

N0tt0N

Well-known member
Joined
Sep 26, 2013
Messages
229
Location
DC
Got to spend some time working today. Finished about half the patching of holes and cracks in mortar and refacing some brittle block. I also moved everything out of the foyer and took down the tired old chandelier light from the 70s. I'll finish the rest tomorrow as the demolition was put off until Tuesday - guess someone forgot it was a holiday! :)

Spent a bit of time trolling GJ yesterday as well for recommendations and advice for the tiling materials. Prices are from Lowes though I found about 40-50% cheaper on line (reputable? don't know). Lowes price on the Keralastic is ridiculous as the list price is $99.95! Since I have 230 square feet to tile I've decided to go with:

  1. 1. MAPEI Kerabond 50-lbs Gray Powder Dry-Thinset Mortar (4@$23.14 = $92.56)
  2. 2. MAPEI Keralastic 5-Gallon Liquid Latex Additives (4@$158.06 = $632.24)
  3. 3. MAPEI Kerapoxy 14-lbs (1 gallon) Black Epoxy Grout (24"x12"x3/8"x1/8" Grout Lines) (1@$108.00 = $108.00)
  4. 4. MAPEI 10.5-oz Black Specialty Caulk (3@$14.36 = $43.08)
  5. 5. Schluter Systems Reno-U Reducer 3/8-in Stainless Steel for Driveway ([email protected] = $157.82)
Total $1033.70

I may only need 1 Reno-U as the opening is 99". I'll leave that until later as it may be effected by the carriage door casing design.
 

type550

Well-known member
Joined
Jul 19, 2010
Messages
141
Location
Melbourne Australia
Although at the beginning you don't know where to start with these builds, planning is everything. I think my garage is smaller than yours, but with careful planning it all fits including a workshop area. Looking forward to seeing it transform!

Andrew
 
OP
N

N0tt0N

Well-known member
Joined
Sep 26, 2013
Messages
229
Location
DC
Spent a couple of hours today finishing up the patching. The fast setting DryLok patch stuff is 'interesting' to work with. Made for some serious running around as it sets in 2-3 minutes. Kind of got the hang of it eventually but I admire those folks that can slap it neat and tidy. Everything ready for the demolition tomorrow.

Tiles are supposed to arrive next Monday. Cabinets are either shipping or arriving next week as well, need to clarify that. Getting excited! Thanks for all the encouragement!
 
OP
N

N0tt0N

Well-known member
Joined
Sep 26, 2013
Messages
229
Location
DC
type550: I really admire your garage build process, especially those custom prints and logos! As much as I try and remember I'm always reminded by creative people like you that you can do almost anything if you set your mind to it! No such thing as stock! Thanks for the inspiration!
 
OP
N

N0tt0N

Well-known member
Joined
Sep 26, 2013
Messages
229
Location
DC
Day 1 Demo!

Here are a few before pictures from this morning and a few after the first day of demolition. Progress!

The first picture is the patching I did last weekend. Really impressed with this stuff though it was challenging to work with.

The next four highlight in green the repositioning of 1) the gas supply line to bring it high and tight against the back wall; 2) the radon evacuation PVC pipe to bring it high and tight against the back wall and then into the right wall before heading down inside the HVAC room to the hole in the slab; 3) the small HVAC ducting that will also be brought to the back wall and then across to the HVAC room; and 4) the large HVAC ducting that will be moved into the house space ceiling. It also highlights in red the removal of the dryer ducting (gone now!) and the garage door ceiling mechanicals.

The final two are from the house side of the wall and show the demo of that side of the wall and floor cut in prep for construction of the new wall.
 

Attachments

  • IMAG0434.jpg
    IMAG0434.jpg
    69 KB · Views: 156
  • IMAG0446.jpg
    IMAG0446.jpg
    53.5 KB · Views: 124
  • IMAG0445.jpg
    IMAG0445.jpg
    35.5 KB · Views: 127
  • IMAG0438.jpg
    IMAG0438.jpg
    57.2 KB · Views: 128
  • IMAG0437.jpg
    IMAG0437.jpg
    43.1 KB · Views: 132
  • IMAG0436.jpg
    IMAG0436.jpg
    44.4 KB · Views: 148
  • IMAG0435.jpg
    IMAG0435.jpg
    55.7 KB · Views: 150
OP
N

N0tt0N

Well-known member
Joined
Sep 26, 2013
Messages
229
Location
DC
Day 2 Demo

After re-communicating on the width of the sliding door cabinets going in the new wall pop out the framing was completed for the new wall. Still have the existing garage-side drywall and metal studs in place until electrical is done and inspected. A number of electrical things got done like moving a garage light switch from 15 feet away at the base of the stairs to just inside the garage door and moving the dryer electric outlet (sigh, another related project since we pulled out the Rube Goldberg dryer venting that ran 45 feet through the garage with at least 8 bends) to the other side of the small laundry room so we can stack the washer/dryer. I'm pretty sure once all the related projects have been chained together I will still have the original chimney but that may be about it. ;)

Ordered the steel fire door to replace the cheap foam door to the garage. Will reuse the entry set there until the front door that will match the new garage carriage doors arrives (did I mention related projects?). Narrowed down the new Washer/Dryer but want to double check the measurements - been doing that for about two years now.

Did a bunch of great research on GJ about lighting. I REALLY appreciate all the excellent, supported advice that pros offer here. It looks like for the planned usage of this 20'x10' garage I will need between 4 and 5 4" T8 fixtures that will go in with two along the walls near the garage door to light beside cars while working on them, one across the middle of the garage above where the back of the car would be (Mid-engine P-car backed into the garage) and then two near that at the back of the garage for ambient lighting in the work area. I will also do under cabinet lighting for task work. I would love to go with some of the newer LED lighting but can't find much about real-world usage or a place to buy them. Lithonia has an AL series 1'x4' designed for suspended ceilings but has a joist mounting kit. It says it delivers equivalent candles in a well dispersed and color corrected way and I can do the two side units in-ceiling although the other three would have to be surface mounted. Any pros have advice on LED alternatives to the usual T8s?
 

Attachments

  • IMAG0449.jpg
    IMAG0449.jpg
    54.6 KB · Views: 68
To avoid these ads, REGISTER NOW!
Top Bottom