To avoid these ads, REGISTER NOW!

One year later 40'x80'

OP
F

fnieto

Well-known member
Joined
Aug 27, 2013
Messages
1,401
Location
Tucson,Arizona
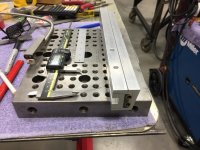
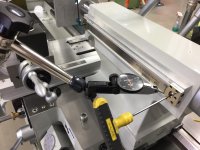
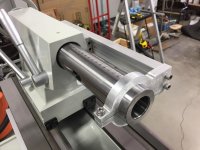
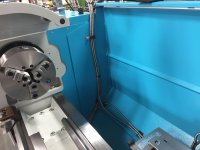
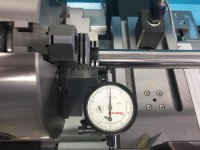
Well I decided to relocate the third scale from the compound to the tailstock (TS). After considerable consideration, I admitted to my self the TS application would be used far more than any vectoring/summing done by the compound. Besides a calculator would aid is any vectoring problems I may encounter. The ability to drill precise hole depths made more sense. The compound application would also require the cable to be hanging out in the "danger zone" and looped around around the front dial full time.
This was a costly decision on my part as the scale was previously cut to fit the 5" travel of the compound vs the 6" quill travel of the TS. A replacement scale cost me $145.

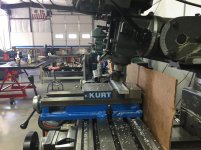
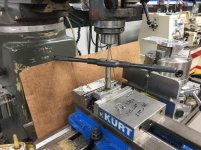
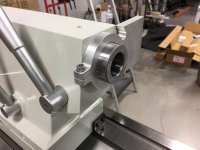
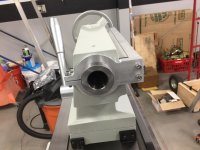
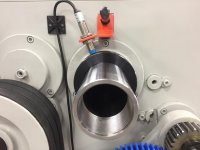
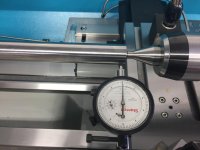
The TS body has a 9º taper so a piece of 5/8" x 1.5" aluminum bar stock was milled to provide the scale a vertical mounting surface.

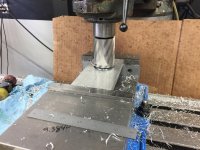
The mill head was set for the 9º face mill pass.
attachment.php


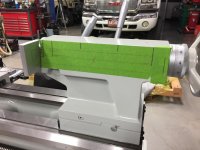
The bar stock was then milled for the scale to nest in. This design will make the scale static and the readhead dynamic when the TS quill is in travel.
attachment.php


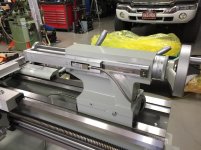
Having the scale plumb will not only look better but will allow for the geometry of the readhead arm to line up better.
attachment.php


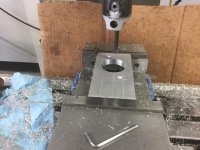
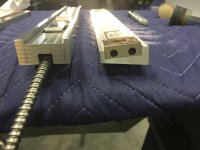
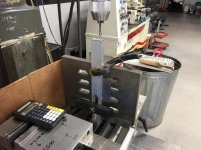
Befor I can design the readhead arm, I need to machine the quill clamp that the arm will attach to via two countersunk slotted holes for lateral fine adjustment. The arm will have a machine profile of the scale bracket. This should allow for a sliding track setup (I hope).
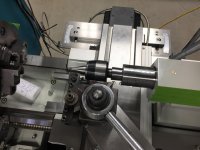
The material used for the quill clamp is 1/2" thick and will require profiling. The rear portion will have a slit of .120" and use a counterbored cap screw to clamp tight to the quill. the opposite end will be for the arm to mount. I used the largest annular cutter I have to save time in boring to size. I opted to over bore by .004" for a slip fit onto the quill. The .120" slit should allow for adequate clamping.
attachment.php


Boring provided a beautiful surface finish
attachment.php


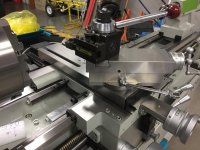
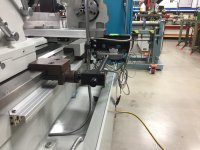
Heres where a long mill table is handy. The vise will remain trammed in place while a rotary supper spacer is setup for profiling the clamp. A co-axeal indicator was used to quickly find the center. The DRO was set to absolute zero on X/Y. The center was then offset for the end mill used and the rotary table was rotated taking notes on the degrees for full cut travels.
Used a three flute 7/16" end mill at 1500 RPM with low PSI air to clear the swarf and a little WD-40.
attachment.php


A final pass of .020" provided a nice finish
attachment.php

More to follow.
 

Attachments

  • IMG_3018.jpg
    IMG_3018.jpg
    152.7 KB · Views: 1,424
  • IMG_3022.jpg
    IMG_3022.jpg
    147.3 KB · Views: 1,417
  • IMG_3021.jpg
    IMG_3021.jpg
    115.7 KB · Views: 1,417
  • IMG_3028.jpg
    IMG_3028.jpg
    153.2 KB · Views: 1,423
  • IMG_3029.jpg
    IMG_3029.jpg
    151.6 KB · Views: 1,425
  • IMG_3030.jpg
    IMG_3030.jpg
    148.2 KB · Views: 1,412
  • IMG_3031.jpg
    IMG_3031.jpg
    148 KB · Views: 1,405
To avoid these ads, REGISTER NOW!
OP
F

fnieto

Well-known member
Joined
Aug 27, 2013
Messages
1,401
Location
Tucson,Arizona
I also had to mount the QCTP (CXA) to check for clearances when a live center is used. The compound T-nut stud is smaller than the 3/4-16 stud required for the Aloris.
Drilled 11/16" and taped with plenty of room on the mill.
attachment.php


The CXA looks right at home. I used this on the 1440 with great results adding rigidity and the use of larger cutters. I did have to use a long nose live center when turning as the CXA was almost too big for that machine. Perfect for the 1640.
attachment.php


attachment.php


attachment.php


While I was on the lathe I decided to dial in the taper attachment. This requires the taper table to be indicated in after the deadman clamp and rod are in place. Once indicated, two holes are drilled through the casting pilot holes provided then pin remmed (#6) and two tapered pins are driven in. This ensures the alignment stays true, any movement will result in the cross feed leads screw to bind. I was able to indicate to .0005" in 12.5". I will not be using the drive pins, Instead I plan on machining a shouldered pin that will located into the carriage. The cast portion will be tapped to take the two modified cap screws. This will allow removal of taper attachment later if ever needed.
attachment.php


Setting up for cutting a taper is straight forward. Set your dovetail taper, line up you cut, secure the deadman clamp and go. On the 1440, it was similar but you also had to remove the cross slide bolt. I used a piece of tape to mark the start of a max taper and mark the end of said taper and the DRO matched up. The carriage turned very smooth by hand throughout the travel.
attachment.php


More to follow.
 

Attachments

  • IMG_3049.jpg
    IMG_3049.jpg
    154.9 KB · Views: 1,390
  • IMG_3050.jpg
    IMG_3050.jpg
    132.8 KB · Views: 1,385
  • IMG_3051.jpg
    IMG_3051.jpg
    149.1 KB · Views: 1,382
  • IMG_3052.jpg
    IMG_3052.jpg
    144.2 KB · Views: 1,383
  • IMG_3054.jpg
    IMG_3054.jpg
    139.2 KB · Views: 1,380
  • IMG_3053.jpg
    IMG_3053.jpg
    149.8 KB · Views: 1,382
OP
F

fnieto

Well-known member
Joined
Aug 27, 2013
Messages
1,401
Location
Tucson,Arizona
I also mounted the custom display mount and arm. The one that came with the kit was light and drilled out of plumb. The display was rotated to the CCW about 1/3 bible on a 8" level.
I can't have that BS. I designed the mount arm to allow for the headstock top cover to be removed without the removal of the display. I also wanted a comfortable working hight with ample adjustment.
The mount is milled from a chuck of 1.5" thick aluminum. The arm is made from .625" x 1.5" aluminum bar. Milled some slots and rounded the ends, a buddy of mine polished it up for me although I was fine with machine marks it does look fantastic.

The mount is drilled and taped with a pair of 5/16-18 holes at the bottom. The bolts come up from the electrical cabinet sandwiching a 1/4" x 3" x 6" piece of flat strap that reinforces the whole cantilever mount. Not a tiny bit of bounce is noted and is solid and smooth with spring and nylon washers.
attachment.php


Here you can see the display rotated away providing removal of the top cover if needed.
attachment.php


I really like the the looks and working hight of the mounted display. Solid and squared to the world heheh. The small dial (black box) to the left is speed control, the right dial when pushed toggles between RPM/SFM.
attachment.php


Thanks for stopping by.

Paco
 

Attachments

  • IMG_3046.jpg
    IMG_3046.jpg
    128.2 KB · Views: 1,379
  • IMG_3048.jpg
    IMG_3048.jpg
    145.1 KB · Views: 1,375
  • IMG_3047.jpg
    IMG_3047.jpg
    146.1 KB · Views: 1,371
OP
F

fnieto

Well-known member
Joined
Aug 27, 2013
Messages
1,401
Location
Tucson,Arizona
The last scale is done and working well. This scale is a 1 micron and the display resolution was set to 2. The TS quill travels smoothly throughout with stable reading to match.

The two halves the track bracket. The scale is mounted to the TS body while the readhead is dynamic. The two halves slide smoothly. Carful measurements for the readhead window location where taken to prevent contact of the readhead to end of scale block.
attachment.php


The TS was measured and laid out for the window location of the readhead arm.
attachment.php


The readhead uses two 8-32 SS socket cap screws accessed by the top holes. The lower section of the window is tapped. The .020" shim was used to locate the holes. These holes have no provisions for adjusting so they had be accurate. Here you can see the cable relief milled at the end of the arm.
attachment.php


The readhead secured. The scale bracket mounting surface was mill to 9º.
attachment.php


Once the scale was mounted to the TS, a test indicator was used to dial in the scale. The magnetic base Noga worked well for this. It's well within the tolerances recommended for mounting. Less than .0005 in 13.5".
attachment.php


The readhead arm was too long to use the vise to drill/tap on the mill. An angle plate was setup and the arm was secured to it using a quick clamp and the more secure clamp at the base through the readhead window. A machinist square made for a quick setup.
This setup was also used to power tap using a two flute 1/4-20 tap.
attachment.php

More to come.
 

Attachments

  • IMG_3061.jpg
    IMG_3061.jpg
    151.6 KB · Views: 1,257
  • IMG_3062.jpg
    IMG_3062.jpg
    152.7 KB · Views: 1,247
  • IMG_3065.jpg
    IMG_3065.jpg
    97.5 KB · Views: 23
  • IMG_3067.jpg
    IMG_3067.jpg
    133.4 KB · Views: 1,247
  • IMG_3069.jpg
    IMG_3069.jpg
    143.5 KB · Views: 1,251
  • IMG_3077.jpg
    IMG_3077.jpg
    138.5 KB · Views: 1,243
  • IMG_3078.jpg
    IMG_3078.jpg
    148.6 KB · Views: 1,246
OP
F

fnieto

Well-known member
Joined
Aug 27, 2013
Messages
1,401
Location
Tucson,Arizona
Two transfer threaded inserts where used on the threaded arm to locate the hole locations on the quill clamp.
attachment.php


The quill clamp final profile is complete and TS scale installed. Full travel stop to stop has .125" of clearance from the readhead and scale end block.
attachment.php


The overall width of the two halves are 1.375". A rigid bracket was required to prevent and flexing resulting in a bad reading. The larger TS really helps make the whole setup look fine without the overkill appearance, at least to me anyway.
attachment.php


Full 6"+ of travel with the cable out of the way. A cable clamp at the rear lower TS body does a nice job managing the cable in all quill positions.
attachment.php


Both metric and inch scales are fully visible mostly due to the 9º angle milled on the scale mount.
attachment.php


The cable was routed through the bottom of the TS and down the second web opening on the bed. This allows full traversing of the TS without hinderance or snagging. The beefy bed webbing has large smooth radius top surfaces allowing the cable to glide.The cable loop is minimal with the quill retracted. A small strap clamp will span the relief groove at the end of the arm to keep any strain off the readhead.
attachment.php


The display now has three functioning axis.
attachment.php

Thanks for looking.

Paco
 

Attachments

  • IMG_3080.jpg
    IMG_3080.jpg
    86.8 KB · Views: 1,247
  • IMG_3082.jpg
    IMG_3082.jpg
    112.5 KB · Views: 1,233
  • IMG_3083.jpg
    IMG_3083.jpg
    94.7 KB · Views: 1,238
  • IMG_3084.jpg
    IMG_3084.jpg
    150.9 KB · Views: 1,243
  • IMG_3085.jpg
    IMG_3085.jpg
    122 KB · Views: 1,232
  • IMG_3086.jpg
    IMG_3086.jpg
    151.9 KB · Views: 1,241
  • IMG_3089.jpg
    IMG_3089.jpg
    149.1 KB · Views: 1,235

LXCam

ALLIANCE MEMBER
Joined
Apr 23, 2013
Messages
19,090
Location
AZ
Paco you're a flipping rock star bud. I installed a reader on my tail for the same reason you have. But after witnessing the shear brilliance of your design and execution would be absolutely embarrassed to show anyone. :lol:
 
OP
F

fnieto

Well-known member
Joined
Aug 27, 2013
Messages
1,401
Location
Tucson,Arizona
Hey Cam,

I'm glad you like the design. It took me a little longer than planed, but I don't work from drawings for one offs. I got lucky on the choice of material, turns out that was the smallest bar stock I had on hand and after profiling the requirements, it worked out.

"Even a blind squirrel finds an acorn once in a while".....lol.

Paco
 
OP
F

fnieto

Well-known member
Joined
Aug 27, 2013
Messages
1,401
Location
Tucson,Arizona
Fantastic all around! Tools, shop, and toys! Thanks for your service and telling your story.

Thank you!

And thanks for checking out the page. I see you have like Boston Whalers.
I have done some SS railing work on a Boston Whaler a few years back. Nice boats, very robust.

Paco
 
OP
F

fnieto

Well-known member
Joined
Aug 27, 2013
Messages
1,401
Location
Tucson,Arizona
The last item on the punch list was a mounting bracket for the Hall sensor magnetic pick up for the tachometer.
A simple design made from 1/8" x 1" flat strap.


attachment.php


Schematic.
attachment.php


The end cover mounting stud was used to secure the bracket eliminating the need to drill/tap into the headstock. The angled wing holding the sensor was TIG welded, the gap set around .040"
attachment.php


Here you can see the magnet (polarity sensitive) on the balance collar. The small magnet will be replaced with a 5/16"diameter x .125" thick magnet and red loc-tite will secure it in place.
attachment.php


What really took a long time was securing the DRO cables once the backsplash was reinstalled. I didn't want any cables hanging into the chip drawer. The 1440 uses a pullout drawer as well and when pulling out I need to lift up the cables to prevent them from pinching. The same when sliding in the drawer. I decided to route the cable eliminating the need to baby sit them. The Y axis cable was extra long and required looping. Plastic zip tie brackets where used but the cheap foam adhesive was replaced with commercial grade 3M double sided tape. The sheet metal was also cleaned/prepped.
attachment.php


attachment.php


The day has finally arrived to place this machine in service. I need to move a few machines to clear the way. The 1440 will be cleaned ,serviced and crated up.
I'm hoping to make some chips today at some point and run some test cuts to verify the impressive tolerance sheets provided by the manufacturer QC department.

Thanks for looking.
Paco
 

Attachments

  • fullsizeoutput_66d.jpeg
    fullsizeoutput_66d.jpeg
    55 KB · Views: 1,033
  • IMG_3107.jpg
    IMG_3107.jpg
    103 KB · Views: 1,032
  • IMG_3108.jpg
    IMG_3108.jpg
    91.5 KB · Views: 1,032
  • IMG_3109.jpg
    IMG_3109.jpg
    112.7 KB · Views: 1,033
  • IMG_3110.jpg
    IMG_3110.jpg
    105.8 KB · Views: 1,033
  • IMG_3104.jpg
    IMG_3104.jpg
    109.2 KB · Views: 1,391
Last edited:

rmack898

Well-known member
Joined
Jan 23, 2007
Messages
3,144
Location
Honu Grove NE Florida
Good choice on putting the third scale on the TS quill and a beautifully executed install.

I'm not sure that I would have spent the $$$ to get a scale 1" longer than the one you had already cut, I can't remember a case where I had to use every last inch of quill travel. But I do also understand how knowing that the scale on you TS quill is an inch shorter than the quill can annoy the **** out of you.
 
To avoid these ads, REGISTER NOW!
OP
F

fnieto

Well-known member
Joined
Aug 27, 2013
Messages
1,401
Location
Tucson,Arizona
Good choice on putting the third scale on the TS quill and a beautifully executed install.

I'm not sure that I would have spent the $$$ to get a scale 1" longer than the one you had already cut, I can't remember a case where I had to use every last inch of quill travel. But I do also understand how knowing that the scale on you TS quill is an inch shorter than the quill can annoy the **** out of you.

Hey Mac,
Yeah an expensive lesson. I didn't want to crash the readhead into the end scale block. The overall length of a 6" scale is 12.5" so from stop to stop I have about .125" clearance. I have had to drill deep holes in the past. It would **** to limit my self due to a short scale.
Thanks for the good words.
 
OP
F

fnieto

Well-known member
Joined
Aug 27, 2013
Messages
1,401
Location
Tucson,Arizona
Awesome work, as usual. I may have missed it, which tach are you using? I have a Wilton drill press that I'd like to install a tach on.

So the tachometer is Mach Tach kit that a friend put together for me. He had to tweak it to work from 9v to 12Vdc. Its capable of inputing SFM as well as RPM. If you want a no frills tach, check out eBay, they offer them for under 10 bucks and they work very well. I ran one on the 1440 without a single issue and it was accurate.
https://www.ebay.com/sch/i.html?_od...tor.TRS1&_nkw=hall+sensor+tachometor&_sacat=0

Here's the Mach Tach site:http://machtach.com/home.html

Paco
 
OP
F

fnieto

Well-known member
Joined
Aug 27, 2013
Messages
1,401
Location
Tucson,Arizona
The machine powered up and ran great through various RPM ranges. Ultra quiet at higher speeds as well as smooth. Had some issues with the tach but figured that out. The DRO was hardwired to the machine's 110VAC leg, the rest is either 12 or 24VDC. The wall enclosure houses the VFD, brake resistor, fuse blocks, 3 pH 3 pole breaker, DC power supply, AC choke ,12 vdc cooling fan and through door disconnect.

Everything was going smoothly when without warning the machine lost all power, lights and DRO.
The VFD remained powered up with no codes. The fact that we lost 12,24VDC and 110VAC to the machine only indicated a bad 3ph 3 pole breaker located in the wall enclosure. It not only feeds power to the DC power supply but also feeds the 3 ph 240v to the flood coolant pump where we pulled 110 to power the DRO. It was 7:30 pm and time to call it with a 24 hour shift less than 12 hours away. No swaft,oil or other mess to report. Need to troubleshoot the breaker tomorrow, then level the machine and wait for the replacement part.

Out with the old, in with the new.
attachment.php


The wall enclosure.
attachment.php


Powered up and running great, then.....
attachment.php


How she sits now DIW. Not a big deal when you consider the entire control system was modified including switches. The part that I need to confirm bad its made by Siemens so not junk by any means. The other tack issue will require an aluminum ring to fit over the balancing collar. It seems the balancer collar has a touch of magnetism resulting in a bogus reading. Again a minor nuisance to correct. I think she's telling me she was fine without the bling Hahaha.
attachment.php


More on her later...

Paco
 

Attachments

  • fullsizeoutput_673.jpg
    fullsizeoutput_673.jpg
    119.3 KB · Views: 1,232
  • IMG_3141.jpg
    IMG_3141.jpg
    124.5 KB · Views: 1,236
  • IMG_3140.jpg
    IMG_3140.jpg
    139.8 KB · Views: 1,229
  • IMG_3137.jpg
    IMG_3137.jpg
    138.7 KB · Views: 1,231
OP
F

fnieto

Well-known member
Joined
Aug 27, 2013
Messages
1,401
Location
Tucson,Arizona
Worked around the breaker issue until the higher rated breaker arrives. Ran the machine for an hour after leveling, inspection and test cuts.

The leveling took a little longer than planed but the level used is super sensitive and the machine would relax after a few minutes.

Started at the inner headstock leveling feet working around making minute adjustments eventually finishing up at the headstock outer feet.
attachment.php


Tailstock.
attachment.php


attachment.php


Before the test cut I wanted to see the TIR of the 8" 3 Jaw chuck. Surprising it was only .0015". The test bar was then centered up to the tailstock to check values. A dial indicator of .0001" resolution was used. Now one can expect a couple of tenths variance in 16", but this machine proved to be absolutely dead nuts.

At the chuck.
attachment.php


A little past 1/2 way point (10-12") no value change.
attachment.php


At the live center/tailstock end. Absolutely no value change
attachment.php


Overall setup.
attachment.php


Very pleased to have these results, not many machines will ship to this level of accuracy.

Time for a test cut.

To be continued...

Paco
 

Attachments

  • IMG_3147.jpg
    IMG_3147.jpg
    95.4 KB · Views: 1,120
  • IMG_3148.jpg
    IMG_3148.jpg
    102.3 KB · Views: 1,121
  • IMG_3145.jpg
    IMG_3145.jpg
    124.9 KB · Views: 1,116
  • fullsizeoutput_676.jpg
    fullsizeoutput_676.jpg
    108.2 KB · Views: 1,123
  • IMG_3153.jpg
    IMG_3153.jpg
    134 KB · Views: 1,122
  • IMG_3154.jpg
    IMG_3154.jpg
    108.2 KB · Views: 1,117
  • IMG_3155.jpg
    IMG_3155.jpg
    106.8 KB · Views: 1,109
OP
F

fnieto

Well-known member
Joined
Aug 27, 2013
Messages
1,401
Location
Tucson,Arizona
A piece of 2" CR round bar was chucked up unsupported. The first pass was done with DOC at .0625". The surface finish was fairly nice with coils of hot (blue) chips rolling off. For the second pass, the RPM and feed was adjusted to allow the chip breakers to work as intended.
The straw colored z shaped (smaller) chips indicated the correct speed/feed. Same .0625" DOC was used for second pass. Both DOC where set using the 1 micron X scale.
The results: 2" - .125" (.0625 x 2) = 1.875

A 0-2" micrometer was used to verify the diameter in three equal spaces. The surface finish on the second pass was also very nice considering a used insert was used.
attachment.php


Woohoo! the new machine is finally dirty (this one for you Mike). The longer coils are from the first pass.You can see the blue/purple color vs the straw color on the smaller swarf.
attachment.php


The machine was ran through various speeds/feeds to get familiarized with its personality :)
The golden hour.
attachment.php


A couple of short videos.

Thanks for looking.
Paco
 

Attachments

  • IMG_3159.jpg
    IMG_3159.jpg
    108.2 KB · Views: 1,111
  • IMG_3160.jpg
    IMG_3160.jpg
    147.3 KB · Views: 1,113
  • IMG_3164.jpg
    IMG_3164.jpg
    131.8 KB · Views: 1,113
OP
F

fnieto

Well-known member
Joined
Aug 27, 2013
Messages
1,401
Location
Tucson,Arizona
Holy ****! That's phenomenal accuracy.

:beer:

Right!, I was waiting for someone to chime in. It's unbecoming of me to brag but this machine is dead nuts. No more sneaking up on final dimensions. The DRO is also very stable and accurate. For those who claim a 2 micron scale on the X axis is more than enough, I disagree.
The 1 micron X scale in rad is extremely accurate.
I now can machine two new back plates for the Bison 8" 4-jaw combination chuck and the 5C scroll chuck.

Back on the break rebuild.
Paco
 

LXCam

ALLIANCE MEMBER
Joined
Apr 23, 2013
Messages
19,090
Location
AZ
The last item on the punch list was a mounting bracket for the Hall sensor magnetic pick up for the tachometer.
A simple design made from 1/8" x 1" flat strap.

attachment.php


Thanks for looking.
Paco

Dang paco who'd have thought last Thursday was national tach day. I had the same chore except for a driveshaft. When my buddy made it in from Ontario canada he had the same type of bracket to which I said that'll never do, give me a few ;)


So I whipped this out.

IMG_3875.jpg

IMG_3877.jpg

IMG_3879.jpg

IMG_3882.jpg

Sorry for the side track but I figured you'd get a kick out of it since you like overkill so much. :D

Glad to see you're finally making chips except for the minor breaker set back. :thumbup:
 

LXCam

ALLIANCE MEMBER
Joined
Apr 23, 2013
Messages
19,090
Location
AZ
Hey Cam,
Good to hear from you!
Is that a kevlar/carbon-fiber prop shaft?
Les see the car man!

Paco

Of course it is. :beer:

And everything that you see that looks like CF, is. No expense has been spared on these one off parts. :evil:

IMG_3926.jpg

IMG_3897.jpg

IMG_3886.jpg
 
Last edited:

Finallygotit

ALLIANCE MEMBER
Joined
Jul 6, 2013
Messages
4,078
Location
Tucson, AZ
Right!, I was waiting for someone to chime in. It's unbecoming of me to brag but this machine is dead nuts. No more sneaking up on final dimensions. The DRO is also very stable and accurate. For those who claim a 2 micron scale on the X axis is more than enough, I disagree.
The 1 micron X scale in rad is extremely accurate.
I now can machine two new back plates for the Bison 8" 4-jaw combination chuck and the 5C scroll chuck.

Back on the break rebuild.
Paco

Honestly, I wouldn't be surprised if the lathe settles a little bit more but I'm sure you're going to be checking it.

:beer:
 

zmotorsports

ALLIANCE MEMBER
Joined
Oct 20, 2009
Messages
21,326
Location
Northern Utah
Yup, I'll be rechecking it in a week and again in a month. Just checking for twist from this point forward.

Paco

Granted yours is quite a bit heavier than my 13x40 Paco, but I was actually shocked mine didn't settle once I set it up. I checked it probably 4 times in the first six months and never made a single alteration after initial setup. I had fully expected to have to make at least one, possibly two, adjustments based off what I was being told but my lathe never did settle or change. I hope you experience the same.
 
OP
F

fnieto

Well-known member
Joined
Aug 27, 2013
Messages
1,401
Location
Tucson,Arizona
Granted yours is quite a bit heavier than my 13x40 Paco, but I was actually shocked mine didn't settle once I set it up. I checked it probably 4 times in the first six months and never made a single alteration after initial setup. I had fully expected to have to make at least one, possibly two, adjustments based off what I was being told but my lathe never did settle or change. I hope you experience the same.

I turned the first project on the machine yesterday and rechecked the level. Still dead on.

Thanks Mike,

Paco
 

zmotorsports

ALLIANCE MEMBER
Joined
Oct 20, 2009
Messages
21,326
Location
Northern Utah
I turned the first project on the machine yesterday and rechecked the level. Still dead on.

Thanks Mike,

Paco

Awesome Paco.:thumbup:

I just had to wonder, maybe your concrete down there in AZ doesn't get as hard as ours does up here and maybe that's why mine didn't settle.:lol:
 
To avoid these ads, REGISTER NOW!
Top Bottom