What does the cylinder look like? Any scarring? Was there any scarring on the seal? Sometimes these jacks utilize a crude machining slit in the upper cylinder wall to prevent the ram from over extending, unfortunately sometimes this area eats away at seals and the guide.

You are using an out of date browser. It may not display this or other websites correctly.
You should upgrade or use an alternative browser.
You should upgrade or use an alternative browser.
Overseas Jack Rebuild Help Tutorial.
- Thread starter Hiball
- Start date
Yes there are a few vertical scratch marks in the cylinder with corresponding marks in the seal cup . Not very deep but you can detect with a finger nail . Having never worked on a jack before I have no idea what critical tolerances are.
Are the marks up near the end of the cylinder? Which would be the factory groove I mentioned earlier,Or do they run the entire length? If a piece of slag has found its way in between the guide and cylinder wall and made a groove length wise in the bore, you will need to address that while working your way down to a fine sand paper finish. If the damage is severe... You may have to think about investing in a another Jack, unless you have the tools to machine a new cylinder. There have been some members who have filled grooves/rust pitting with super glue, which will still require finishing the cylinder wall to a smooth surface, Just another option. It's really hard to say without seeing the damage.
Last edited:
Hiball , thanks for the input . I'm going to try a small cylinder hone to see if I can polish the scratches . If that works I don't think the piston is as critical if I take off that high spot because the seal is what makes contact . Am I just dreaming?
Hiball , thanks for the input . I'm going to try a small cylinder hone to see if I can polish the scratches . If that works I don't think the piston is as critical if I take off that high spot because the seal is what makes contact . Am I just dreaming?
A Cylinder Hone will work for what you need, Just remember that you need to finish with a Fine Grit Stone that will leave a Nice Surface. Without having the cylinder here in front of me its impossible to know how much material you are going to need to remove, but remember the Guide/Seal size is specific to the Bore so any Deep Grooves might cause other issues if trying to remove too much Material. Obviously I would try and remove any High spot on the Guide to attempt to deter any future problems when riding over the Extension Relief.
Good Luck..
Very informative thread....thanks to all the contributors especially Hiball !
Wonder if anybody can give me any tips....read all 37 pages and I am thinking my next step is to replace the main ram seal/cup?
I have a 3.5 ton Craftsman circa late 90s. Model #950145 which I believe is a 214-50145 ? It is a quick lift jack so it has (4) valves. So far I have checked the fluid (Added a slight amount) and bled they system. Also I removed the main overload dust screw (some oil inside) and checked the adjustment (~1 turn out).
Jack has been lightly used over the years with no apparent leaks and when I used it several months ago it would leak down very slowly under load. Used it again and it seemed to work fine. Used it this week and it jacked the vehicle up enough to get one jack stand under and when I attempted to jack up the vehicle it would no longer lift it. It will pump up to height but will not go any further under load even if I am just standing on the saddle. Just wondering if anybody had any suggestions on the next step if it is repairable within reason. I know the HF equivalents go for $80; would love to fix this one for the price of an o-ring if possible") thanks.
thanks.
Wonder if anybody can give me any tips....read all 37 pages and I am thinking my next step is to replace the main ram seal/cup?
I have a 3.5 ton Craftsman circa late 90s. Model #950145 which I believe is a 214-50145 ? It is a quick lift jack so it has (4) valves. So far I have checked the fluid (Added a slight amount) and bled they system. Also I removed the main overload dust screw (some oil inside) and checked the adjustment (~1 turn out).
Jack has been lightly used over the years with no apparent leaks and when I used it several months ago it would leak down very slowly under load. Used it again and it seemed to work fine. Used it this week and it jacked the vehicle up enough to get one jack stand under and when I attempted to jack up the vehicle it would no longer lift it. It will pump up to height but will not go any further under load even if I am just standing on the saddle. Just wondering if anybody had any suggestions on the next step if it is repairable within reason. I know the HF equivalents go for $80; would love to fix this one for the price of an o-ring if possible
thanks.Very informative thread....thanks to all the contributors especially Hiball !
Wonder if anybody can give me any tips....read all 37 pages and I am thinking my next step is to replace the main ram seal/cup?
I have a 3.5 ton Craftsman circa late 90s. Model #950145 which I believe is a 214-50145 ? It is a quick lift jack so it has (4) valves. So far I have checked the fluid (Added a slight amount) and bled they system. Also I removed the main overload dust screw (some oil inside) and checked the adjustment (~1 turn out).
Jack has been lightly used over the years with no apparent leaks and when I used it several months ago it would leak down very slowly under load. Used it again and it seemed to work fine. Used it this week and it jacked the vehicle up enough to get one jack stand under and when I attempted to jack up the vehicle it would no longer lift it. It will pump up to height but will not go any further under load even if I am just standing on the saddle. Just wondering if anybody had any suggestions on the next step if it is repairable within reason. I know the HF equivalents go for $80; would love to fix this one for the price of an o-ring if possible
My recommendation would be to bite the bullet and remove the hydraulic unit from the frame and then verify the main ram seal, there is a good chance it's coming apart.
Thanks. I just removed the hydraulic unit. Now to just remove the nut !!!
Is it normal for the pump piston to come out when the handle is removed along with some hydraulic fluid ? Anyway I will report back on status of the main ram seal.
If the Pump Piston is connected to the Handle assembly, Yes if you don't remove the assembly 1st and back it out of the top of the Pump Piston, it Can and Will Pull the Pump Piston out, And Yes it will bring Oil with it.

The Picture above shows how you slide the handle assembly out of the pump piston after you remove the 2 bolts.
Last edited:
wkndwarrior29
Well-known member
I've browsed the forum and can't seem to find my answer so here goes, and hopefully this is a simple and not stupid question.
I have a Roush branded 3.5 Ton jack with a model number G-738 which leads me to believe it is the same as the Shin Fu G-737. It leaks oil when jacking around the pump piston. I do not have a large vice and have been hoping to replace the O-rings without a full disassembly, but have been unsuccessful in getting the jack apart. In the picture I drew an arrow where the leak is and where I have been trying to loosen the nut. I tried a small cheater on my wrench but wanted a sanity check before I break anything.
Am I headed down the wrong path? Is this reverse threaded? Or do I just need to break out a larger cheater?
Any help is appreciated. Thank you!
Attachments

My recommendation would be to bite the bullet and remove the hydraulic unit from the frame and then verify the main ram seal, there is a good chance it's coming apart.
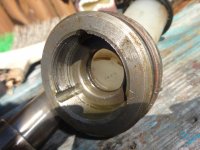
Hiball you were correct. The main ram seal was coming apart. Thanks for the assistance ! I think unless anybody has any other suggestions I will swap out the Ucup and put in some fresh oil. None of the other O-rings appeared to be leaking so should I mess with them ? Below are some pics of the Ucup seal. Measurements are 24.5x40x9.7MM (25x40x10); not sure if I will be able to locate one locally.


Last edited:
I've browsed the forum and can't seem to find my answer so here goes, and hopefully this is a simple and not stupid question.
I have a Roush branded 3.5 Ton jack with a model number G-738 which leads me to believe it is the same as the Shin Fu G-737. It leaks oil when jacking around the pump piston. I do not have a large vice and have been hoping to replace the O-rings without a full disassembly, but have been unsuccessful in getting the jack apart. In the picture I drew an arrow where the leak is and where I have been trying to loosen the nut. I tried a small cheater on my wrench but wanted a sanity check before I break anything.
Am I headed down the wrong path? Is this reverse threaded? Or do I just need to break out a larger cheater?
Any help is appreciated. Thank you!
Standard Thread, There is a couple Orings on the end of the Pump Piston IRC, Possibly a Gland seal on the Cylinder also. The biggest Problem with trying to remove the Pump Cylinder while the Hydraulic Unit is in the Frame is its going to trying to keep it stationary while trying to remove. If you can push the Pump Piston In, You might be able to Zip it off with a Impact, Otherwise you are probably going to need to secure the Jack to use a Wrench/Cheater.
Last edited:
Hiball you were correct. The main ram seal was coming apart. Thanks for the assistance ! I think unless anybody has any other suggestions I will swap out the Ucup and put in some fresh oil. None of the other O-rings appeared to be leaking so should I mess with them ? Below are some pics of the Ucup seal. Measurements are 40x24.5x9.7MM (40x25x10); not sure if I will be able to locate one locally.


Im guessing 40x24x10, You can Measure the actual Hard part of the Piston to get the ID, But a 24MM ID ucup will measure roughly 24.5+ on the Backside. There is a Number in my Signature for Hydraulic Parts Supply in Kansas, Or some Members buy them from The Oring Store or Lazzar Hydraulics. In regards to the Orings, I always like to replace everything while I have Jacks apart, It never pays in the Long run to Fix only the Problem.
I would like to add.. I know some members have had luck sourcing seal kits from Shinn fu, it might be worth a try.
Last edited:
wkndwarrior29
Well-known member
Thanks Hiball, I'll give it another go around with a larger cheater
Im guessing 40x24x10, You can Measure the actual Hard part of the Piston to get the ID, But a 24MM ID ucup will measure roughly 24.5+ on the Backside. There is a Number in my Signature for Hydraulic Parts Supply in Kansas, Or some Members buy them from The Oring Store. In regards to the Orings, I always like to replace everything while I have Jacks apart, It never pays in the Long run to Fix only the Problem.
I would like to add.. I know some members have had luck sourcing seal kits from Shinn fu, it might be worth a try.
Good point on replacing other O-rings, will start pulling and measuring them. I do have a schematic of what may be the same power unit Shinn Fu/Magic Lift 3 ton. Would you suggest replacing All the orings lableled C, F, H, and K..... in addition to "D" which is the UCup seal ? Sending PM regarding Useal purchase. Thanks.

Good point on replacing other O-rings, will start pulling and measuring them. I do have a schematic of what may be the same power unit Shinn Fu/Magic Lift 3 ton. Would you suggest replacing All the orings lableled C, F, H, and K..... in addition to "D" which is the UCup seal ? Sending PM regarding Useal purchase. Thanks.
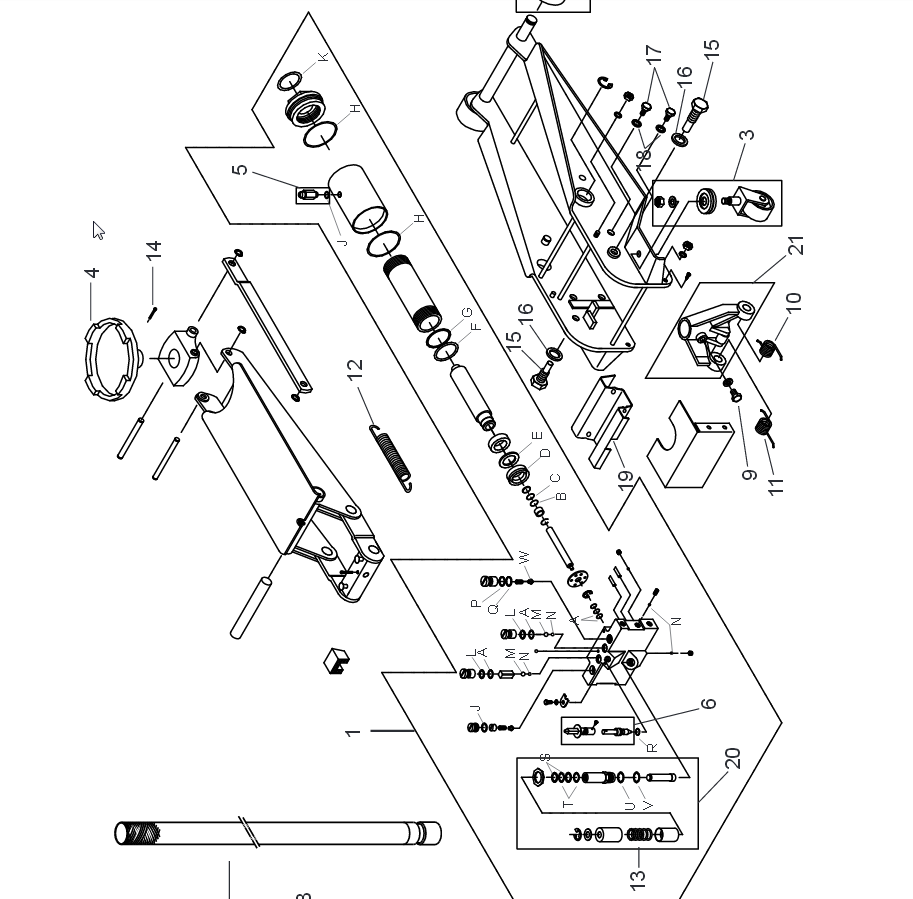
Yes, But I would also attempt to secure a "Kit" versus piece all the Orings together (unless you have a Local Shop), As I stated earlier you might check with Shinn Fu or take the Shinn fu part number for the Kit and Google it to see if you get any hits. Also Double check the ID of that UCUP, I believe it to be a 24 versus 25, If you measure the actual Ram where the Ucup sits it will give you the Correct size.
Yes, But I would also attempt to secure a "Kit" versus piece all the Orings together (unless you have a Local Shop), As I stated earlier you might check with Shinn Fu or take the Shinn fu part number for the Kit and Google it to see if you get any hits. Also Double check the ID of that UCUP, I believe it to be a 24 versus 25, If you measure the actual Ram where the Ucup sits it will give you the Correct size.
I will try and search for the shinn fu part # (not listed in manual) and associated kit. The 24.5 MM I measured was actual dimensions of the Ram. I just measured the ID of the UCUP and it is also 24.5 MM (sits tight on the Ram). It sounds like I need a 40x24x10 ? Thanks.
I will try and search for the shinn fu part # (not listed in manual) and associated kit. The 24.5 MM I measured was actual dimensions of the Ram. I just measured the ID of the UCUP and it is also 24.5 MM (sits tight on the Ram). It sounds like I need a 40x24x10 ? Thanks.
Hmmm.. Normally they are oversized on the back side in comparison to the actual ram, then again we are talking about .5 MM.
RandyWilliamson
New member
- Joined
- Feb 15, 2015
- Messages
- 4
HI everyone!
You guys have inspired me to keep my Michelin G-735..its been good to me and has stood outside in the elements for years..with only shade every now and then. Anyway it got to the point where it would do less and less lift with each stroke until finally it will lift up with no weight...but with weight it will NOT lift and the few last times it did it would slowly go down. It has no leaks that I can see or make out...but I did try to add more fluid via the filler plug before I took it apart. It did seem to be missing some but it did not get any better....I took it apart to check its seals...and low and behold they all look fine. So I dont know what is going on. I also like a goof lost the little ball that goes inside for the handle tightening bolt(that releases it when jacked up) where should I source a replacement? And what do you recommend I do to repair. I did find a procedure that I had not tried before dissassembly...but I dont know im iffy about it. Like I said I never noticed a leak..and well I dont see any Orings damaged. I also did NOT touch the screws that say do not adjust..I dont know how to adjust them and well they are not leaking so I figured they cannot be the problem and well I should leave it well enough alone.
This is the procedure I did NOT try:
http://newsgroups.derkeiler.com/Archive/Rec/rec.autos.tech/2009-03/msg00014.html
What do you think I should do or replace.? and where to now for the ball? i tried magnets and tried to scour the earth it fell to but no luck...i lost a lot of time trying to find it. The only thing to do next is to go complete archeaologist in that area. Very dissapointed I dropped the ball. Where does that small screen go ? I found it inside the outer chamber it is half resting on in the picture. I thought it might be for the filler hole but saw some postings stating it goes elsewhere. I beleive what is called the ram seal I kind of took it off to inspect it and now im not sure if the recessed side area should go faceing up towards the snap ring or if it should go down facing the plastic white washer. (in the pic I have it off w recess side facing up)
Attachments


Last edited:
HI everyone!
You guys have inspired me to keep my Michelin G-735..its been good to me and has stood outside in the elements for years..with only shade every now and then. Anyway it got to the point where it would do less and less lift with each stroke until finally it will lift up with no weight...but with weight it will NOT lift and the few last times it did it would slowly go down. It has no leaks that I can see or make out...but I did try to add more fluid via the filler plug before I took it apart. It did seem to be missing some but it did not get any better....I took it apart to check its seals...and low and behold they all look fine. So I dont know what is going on. I also like a goof lost the little ball that goes inside for the handle tightening bolt(that releases it when jacked up) where should I source a replacement? And what do you recommend I do to repair. I did find a procedure that I had not tried before dissassembly...but I dont know im iffy about it. Like I said I never noticed a leak..and well I dont see any Orings damaged. I also did NOT touch the screws that say do not adjust..I dont know how to adjust them and well they are not leaking so I figured they cannot be the problem and well I should leave it well enough alone.
This is the procedure I did NOT try:
http://newsgroups.derkeiler.com/Archive/Rec/rec.autos.tech/2009-03/msg00014.html
What do you think I should do or replace.? and where to now for the ball? i tried magnets and tried to scour the earth it fell to but no luck...i lost a lot of time trying to find it. The only thing to do next is to go complete archeaologist in that area. Very dissapointed I dropped the ball. Where does that small screen go ? I found it inside the outer chamber it is half resting on in the picture. I thought it might be for the filler hole but saw some postings stating it goes elsewhere. I beleive what is called the ram seal I kind of took it off to inspect it and now im not sure if the recessed side area should go faceing up towards the snap ring or if it should go down facing the plastic white washer. (in the pic I have it off w recess side facing up)
Hmm... I think you better take a better look at that UCUP, It doesn't appear to be fine.

In Regards of what to change.. I would Change Everything while you have it apart, Obviously the UCUP is a Gimme as it appears to be split. The Ucup gets its name because of the U Channel on the Pressure size, So in this case the Backside (Flat side) should made up against the White Washer and the U side towards the Pressure or the Snap ring side if you wish. The Screen that you found goes into the Intake port at the bottom of the Unit, In between the Reservoir and Cylinder and acts like a filter to prevent debris from entering the Valve system. Ill need to do some scouring to find the Ball size for the Release Valve, Mainly because I don't spend a lot of time on these jacks to recall from Memory. Its probably in this thread a few dozen times, but it will need to be extracted.
Here is a Link to Lazzars in regards to a Seal Kit, As long as the Jack isn't too beat up from being in the Elements the Price looks good and will save you a lot of Mic time.
Last edited:
RandyWilliamson
New member
- Joined
- Feb 15, 2015
- Messages
- 4
HAH !! I have to laugh at myself right now!! I thought that was to slip it on and off since it has such a perfect and clean cut! HAHAHA. Thank you Hiball you are awesome..im going to think about that seal kit reason is I dont want to take out the other "Do not adjust" screws for fear of not getting it back in just right. And well since they are not leaking. Do you know the size of the Ucup I need and does it come from that blue brand you like? I think I sort of want to do just that and the oring for the release bolt and of course the ball that warped time and space and travelled to another dimension. (I still can't find it..and I took a comb to the area) Thank you again.
I know you had to have thought this ***** slipped it off and didnt think it was bad!! hahahaha In my defense it is a really really clean slice..and the ends **** right up to each other...I guess in all sillyness the fact that the pressurized oil will seep right thru that...somehow escaped me. lol!
How would I go about placing that screen back into place? I have not seperated the outer body from the base...i was only able to remove the top nut/cover. Actually Id' like those 2 Orings for that too. I dont think it the shell comes out of the base. Actually in Lazzars pic of 737 it shows it clearly does. How would that screen come out of where ever it goes ?
Last edited:
HAH !! I have to laugh at myself right now!! I thought that was to slip it on and off since it has such a perfect and clean cut! HAHAHA. Thank you Hiball you are awesome..im going to think about that seal kit reason is I dont want to take out the other "Do not adjust" screws for fear of not getting it back in just right. And well since they are not leaking. Do you know the size of the Ucup I need and does it come from that blue brand you like? I think I sort of want to do just that and the oring for the release bolt and of course the ball that warped time and space and travelled to another dimension. (I still can't find it..and I took a comb to the area) Thank you again.
I know you had to have thought this ***** slipped it off and didnt think it was bad!! hahahaha In my defense it is a really really clean slice..and the ends **** right up to each other...I guess in all sillyness the fact that the pressurized oil will seep right thru that...somehow escaped me. lol!
How would I go about placing that screen back into place? I have not seperated the outer body from the base...i was only able to remove the top nut/cover. Actually Id' like those 2 Orings for that too. I dont think it the shell comes out of the base. Actually in Lazzars pic of 737 it shows it clearly does. How would that screen come out of where ever it goes ?
No Worries... Its Obviously up to you in regards to what you replace, but my Experience tells me that its best to just take care of all the Seals while you have it apart, Obviously one must account for there time and dependent on how you value yours, Its solely up to you. The Reservoir should come off with a couple side to side whacks, There is some models that are welded to the Hydraulic block, But I don't believe yours is one of them. Once the Reservoir is Off, you can reinsert the Screen back into the intake hole, Its strictly a friction fit, but 9 times out of 10 I find them in the bottom of the Reservoir when dismantling.
RandyWilliamson
New member
- Joined
- Feb 15, 2015
- Messages
- 4
Sounds like that screen will just come back out...do u recommend leaving it out?
How can I find the ball size?
How can I find the ball size?
RandyWilliamson
New member
- Joined
- Feb 15, 2015
- Messages
- 4
Maxboi reported there was a problem with that kit:
http://www.garagejournal.com/forum/showthread.php?t=217693
If I bought o-ring set from harbor freight..then ordered check ball and a poly ucup would I be alright or is there a special oring I would still be missing?
If I took out the 3 "do not adjust" screws...would I be ok maybe counting the threads they currently show and putting them back in close to the same amount they showed originally?
Maxboi reported there was a problem with that kit:
http://www.garagejournal.com/forum/showthread.php?t=217693
If I bought o-ring set from harbor freight..then ordered check ball and a poly ucup would I be alright or is there a special oring I would still be missing?
If I took out the 3 "do not adjust" screws...would I be ok maybe counting the threads they currently show and putting them back in close to the same amount they showed originally?
It might be best to contact Marc at Lazzar and simply ask him about the kit, in regards to the "shelf Oring kits", they are extremely generic in sizing and more than likely you won't come close to filling your needs. In regards to the adjustable valves, Sure.. You can count the revolutions from there current position to completely closed and as long as you take good notes you can easily get them back to factory settings. In regards to that kit that MaxBoi had issues with, it appears that kit was direct from Shin Fu, Not Lazzars.
Last edited:
Just a follow up on the AC Delco 34700 . I filled off the stuck piece of metal slag from the piston rod and checked dimensions . Honed the cylinder with 240 and finished up with 320 , all had . there was still a slight scratch about a 1/2" long half way down the cylinder . I filled it with JB weld and the next day honed again with the 320 . I bought the seal kit direct from Delco . What a joke . It did have the plastic cup and O ring for the piston and tank cover but only half the O rings for the main pump and non for the quick lift pump . The reservoir top and bottom seals were so poorly made ( rough edges ) that I decided to use the old ones which looked better . After a thorough cleanng I put it all back together , set both overloads at 1-1/2 turns as before and gave it a test . It lifted to the frame fine but needed a lot of force on the handle to lift the truck , but it did lift. So after reading all about these overload valves I backed off on the main pump valve several turns to eliminate it and adjusted the quick lift out 2-1/2 turns , that seems to work , goes to the frame but won't lift a load . Then I adjusted the main valve 1 turn out and that lifted the wheels off the floor . I let it stand about half an hour and it stayed put . I don't know why the adjustment are so different from the tear down .Time will tell but for now it looks like have a working jack .
Yes, But I would also attempt to secure a "Kit" versus piece all the Orings together (unless you have a Local Shop), As I stated earlier you might check with Shinn Fu or take the Shinn fu part number for the Kit and Google it to see if you get any hits. Also Double check the ID of that UCUP, I believe it to be a 24 versus 25, If you measure the actual Ram where the Ucup sits it will give you the Correct size.
UPDATE: Well I finally tracked down, ordered and received the seal kit directly from Shinn Fu (took a while to get it shipped). Anyway I just got finished replacing the Ucup and back up ring and a few other orings in the kit (did not mess with the valves). Also replaced the pump piston oring. Assembled everything, put some fresh fluid in and bled it for air bubbles. The jack is operating exactly how it did prior to tear down. I am puzzled since the Ucup from the photos was obviously shot and no way it could hold pressure ? Anybody have any ideas what is up ? Jack operates as expected but will not jack up during load. Any assistance would be helpful; really was hoping not to have to purchase a new jack. Thanks !
UPDATE: Well I finally tracked down, ordered and received the seal kit directly from Shinn Fu (took a while to get it shipped). Anyway I just got finished replacing the Ucup and back up ring and a few other orings in the kit (did not mess with the valves). Also replaced the pump piston oring. Assembled everything, put some fresh fluid in and bled it for air bubbles. The jack is operating exactly how it did prior to tear down. I am puzzled since the Ucup from the photos was obviously shot and no way it could hold pressure ? Anybody have any ideas what is up ? Jack operates as expected but will not jack up during load. Any assistance would be helpful; really was hoping not to have to purchase a new jack. Thanks !
Ok I hadn't go back and check on your initial problem, based off the Ucup condition it's possible that a piece made its way into the valve system, thus it's preventing a ball from seating and keeping you from building cylinder pressure.
Notice any handle feedback pressure when trying to lift the load?
Last edited:
Thanks again Hiball....I think I may have spoke too soon. My test was to try and jack myself up (what was I thinking); anyway just put it under the vehicle and it appears to be working ! Holding a load with no apparent leak down. Thank you for all your help. Also this jack has screens that appear to prevent any debris to get into the valve system (at least that is what it appears).
Thanks again Hiball....I think I may have spoke too soon. My test was to try and jack myself up (what was I thinking); anyway just put it under the vehicle and it appears to be working ! Holding a load with no apparent leak down. Thank you for all your help. Also this jack has screens that appear to prevent any debris to get into the valve system (at least that is what it appears).
Good to here.. Sometimes those screens find themselves out of place and end up lying in the reservoir.
hello hiball
i got a Jack like the red one at the top, and i got a challenge to you
can you make a Injector pop tester of the floor Jack ?
please doo so
thanks from Michael Bech Hansen from Denmark
I actually had a friend who made one out of a porta-power, Back when I was messing with older IDI diesels, I actually bought one off ebay that needed rebuilt fairly cheap. I've seen numerous plans on some of the popular diesel forums where they utilized bottle jacks as power units.
Don't forget about PPE..

luv2rallye
Member
- Joined
- Jun 4, 2014
- Messages
- 9
Hello Hiball:
You helped me back on posts #603-616 and you certainly are an expert at floor jacks! Thank you. Perhaps you can help me again? I'm the original owner of a Sears model 328.12001 1.5 ton floor jack (the green one - serial 159584043). It's been working but I've noticed when you raise the jack handle and don't wait at least 3 seconds before pushing it down, the upper arm doesn't raise very far. If you wait the full 3 seconds, the arm goes up the full amount. This gets quite annoying as it now takes 5 times more handle pumps to raise the car than it used to. I assumed the fluid isn't filling the reservoir quickly enough through the suction/delivery assembly so I disassembled it and cleaned it (ya I found the 2 balls in there this time). However this made no difference. (I think this was probably happening after I got it working last time but I just didn't notice or i've just been putting up with it).
Also do you know the manufacturer? All it says is it's made in Japan.
Hello Hiball:
You helped me back on posts #603-616 and you certainly are an expert at floor jacks! Thank you. Perhaps you can help me again? I'm the original owner of a Sears model 328.12001 1.5 ton floor jack (the green one - serial 159584043). It's been working but I've noticed when you raise the jack handle and don't wait at least 3 seconds before pushing it down, the upper arm doesn't raise very far. If you wait the full 3 seconds, the arm goes up the full amount. This gets quite annoying as it now takes 5 times more handle pumps to raise the car than it used to. I assumed the fluid isn't filling the reservoir quickly enough through the suction/delivery assembly so I disassembled it and cleaned it (ya I found the 2 balls in there this time). However this made no difference. (I think this was probably happening after I got it working last time but I just didn't notice or i've just been putting up with it).
Also do you know the manufacturer? All it says is it's made in Japan.
It could be a possibility of a couple things, Weak Pump Seals + Overfilled Reservoirs could create Vacuum issues, You could try pulling the Fill plug and see if this condition improves. If that doesnt fix the problem, More than likely you have some sort of contaminate blocking the Intake/Intake Vein below the lower ball and its restricting the flow of Oil, But there is enough vacuum created to eventually fill the Pump Cylinder (since it works if you wait) which would indicate the Seals/Piston Surface is good.
I dont have time to check on that Model, but i believe the Green/White Japan jacks where made by a company called Yasui.
luv2rallye
Member
- Joined
- Jun 4, 2014
- Messages
- 9
Once again you have the answer. It was overfilled and creating a vacuum issue (removing the plug made it work perfectly). Thank you!
cyclenut63
New member
- Joined
- Dec 29, 2013
- Messages
- 1
OK ! my first post ! Thanks for the floor jack tutorial, with your help I was able to revive my 2 ton floor jack for only $11. The satisfaction is worth more than the savings. I just hate to throw anything away when it can be fixed. Cyclenut63
icecoldtony
New member
- Joined
- May 9, 2015
- Messages
- 1
Hi Hiball, I've got a question about reassembling the floor jack. I've got a wilmar w1634 which I disassembled and rebuilt but putting it together I couldn't get the spring that keeps the handle up on. As far as I can tell it needs to be compressed slightly to allow the bolt to go on. I just can't seem to do that and put it together.
Hi Hiball, I've got a question about reassembling the floor jack. I've got a wilmar w1634 which I disassembled and rebuilt but putting it together I couldn't get the spring that keeps the handle up on. As far as I can tell it needs to be compressed slightly to allow the bolt to go on. I just can't seem to do that and put it together.
They can be a bear sometimes, I normally try and keep the spring in the loosest position possible, which means not necessarily having one of the legs in the correct spot and then after I get the bolt started, I use a heavy duty 90 degree pick to pull it over the bump that keeps it secured.
cascabelin
New member
- Joined
- May 24, 2015
- Messages
- 1
Great post, I have already fixed two MVP floor jacks. I'm new here, from Mexico.
I just registered to say thank you very much to Hiball. We all know that jacks aren't cheap, but the fact is, TIME is MONEY and because of you Hiball I can spend the time with my family now instead of on a new jack. For the record I spent like 8 bucks on jack oil and 7 bucks on seals. DEAL!