To avoid these ads, REGISTER NOW!

Overseas Jack Rebuild Help Tutorial.

OP
H

Hiball

Well-known member
Joined
Apr 30, 2009
Messages
14,026
Location
Missery
I can get it up to full extension but not with any load at all, it will try lowering inbetween pumps & once fully extended it will lower semi slowly under it's own weight
It lowers much slower than when a return valve is open


Also when handle is turned anti clockwise to open release valve it doesnt drop any faster & I can still pump it up

Yes filled & bled, tried for about 20 mins cycling it & checking oil level

I would look into the release valve, something is awry.
 
To avoid these ads, REGISTER NOW!

James66

Member
Joined
Jan 10, 2020
Messages
5
Location
Uk
Ok thanks, is it worth stripping out the overload & the other site incase of blockages?
If so I'm guessing I should screw in counting the turns so I know how many turns out to set them to when re-assembled?
 
OP
H

Hiball

Well-known member
Joined
Apr 30, 2009
Messages
14,026
Location
Missery
Ok thanks, is it worth stepping out the overload & the other site incasenof blockages?
If so I'm guessing I should screw in counting the turns so I know how many turns out to set them to when re-assembled?

It can’t hurt, especially since your Ucup was in pieces. Yes I would get the current setting prior to disassembly. It’s possible it’s got something holding it open, but without knowing what you disassembled, I started with the release valve. I would add that you look at the working valve also, if there is **** in there, it will cause it’s own issues. The main problem I see when people reinstall the release is they don’t get it installed in the locking washer correct and it prevents it from seating correctly. Or they bottom the outer hex portions down before the release stem/needle can get to where it needs to be. It’s a give and take when reinstalling, as you tighten the assembly you need to spin the gear to retract the internal mechanism all while tightening the assembly till it bottoms out.
 
Last edited:

James66

Member
Joined
Jan 10, 2020
Messages
5
Location
Uk
Ok, I'll pull it out tomorrow & see what's what
I dont suppose you know what brands the orange ones were sold under?
Be nice to properly restore it, got an 80's blue point engine hoist which is still 100% working, madness how modern equipment isnt even in the same league as the old stuff
 

RTM

Well-known member
Joined
May 13, 2019
Messages
13,063
Location
SF Bay Area
Overseas Jack ID

Hey gang

Can anyone ID this jack manufacturer? I bought it used, and am in need of the universal that connects the handle to the valve, (rivets broke), and want to see if I can just buy the part (will add dimensions here later, with a pic). I may need to do some work on the valves, as the fast / power lift doesn't seem to switch right, was a bear to lift once it contacted the axle of the truck. I have not checked it for holding ability yet, just refilled it, and used it to move furniture out of a pod, so nothing challenging yet. More pix here

Thanks HiBall for starting and maintaining this thread over the years, and to all the participants who contributed knowledge.

IMG_20200109_091821-X2.jpg
 
Last edited:

swegmike

Member
Joined
Jan 1, 2020
Messages
16
Location
VA
Well the label says 3000 lbs. So it 1.5 ton jack. As for the rivots, you may be able to match the rivet size with those in a hardware store, or take it to a machine shop for them to replace them. What does it say in the scratched area? Is there a model number or some product name in this area?
 
OP
H

Hiball

Well-known member
Joined
Apr 30, 2009
Messages
14,026
Location
Missery
Re: Overseas Jack ID

Hey gang

Can anyone ID this jack manufacturer? I bought it used, and am in need of the universal that connects the handle to the valve, (rivets broke), and want to see if I can just buy the part (will add dimensions here later, with a pic). I may need to do some work on the valves, as the fast / power lift doesn't seem to switch right, was a bear to lift once it contacted the axle of the truck. I have not checked it for holding ability yet, just refilled it, and used it to move furniture out of a pod, so nothing challenging yet. More pix here

Thanks HiBall for starting and maintaining this thread over the years, and to all the participants who contributed knowledge.

IMG_20200109_091821-X2.jpg

The smaller aluminum floor jacks all seem to have the same behavior once the load is reached, at that point the speed portion bypasses and power side works alone. The overall handle feedback increasing is a combination of the jack now against the load and the size of the pump piston in comparison to the cylinder. Who knows what brand of sticker was applied, Tons of resellers including HF, Arcan, NOS or Larin to name a few. In regards to the universal joint and a broken rivet I suspect you could fix the old one with a small bolt or new rivet?
 

James66

Member
Joined
Jan 10, 2020
Messages
5
Location
Uk
Hiball

Thanks for the help, stripped it out & flushed with bit more oil & there was a fair bit of crud that come out
Now fully working but I have a new leak �� on the pump rod

Out of interest is the sears 328.12001 main seal 40x22x10?
Would be good to know so I know which rebuild kit to order to get everything easier

Thanks again
 
OP
H

Hiball

Well-known member
Joined
Apr 30, 2009
Messages
14,026
Location
Missery
Hiball

Thanks for the help, stripped it out & flushed with bit more oil & there was a fair bit of crud that come out
Now fully working but I have a new leak �� on the pump rod

Out of interest is the sears 328.12001 main seal 40x22x10?
Would be good to know so I know which rebuild kit to order to get everything easier

Thanks again

That’s the problem with only fixing 1 problem, generally you will always be time ahead if your strip the entire hydraulic unit and replace all seals/components. In regards to sears jack in question, I’m not 100% sure. It’s a common size in 10 and 12mm thickness for jacks from the era. The best advice is to measure the pump piston diameter, get a rough cross section for the Oring and talk to the supplier of choice, same goes for the Oring inside the tank nut.
 
OP
H

Hiball

Well-known member
Joined
Apr 30, 2009
Messages
14,026
Location
Missery
I’m sure this has been asked, but is it ok to use hydraulic oil for a tractor to top off a floor jack?

In regards to seal compatibility, Sure... depending on the oil weight etc it can possible slow things down depending on the operating temps etc.
 

jalmbe5

Member
Joined
Aug 12, 2013
Messages
5
Location
Holden, LA
I'm trying to repair my floor jack which will not raise a load anymore. It's an MVP G-630WM. There are no visible leaks. I've taken it apart and found a crack in u-cup seal. I measured the seal with calipers and it looks like a 24mmx40mmx10mm (or 8mm) is the closest match. My seal seems to be kind of unique. It has a notch or step on the OD of the bottom (flat, not cup) side. This stepped section sits down in a mating backup washer. All of the seals and backup washers I see are flat and don't "mate" together like mine. Is this important? If I get a regular u-cup seal should I get a new regular flat backup washer and not reuse the stepped one?
 

Attachments

  • IMG_20200112_220548151.jpg
    IMG_20200112_220548151.jpg
    108.3 KB · Views: 44
  • IMG_20200112_220651874.jpg
    IMG_20200112_220651874.jpg
    120.3 KB · Views: 43
  • IMG_20200112_220728756.jpg
    IMG_20200112_220728756.jpg
    82.5 KB · Views: 40
  • IMG_20200112_220746208.jpg
    IMG_20200112_220746208.jpg
    113.8 KB · Views: 39
OP
H

Hiball

Well-known member
Joined
Apr 30, 2009
Messages
14,026
Location
Missery
I'm trying to repair my floor jack which will not raise a load anymore. It's an MVP G-630WM. There are no visible leaks. I've taken it apart and found a crack in u-cup seal. I measured the seal with calipers and it looks like a 24mmx40mmx10mm (or 8mm) is the closest match. My seal seems to be kind of unique. It has a notch or step on the OD of the bottom (flat, not cup) side. This stepped section sits down in a mating backup washer. All of the seals and backup washers I see are flat and don't "mate" together like mine. Is this important? If I get a regular u-cup seal should I get a new regular flat backup washer and not reuse the stepped one?

The majority of Ucups that I’ve seen like that are made of BN and that stepped washer serves as a backup to prevent extrusion. If it was mine, I would replace the entire seal/washer with a Poly Ucup in the correct size and thickest seal I could fit between the steel guide and Snap ring.

I suppose if you where wanting to retain the use of a backup washer you could attempt to source one or modify the current one to accept a flat Ucup.
 
Last edited:

swegmike

Member
Joined
Jan 1, 2020
Messages
16
Location
VA
On the stepped washer and seal, my 3ton Sears jack had an outside edge like yours on the backing washer used in the pump check valve and then the oring. Since I was not able to find a replacement stepped washer, I just went with a regular backing washer and oring as-is done nowadays. I wonder if all Chinese jacks use green main pump seals - the color of jade for some reason. But I haven't seen aftermarket ucups in this green color.
 

swegmike

Member
Joined
Jan 1, 2020
Messages
16
Location
VA
Back around page 22 on the forum there was discussion on removing the stepped edge of the main RAM shaft since it causes drag. However, I wonder if one can put two different ucups in series in floor jacks. That is ucup #1 has one inner diameter, followed by ucup #2 that has the inner diameter of the step and then one doesn't have to remove the step and also get twice the benefit of the ucup. The same could be done for the backup washers too in combination with these ucups. This should work since various hydraulic system diagrams show ucups in series (2 or more) not to mention stacked V cups. In this case, it is U instead of V! :)
 
OP
H

Hiball

Well-known member
Joined
Apr 30, 2009
Messages
14,026
Location
Missery
Back around page 22 on the forum there was discussion on removing the stepped edge of the main RAM shaft since it causes drag. However, I wonder if one can put two different ucups in series in floor jacks. That is ucup #1 has one inner diameter, followed by ucup #2 that has the inner diameter of the step and then one doesn't have to remove the step and also get twice the benefit of the ucup. The same could be done for the backup washers too in combination with these ucups. This should work since various hydraulic system diagrams show ucups in series (2 or more) not to mention stacked V cups. In this case, it is U instead of V! :)

Yeah I wouldn’t back to back “piston” application Ucups, that’s asking for problems, A Ucup won’t provide a solid or uniform base for the stacked Ucup to work properly.
 

swegmike

Member
Joined
Jan 1, 2020
Messages
16
Location
VA
is their a dye (or UV) compatible with hydraulic fluid? If so, then it will be easy to track down hydraulic oil leaks.
 
OP
H

Hiball

Well-known member
Joined
Apr 30, 2009
Messages
14,026
Location
Missery
is their a dye (or UV) compatible with hydraulic fluid? If so, then it will be easy to track down hydraulic oil leaks.

Not sure.. Tracking down leaks isn’t overly difficult, not to mention that due to some seals inherit design, it’s common for some seals to allow a “small” film of oil to coat the rod surface. It would be like taking a black light to your local No-tell Motels comforter.
 

jalmbe5

Member
Joined
Aug 12, 2013
Messages
5
Location
Holden, LA
The majority of Ucups that I’ve seen like that are made of BN and that stepped washer serves as a backup to prevent extrusion. If it was mine, I would replace the entire seal/washer with a Poly Ucup in the correct size and thickest seal I could fit between the steel guide and Snap ring.

I suppose if you where wanting to retain the use of a backup washer you could attempt to source one or modify the current one to accept a flat Ucup.

Thank you Hiball! The shaft has an additional step at the the backup washer so I think I'll keep it and just trim the washer to be flat. Thanks again for your assistance and the wealth of information in this thread.
 
OP
H

Hiball

Well-known member
Joined
Apr 30, 2009
Messages
14,026
Location
Missery
Thank you Hiball! The shaft has an additional step at the the backup washer so I think I'll keep it and just trim the washer to be flat. Thanks again for your assistance and the wealth of information in this thread.

Yes, If there is a step on the Ram, it will either need to go or trim the washer.
 
To avoid these ads, REGISTER NOW!

jalmbe5

Member
Joined
Aug 12, 2013
Messages
5
Location
Holden, LA
Yes, If there is a step on the Ram, it will either need to go or trim the washer.

I trimmed the washer and got everything back together. I think I got the air bled out but I'm not sure. It will lift a load now, but it won't start lifting on the first stroke of the handle. I have to stroke it once then on the next stroke it will lift. That's if I'm able to bring the handle all the way up then down. If I'm in a situation where I can't bring the handle all the way up, such as trying to jack my truck under the rear axle differential and the handle hits the bumper, then it takes several pumps before it'll start lifting. Do you think it still needs to be bled? What other issues could I have?

Thanks,

Jarrett
 
OP
H

Hiball

Well-known member
Joined
Apr 30, 2009
Messages
14,026
Location
Missery
I trimmed the washer and got everything back together. I think I got the air bled out but I'm not sure. It will lift a load now, but it won't start lifting on the first stroke of the handle. I have to stroke it once then on the next stroke it will lift. That's if I'm able to bring the handle all the way up then down. If I'm in a situation where I can't bring the handle all the way up, such as trying to jack my truck under the rear axle differential and the handle hits the bumper, then it takes several pumps before it'll start lifting. Do you think it still needs to be bled? What other issues could I have?

Thanks,

Jarrett

It’s kinda the nature of the beast of any jack that uses a 90 degree pump piston, it’s why Walker created the angled pump to allow more stroke under vehicles. It could also be a weak pump seal or rod surface issue in that particular sealing zone.
 

RTM

Well-known member
Joined
May 13, 2019
Messages
13,063
Location
SF Bay Area
As for the rivots, you may be able to match the rivet size with those in a hardware store, or take it to a machine shop for them to replace them. What does it say in the scratched area? Is there a model number or some product name in this area?

Turns out I had thought of this, but didn't remember why it didn't work. The universal is some type of Cardan Joint, and the rivets that broke don't go through, the cross shaft is in the way.

IMG_20200120_144901-X2.jpg


Some type of blind rivet or expansion plug was needed, so I just bought a new joint for $15 (more than the jack itself). It needed a 12mm bore, should be here in a week. New one rated for 26Nm, so probably much stronger than the old POS. Had to press out the old pin shaft (face up on right piece), and got to play with the Dake 001 press, and it worked easily the first time (little victories)

The area in the photo obliterated by scratches is just min and max heights.

Poked through all the "racing" "1.5T" manuals at HCRCnow, and didn't find any with the odd set up of ports mine has. Will look harder later.

But, should be back in business next weekend.

Thanks all
 
Last edited:

swegmike

Member
Joined
Jan 1, 2020
Messages
16
Location
VA
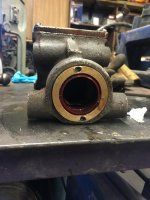
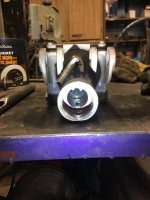
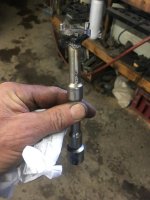
See weblink below on calculating spring load. I'm trying to determine what the max load for the safety/overload valve to open up is for my jack. Since my spring is black coated, I'm assuming the material is oil tempered. The Sears jack is 3ton (6000 lbs). The spring height unloaded and measured outside of the jack is 18.75mm. It is closed and ground flat. The outside diameter is 10.20 or 10.25mm. The approx coil cross section is 3.2 to 3.25mm since I can't get the calipers on the coils wire cross section to measure it more accurately. The number of coils is 5, but if using the extra 1/2 turn it would be 5.5 turns. Mean diameter calculated to be 8.6mm.

So I'm not sure if the stress load or the load at solid is the value that the safety valve opens at. If one calculates the pre-load value to be the max height minus some compression distance of the spring that is equivalent to putting 1.5 turns on the set screw, one would think that the stress and/or load at solid to increase so that the safety valve opens at a different higher or lower value.

https://www.newcombspring.com/springulator/compression-spring-calculator

I selected the "dimensional" calculator part and not the 1, 2 load or the variable load calculator since I didn't know the P1, L1 values to enter.
stress limit=680, corrected stress @solid height=600, Load @solid height=536.88

tensile strength=1510 max % allowed at tensile strength=45 thus 1510*.45=679.5 or 680 the stress limit.

Although the above stress/load numbers didn't specify a unit of measure, from what I've searched on stress they are typically in MPa (mega pascals) which can be converted to PSI via google.

Thus 680 MPa is 98,625.7 psi then dividing 2,000 lbs/ton = 49.3 tons
Using load@solid height of 536.88 it is 77,867.86 ps and is 38.934 tons

Hence the spring range is 0-38.934 tons . I don't think I could turn the set screw enough to max out the maximum tonnage for the spring, and count the number of turns while doing it.

One could create/determine a scale that is a relationship between number of turns and tonnage. So the "turns" scale is 0-(max turns needed for 38.934 tons).

Now to determine the number of turns needed to open the safety valve at 3 tons, one would calculate the % as 3/38.934= 7.7% and multiple by the (max number of turns) on the "turns" scale to determine the number of turns needed to open at 3 tons. Hopefully it would be 1.5 turns.

Since x*(0.077)=1.5 turns then x is 19.48. Hence the (max turns needed for 38.934 tons) would be 19.48 turns.


Any more insight on the above info?
 
Last edited:

ALTEREGO

Well-known member
Joined
May 15, 2018
Messages
420
Location
@HOME
Hello Everyone,

I will start working on a Norco 71230A jack in the near future (currently working on a Hein-Werner WS) and I have a couple questions.


Background:
The jack lifts as it should but it will go down slowly when under load while the handle goes up proportionately. No visible leaks or other issues.
The jack was rebuilt a little over 2 years ago, I called the shop that rebuilt it
and told them about what was happening hoping they would guide me to perhaps a minor adjustment but they told me that the jack needed to be rebuilt again. The guy was very nice and he didn't seem surprised with the jack failing after only 2 years of being rebuilt.

Questions:
1.- I believe the usual guarantee on a hydraulic pump rebuild job is often for just months or 1 year tops, but isn't 2 years too short of a time for the seals to fail? Of course, who knows how the jack was used (abused) and the quality of the rebuilt, but my next question is, if 2 years is how long is going to last, is it worth rebuilding? For those of you that have rebuilt a similar unit, how long did it last?

2.- From what I've read in this forum, the issue could most likely be either the working valve assembly order (more specifically, the bigger upper bearing ball not sitting correctly) or the ram seal not sealing properly and letting oil sip through, am I correct?
If so, the ball that I should check more closely is the bigger upper ball # 9 in the diagram below?

Thank you again to everyone in advance for all your help, I really appreciate it!

View media item 100559View media item 100560
 
Last edited:
OP
H

Hiball

Well-known member
Joined
Apr 30, 2009
Messages
14,026
Location
Missery
I’d definitely check the upper ball #9, handle feedback is a dead giveaway that pressure from the Main cylinder is back flowing into the pump piston chamber, thus raising the handle.

In regards to the longevity of the Jack rebuild, If all the cylinder surfaces and rod finish was good the jack should perform well past 2 years. Secondly.. if the shop is requesting that the jack be rebuilt again based off the symptoms you described, I’d probably take my business elsewhere.
 

ALTEREGO

Well-known member
Joined
May 15, 2018
Messages
420
Location
@HOME
Hiball,

Sadly, those were my thoughts in regards of the local shop as well. I had read your posts about the possible causes of the jack not holding load and the handle feedback and I was hoping they would guide me through the process of checking the valve assembly parts or even offered to look at the jack for me but... that was not the case.

I will check the valve assembly order, triple check ball #9 and report back. Hopefully ball #9 is just stuck or out of place some how and is an easy fix. If everything looks right with the valve system (hopefully I can tell whether it is or not hahaha, that's the tricky part), would the second place to look be the ram seal? Thank you again for all your help Hiball, I sincerely appreciate it!
 

Jazz1

Well-known member
Joined
Jan 3, 2016
Messages
4,184
Location
Thunder Bay On.
I’d definitely check the upper ball #9, handle feedback is a dead giveaway that pressure from the Main cylinder is back flowing into the pump piston chamber, thus raising the handle.

In regards to the longevity of the Jack rebuild, If all the cylinder surfaces and rod finish was good the jack should perform well past 2 years. Secondly.. if the shop is requesting that the jack be rebuilt again based off the symptoms you described, I’d probably take my business elsewhere.

I have not had any luck removing this brass piece on S14 Blackhawk. Heated jack and latched onto brass with lathe jaws,,won't budge. Soaking daily with Screwloose. You ever run into this?
Either patience or cut the brass out but don't know where I'd find a nut like that. I'm assuming its threaded in and not pressed
 

Attachments

  • IMG_6036.jpg
    IMG_6036.jpg
    89.6 KB · Views: 42
OP
H

Hiball

Well-known member
Joined
Apr 30, 2009
Messages
14,026
Location
Missery
Hiball,

Sadly, those were my thoughts in regards of the local shop as well. I had read your posts about the possible causes of the jack not holding load and the handle feedback and I was hoping they would guide me through the process of checking the valve assembly parts or even offered to look at the jack for me but... that was not the case.

I will check the valve assembly order, triple check ball #9 and report back. Hopefully ball #9 is just stuck or out of place some how and is an easy fix. If everything looks right with the valve system (hopefully I can tell whether it is or not hahaha, that's the tricky part), would the second place to look be the ram seal? Thank you again for all your help Hiball, I sincerely appreciate it!

I get it... there not in the business of handing out free information and trust me, I’ve made plenty of enemies from people I considered friends for doing such favors. If the jack stops dropping under load once the handle peaks, I’d say that’s your main issue and definitely the first place to look. I would elevate the jack in the rear and disassemble the valve looking for anything preventing the upper ball from seating. If nothing is visible and the fluid looks good, I would reinstall the ball and grab a punch sized as close the ball as possible and give it a couple whacks to possible reform the seat.
 
OP
H

Hiball

Well-known member
Joined
Apr 30, 2009
Messages
14,026
Location
Missery
I have not had any luck removing this brass piece on S14 Blackhawk. Heated jack and latched onto brass with lathe jaws,,won't budge. Soaking daily with Screwloose. You ever run into this?
Either patience or cut the brass out but don't know where I'd find a nut like that. I'm assuming its threaded in and not pressed

Do you have a adjustable face pin spanner? It definitely threads out, standard thread. I would be Leary if using any punches in those holes as I can already see some deformation and that normally makes them out of round in the middle and causes rod finish damage.
 

ALTEREGO

Well-known member
Joined
May 15, 2018
Messages
420
Location
@HOME
I have not had any luck removing this brass piece on S14 Blackhawk. Heated jack and latched onto brass with lathe jaws,,won't budge. Soaking daily with Screwloose. You ever run into this?
Either patience or cut the brass out but don't know where I'd find a nut like that. I'm assuming its threaded in and not pressed


Some cheap options, not sure if they would work for you Jazz1...
 
OP
H

Hiball

Well-known member
Joined
Apr 30, 2009
Messages
14,026
Location
Missery
Do you have a adjustable face pin spanner? It definitely threads out, standard thread. I would be Leary if using any punches in those holes as I can already see some deformation and that normally makes them out of round in the middle and causes rod finish damage.

I guess I should clarify, while a face spanner will easily remove that backing ring. Upon installation you will need a face spanner that will fit the holes and clear the Main Ram. I have speciality sockets to fit the common Blackhawk models and have introduced a couple face spanners to the grinding wheel to allow for clearances. I suspect you will need to clean those pin holes up to accept the proper sized pin.
 
OP
H

Hiball

Well-known member
Joined
Apr 30, 2009
Messages
14,026
Location
Missery
Hiball,

So...a cheap face spanner like the ones on the link on my previous post won't work?
How about something like this one?

Much more expensive but it looks solid, does it look like it will have enough clearance once the main ram is on? Could it also work to loosen the main tank nut?


View media item 100574
View media item 100575
View media item 100576

It would probably do the outer ring, but there is generally a deeper compression nut that sets the Vee packing preload, it’s looks a little wide and probably not long enough.
 

Jazz1

Well-known member
Joined
Jan 3, 2016
Messages
4,184
Location
Thunder Bay On.
It would probably do the outer ring, but there is generally a deeper compression nut that sets the Vee packing preload, it’s looks a little wide and probably not long enough.

That's a very nice adjustable face spanner. We had no luck with a homemade spanner and thats what damaged the holes. Going keep soaking it, possibly drill a couple new holes. Also made a tool with 1" round stock, about 6" long, two pins inbedded into it to undo another part inside the jack but again it failed. I can't believe these are so tight and unwilling to part ways. More soaking before the jack is deemed a boat anchor. Thanks for response:thumbup:
 

Attachments

  • 8F638346-1548-4C6C-989B-22D3575CA4C6.jpg
    8F638346-1548-4C6C-989B-22D3575CA4C6.jpg
    81.1 KB · Views: 47
Last edited:
OP
H

Hiball

Well-known member
Joined
Apr 30, 2009
Messages
14,026
Location
Missery
That's a very nice adjustable face spanner. We had no luck with a homemade spanner and thats what damaged the holes. Going keep soaking it, possibly drill a couple new holes. Also made a tool with 1" round stock, about 6" long, two pins inbedded into it to undo another part inside the jack but again it failed. I can't believe these are so tight and unwilling to part ways. More soaking before the jack is deemed a boat anchor. Thanks for response:thumbup:

At this point, prior to drilling new holes I would probably grab my brass punch. I can see that the hole’s are elongated both directions so my guess is at sometime in its life it’s been beat on, probably in a effort to control a leak. Once you break it free, it will probably come loose with your homemade tool.
 

Jazz1

Well-known member
Joined
Jan 3, 2016
Messages
4,184
Location
Thunder Bay On.
Punch and hammer worked. I had been trying to avoid the hammer. The damage I can deal with. Next is the one same as piece beside the brass nut. It’s deep inside the jack and tool I made not budging it yet even with 1/2” impact
 

Attachments

  • 336DCF8D-0DC4-4500-8432-047AD6302458.jpg
    336DCF8D-0DC4-4500-8432-047AD6302458.jpg
    81.5 KB · Views: 60
  • IMG_6088.jpg
    IMG_6088.jpg
    73.4 KB · Views: 55
  • 6BA4563F-3796-45A6-82B0-9BF216B5CFC5.jpg
    6BA4563F-3796-45A6-82B0-9BF216B5CFC5.jpg
    66.9 KB · Views: 55
Last edited:

Jazz1

Well-known member
Joined
Jan 3, 2016
Messages
4,184
Location
Thunder Bay On.
Welded 1/2” NF bolt to ready rod and used as puller to remove piece in jack. Did not budge. Anyone recall how to remove that piece?
 

Attachments

  • 1640C904-002D-48F4-897D-CECF466AE634.jpg
    1640C904-002D-48F4-897D-CECF466AE634.jpg
    66.5 KB · Views: 49
  • IMG_6039.jpg
    IMG_6039.jpg
    80.9 KB · Views: 42
Last edited:

ALTEREGO

Well-known member
Joined
May 15, 2018
Messages
420
Location
@HOME
UPDATE: Well I finally tracked down, ordered and received the seal kit directly from Shinn Fu (took a while to get it shipped). Anyway I just got finished replacing the Ucup and back up ring and a few other orings in the kit (did not mess with the valves). Also replaced the pump piston oring. Assembled everything, put some fresh fluid in and bled it for air bubbles. The jack is operating exactly how it did prior to tear down. I am puzzled since the Ucup from the photos was obviously shot and no way it could hold pressure ? Anybody have any ideas what is up ? Jack operates as expected but will not jack up during load. Any assistance would be helpful; really was hoping not to have to purchase a new jack. Thanks !

Hi Y2K600F4,

Do you have the contact information of the person with Shinn-Fu that helped you with the rebuild kit?

I tried to order a kit from them because I read here at the forum that their prices were very very affordable. The sales/customer-service person that helped me told me that they only sell to people with an account and I would need to be "a certified service center or do 10k to 20k a year (purchases)" to open an account with them. When I told him that I was just a customer he informed me that they don't sell directly to customers and referred me to an online company I will not do business with.


Anyone else had luck ordering a replacement kit from Shinn-Fu? Please, let me know. Thanks!
 

ALTEREGO

Well-known member
Joined
May 15, 2018
Messages
420
Location
@HOME
I checked the bearing #9 on the Norco jack and didn't find anything unusual. Most likely I don't know what I'm looking for. I thought there could be some debris or something obstructing the checkball but I did not find anything. I did tap the checkball to help it seat but it did not work, the jack still lowers until the handle peaks.

Any suggestions on what to look for and how to address the checkball issue?

Could it be some other issue besides the bearing not sitting properly? Looking at the diagram, I did not check the condition of the #8 Oring, could that be the issue?


View media item 100559
 
To avoid these ads, REGISTER NOW!
Top Bottom